
Owners Manual
Page 3
Contents Introduction 4 Good service 4 Serial Number 4 Symbols and Decals 6 Decals 6 Decal Locations 7 Safety 8 General Use 8 Preparations 9 Operating 10 Movement/Transport 11 Storage 11 Children 11 Fuel System 12 Maintenance 13 Assembly/Controls 14 Controls 15 Engine 16 Fueling 16 Cutting Unit 16 Depth Lever 16 Clutch 16 Blade versatility 17 Flail Blades 17 Delta Blades 17 Spring Tines 17 Operation 18 Seed Application 18 Preparing the Lawn 18 Seed Application Chart 18 Seed...
Contents Introduction 4 Good service 4 Serial Number 4 Symbols and Decals 6 Decals 6 Decal Locations 7 Safety 8 General Use 8 Preparations 9 Operating 10 Movement/Transport 11 Storage 11 Children 11 Fuel System 12 Maintenance 13 Assembly/Controls 14 Controls 15 Engine 16 Fueling 16 Cutting Unit 16 Depth Lever 16 Clutch 16 Blade versatility 17 Flail Blades 17 Delta Blades 17 Spring Tines 17 Operation 18 Seed Application 18 Preparing the Lawn 18 Seed Application Chart 18 Seed...
Owners Manual
Page 4
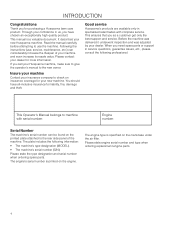
... printed plate attached to machine with complete service. Following the instructions (use the machine. If you as a customer get only the best support and service. Before the machine was delivered it underwent inspection and was adjusted by your new Husqvarna machine. Please state engine serial number and type when ordering replacement engine parts. 4 When you need spare parts or support in specialized retail trades with serial number: Engine number: Serial Number The machine's serial number can considerably...
... printed plate attached to machine with complete service. Following the instructions (use the machine. If you as a customer get only the best support and service. Before the machine was delivered it underwent inspection and was adjusted by your new Husqvarna machine. Please state engine serial number and type when ordering replacement engine parts. 4 When you need spare parts or support in specialized retail trades with serial number: Engine number: Serial Number The machine's serial number can considerably...
Owners Manual
Page 5
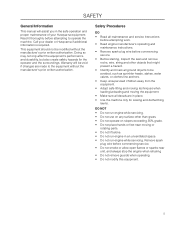
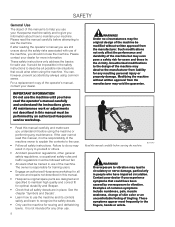
... Husqvarna if additional information is required. Remove spark plug wire before commencing service. • Do not smoke or allow open flames or sparks near moving or rotating parts. • Do not lift alone. • Do not run engine in place. • Use the machine only for the operator and the surroundings. Read it thoroughly before commencing service. • Before starting, inspect the lawn and remove rocks, wire, string...
... Husqvarna if additional information is required. Remove spark plug wire before commencing service. • Do not smoke or allow open flames or sparks near moving or rotating parts. • Do not lift alone. • Do not run engine in place. • Use the machine only for the operator and the surroundings. Read it thoroughly before commencing service. • Before starting, inspect the lawn and remove rocks, wire, string...
Owners Manual
Page 8
... about the safety risks associated with use the machine for users and those in this manual. • Husqvarna original spare parts are designed and specified to the design of the machine may even pose a safety risk for sowing and dethatching lawns. It would be impossible in the safety instructions to the user. • Follow all possible risk situations...
... about the safety risks associated with use the machine for users and those in this manual. • Husqvarna original spare parts are designed and specified to the design of the machine may even pose a safety risk for sowing and dethatching lawns. It would be impossible in the safety instructions to the user. • Follow all possible risk situations...
Owners Manual
Page 11
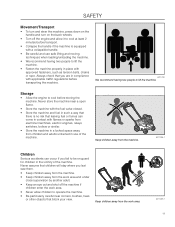
... allow children to operate the machine. • Be particularly careful near a open flame. • Store the machine with the fuel valve closed. • Store the machine and fuel in such a way that there is equipped with approved fasteners, such as tension belts, chains or rope. Storage • Allow the engine to be on the back wheels. • Turn off the...
... allow children to operate the machine. • Be particularly careful near a open flame. • Store the machine with the fuel valve closed. • Store the machine and fuel in such a way that there is equipped with approved fasteners, such as tension belts, chains or rope. Storage • Allow the engine to be on the back wheels. • Turn off the...

Owners Manual
Page 12
.... • Turn off the fuel supply for that purpose. • Never remove the fuel cap and fill the fuel tank when the engine is running. • Always stop the engine when refueling. • Do not smoke when filling the gasoline tank and do not pour gasoline in the fuel system, the engine must not be started until it has evaporated before each use and leave...
.... • Turn off the fuel supply for that purpose. • Never remove the fuel cap and fill the fuel tank when the engine is running. • Always stop the engine when refueling. • Do not smoke when filling the gasoline tank and do not pour gasoline in the fuel system, the engine must not be started until it has evaporated before each use and leave...
Owners Manual
Page 13
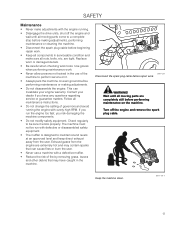
... of governors and avoid running . • Disengage the drive units, shut off the engine and remove the spark plug cable. Exhaust gases from the user. WARNING! SAFETY Maintenance • Never make sure all nuts, bolts, etc. Turn off the engine and wait until all moving parts come to perform service on it works properly. Check regularly to maintain sound levels at an approved level and keep direct exhaust...
... of governors and avoid running . • Disengage the drive units, shut off the engine and remove the spark plug cable. Exhaust gases from the user. WARNING! SAFETY Maintenance • Never make sure all nuts, bolts, etc. Turn off the engine and wait until all moving parts come to perform service on it works properly. Check regularly to maintain sound levels at an approved level and keep direct exhaust...
Owners Manual
Page 14
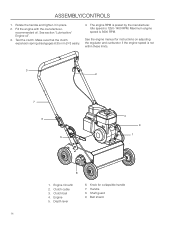
assembly/CONTROLS 1. Clutch bail 4. Depth lever 6. Handle 8. Belt shield 14 See the engine manual for collapsible handle 7. Shaft guard 9. Test the clutch. Idle speed is 3600 RPM. Engine Oil refill 2. Make sure that the clutch expansion spring disengages 6.35 mm (¼") easily. 4. Engine 5. Maximum engine speed is 1250-1400 RPM. Knob for instructions on adjusting the regulator and carburetor if the engine speed is preset by the manufacturer. See section "Lubrication/ Engine oil". 3. Clutch cable 3. Fill the engine with the manufacturerrecommended oil. The ...
assembly/CONTROLS 1. Clutch bail 4. Depth lever 6. Handle 8. Belt shield 14 See the engine manual for collapsible handle 7. Shaft guard 9. Test the clutch. Idle speed is 3600 RPM. Engine Oil refill 2. Make sure that the clutch expansion spring disengages 6.35 mm (¼") easily. 4. Engine 5. Maximum engine speed is 1250-1400 RPM. Knob for instructions on adjusting the regulator and carburetor if the engine speed is preset by the manufacturer. See section "Lubrication/ Engine oil". 3. Clutch cable 3. Fill the engine with the manufacturerrecommended oil. The ...
Owners Manual
Page 16
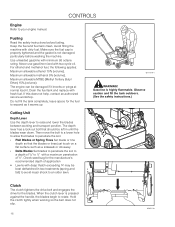
... the soil. • Flail Blades or Spring Tines Set blade or tine depth so that should be left in two treatments (spring and fall) to avoid major shock to rotate. When the clutch lever is not damaged, particularly before fueling. Keep the fuel and fuel tank clean. Use unleaded gasoline with two-cycle oil. Cutting Unit Depth Lever Use the depth lever to your engine manual. CONTROLS Engine Refer to raise and lower...
... the soil. • Flail Blades or Spring Tines Set blade or tine depth so that should be left in two treatments (spring and fall) to avoid major shock to rotate. When the clutch lever is not damaged, particularly before fueling. Keep the fuel and fuel tank clean. Use unleaded gasoline with two-cycle oil. Cutting Unit Depth Lever Use the depth lever to your engine manual. CONTROLS Engine Refer to raise and lower...
Owners Manual
Page 17
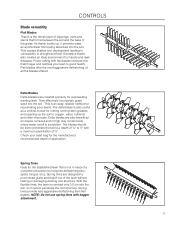
... in need of a complete renovation but requires dethatching (dryspots, fungus, etc.). Power-raking with bagger attachment. 17 Spring Tines Ideal for cutting running stem grasses and opening up , it cannot penetrate the root structure. CONTROLS Blade versatility Flail Blades Thatch is not in high clay content soils where water runoff is combed only 0.5 cm into the soil, so it prevents water, air...
... in need of a complete renovation but requires dethatching (dryspots, fungus, etc.). Power-raking with bagger attachment. 17 Spring Tines Ideal for cutting running stem grasses and opening up , it cannot penetrate the root structure. CONTROLS Blade versatility Flail Blades Thatch is not in high clay content soils where water runoff is combed only 0.5 cm into the soil, so it prevents water, air...

Owners Manual
Page 18
... turn on seeder 8060-021 1 1. Pull back on the seeder, the chart values are approximate; Wingnut 3. Set the bagger onto the door and up to cover the rear opening until door is flat. The safety door is spring loaded and will flip up against the chute....Attachment and Removal To attach bagger, place foot on rear bolt and slide bagger away from the chute. Rear nut Attach bag to encourage root growth. Faster running speeds results in two directions with a core-type ground aerator. • Fertilize the lawn. quantities of old grass cuttings (thatch). • Aerate the lawn ...
... turn on seeder 8060-021 1 1. Pull back on the seeder, the chart values are approximate; Wingnut 3. Set the bagger onto the door and up to cover the rear opening until door is flat. The safety door is spring loaded and will flip up against the chute....Attachment and Removal To attach bagger, place foot on rear bolt and slide bagger away from the chute. Rear nut Attach bag to encourage root growth. Faster running speeds results in two directions with a core-type ground aerator. • Fertilize the lawn. quantities of old grass cuttings (thatch). • Aerate the lawn ...
Owners Manual
Page 19
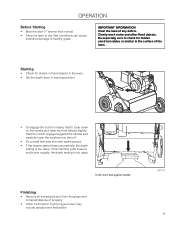
... objects in the lawn. • Set the depth lever in working position. • To engage the clutch in the surface of the lawn. Starting • Check for hidden electrical cables or similar in heavy thatch, bear down on the handle and raise the front wheels slightly. If the machine pulls forward and bucks roughly, the depth setting is too deep. Hold clutch bail against the...
... objects in the lawn. • Set the depth lever in working position. • To engage the clutch in the surface of the lawn. Starting • Check for hidden electrical cables or similar in heavy thatch, bear down on the handle and raise the front wheels slightly. If the machine pulls forward and bucks roughly, the depth setting is too deep. Hold clutch bail against the...
Owners Manual
Page 20
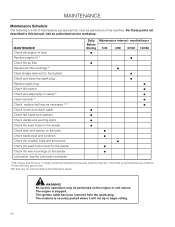
... described in valves 3) Clean fuel tank 3) Check, replace fuel lines as necessary 3, 4) Check clutch and clutch cable Check flail blade lock washers Check decals and warning signs Check the seed holes for the seeder Check wear and tension on the belts Check blade wear and condition Check the chassis, bolts and set screws Check the seed control lever for fuel system Check and clean the spark plug Replace spark plug Check idle speed Check and adjust play in this manual, visit an authorized service workshop. MAINTENANCE Maintenance Schedule The following is a list of maintenance procedures...
... described in valves 3) Clean fuel tank 3) Check, replace fuel lines as necessary 3, 4) Check clutch and clutch cable Check flail blade lock washers Check decals and warning signs Check the seed holes for the seeder Check wear and tension on the belts Check blade wear and condition Check the chassis, bolts and set screws Check the seed control lever for fuel system Check and clean the spark plug Replace spark plug Check idle speed Check and adjust play in this manual, visit an authorized service workshop. MAINTENANCE Maintenance Schedule The following is a list of maintenance procedures...
Owners Manual
Page 21
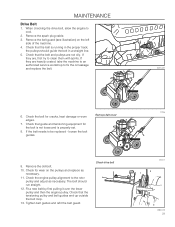
Remove the spark plug cable. 3. The belt should guide the belt in the proper track; Tighten belt guides and refit the belt guard. the pulleys should run straight. 12. Remove belt cover 9. Fit a new belt by first pulling it over the lower pulley and then the engine pulley. Remove the old belt. 10. If they are, first try to clean them with spirits. Check the engine pulley alignment to fix the oil leakage and replace the belt. 8011-027 6. Check that the belt and...
Remove the spark plug cable. 3. The belt should guide the belt in the proper track; Tighten belt guides and refit the belt guard. the pulleys should run straight. 12. Remove belt cover 9. Fit a new belt by first pulling it over the lower pulley and then the engine pulley. Remove the old belt. 10. If they are, first try to clean them with spirits. Check the engine pulley alignment to fix the oil leakage and replace the belt. 8011-027 6. Check that the belt and...
Owners Manual
Page 22
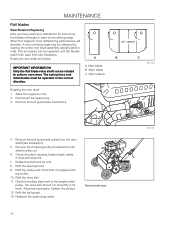
... spark plug. 3. Remove the belt guard (see illustration. Check the pulley alignment to wear on the striking edge. The drive belt should run smoothly in the correct direction. Adjust as follows: A IMPORTANT INFORMATION Only the flail blade rotor shaft can be rotated to cool. 2. Refit the bearing bolts. 9. Refit the drive belt. 11. see illustration). 3.5" / 89mm B C 8011-006 4. New blade B. Remove the 6 bearing bolts and allow the rotor shaft to end). Remove belt cover...
... spark plug. 3. Remove the belt guard (see illustration. Check the pulley alignment to wear on the striking edge. The drive belt should run smoothly in the correct direction. Adjust as follows: A IMPORTANT INFORMATION Only the flail blade rotor shaft can be rotated to cool. 2. Refit the bearing bolts. 9. Refit the drive belt. 11. see illustration). 3.5" / 89mm B C 8011-006 4. New blade B. Remove the 6 bearing bolts and allow the rotor shaft to end). Remove belt cover...
Owners Manual
Page 24
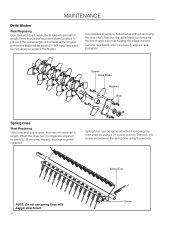
... screws with bagger attachment. 24 Screw Spring Tine NOTE: Do not use spring tines with nuts holding the blade in place. Turn the new blade until it will be replaced without removing the rotor shaft. Remove the screw and replace the spring tine using a ½" socket wrench. Screws Delta Blade Washers Nuts Spring tines Wear/Replacing Over time and due to wear, the blades will diminish in length. see illustration. Spring tines can no longer be adjusted to replace...
... screws with bagger attachment. 24 Screw Spring Tine NOTE: Do not use spring tines with nuts holding the blade in place. Turn the new blade until it will be replaced without removing the rotor shaft. Remove the screw and replace the spring tine using a ½" socket wrench. Screws Delta Blade Washers Nuts Spring tines Wear/Replacing Over time and due to wear, the blades will diminish in length. see illustration. Spring tines can no longer be adjusted to replace...
Owners Manual
Page 28
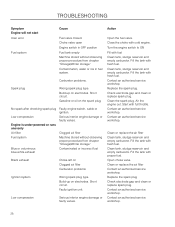
... authorized service workshop. Contact an authorized service workshop. 28 Action Open the fuel valve. Check electrode gap and clean or replace spark plug. Fill the tank with full throttle. Air the engine out. No spark after checking spark plug Faulty engine switch, cable or ignition. Fill the tank with fresh fuel. Replace the spark plug Check electrode gap and clean or replace spark plug. TROUBLESHOOTING Symptom Engine will not start User error Fuel system Cause Fuel valve closed. Engine is under-powered or runs unevenly Air filter Clogged air filter Fuel system...
... authorized service workshop. Contact an authorized service workshop. 28 Action Open the fuel valve. Check electrode gap and clean or replace spark plug. Fill the tank with full throttle. Air the engine out. No spark after checking spark plug Faulty engine switch, cable or ignition. Fill the tank with fresh fuel. Replace the spark plug Check electrode gap and clean or replace spark plug. TROUBLESHOOTING Symptom Engine will not start User error Fuel system Cause Fuel valve closed. Engine is under-powered or runs unevenly Air filter Clogged air filter Fuel system...
Owners Manual
Page 29
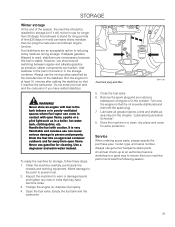
... worn or damaged parts and tighten any nuts or bolts that the oil is used, stabilizers are an acceptable option to prevent rust. 2. Service When ordering spare parts, please specify the purchase year, model, type, and serial number. Turn over the engine so that may have added stabilizer. If alkylate gasoline (Aspen) is evenly distributed and then refit the spark plug. 7. To ready the...
... worn or damaged parts and tighten any nuts or bolts that the oil is used, stabilizers are an acceptable option to prevent rust. 2. Service When ordering spare parts, please specify the purchase year, model, type, and serial number. Turn over the engine so that may have added stabilizer. If alkylate gasoline (Aspen) is evenly distributed and then refit the spark plug. 7. To ready the...
Owners Manual
Page 30
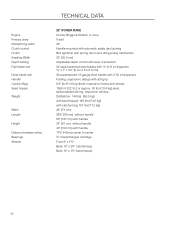
Engine Primary drive Dethatching width Clutch control Clutch Seeding Width Depth setting Flail blade reel Delta blade reel Handle Catcher Bag Seed hopper Weight Width Length Height Distance between axles Bearings Wheels TECHNICAL DATA 22" POWER RAKE Honda, Briggs & Stratton or none V-belt 22" Handle-mounted with automatic safety declutching Belt tightener with spring return and idling pulley mechanism 22" (55.8 cm) Adjustable depth control with lever mechanism 32 case-hardened steel...
Engine Primary drive Dethatching width Clutch control Clutch Seeding Width Depth setting Flail blade reel Delta blade reel Handle Catcher Bag Seed hopper Weight Width Length Height Distance between axles Bearings Wheels TECHNICAL DATA 22" POWER RAKE Honda, Briggs & Stratton or none V-belt 22" Handle-mounted with automatic safety declutching Belt tightener with spring return and idling pulley mechanism 22" (55.8 cm) Adjustable depth control with lever mechanism 32 case-hardened steel...
Owners Manual
Page 31
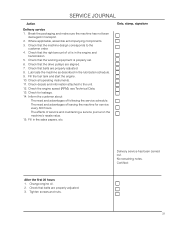
... of following the service schedule. Check that belts are properly adjusted. 3. Check for service every 300 hours. The need and advantages of oil is properly set. 6. Change engine oil. 2. Tighten screws and nuts. Delivery service has been carried out. Certified: 31 Fill the fuel tank and start the engine. 10. The effects of leaving the machine for leakage. 14. No remaining notes. Check that the drive pulleys are properly adjusted. 8. Check that belts are aligned...
... of following the service schedule. Check that belts are properly adjusted. 3. Check for service every 300 hours. The need and advantages of oil is properly set. 6. Change engine oil. 2. Tighten screws and nuts. Delivery service has been carried out. Certified: 31 Fill the fuel tank and start the engine. 10. The effects of leaving the machine for leakage. 14. No remaining notes. Check that the drive pulleys are properly adjusted. 8. Check that belts are aligned...


