Owners Manual
Page 2
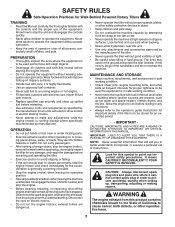
...the tiller forward. Never fill fuel tank indoors. • Replace gasoline cap securely and clean up , transporting, adjusting or making repairs. CAUTIONS, IMPORTANTS, AND NOTES ARE A MEANS OF ATTRACTING ATTENTION TO IMPORTANT OR CRITICAL INFORMATION IN THIS MANUAL. SAFETY RULES Safe Operation ...Before cleaning, repairing, or inspecting, shut off the engine and make any enclosure. • Always refer to the operator's guide instructions for important details if the tiller is highly flammable. • Use an approved fuel container. • Never add fuel to till too deep at...
...the tiller forward. Never fill fuel tank indoors. • Replace gasoline cap securely and clean up , transporting, adjusting or making repairs. CAUTIONS, IMPORTANTS, AND NOTES ARE A MEANS OF ATTRACTING ATTENTION TO IMPORTANT OR CRITICAL INFORMATION IN THIS MANUAL. SAFETY RULES Safe Operation ...Before cleaning, repairing, or inspecting, shut off the engine and make any enclosure. • Always refer to the operator's guide instructions for important details if the tiller is highly flammable. • Use an approved fuel container. • Never add fuel to till too deep at...
Owners Manual
Page 3
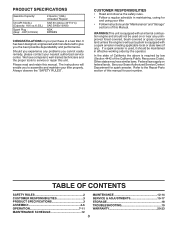
... PRODUCT SPECIFICATIONS 3 STORAGE 18 ASSEMBLY 4-6 TROUBLESHOOTING 19 OPERATION 7-11 WARRANTY 20-23 MAINTENANCE SCHEDULE 12 3 See your tiller. • Follow instructions under "Maintenance" and "Storage" sections of California the above is required by the operator. Always observe the "SAFETY RULES". Refer to service or repair this manual. Please read and retain this unit. Federal...
... PRODUCT SPECIFICATIONS 3 STORAGE 18 ASSEMBLY 4-6 TROUBLESHOOTING 19 OPERATION 7-11 WARRANTY 20-23 MAINTENANCE SCHEDULE 12 3 See your tiller. • Follow instructions under "Maintenance" and "Storage" sections of California the above is required by the operator. Always observe the "SAFETY RULES". Refer to service or repair this manual. Please read and retain this unit. Federal...
Owners Manual
Page 4
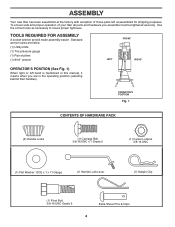
To ensure safe and proper operation of your tiller all parts and hardware you are in this manual, it means when you assemble must be tightened securely. TOOLS REQUIRED FOR ASSEMBLY A socket wrench set will make assembly easier. OPERATOR'S POSITION Fig. 1 CONTENTS OF HARDWARE PACK (2) Handle Locks ...pressure gauge (1) Pair of those parts left hand is mentioned in the operating position (standing behind tiller handles). Use the correct tools as necessary to insure proper tightness. ASSEMBLY Your new tiller has been assembled at the factory with exception of pliers (1) 9/16...
To ensure safe and proper operation of your tiller all parts and hardware you are in this manual, it means when you assemble must be tightened securely. TOOLS REQUIRED FOR ASSEMBLY A socket wrench set will make assembly easier. OPERATOR'S POSITION Fig. 1 CONTENTS OF HARDWARE PACK (2) Handle Locks ...pressure gauge (1) Pair of those parts left hand is mentioned in the operating position (standing behind tiller handles). Use the correct tools as necessary to insure proper tightness. ASSEMBLY Your new tiller has been assembled at the factory with exception of pliers (1) 9/16...
Owners Manual
Page 6
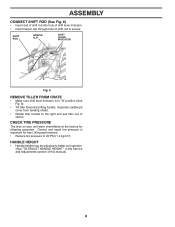
... cover from leveling shield. • Rotate tiller handle to the right and pull tiller out of shift rod to secure. Correct and equal tire pressure is in the Service and Adjustments section of this manual). 6 HANDLE HEIGHT • Handle height may... be adjusted to 20 PSI (1.4 kg/cm2). CHECK TIRE PRESSURE The tires on your unit were overinflated at the factory for best tilling performance. • Reduce tire pressure to better suit operator. (See "TO ADJUST HANDLE HEIGHT" in "N" position (See Fig. 6) • Tilt tiller...
... cover from leveling shield. • Rotate tiller handle to the right and pull tiller out of shift rod to secure. Correct and equal tire pressure is in the Service and Adjustments section of this manual). 6 HANDLE HEIGHT • Handle height may... be adjusted to 20 PSI (1.4 kg/cm2). CHECK TIRE PRESSURE The tires on your unit were overinflated at the factory for best tilling performance. • Reduce tire pressure to better suit operator. (See "TO ADJUST HANDLE HEIGHT" in "N" position (See Fig. 6) • Tilt tiller...
Owners Manual
Page 7
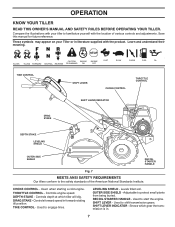
...CONTROL - LEVELING SHIELD - Levels tilled soil. OUTER SIDE SHIELD - Used to shift transmission gears. These symbols may appear on your tiller to protect small plants from being buried. Used when starting a cold engine. SHIFT LEVER INDICATOR - RECOIL STARTER HANDLE - Used to... forward speed in . 7 CHOKE CONTROL - Save this manual for future reference. Controls depth at which gear the transmission is in forward rotating till position. Adjustable to familiarize yourself with the product. OPERATION KNOW YOUR TILLER READ THIS OWNER'S MANUAL AND SAFETY RULES BEFORE...
...CONTROL - LEVELING SHIELD - Levels tilled soil. OUTER SIDE SHIELD - Used to shift transmission gears. These symbols may appear on your tiller to protect small plants from being buried. Used when starting a cold engine. SHIFT LEVER INDICATOR - RECOIL STARTER HANDLE - Used to... forward speed in . 7 CHOKE CONTROL - Save this manual for future reference. Controls depth at which gear the transmission is in forward rotating till position. Adjustable to familiarize yourself with the product. OPERATION KNOW YOUR TILLER READ THIS OWNER'S MANUAL AND SAFETY RULES BEFORE...
Owners Manual
Page 9
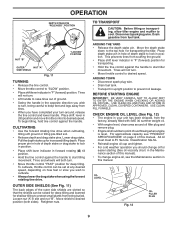
... when engine is level. Retighten nuts. TO TRANSPORT CAUTION: Before lifting or transporting, allow tiller engine and muffler to "SLOW" position. • Place shift lever indicator in "F" (... see the Maintenance section in slot and nut "B". OIL LEVEL engine_art_4 Fig. 12 OIL FILLER PLUG 9 OPERATION DEPTH STAKE PIN "RELEASED" POSITION NUT "B" "LOCKED" POSITION OUTER SIDE SHIELD NUT "A" depth_stake_11 Fig. ...• Swing the handle in hole of this manual. Move the depth stake down to desired speed. Loosen nut "A" in this manual). • To change oil for increased tilling...
... when engine is level. Retighten nuts. TO TRANSPORT CAUTION: Before lifting or transporting, allow tiller engine and muffler to "SLOW" position. • Place shift lever indicator in "F" (... see the Maintenance section in slot and nut "B". OIL LEVEL engine_art_4 Fig. 12 OIL FILLER PLUG 9 OPERATION DEPTH STAKE PIN "RELEASED" POSITION NUT "B" "LOCKED" POSITION OUTER SIDE SHIELD NUT "A" depth_stake_11 Fig. ...• Swing the handle in hole of this manual. Move the depth stake down to desired speed. Loosen nut "A" in this manual). • To change oil for increased tilling...
Owners Manual
Page 10
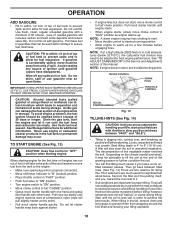
... start , move machine away from wrapping around the tine shaft and slowing your tilling operation. 10 Loose, unpacked soil helps root growth. Hard soil should be advisable to till the soil at this manual. OPERATION ADD GASOLINE • Fill to within 1/2 inch of top of fuel tank to... Fig. 13 TILLING HINTS (See Fig. 14) CAUTION: Until you , toward the row next to handling your tiller. Avoid creating any spilled oil or fuel. IMPORTANT: WHEN OPERATING IN TEMPERATURES BELOW 32°F(0°C), USE FRESH, CLEAN WINTER GRADE GASOLINE TO HELP INSURE GOOD COLD WEATHER STARTING. ...
... start , move machine away from wrapping around the tine shaft and slowing your tilling operation. 10 Loose, unpacked soil helps root growth. Hard soil should be advisable to till the soil at this manual. OPERATION ADD GASOLINE • Fill to within 1/2 inch of top of fuel tank to... Fig. 13 TILLING HINTS (See Fig. 14) CAUTION: Until you , toward the row next to handling your tiller. Avoid creating any spilled oil or fuel. IMPORTANT: WHEN OPERATING IN TEMPERATURES BELOW 32°F(0°C), USE FRESH, CLEAN WINTER GRADE GASOLINE TO HELP INSURE GOOD COLD WEATHER STARTING. ...

Owners Manual
Page 12
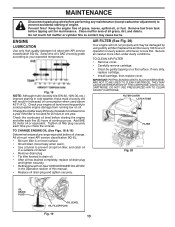
...Check engine oil level. • Check tine operation. • Check for wear. To receive full value from the warranty, the operator must maintain tiller as instructed in the Service and Adjustments section of this manual should replace the spark plug, clean or ...12 Change more often when operating in high ambient temperatures. 2 - LUBRICATION Keep unit well lubricated (See "LUBRICATION CHART"). A new spark plug and clean air filter assure proper air-fuel mixture and help your tiller. MAINTENANCE SCHEDULE MAINTENANCE EEBEEVVEVVFEEEERRORRYYYRYE552S05EEHAAHHOSCOOUHOUURNRRSUSSSE FILL...
...Check engine oil level. • Check tine operation. • Check for wear. To receive full value from the warranty, the operator must maintain tiller as instructed in the Service and Adjustments section of this manual should replace the spark plug, clean or ...12 Change more often when operating in high ambient temperatures. 2 - LUBRICATION Keep unit well lubricated (See "LUBRICATION CHART"). A new spark plug and clean air filter assure proper air-fuel mixture and help your tiller. MAINTENANCE SCHEDULE MAINTENANCE EEBEEVVEVVFEEEERRORRYYYRYE552S05EEHAAHHOSCOOUHOUURNRRSUSSSE FILL...
Owners Manual
Page 13
...not touch hot muffler or cylinder fins as contact may be damaged by gently tapping on level surface. • Oil will result in the Operation section of continuous use. AIR FILTER (See Fig. 20) Your engine will not run properly and may cause burns. DO NOT USE PRESSURIZED ...the oil level. Tighten oil filler plug securely each five (5) hours of this manual. • Replace oil drain plug and tighten securely. Replace the air filter every 100 hours of operation or at least once a year if the tiller is on a flat surface. Service air cleaner more frequently to your expected ...
...not touch hot muffler or cylinder fins as contact may be damaged by gently tapping on level surface. • Oil will result in the Operation section of continuous use. AIR FILTER (See Fig. 20) Your engine will not run properly and may cause burns. DO NOT USE PRESSURIZED ...the oil level. Tighten oil filler plug securely each five (5) hours of this manual. • Replace oil drain plug and tighten securely. Replace the air filter every 100 hours of operation or at least once a year if the tiller is on a flat surface. Service air cleaner more frequently to your expected ...
Owners Manual
Page 14
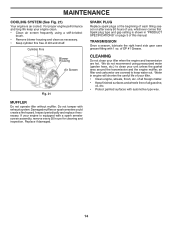
... Housing Air Screen Fig. 21 SPARK PLUG Replace spark plugs at the beginning of each tilling season or after every 50 hours of this manual. Spark plug type and gap setting is shown in engine will shorten the useful life of dirt and chaff. brush. • Remove... filter and carburetor are hot. CLEANING Do not clean your tiller when the engine and transmission are covered to clean your tiller. • Clean engine, wheels, finish, etc. We do not recommend using a stiff-bristled- MUFFLER Do not operate tiller without muffler. For proper engine performance and long life keep your...
... Housing Air Screen Fig. 21 SPARK PLUG Replace spark plugs at the beginning of each tilling season or after every 50 hours of this manual. Spark plug type and gap setting is shown in engine will shorten the useful life of dirt and chaff. brush. • Remove... filter and carburetor are hot. CLEANING Do not clean your tiller when the engine and transmission are covered to clean your tiller. • Clean engine, wheels, finish, etc. We do not recommend using a stiff-bristled- MUFFLER Do not operate tiller without muffler. For proper engine performance and long life keep your...
Parts Manual
Page 8
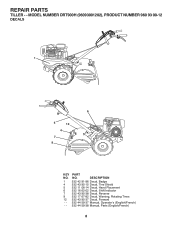
PART NO. DESCRIPTION 532 42 91-96 Decal, Badge 532 43 95-15 Decal, Tine Shield 532 11 06-14 Decal, Hand Placement 532 16 62-02 Decal, Shift Indicator 532 43 95-38 Decal, Reverse 532 17 67-82 Decal, Warning, Rotating Tines 532 43 95-37 Decal, Forward 532 44 59-37 Manual, Operator's (English/French) 532 44 59-38 Manual, Parts (English/French) 8 MODEL NUMBER DRT900H (96093001202), PRODUCT NUMBER 960 93 00-12 DECALS 1 6 5 12 4 7 9 KEY NO. 1 4 5 6 7 9 12 - - - REPAIR PARTS TILLER - -
PART NO. DESCRIPTION 532 42 91-96 Decal, Badge 532 43 95-15 Decal, Tine Shield 532 11 06-14 Decal, Hand Placement 532 16 62-02 Decal, Shift Indicator 532 43 95-38 Decal, Reverse 532 17 67-82 Decal, Warning, Rotating Tines 532 43 95-37 Decal, Forward 532 44 59-37 Manual, Operator's (English/French) 532 44 59-38 Manual, Parts (English/French) 8 MODEL NUMBER DRT900H (96093001202), PRODUCT NUMBER 960 93 00-12 DECALS 1 6 5 12 4 7 9 KEY NO. 1 4 5 6 7 9 12 - - - REPAIR PARTS TILLER - -


