
Operation Manual
Page 3
... 6 General Use 6 Preparations 8 Operating 9 Movement/Transport 9 Storage 9 Fuel System 10 Maintenance 10 Assembly 11 Controls 12 Steering/Locking Handle 12 Handle Lock 12 Throttle Lever 12 Depth Control Setting Plate 12 Transport/Engaged Lever 12 Engine 13 Operation 14 General 14 Bed Shaping 14 Laying Cable 14 Maintenance 15 Maintenance Schedule 15 Drive Chain 16 Tightening 16 Checking Drive Chain And Sprockets 16 Replacing Drive Chain 17 Cleaning 17 Service 17 Storage 18 Lubrication 19 Lubrication Schedule 19 Troubleshooting 20 REPAIR PARTS 22...
... 6 General Use 6 Preparations 8 Operating 9 Movement/Transport 9 Storage 9 Fuel System 10 Maintenance 10 Assembly 11 Controls 12 Steering/Locking Handle 12 Handle Lock 12 Throttle Lever 12 Depth Control Setting Plate 12 Transport/Engaged Lever 12 Engine 13 Operation 14 General 14 Bed Shaping 14 Laying Cable 14 Maintenance 15 Maintenance Schedule 15 Drive Chain 16 Tightening 16 Checking Drive Chain And Sprockets 16 Replacing Drive Chain 17 Cleaning 17 Service 17 Storage 18 Lubrication 19 Lubrication Schedule 19 Troubleshooting 20 REPAIR PARTS 22...

Operation Manual
Page 4
... delivered it underwent inspection and was adjusted by your new Husqvarna machine. The engine's serial number is printed on insurance coverage for liability, fire, damage and theft. Read the manual carefully before attempting to use , service, maintenance, etc.) can be found on the starter. Insure your machine Contact your insurance company to check on the engine. Use The BE550 is specified on the crankcase under...
... delivered it underwent inspection and was adjusted by your new Husqvarna machine. The engine's serial number is printed on insurance coverage for liability, fire, damage and theft. Read the manual carefully before attempting to use , service, maintenance, etc.) can be found on the starter. Insure your machine Contact your insurance company to check on the engine. Use The BE550 is specified on the crankcase under...

Operation Manual
Page 5
... if the reader DOES NOT follow the instructions given in the manual. Used also when there is a potential for misuse or misassembly. Used in this publication to notify the reader of a risk of personal injury, particularly if the reader DOES NOT follow the instructions given in the manual. DANGER - Cutting Head Alignment 5. Xxxx xxx xxxx xx xxxx x xxxx...
... if the reader DOES NOT follow the instructions given in the manual. Used also when there is a potential for misuse or misassembly. Used in this publication to notify the reader of a risk of personal injury, particularly if the reader DOES NOT follow the instructions given in the manual. DANGER - Cutting Head Alignment 5. Xxxx xxx xxxx xx xxxx x xxxx...
Operation Manual
Page 6
...even pose a safety risk for any maintenance. The owner is responsible for training users. • Engage an authorized Husqvarna workshop for more information. IMPORTANT INFORMATION Do not use the machine until you are still ...Engine exhaust, some of its constituents and certain vehicle components contain or emit chemicals considered by an authorized Husqvarna service workshop. • Read this manual, it before attempting to the user. • Follow all service and repairs not described in the vicinity. To obtain extra copies of the machine. Please read the operator's manual...
...even pose a safety risk for any maintenance. The owner is responsible for training users. • Engage an authorized Husqvarna workshop for more information. IMPORTANT INFORMATION Do not use the machine until you are still ...Engine exhaust, some of its constituents and certain vehicle components contain or emit chemicals considered by an authorized Husqvarna service workshop. • Read this manual, it before attempting to the user. • Follow all service and repairs not described in the vicinity. To obtain extra copies of the machine. Please read the operator's manual...
Operation Manual
Page 7
... only use Husqvarna original spare parts. • Check that all parts have cooled before touching the engine. SAFETY • Husqvarna original spare parts are designed and specified to maintain high quality and correct fit for help should an emergency arise. • The machine is in serviceable condition prior to use; Keep... in the ground. Contact your doctor if you to lose control of the machine to vibration. see the chapter "Maintenance/ Maintenance Schedule". • Only use the machine in daylight or in the use of the machine. Pay attention to other people are nearby ...
... only use Husqvarna original spare parts. • Check that all parts have cooled before touching the engine. SAFETY • Husqvarna original spare parts are designed and specified to maintain high quality and correct fit for help should an emergency arise. • The machine is in serviceable condition prior to use; Keep... in the ground. Contact your doctor if you to lose control of the machine to vibration. see the chapter "Maintenance/ Maintenance Schedule". • Only use the machine in daylight or in the use of the machine. Pay attention to other people are nearby ...

Operation Manual
Page 8
... wire, etc. Be certain to check for washing lines, etc. that could become caught in moving machine parts. • Wear protective shoes or boots. SAFETY Preparations • Have first aid equipment at hand when using the machine. • Check that nobody else is in the vicinity of the machine when you start the engine, engage the drive or run the...
... wire, etc. Be certain to check for washing lines, etc. that could become caught in moving machine parts. • Wear protective shoes or boots. SAFETY Preparations • Have first aid equipment at hand when using the machine. • Check that nobody else is in the vicinity of the machine when you start the engine, engage the drive or run the...

Operation Manual
Page 9
...; Start the engine carefully and with approved fasteners, such as tension belts, chains or rope. The tines may cause you to slip. • Keep your hands and feet away from moving parts. • Keep your hands and feet away from the work on slopes. Always check that you are in compliance with flames or sparks from electrical machines, electric engines, relays, switches...
...; Start the engine carefully and with approved fasteners, such as tension belts, chains or rope. The tines may cause you to slip. • Keep your hands and feet away from moving parts. • Keep your hands and feet away from the work on slopes. Always check that you are in compliance with flames or sparks from electrical machines, electric engines, relays, switches...
Operation Manual
Page 10
... burn the user. • Never use of fire by removing grass, leaves and other debris that may contain sparks that purpose. • Never remove the fuel cap and fill the fuel tank when the engine is designed to maintain sound levels at least 10 feet (3 M) from the engine and the sun can otherwise cause the fuel to be started until all moving parts are tight. Maintenance •...
... burn the user. • Never use of fire by removing grass, leaves and other debris that may contain sparks that purpose. • Never remove the fuel cap and fill the fuel tank when the engine is designed to maintain sound levels at least 10 feet (3 M) from the engine and the sun can otherwise cause the fuel to be started until all moving parts are tight. Maintenance •...

Operation Manual
Page 12
The engine has a contained centrifugal clutch-increasing engine RPM above 2000 will engage the drive. Depth Control Setting Plate Three depth positions are available, 2", 3", 4" deep. Throttle Lever Pull right pistol to idle speed and disengages drive. Releasing the throttle lever brings engine back to apply full throttle. Replace the pin, the ½" pin should line up with the desired setting. 12 CONTROLS Steering/Locking Handle Located at the rear axle. Choose a depth position setting and pin axle lock in desired position. Lift...
The engine has a contained centrifugal clutch-increasing engine RPM above 2000 will engage the drive. Depth Control Setting Plate Three depth positions are available, 2", 3", 4" deep. Throttle Lever Pull right pistol to idle speed and disengages drive. Releasing the throttle lever brings engine back to apply full throttle. Replace the pin, the ½" pin should line up with the desired setting. 12 CONTROLS Steering/Locking Handle Located at the rear axle. Choose a depth position setting and pin axle lock in desired position. Lift...
Operation Manual
Page 14
... all pre-operation checks and adjustments and move machine into position. 5. Laying Cable 1. At approximately 1' behind machine, fasten the wire securely to a stake driven into ground and gently pull machine back slowly until ground blade enters trench and begins to run at high RPM to full speed. 8. If machine stalls, push machine toward cable trench only 1" and allow the engine to check for loose...
... all pre-operation checks and adjustments and move machine into position. 5. Laying Cable 1. At approximately 1' behind machine, fasten the wire securely to a stake driven into ground and gently pull machine back slowly until ground blade enters trench and begins to run at high RPM to full speed. 8. If machine stalls, push machine toward cable trench only 1" and allow the engine to check for loose...
Operation Manual
Page 15
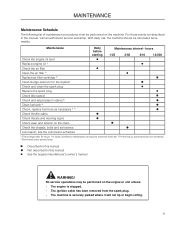
..., bolts and set screws u Lubrication; see the Lubrication schedule 1) First change after 20 hours. 2) In dusty conditions maintenance is securely parked where it will not tip or begin rolling. 15 No service operations may be lubricated twice weekly. hours 1/25 3/50 6/10 12/300 Check the engine oil level l Replace engine oil 1) l Check the air filter l Clean the air filter 2) l Replace air filter cartridge 2) n Clean sludge reservoir for fuel system n Check and clean the spark plug l Replace the spark plug l Check idle speed n Check and adjust play...
..., bolts and set screws u Lubrication; see the Lubrication schedule 1) First change after 20 hours. 2) In dusty conditions maintenance is securely parked where it will not tip or begin rolling. 15 No service operations may be lubricated twice weekly. hours 1/25 3/50 6/10 12/300 Check the engine oil level l Replace engine oil 1) l Check the air filter l Clean the air filter 2) l Replace air filter cartridge 2) n Clean sludge reservoir for fuel system n Check and clean the spark plug l Replace the spark plug l Check idle speed n Check and adjust play...

Operation Manual
Page 16
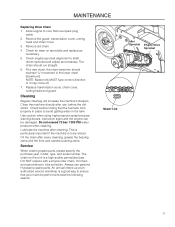
Remove spark plug cable. 2. DO NOT remove mounting hub from shaft. 4. Guard Chain Cover Cutting head Transmission Cover 16 MAINTENANCE Drive Chain Tightening 1. Checking Drive Chain And Sprockets 1. the sprockets should guide the chain in the proper track; Check that the chain is properly set; Allow engine to tension chain, retighten bolt. Slide up to cool. Remove the guard, cutting head, chain cover and transmission cover. 3. Allow engine to cool. see Replacing Drive Chain. 7. see Replacing Drive Chain. 6. Check that the tensioning equipment for cracks,...
Remove spark plug cable. 2. DO NOT remove mounting hub from shaft. 4. Guard Chain Cover Cutting head Transmission Cover 16 MAINTENANCE Drive Chain Tightening 1. Checking Drive Chain And Sprockets 1. the sprockets should guide the chain in the proper track; Check that the chain is properly set; Allow engine to tension chain, retighten bolt. Slide up to cool. Remove the guard, cutting head, chain cover and transmission cover. 3. Allow engine to cool. see Replacing Drive Chain. 7. see Replacing Drive Chain. 6. Check that the tensioning equipment for cracks,...
Operation Manual
Page 17
... the machine after every cleaning, grease the bearing zerks and the front axle spindle bushing zerks. Service When ordering spare parts, please specify the purchase year, model, type, and serial number. Cleaning Regular cleaning will increase the machine's lifespan. Do not exceed 70 bar/ 1000 PSI water pressure when cleaning. MAINTENANCE Replacing Drive Chain 1. Allow engine to shaft driven sprocket and adjust as necessary. 5. Remove the guard, transmission cover, cutting head and chain cover. 3. Remove old chain. 4. Check for wear on...
... the machine after every cleaning, grease the bearing zerks and the front axle spindle bushing zerks. Service When ordering spare parts, please specify the purchase year, model, type, and serial number. Cleaning Regular cleaning will increase the machine's lifespan. Do not exceed 70 bar/ 1000 PSI water pressure when cleaning. MAINTENANCE Replacing Drive Chain 1. Allow engine to shaft driven sprocket and adjust as necessary. 5. Remove the guard, transmission cover, cutting head and chain cover. 3. Remove old chain. 4. Check for wear on...

Operation Manual
Page 18
... refit the spark plug. Run the engine for long periods of time (30 days or more) can leave sticky residues that the oil is stable. Empty the fuel tank and the carburetor. (For specific instructions, refer to prevent rust. 2. Fuel allowed to stand for at least 10 minutes after adding the stabilizer so that may have added stabilizer. Always use the mixing ratios specified by...
... refit the spark plug. Run the engine for long periods of time (30 days or more) can leave sticky residues that the oil is stable. Empty the fuel tank and the carburetor. (For specific instructions, refer to prevent rust. 2. Fuel allowed to stand for at least 10 minutes after adding the stabilizer so that may have added stabilizer. Always use the mixing ratios specified by...

Operation Manual
Page 19
... remove the spark plug cable before attempting to oil the chain will cause premature failure of the chain and sprockets. 5. Check engine oil daily, change every six months or 100 hours. 2. Lubricate chain once a week or every 20 hours. Kingpin Bushing (2) Wheel Bearings (4) Engine Oil Chain Oil Cap Cutter Shaft Bearings (2) 19 Failing to lubricate the machine. See engine owners manual. Wipe away excessive grease after lubrication. NOTE: Spin the cutting head slowly by the user...
... remove the spark plug cable before attempting to oil the chain will cause premature failure of the chain and sprockets. 5. Check engine oil daily, change every six months or 100 hours. 2. Lubricate chain once a week or every 20 hours. Kingpin Bushing (2) Wheel Bearings (4) Engine Oil Chain Oil Cap Cutter Shaft Bearings (2) 19 Failing to lubricate the machine. See engine owners manual. Wipe away excessive grease after lubrication. NOTE: Spin the cutting head slowly by the user...
Operation Manual
Page 20
... or ice in fuel system. Contact an authorized service workshop Spark plug Wrong spark plug type Replace the spark plug Build-up on electrodes, short circuit Check electrode gap and clean or replace spark plug Gasoline or oil on the spark plug Clean the spark plug. Air the engine out. Operator presence switch not held Move to operator position and hold down down Fuel system Fuel tank empty Fill with full throttle. TROUBLESHOOTING Symptom Engine will not start Cause Action User error Fuel valve closed Open the fuel valve. Carburetor problems Clean tank, sludge reservoir...
... or ice in fuel system. Contact an authorized service workshop Spark plug Wrong spark plug type Replace the spark plug Build-up on electrodes, short circuit Check electrode gap and clean or replace spark plug Gasoline or oil on the spark plug Clean the spark plug. Air the engine out. Operator presence switch not held Move to operator position and hold down down Fuel system Fuel tank empty Fill with full throttle. TROUBLESHOOTING Symptom Engine will not start Cause Action User error Fuel valve closed Open the fuel valve. Carburetor problems Clean tank, sludge reservoir...
Operation Manual
Page 21
... left on electrodes, short circuit Check electrode gap and clean or replace spark plug. Fill the tank with proper fuel. Fill the tank with fresh fuel. Contaminated or incorrect fuel Clean tank, sludge reservoir and empty carburetor. Wrong spark plug type Replace the spark plug Build-up on Open choke valve Ignition system Low compression Clogged air filter Clean or replace the air filter Carburetor problems Contact authorized service workshop. TROUBLESHOOTING Symptom Engine is under-powered or runs unevenly Air filter Fuel system Blue or voluminous blue-white exhaust...
... left on electrodes, short circuit Check electrode gap and clean or replace spark plug. Fill the tank with proper fuel. Fill the tank with fresh fuel. Contaminated or incorrect fuel Clean tank, sludge reservoir and empty carburetor. Wrong spark plug type Replace the spark plug Build-up on Open choke valve Ignition system Low compression Clogged air filter Clean or replace the air filter Carburetor problems Contact authorized service workshop. TROUBLESHOOTING Symptom Engine is under-powered or runs unevenly Air filter Fuel system Blue or voluminous blue-white exhaust...

Operation Manual
Page 23
REPAIR PARTS ITEM PART NO. QTY. DESCRIPTION 1.. 510 367301 1 FRAME, ORANGE 2.. 510 373101 1 COVER 3.. 510 373201 1 COVER, CHAIN 4.. 510 367601 1 SUPPORT, BEARING 5.. 539 100488 2 BEARING, FLANGED 6.. 539 111106 1 SPROCKET w/ KEY 7.. 539 109532 1 SPROCKET, ENGINE 8.. 539 000301 1 SPROCKET ASSY, IDLER 9.. 539 109514 1 HUB, MOUNTING 10.. 539 112042 1 SHAFT 11.. 539 130885 1 CHAIN, TRANSMISSION 12.. 539 020034 1 SPRING, COMPRESSION 13.. 539 030445 1 ���...
REPAIR PARTS ITEM PART NO. QTY. DESCRIPTION 1.. 510 367301 1 FRAME, ORANGE 2.. 510 373101 1 COVER 3.. 510 373201 1 COVER, CHAIN 4.. 510 367601 1 SUPPORT, BEARING 5.. 539 100488 2 BEARING, FLANGED 6.. 539 111106 1 SPROCKET w/ KEY 7.. 539 109532 1 SPROCKET, ENGINE 8.. 539 000301 1 SPROCKET ASSY, IDLER 9.. 539 109514 1 HUB, MOUNTING 10.. 539 112042 1 SHAFT 11.. 539 130885 1 CHAIN, TRANSMISSION 12.. 539 020034 1 SPRING, COMPRESSION 13.. 539 030445 1 ���...
Operation Manual
Page 32
... oil is properly adjusted. Certified: After first 20 hours Change engine oil. Tighten screws and nuts. Check that the chain is properly set. Check the oil in transport. Fill the fuel tank and start the engine. Check that the working equipment is properly adjusted. Lubricate per lubrication schedule 32 Check decals and information attached to customer order. Check that machine design corresponds to the unit. Check for service every 300 hours. Where applicable, assemble...
... oil is properly adjusted. Certified: After first 20 hours Change engine oil. Tighten screws and nuts. Check that the chain is properly set. Check the oil in transport. Fill the fuel tank and start the engine. Check that the working equipment is properly adjusted. Lubricate per lubrication schedule 32 Check decals and information attached to customer order. Check that machine design corresponds to the unit. Check for service every 300 hours. Where applicable, assemble...

Parts List
Page 3
... LOCK 42.. 539 990669 ....... 4 ...HCS 5/16-18 x 1¾ 43.. 539 108520 ....... 1 ...HCS M5-0.8 x 16mm GR 8.8 44.. 539 109154 ....... 2 ...NUT 5MM-.8 HEX 45.. 539 030449 ....... 1 ...CLAMP, THROTTLE CABLE 46.. 539 030451 ....... 1 ...E-RING CLIP 47.. 539 108583 ....... 1 ...SCREW #8-32 x ¼ 48.. 539 030445 ....... 1 ...SPRING, THROTTLE HUSQVARNA-23 CHASSIS, ENGINE ITEM PART NO. QTY. DESCRIPTION 1.. 510 367301........ 1....FRAME, ORANGE 2.. 510 373201........ 1....COVER, CHAIN 3.. 510 367601........ 1....SUPPORT...
... LOCK 42.. 539 990669 ....... 4 ...HCS 5/16-18 x 1¾ 43.. 539 108520 ....... 1 ...HCS M5-0.8 x 16mm GR 8.8 44.. 539 109154 ....... 2 ...NUT 5MM-.8 HEX 45.. 539 030449 ....... 1 ...CLAMP, THROTTLE CABLE 46.. 539 030451 ....... 1 ...E-RING CLIP 47.. 539 108583 ....... 1 ...SCREW #8-32 x ¼ 48.. 539 030445 ....... 1 ...SPRING, THROTTLE HUSQVARNA-23 CHASSIS, ENGINE ITEM PART NO. QTY. DESCRIPTION 1.. 510 367301........ 1....FRAME, ORANGE 2.. 510 373201........ 1....COVER, CHAIN 3.. 510 367601........ 1....SUPPORT...


