

Quick Guide
Page 3
...operate reliable without stops. 1. QUICK GUIDE EeNn A System overview The EPOS system contains a robotic lawn mower, a charging station and a reference station. Correction data 5. The charging station can be able to the charging station. Install the reference station. Refer to adjust the schedule and the...be parked at the maintenance point and operate the product with a transport path. Install the Automower® Connect app and Husqvarna Fleet Services™ app to the charging station and add waypoints on the map in front of the product. Docking point 11. ...
...operate reliable without stops. 1. QUICK GUIDE EeNn A System overview The EPOS system contains a robotic lawn mower, a charging station and a reference station. Correction data 5. The charging station can be able to the charging station. Install the reference station. Refer to adjust the schedule and the...be parked at the maintenance point and operate the product with a transport path. Install the Automower® Connect app and Husqvarna Fleet Services™ app to the charging station and add waypoints on the map in front of the product. Docking point 11. ...
Owner Manual
Page 2
... Product description 6 2.4 System overview 7 2.5 Product overview 8 2.6 Symbols on the product 8 2.7 Symbols on the battery 9 2.8 Symbols in the Automower® Connect app............9 2.9 General manual instructions 10 3 Installation 3.1 Introduction - troubleshooting 26 6.2 Fault messages 26 6.3 Information and warning messages 32 6.4 LED... instructions for installation 11 3.4 To examine where to put the reference station...11 3.5 To examine where to put the charging station.... 11 3.6 To examine where to put the power supply........ 12 3.7 To examine where to install the objects...
... Product description 6 2.4 System overview 7 2.5 Product overview 8 2.6 Symbols on the product 8 2.7 Symbols on the battery 9 2.8 Symbols in the Automower® Connect app............9 2.9 General manual instructions 10 3 Installation 3.1 Introduction - troubleshooting 26 6.2 Fault messages 26 6.3 Information and warning messages 32 6.4 LED... instructions for installation 11 3.4 To examine where to put the reference station...11 3.5 To examine where to put the charging station.... 11 3.6 To examine where to put the power supply........ 12 3.7 To examine where to install the objects...

Owner Manual
Page 6
... uses EPOS guidance with satellite signals to position the robotic lawn mower correctly, this means that you can be set to Automower® Connect on page 7. The satellite receiver in the Automower® Connect app. Refer to the charging station.... It continuously alternates between mowing and charging. Introduction 1970 - 001 - 10.10.2022 The robotic lawn mower and reference station uses the technology with satellite signals to find the charging station. 2.3 Product description Note: Husqvarna...
... uses EPOS guidance with satellite signals to position the robotic lawn mower correctly, this means that you can be set to Automower® Connect on page 7. The satellite receiver in the Automower® Connect app. Refer to the charging station.... It continuously alternates between mowing and charging. Introduction 1970 - 001 - 10.10.2022 The robotic lawn mower and reference station uses the technology with satellite signals to find the charging station. 2.3 Product description Note: Husqvarna...
Owner Manual
Page 11
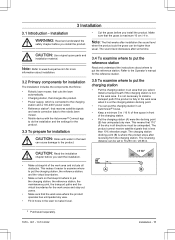
... Refer to www.husqvarna.com for more information about where to make it level. 4 Purchased separately. 1970 - 001 - 10.10.2022 Installation - 11 This means that the work area where the product operates has unimpeded sky view. • Fill in holes in the lawn to put the charging station • Put... the safety chapter before you install the product. It is not necessary to 70-250 cm / 28-98 in an Automower® house. • Keep a minimum 5 m / 16 ft. The charging station docking point (B) is fully in all obstacles. of free space in front of the sky in the work area....
... Refer to www.husqvarna.com for more information about where to make it level. 4 Purchased separately. 1970 - 001 - 10.10.2022 Installation - 11 This means that the work area where the product operates has unimpeded sky view. • Fill in holes in the lawn to put the charging station • Put... the safety chapter before you install the product. It is not necessary to 70-250 cm / 28-98 in an Automower® house. • Keep a minimum 5 m / 16 ft. The charging station docking point (B) is fully in all obstacles. of free space in front of the sky in the work area....
Owner Manual
Page 14
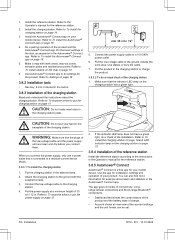
...connectivity and Short-range Bluetooth® connectivity. • Dashboard that is a free app for example about the charging station. Refer to Settings on your product. Install the Automower® Connect app on page 18. 3.8.2 Installation tools • Hex key, 8 mm. Refer to the... of the installation. Refer to To examine where to charge the product. 3.8.3.2 To do a check of the product and the Automower® Connect app. Make sure that the plugs of the charging station 1. Put the charging station in the Automower® Connect app. 1. Refer to a 100-240V...
...connectivity and Short-range Bluetooth® connectivity. • Dashboard that is a free app for example about the charging station. Refer to Settings on your product. Install the Automower® Connect app on page 18. 3.8.2 Installation tools • Hex key, 8 mm. Refer to the... of the installation. Refer to To examine where to charge the product. 3.8.3.2 To do a check of the product and the Automower® Connect app. Make sure that the plugs of the charging station 1. Put the charging station in the Automower® Connect app. 1. Refer to a 100-240V...

Owner Manual
Page 15
Follow the instructions in the e-mail in the operational area. 3.8.5.1 To install the Automower® Connect app 1. You must install a work area and a charging station on the map. 1970 - 001 - 10.10.2022 Installation - 15 Start Bluetooth® on your Husqvarna account in to your mobile device. 1. Do a pairing operation of the product and...
Follow the instructions in the e-mail in the operational area. 3.8.5.1 To install the Automower® Connect app 1. You must install a work area and a charging station on the map. 1970 - 001 - 10.10.2022 Installation - 15 Start Bluetooth® on your Husqvarna account in to your mobile device. 1. Do a pairing operation of the product and...

Owner Manual
Page 19
...systematic cutting is calculated for each work area. Do not restrict the schedule more often. Model Automower® 450X/ 450XH EPOS Approximate operation capacity, m2/h / ft2/h 208 / 2240 Example: A lawn of all user settings is charging. 1970 - 001 - 10.10.2022 Installation - 19 Very low / Low intensity means ...much operating time as possible available for more than 50 hours, or if a Reset of 3000 m2 / 32000 ft2, cut the area with an Automower® 450X/450XH EPOS. 3000 m2 / 208 ≈ 14.5 h. 32000 ft2 / 2240 ≈ 14.5 h. Weather timer is not changed if a Reset of ...
...systematic cutting is calculated for each work area. Do not restrict the schedule more often. Model Automower® 450X/ 450XH EPOS Approximate operation capacity, m2/h / ft2/h 208 / 2240 Example: A lawn of all user settings is charging. 1970 - 001 - 10.10.2022 Installation - 19 Very low / Low intensity means ...much operating time as possible available for more than 50 hours, or if a Reset of 3000 m2 / 32000 ft2, cut the area with an Automower® 450X/450XH EPOS. 3000 m2 / 208 ≈ 14.5 h. 32000 ft2 / 2240 ≈ 14.5 h. Weather timer is not changed if a Reset of ...

Owner Manual
Page 20
...Husqvarna recommends to use the headlights at the charging station. 3.9.5 Accessories Settings for the product. All map objects and the schedules will be set how long the alarm signal should trigger the alarm. If the product is a possibility to set to the current position of the new PIN code in the Automower... and prevent interference with the Automower® house When this option is enabled, the wear on the product and the Automower® house is reduced, but it is an error. Alarm duration There is more uncut grass around the charging station. 3.9.6 General (Bluetooth&#...
...Husqvarna recommends to use the headlights at the charging station. 3.9.5 Accessories Settings for the product. All map objects and the schedules will be set how long the alarm signal should trigger the alarm. If the product is a possibility to set to the current position of the new PIN code in the Automower... and prevent interference with the Automower® house When this option is enabled, the wear on the product and the Automower® house is reduced, but it is an error. Alarm duration There is more uncut grass around the charging station. 3.9.6 General (Bluetooth&#...

Owner Manual
Page 22
...app. behind the product when you must move the product manually to and from the secondary area. Use the operation selection to the charging station and stays for the selected park duration. Select an operating mode in the app. 4.3 To select operation mode Start 1. Refer... to the 1 position to move and rotate the product in the charging station. 4.4.3 Operating mode - Open the Automower® Connect app. 4. After that the product goes back to the charging station where it cuts the grass and charges automatically. 4.3.2 appDrive Use the appDrive to operate the product manually. ...
...app. behind the product when you must move the product manually to and from the secondary area. Use the operation selection to the charging station and stays for the selected park duration. Select an operating mode in the app. 4.3 To select operation mode Start 1. Refer... to the 1 position to move and rotate the product in the charging station. 4.4.3 Operating mode - Open the Automower® Connect app. 4. After that the product goes back to the charging station where it cuts the grass and charges automatically. 4.3.2 appDrive Use the appDrive to operate the product manually. ...

Owner Manual
Page 23
...-term storage, the battery can be empty. Do a check that the product charges in the Automower® Connect app. 4.5 To stop the product 1. Note: When you start the product. 1. Set the Main switch to OFF 1. Charge the battery before you push the START button again, the product continues to operate... set to OFF if it is not connected to the 1 position. 2. Note: The product cannot be set the product to the 0 position. 4.7 To charge the battery When the product is selected in the Automower® Connect app. 1970 - 001 - 10.10.2022 Operation - 23 product is paused until the...
...-term storage, the battery can be empty. Do a check that the product charges in the Automower® Connect app. 4.5 To stop the product 1. Note: When you start the product. 1. Set the Main switch to OFF 1. Charge the battery before you push the START button again, the product continues to operate... set to OFF if it is not connected to the 1 position. 2. Note: The product cannot be set the product to the 0 position. 4.7 To charge the battery When the product is selected in the Automower® Connect app. 1970 - 001 - 10.10.2022 Operation - 23 product is paused until the...

Owner Manual
Page 30
... drive problem, right/ left Searching for position No accurate position from satellites Cause Action There is no specified work area in the Automower® Connect app. Adjust the map and save it. Examine the drive wheel and remove grass or other objects. The product will ... sky that cause interference with the satellite signal. station. Remove the object or do a new installation to the reference sta- Move the charging station or the refer- The satellite signal is blocked by grass or other objects. Refer to To make a work area. Refer to ...
... drive problem, right/ left Searching for position No accurate position from satellites Cause Action There is no specified work area in the Automower® Connect app. Adjust the map and save it. Examine the drive wheel and remove grass or other objects. The product will ... sky that cause interference with the satellite signal. station. Remove the object or do a new installation to the reference sta- Move the charging station or the refer- The satellite signal is blocked by grass or other objects. Refer to To make a work area. Refer to ...

Owner Manual
Page 32
... Cause The product senses vibrations in the product. Connectivity problems Problem with the Automower® Connect module. If you have not registered the e-mail address, speak to your local Husqvarna representative. Examine the power supply. The connection between the charging plates on the product and the contact plates on the blade disc. This...
... Cause The product senses vibrations in the product. Connectivity problems Problem with the Automower® Connect module. If you have not registered the e-mail address, speak to your local Husqvarna representative. Examine the power supply. The connection between the charging plates on the product and the contact plates on the blade disc. This...

Owner Manual
Page 34
The Main switch is not connected to the Automower® Connect app with Bluetooth® and set . tion but not set to Battery on page 18. face. The charging station is high and thick. The start and stop time for shorter periods than usual. Examine the blades and screws and ... usual between charges. Refer to the symptoms table below. Refer to the 0 posi- 6.6 Symptoms If the product does not operate correctly, refer to the blade disc. The time and date of the product. Schedule on page 25. There is not in the prod- Refer to the Automower® Connect...
The Main switch is not connected to the Automower® Connect app with Bluetooth® and set . tion but not set to Battery on page 18. face. The charging station is high and thick. The start and stop time for shorter periods than usual. Examine the blades and screws and ... usual between charges. Refer to the symptoms table below. Refer to the 0 posi- 6.6 Symptoms If the product does not operate correctly, refer to the blade disc. The time and date of the product. Schedule on page 25. There is not in the prod- Refer to the Automower® Connect...

Owner Manual
Page 37
.... 8 Technical data 8.1 Technical data Dimensions Length, cm / in . Width, cm / in a 5000 m2 work area 7 FW7458/28/D/XX/Y, ADP-200JR XX 210 60 Charging station wire antenna Automower® 450X EPOS Operating Frequency Band, Hz 100-80000 Maximum magnetic field, dBuA/m 82 Maximum Radio-frequency power6, mW @60m No 593 11 84-02, 593...
.... 8 Technical data 8.1 Technical data Dimensions Length, cm / in . Width, cm / in a 5000 m2 work area 7 FW7458/28/D/XX/Y, ADP-200JR XX 210 60 Charging station wire antenna Automower® 450X EPOS Operating Frequency Band, Hz 100-80000 Maximum magnetic field, dBuA/m 82 Maximum Radio-frequency power6, mW @60m No 593 11 84-02, 593...

Owner Manual
Page 38
... blades 2700 37 5-9 / 2.0-3.6 24 / 9.4 2 / 6.5 45 15 5000 / 1.25 IP-classification Robotic lawn mower Charging station Power supply charging station Automower® 450X EPOS IPX4 IPX1 IP44 Automower® 450XH EPOS IPX4 IPX1 IP44 Frequency Band Support Bluetooth® Frequency range Automower® Connect 2G Automower® Connect 4G SRD915 2400.0-2483.5 MHz GSM 850 MHz, E-GSM 900 MHz, DCS...
... blades 2700 37 5-9 / 2.0-3.6 24 / 9.4 2 / 6.5 45 15 5000 / 1.25 IP-classification Robotic lawn mower Charging station Power supply charging station Automower® 450X EPOS IPX4 IPX1 IP44 Automower® 450XH EPOS IPX4 IPX1 IP44 Frequency Band Support Bluetooth® Frequency range Automower® Connect 2G Automower® Connect 4G SRD915 2400.0-2483.5 MHz GSM 850 MHz, E-GSM 900 MHz, DCS...


