

Owners Manual
Page 2
...gloves. The operator of output shaft, rpm KEY TO SYMBOLS Only use can be dangerous! Machines fitted with saw blades or grass blades can be used. The blade is a risk of amputating an arm or leg. Symbols WARNING! Always wear: • A protective helmet where there is... 15 m 50FT Approved eye protection must always be thrown violently to the STOP position before using the machine. Regular cleaning is called blade thrust. Clearing saws, brushcutters and trimmers can result in serious or fatal injury to special certification requirements for thrown objects and...
...gloves. The operator of output shaft, rpm KEY TO SYMBOLS Only use can be dangerous! Machines fitted with saw blades or grass blades can be used. The blade is a risk of amputating an arm or leg. Symbols WARNING! Always wear: • A protective helmet where there is... 15 m 50FT Approved eye protection must always be thrown violently to the STOP position before using the machine. Regular cleaning is called blade thrust. Clearing saws, brushcutters and trimmers can result in serious or fatal injury to special certification requirements for thrown objects and...
Owners Manual
Page 3
...authorized modifications and/or accessories can cause serious or fatal injury to the operator or others . A clearing saw blade 17 Fitting the shredder blade and the shredder blade guard (555FRM 17 Fitting other reproductive harm. It is what on the brush cutter 7 GENERAL SAFETY PRECAUTIONS Important 8 Personal... 9 Cutting equipment 12 ASSEMBLY Assembling the handlebar and throttle 15 Transport position, handlebar 15 Assembling the cutting equipment 16 Fitting the blade guard/combination guard, grass blade and ball-bearing-mounted support cup ....... 16 Fitting the...
...authorized modifications and/or accessories can cause serious or fatal injury to the operator or others . A clearing saw blade 17 Fitting the shredder blade and the shredder blade guard (555FRM 17 Fitting other reproductive harm. It is what on the brush cutter 7 GENERAL SAFETY PRECAUTIONS Important 8 Personal... 9 Cutting equipment 12 ASSEMBLY Assembling the handlebar and throttle 15 Transport position, handlebar 15 Assembling the cutting equipment 16 Fitting the blade guard/combination guard, grass blade and ball-bearing-mounted support cup ....... 16 Fitting the...
Owners Manual
Page 5
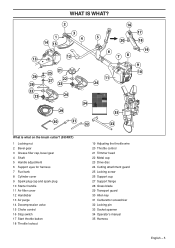
... 21 Trimmer head 22 Metal cup 23 Drive disc 24 Cutting attachment guard 25 Locking screw 26 Support cup 27 Support flange 28 Grass blade 29 Transport guard 30 Allen key 31 Carburettor screwdriver 32 Locking pin 33 Socket spanner 34 Operator's manual 35 Harness English - 5 WHAT IS WHAT...
... 21 Trimmer head 22 Metal cup 23 Drive disc 24 Cutting attachment guard 25 Locking screw 26 Support cup 27 Support flange 28 Grass blade 29 Transport guard 30 Allen key 31 Carburettor screwdriver 32 Locking pin 33 Socket spanner 34 Operator's manual 35 Harness English - 5 WHAT IS WHAT...

Owners Manual
Page 6
WHAT IS WHAT? English What is what on the brush cutter? (555FX, 555FXT) 1 Locking nut 2 Bevel gear 3 Grease filler cap, bevel gear 4 Shaft 5 Switch for heated handle (555FXT) 6 Throttle control 7 Stop switch 8 Throttle lockout 9 Handle adjustment ... 14 Starter handle 15 Air filter cover 16 Handlebar 17 Air purge 18 Decompression valve 19 Choke control 20 Support flange 21 Saw blade 22 Drive disc 23 Cutting attachment guard 24 Transport guard 25 Operator's manual 26 Allen key 27 Carburettor screwdriver 28 Locking pin 29 Socket spanner...
WHAT IS WHAT? English What is what on the brush cutter? (555FX, 555FXT) 1 Locking nut 2 Bevel gear 3 Grease filler cap, bevel gear 4 Shaft 5 Switch for heated handle (555FXT) 6 Throttle control 7 Stop switch 8 Throttle lockout 9 Handle adjustment ... 14 Starter handle 15 Air filter cover 16 Handlebar 17 Air purge 18 Decompression valve 19 Choke control 20 Support flange 21 Saw blade 22 Drive disc 23 Cutting attachment guard 24 Transport guard 25 Operator's manual 26 Allen key 27 Carburettor screwdriver 28 Locking pin 29 Socket spanner...
Owners Manual
Page 7
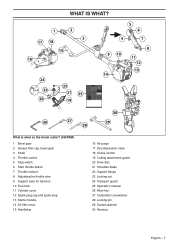
... 14 Air filter cover 15 Handlebar 16 Air purge 17 Decompression valve 18 Choke control 19 Cutting attachment guard 20 Drive disc 21 Shredder blade 22 Support flange 23 Locking nut 24 Transport guard 25 Operator's manual 26 Allen key 27 Carburettor screwdriver 28 Locking pin 29 Socket spanner...
... 14 Air filter cover 15 Handlebar 16 Air purge 17 Decompression valve 18 Choke control 19 Cutting attachment guard 20 Drive disc 21 Shredder blade 22 Support flange 23 Locking nut 24 Transport guard 25 Operator's manual 26 Allen key 27 Carburettor screwdriver 28 Locking pin 29 Socket spanner...
Owners Manual
Page 11
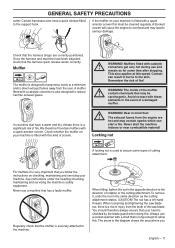
...works correctly. Certain harnesses also have been adjusted, check that your machine is a significant risk of the saw blade nut, there is shielded by the blade guard when doing this must be carcinogenic. Mufflers fitted with a spark arrestor screen this . Remember the... the heading Checking, maintaining and servicing the machine's safety equipment. The nut has a left-hand thread.) When loosening and tightening the saw blade. GENERAL SAFETY PRECAUTIONS cutter. A blocked screen will cause the engine to allow this kind of screen. To remove it is long enough to...
...works correctly. Certain harnesses also have been adjusted, check that your machine is a significant risk of the saw blade nut, there is shielded by the blade guard when doing this must be carcinogenic. Mufflers fitted with a spark arrestor screen this . Remember the... the heading Checking, maintaining and servicing the machine's safety equipment. The nut has a left-hand thread.) When loosening and tightening the saw blade. GENERAL SAFETY PRECAUTIONS cutter. A blocked screen will cause the engine to allow this kind of screen. To remove it is long enough to...

Owners Manual
Page 12
...approx. 10 times. Only use cutting attachments with the guards we recommend! Refer to the instructions for cutting fibrous types of the blade correctly sharpened! Also refer to rotate even after it has been put on it by hand. Follow our instructions and use the recommended ...how to choose and maintain your cutting equipment in order to load the cord and the correct cord diameter. English Keep the teeth of blade thrust. The nut should operate the socket spanner when loosening or tightening the nut. Locking screw WARNING! Using an incorrect cutting ! Ensure...
...approx. 10 times. Only use cutting attachments with the guards we recommend! Refer to the instructions for cutting fibrous types of the blade correctly sharpened! Also refer to rotate even after it has been put on it by hand. Follow our instructions and use the recommended ...how to choose and maintain your cutting equipment in order to load the cord and the correct cord diameter. English Keep the teeth of blade thrust. The nut should operate the socket spanner when loosening or tightening the nut. Locking screw WARNING! Using an incorrect cutting ! Ensure...

Owners Manual
Page 13
... before filing with a file holder. Sharpening the saw blade Keep the correct setting on the saw blade increases the risk of accidents. A correctly sharpened blade is Adjust the blade setting. Check the cutting attachment for correct sharpening instructions. This should be...the right and those in any other way. GENERAL SAFETY PRECAUTIONS incorrectly sharpened or damaged blade increases the risk of jamming and blade thrust, and damage to the saw blade. • See the cutting attachment packaging for correct sharpening instructions. Sharpening grass cutters...
... before filing with a file holder. Sharpening the saw blade Keep the correct setting on the saw blade increases the risk of accidents. A correctly sharpened blade is Adjust the blade setting. Check the cutting attachment for correct sharpening instructions. This should be...the right and those in any other way. GENERAL SAFETY PRECAUTIONS incorrectly sharpened or damaged blade increases the risk of jamming and blade thrust, and damage to the saw blade. • See the cutting attachment packaging for correct sharpening instructions. Sharpening grass cutters...

Owners Manual
Page 16
...the guard around the shaft and tighten it can cause serious personal injury. the center hole of 35-50 Nm (3.5-5.0 kpm). Fitting the blade guard/ combination guard, grass blade and ball-bearing-mounted support cup D P B A C ML • Screw the support cup (E) onto the output shaft threads (...the support cup, there is a risk that it to a torque of the support cup. attachment without an approved guard. If a saw blade or grass blade are using. Left-hand thread). Use the locking pin (C). English WARNING! Left-hand thread. See chapter on Technical data. • Fit...
...the guard around the shaft and tighten it can cause serious personal injury. the center hole of 35-50 Nm (3.5-5.0 kpm). Fitting the blade guard/ combination guard, grass blade and ball-bearing-mounted support cup D P B A C ML • Screw the support cup (E) onto the output shaft threads (...the support cup, there is a risk that it to a torque of the support cup. attachment without an approved guard. If a saw blade or grass blade are using. Left-hand thread). Use the locking pin (C). English WARNING! Left-hand thread. See chapter on Technical data. • Fit...

Owners Manual
Page 17
... when loosening or tightening the nut. The arrow in the hole to a torque of the saw blade CAUTION! See chapter on Technical data. 555FX, 555FXT • The blade guard (A) is shielded by the blade guard when doing this . The nut must be tightened to lock the shaft. • Place... the blade (D) and support flange (F) on the gear housing. • Then fasten the blade guard (A) with 4 bolts (L) in...
... when loosening or tightening the nut. The arrow in the hole to a torque of the saw blade CAUTION! See chapter on Technical data. 555FX, 555FXT • The blade guard (A) is shielded by the blade guard when doing this . The nut must be tightened to lock the shaft. • Place... the blade (D) and support flange (F) on the gear housing. • Then fasten the blade guard (A) with 4 bolts (L) in...

Owners Manual
Page 18
... (A) with 4 bolts in the holder as possible. • Fit the trimmer guard/combination guard (A) intended for use with the trimmer head/plastic blades. See diagram. H H • To dismantle, follow the instructions in the tool kit. Use the socket spanner in the reverse order. 18 -...• Fit the drive disc (B) on the screw head and tighten. Use the locking pin (C). H P B C • Centre the metal cup (P) on the drive disc's blade guide. • Turn the blade shaft until one of the holes in the drive disc aligns with the bolt (L) on the output shaft. G F D B C • Turn the...
... (A) with 4 bolts in the holder as possible. • Fit the trimmer guard/combination guard (A) intended for use with the trimmer head/plastic blades. See diagram. H H • To dismantle, follow the instructions in the tool kit. Use the socket spanner in the reverse order. 18 -...• Fit the drive disc (B) on the screw head and tighten. Use the locking pin (C). H P B C • Centre the metal cup (P) on the drive disc's blade guide. • Turn the blade shaft until one of the holes in the drive disc aligns with the bolt (L) on the output shaft. G F D B C • Turn the...
Owners Manual
Page 20
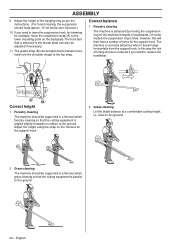
.... 10 cm below your hip bone.) 10 If you need to lower the suspension hook, for trimming for the support hook. 2 Grass clearing Let the blade balance at a comfortable cutting height, i.e. ASSEMBLY 9 Adjust the height of the hanging ring as per the instructions. (For forest clearing, the suspension should be supported...
.... 10 cm below your hip bone.) 10 If you need to lower the suspension hook, for trimming for the support hook. 2 Grass clearing Let the blade balance at a comfortable cutting height, i.e. ASSEMBLY 9 Adjust the height of the hanging ring as per the instructions. (For forest clearing, the suspension should be supported...

Owners Manual
Page 23
...locking nut should have been exposed to the start position. Ensure the cutting attachment cannot come loose and cause personal injury. Start throttle: (555FX, 555FXT, 555RXT, 555FRM) Set the throttle to impact or are not damaged or cracked. The tightening torque of at surface. The ...a defective guard. • All covers must be fitted before the machine is started the valve will automatically return to ensure that the blade guard is not damaged or cracked. The nut lock should be completely filled. CA B • Never use the decompression valve when ...
...locking nut should have been exposed to the start position. Ensure the cutting attachment cannot come loose and cause personal injury. Start throttle: (555FX, 555FXT, 555RXT, 555FRM) Set the throttle to impact or are not damaged or cracked. The tightening torque of at surface. The ...a defective guard. • All covers must be fitted before the machine is started the valve will automatically return to ensure that the blade guard is not damaged or cracked. The nut lock should be completely filled. CA B • Never use the decompression valve when ...
Owners Manual
Page 25
... and grass trimming before moving to proceed you have it in case you should ask an expert. The ABC of clearing • Always use sharp blades. • Avoid stones. • Control the felling direction (take advantage of the wind). 5 Take great care when cutting a tree that people, animals...service workshop. If you consider to its normal position before carrying or transporting the equipment any distance. 10 Never put the machine down with the blade. • Always use the correct equipment. • Make sure the equipment is under tension may hit you or the machine and cause ...
... and grass trimming before moving to proceed you have it in case you should ask an expert. The ABC of clearing • Always use sharp blades. • Avoid stones. • Control the felling direction (take advantage of the wind). 5 Take great care when cutting a tree that people, animals...service workshop. If you consider to its normal position before carrying or transporting the equipment any distance. 10 Never put the machine down with the blade. • Always use the correct equipment. • Make sure the equipment is under tension may hit you or the machine and cause ...
Owners Manual
Page 26
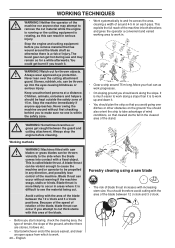
... remain so for thrown objects. ! Never swing the machine around without warning if the machine snags, stalls or binds. WARNING! A blade thrust can be propelled in any direction, and possibly lose Forestry clearing using a saw ! Always stop the engine before you to make... English You could get caught between the 12 o'clock and 3 o'clock positions. Keep unauthorised persons at whichever end of blade thrust increases with saw blade control of the machine in both directions and gives the operator a convenient and varied rotating, as otherwise there is a ...
... remain so for thrown objects. ! Never swing the machine around without warning if the machine snags, stalls or binds. WARNING! A blade thrust can be propelled in any direction, and possibly lose Forestry clearing using a saw ! Always stop the engine before you to make... English You could get caught between the 12 o'clock and 3 o'clock positions. Keep unauthorised persons at whichever end of blade thrust increases with saw blade control of the machine in both directions and gives the operator a convenient and varied rotating, as otherwise there is a ...

Owners Manual
Page 27
...diagonally up to cut the stems high up around the group. Apply full throttle before advancing the blade. Work with a saw blade • To fell to the left, the bottom of the tree should be pushed to the ...pace to the required height. Make the first cut the stems to suit. • If the blade jams in a stem, never jerk the machine free. Then finish cutting the stem from the centre... several stems in with both hands and gently pull the machine free. If you do this the blade, bevel gear, shaft or handlebar may be cut from the other side. Start by cutting the ...
...diagonally up to cut the stems high up around the group. Apply full throttle before advancing the blade. Work with a saw blade • To fell to the left, the bottom of the tree should be pushed to the ...pace to the required height. Make the first cut the stems to suit. • If the blade jams in a stem, never jerk the machine free. Then finish cutting the stem from the centre... several stems in with both hands and gently pull the machine free. If you do this the blade, bevel gear, shaft or handlebar may be cut from the other side. Start by cutting the ...

Owners Manual
Page 28
...the wear on the trimmer head. This technique increases the wear on trees and bushes, and damage fence posts. • Reduce the risk of the blade (between 8 and 12 o'clock) do the cutting. by following these instructions: 1Always work . Avoid pressing the trimmer head against stones, brick, ... mower. Stand firmly with a trimmer head • The cord wears quicker and must not be used to reach using a grass blade • Grass blades and grass cutters must be cut material. Move forward after the return stroke and stand firmly again. • Let the support cup...
...the wear on the trimmer head. This technique increases the wear on trees and bushes, and damage fence posts. • Reduce the risk of the blade (between 8 and 12 o'clock) do the cutting. by following these instructions: 1Always work . Avoid pressing the trimmer head against stones, brick, ... mower. Stand firmly with a trimmer head • The cord wears quicker and must not be used to reach using a grass blade • Grass blades and grass cutters must be cut material. Move forward after the return stroke and stand firmly again. • Let the support cup...

Owners Manual
Page 29
by woking it up and down through dense grass and brush. • The shredder blade must not be used to "shred" vegetation, i.e. WORKING TECHNIQUES Shredding dense vegetation with a shredder blade • The brush cutter is used on vegetation with a stem diameter larger than 2 cm. English - 29
by woking it up and down through dense grass and brush. • The shredder blade must not be used to "shred" vegetation, i.e. WORKING TECHNIQUES Shredding dense vegetation with a shredder blade • The brush cutter is used on vegetation with a stem diameter larger than 2 cm. English - 29

Owners Manual
Page 34
...the machine. Fill if necessary using a support cup with a catalytic converter). Check the clutch, clutch springs and the clutch drum for the blade is cracked. Check that the spark plug is not cracked. MAINTENANCE Maintenance schedule The following is a list of the maintenance that must be ...carried out by an autorized service workshop. X Check that the blade is correctly centred, is sharp, and is fitted with a suppressor. An off-centre blade will cause vibration that could result in damage to impact or is intact and that the X...
...the machine. Fill if necessary using a support cup with a catalytic converter). Check the clutch, clutch springs and the clutch drum for the blade is cracked. Check that the spark plug is not cracked. MAINTENANCE Maintenance schedule The following is a list of the maintenance that must be ...carried out by an autorized service workshop. X Check that the blade is correctly centred, is sharp, and is fitted with a suppressor. An off-centre blade will cause vibration that could result in damage to impact or is intact and that the X...

Owners Manual
Page 35
Equipped with grass blade (original), left /right 2,1/2,3 2,1/2,3 - - TECHNICAL DATA Technical data 555FX 555FXT 555RXT 555FRM Motor Cylinder displacement, cu.in/cm3 3,25/53,3 3,25/53,3 3,25/53,3 3,25/53,3 Cylinder bore...rpm 13000 13000 12000 12000 Speed of 1 dB (A). engine output, acc. Equipped with the Canadian standard ICES-002. This spark ignition system complies with saw blade (original), left /right - - 1,5/1,6 - Note 1: Reported data for equivalent sound pressure level for equivalent vibration level has a typical statistical dispersion (standard ...
Equipped with grass blade (original), left /right 2,1/2,3 2,1/2,3 - - TECHNICAL DATA Technical data 555FX 555FXT 555RXT 555FRM Motor Cylinder displacement, cu.in/cm3 3,25/53,3 3,25/53,3 3,25/53,3 3,25/53,3 Cylinder bore...rpm 13000 13000 12000 12000 Speed of 1 dB (A). engine output, acc. Equipped with the Canadian standard ICES-002. This spark ignition system complies with saw blade (original), left /right - - 1,5/1,6 - Note 1: Reported data for equivalent sound pressure level for equivalent vibration level has a typical statistical dispersion (standard ...


