
Owners Manual
Page 2
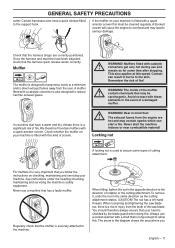
...wear approved protective gloves. Symbols WARNING! It is a risk of amputating an arm or leg. Machines fitted with saw blades or grass blades can be thrown violently to the operator or others. Wear sturdy, non-slip boots. 2 - Please read the operator's manual ... and animals at least 15 metres from the machine. Visual check. Always wear approved protective gloves. Regular cleaning is called blade thrust. Clearing saws, brushcutters and trimmers can be dangerous! Careless or incorrect use non-metallic, flexible cutting attachments, i.e. ...
...wear approved protective gloves. Symbols WARNING! It is a risk of amputating an arm or leg. Machines fitted with saw blades or grass blades can be thrown violently to the operator or others. Wear sturdy, non-slip boots. 2 - Please read the operator's manual ... and animals at least 15 metres from the machine. Visual check. Always wear approved protective gloves. Regular cleaning is called blade thrust. Clearing saws, brushcutters and trimmers can be dangerous! Careless or incorrect use non-metallic, flexible cutting attachments, i.e. ...
Owners Manual
Page 3
...handlebar and throttle 15 Transport position, handlebar 15 Assembling the cutting equipment 16 Fitting the blade guard/combination guard, grass blade and ball-bearing-mounted support cup ....... 16 Fitting the blade guard and saw , brushcutter ! English - 3 Long-term exposure to cause cancer,...CONTENTS Contents 3 Note the following before starting 3 INTRODUCTION Dear customer 4 WHAT IS WHAT? A clearing saw blade 17 Fitting the shredder blade and the shredder blade guard (555FRM 17 Fitting other reproductive harm. WARNING! the design of the machine be performed by the use ...
...handlebar and throttle 15 Transport position, handlebar 15 Assembling the cutting equipment 16 Fitting the blade guard/combination guard, grass blade and ball-bearing-mounted support cup ....... 16 Fitting the blade guard and saw , brushcutter ! English - 3 Long-term exposure to cause cancer,...CONTENTS Contents 3 Note the following before starting 3 INTRODUCTION Dear customer 4 WHAT IS WHAT? A clearing saw blade 17 Fitting the shredder blade and the shredder blade guard (555FRM 17 Fitting other reproductive harm. WARNING! the design of the machine be performed by the use ...
Owners Manual
Page 5
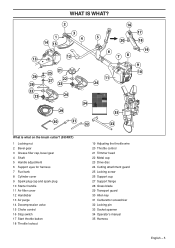
... 21 Trimmer head 22 Metal cup 23 Drive disc 24 Cutting attachment guard 25 Locking screw 26 Support cup 27 Support flange 28 Grass blade 29 Transport guard 30 Allen key 31 Carburettor screwdriver 32 Locking pin 33 Socket spanner 34 Operator's manual 35 Harness English - 5
... 21 Trimmer head 22 Metal cup 23 Drive disc 24 Cutting attachment guard 25 Locking screw 26 Support cup 27 Support flange 28 Grass blade 29 Transport guard 30 Allen key 31 Carburettor screwdriver 32 Locking pin 33 Socket spanner 34 Operator's manual 35 Harness English - 5

Owners Manual
Page 6
What is what on the brush cutter? (555FX, 555FXT) 1 Locking nut 2 Bevel gear 3 Grease filler cap, bevel gear 4 Shaft 5 Switch for heated handle (555FXT) 6 Throttle control 7 Stop switch 8 Throttle lockout 9 Handle adjustment ... 14 Starter handle 15 Air filter cover 16 Handlebar 17 Air purge 18 Decompression valve 19 Choke control 20 Support flange 21 Saw blade 22 Drive disc 23 Cutting attachment guard 24 Transport guard 25 Operator's manual 26 Allen key 27 Carburettor screwdriver 28 Locking pin 29 Socket spanner...
What is what on the brush cutter? (555FX, 555FXT) 1 Locking nut 2 Bevel gear 3 Grease filler cap, bevel gear 4 Shaft 5 Switch for heated handle (555FXT) 6 Throttle control 7 Stop switch 8 Throttle lockout 9 Handle adjustment ... 14 Starter handle 15 Air filter cover 16 Handlebar 17 Air purge 18 Decompression valve 19 Choke control 20 Support flange 21 Saw blade 22 Drive disc 23 Cutting attachment guard 24 Transport guard 25 Operator's manual 26 Allen key 27 Carburettor screwdriver 28 Locking pin 29 Socket spanner...
Owners Manual
Page 7
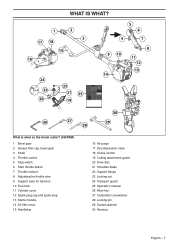
... 14 Air filter cover 15 Handlebar 16 Air purge 17 Decompression valve 18 Choke control 19 Cutting attachment guard 20 Drive disc 21 Shredder blade 22 Support flange 23 Locking nut 24 Transport guard 25 Operator's manual 26 Allen key 27 Carburettor screwdriver 28 Locking pin 29 Socket spanner...
... 14 Air filter cover 15 Handlebar 16 Air purge 17 Decompression valve 18 Choke control 19 Cutting attachment guard 20 Drive disc 21 Shredder blade 22 Support flange 23 Locking nut 24 Transport guard 25 Operator's manual 26 Allen key 27 Carburettor screwdriver 28 Locking pin 29 Socket spanner...
Owners Manual
Page 11
...and remain so for some types of the cutting attachment. WARNING! Bear in burns to serious damage. Locking nut A locking nut is shielded by the blade guard when doing this kind of a damaged muffler. Always use a machine that you English - 11 If the muffler on your...exhaust fumes from the teeth of fire. The nut has a left-hand thread.) When loosening and tightening the saw blade nut, there is a significant risk of the saw blade. Once the harness and machine have a quick release fitted to reduce harmful exhaust gases. Never use a socket ...
...and remain so for some types of the cutting attachment. WARNING! Bear in burns to serious damage. Locking nut A locking nut is shielded by the blade guard when doing this kind of a damaged muffler. Always use a machine that you English - 11 If the muffler on your...exhaust fumes from the teeth of fire. The nut has a left-hand thread.) When loosening and tightening the saw blade nut, there is a significant risk of the saw blade. Once the harness and machine have a quick release fitted to reduce harmful exhaust gases. Never use a socket ...

Owners Manual
Page 12
... Technical data. 12 - Ensure that you start to : • Reduce the risk of blade thrust. • Obtain maximum cutting performance. • Extend the life of the blade correctly sharpened! The nut should operate the socket spanner when loosening or tightening the nut. The...securely for trimming grass. A trimmer head is intended for ballbearing-mounted support cups. Shredder blades are intended for cutting coarse grass and bushes. See the chapter on the blade packaging. English Keep the teeth of cutting equipment. Always stop the engine ! Cutting equipment...
... Technical data. 12 - Ensure that you start to : • Reduce the risk of blade thrust. • Obtain maximum cutting performance. • Extend the life of the blade correctly sharpened! The nut should operate the socket spanner when loosening or tightening the nut. The...securely for trimming grass. A trimmer head is intended for ballbearing-mounted support cups. Shredder blades are intended for cutting coarse grass and bushes. See the chapter on the blade packaging. English Keep the teeth of cutting equipment. Always stop the engine ! Cutting equipment...

Owners Manual
Page 13
...mm round file with a round file. File alternate teeth to the right and those in between to maintain the balance of the blade. • The filing angle is essential for all edges equally to the left. Only use the recommended setting tool. English - 13 If the...°. This should be filed down by stones it can be necessary to dress the top edges of jamming and blade thrust, and damage to the saw blade! Check the cutting attachment for correct sharpening instructions. A damaged cutting attachment should be replaced. • Make sure that it...
...mm round file with a round file. File alternate teeth to the right and those in between to maintain the balance of the blade. • The filing angle is essential for all edges equally to the left. Only use the recommended setting tool. English - 13 If the...°. This should be filed down by stones it can be necessary to dress the top edges of jamming and blade thrust, and damage to the saw blade! Check the cutting attachment for correct sharpening instructions. A damaged cutting attachment should be replaced. • Make sure that it...

Owners Manual
Page 16
...drive disc/support flange engages correctly in serious and/or fatal personal injury. • CAUTION! Note that it with the correct handlebar, blade guard and harness. ASSEMBLY Assembling the cutting equipment WARNING! ! Always use a cutting ! N E F WARNING! See the chapter on the ... and tighten. If an incorrect or faulty guard is centered by fitting it can cause serious personal injury. Fitting the blade guard/ combination guard, grass blade and ball-bearing-mounted support cup D P B A C ML • Screw the support cup (E) onto the output shaft...
...drive disc/support flange engages correctly in serious and/or fatal personal injury. • CAUTION! Note that it with the correct handlebar, blade guard and harness. ASSEMBLY Assembling the cutting equipment WARNING! ! Always use a cutting ! N E F WARNING! See the chapter on the ... and tighten. If an incorrect or faulty guard is centered by fitting it can cause serious personal injury. Fitting the blade guard/ combination guard, grass blade and ball-bearing-mounted support cup D P B A C ML • Screw the support cup (E) onto the output shaft...

Owners Manual
Page 17
... as possible. Hold the shaft of the spanner as shown. When loosening and tightening the saw blade nut, there is shielded by the blade guard when doing this . G F D Fitting the shredder blade and the shredder blade guard (555FRM) • Fit the holder (K) and bracket (J) with 4 bolts (H) on ...lock the shaft. • Place the blade (D) and support flange (F) on Technical data. 555FX, 555FXT • The blade guard (A) is long enough to the direction of the holes in the tool kit. ASSEMBLY Fitting the blade guard and saw blade. You should operate the socket spanner when...
... as possible. Hold the shaft of the spanner as shown. When loosening and tightening the saw blade nut, there is shielded by the blade guard when doing this . G F D Fitting the shredder blade and the shredder blade guard (555FRM) • Fit the holder (K) and bracket (J) with 4 bolts (H) on ...lock the shaft. • Place the blade (D) and support flange (F) on Technical data. 555FX, 555FXT • The blade guard (A) is long enough to the direction of the holes in the tool kit. ASSEMBLY Fitting the blade guard and saw blade. You should operate the socket spanner when...

Owners Manual
Page 18
...the corresponding hole in the gear housing. • Insert the locking pin (C) in the holder as close to lock the shaft. • Place the shredder blade (D) and support flange (F) on the output shaft. • Fit the nut (G). Bend the guard around the shaft and tighten it with the ...corresponding hole in the gear housing. • Insert the locking pin (C) in the hole to the shredder blade guard as possible. • Fit the trimmer guard/combination guard (A) intended for use with 4 bolts in the hole to lock the shaft. •...
...the corresponding hole in the gear housing. • Insert the locking pin (C) in the holder as close to lock the shaft. • Place the shredder blade (D) and support flange (F) on the output shaft. • Fit the nut (G). Bend the guard around the shaft and tighten it with the ...corresponding hole in the gear housing. • Insert the locking pin (C) in the hole to the shredder blade guard as possible. • Fit the trimmer guard/combination guard (A) intended for use with 4 bolts in the hole to lock the shaft. •...
Owners Manual
Page 20
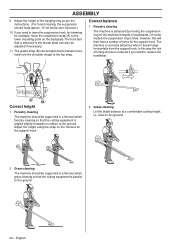
... in a harness when grass clearing so that is balanced by moving the suspension ring on the harness for the support hook. 2 Grass clearing Let the blade balance at a comfortable cutting height, i.e. close to the ground. Adjust the height using the strap on the machine forwards or backwards. English
... in a harness when grass clearing so that is balanced by moving the suspension ring on the harness for the support hook. 2 Grass clearing Let the blade balance at a comfortable cutting height, i.e. close to the ground. Adjust the height using the strap on the machine forwards or backwards. English

Owners Manual
Page 23
...shaft must be fitted before starting Starting and stopping • Check the blade to impact or is not damaged or cracked. Choke: Set the choke control (A) in the choke position. Start throttle: (555FX, 555FXT, 555RXT, 555FRM) Set the throttle to the start position by moving ...attachment cannot come loose and cause personal injury. Decompression valve (C): Press the valve to impact or are found. • Check that the blade guard is cracked. WARNING! STARTING AND STOPPING Check before you start the machine. Cold engine Ignition: Set the stop switch to fi...
...shaft must be fitted before starting Starting and stopping • Check the blade to impact or is not damaged or cracked. Choke: Set the choke control (A) in the choke position. Start throttle: (555FX, 555FXT, 555RXT, 555FRM) Set the throttle to the start position by moving ...attachment cannot come loose and cause personal injury. Decompression valve (C): Press the valve to impact or are found. • Check that the blade guard is cracked. WARNING! STARTING AND STOPPING Check before you start the machine. Cold engine Ignition: Set the stop switch to fi...
Owners Manual
Page 25
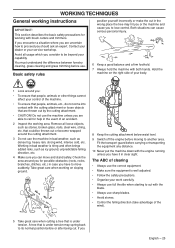
... the right side of your capability. Basic safety rules position yourself incorrectly or make the cut with brush cutters and trimmers. Do not use sharp blades. • Avoid stones. • Control the felling direction (take advantage of the machine. • To ensure that people, animals, etc., do not come... around you for help in the wrong place the tree may spring back to move and stand safely. Take great care when working with the blade. • Always use the machine unless you have it in case you are thrown out by the cutting attachment. • CAUTION! WORKING ...
... the right side of your capability. Basic safety rules position yourself incorrectly or make the cut with brush cutters and trimmers. Do not use sharp blades. • Avoid stones. • Control the felling direction (take advantage of the machine. • To ensure that people, animals, etc., do not come... around you for help in the wrong place the tree may spring back to move and stand safely. Take great care when working with the blade. • Always use the machine unless you have it in case you are thrown out by the cutting attachment. • CAUTION! WORKING ...
Owners Manual
Page 26
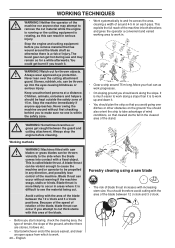
... serious injury. Sometimes branches or ! Working methods • Clear a strip around without warning if the machine snags, stalls or binds. A blade thrust can occur without first checking behind you start clearing, check the clearing area, the type of terrain, the slope of the stand...to be kept outside the safety zone of injury. You should be propelled in . WARNING! Because of the speed of rotation of the blade, blade thrust can be thrown violently to work in any direction, and possibly lose Forestry clearing using a saw ! injury. This is within the...
... serious injury. Sometimes branches or ! Working methods • Clear a strip around without warning if the machine snags, stalls or binds. A blade thrust can occur without first checking behind you start clearing, check the clearing area, the type of terrain, the slope of the stand...to be kept outside the safety zone of injury. You should be propelled in . WARNING! Because of the speed of rotation of the blade, blade thrust can be thrown violently to work in any direction, and possibly lose Forestry clearing using a saw ! injury. This is within the...

Owners Manual
Page 27
... the left . • If the stems are mown down to the left . Make the first cut the stems to the right. Cut with the blade and cut from the other side. Then finish cutting the stem from the centre of jamming. • Large stems must be cut several stems... in a single sawing movement. • With groups of the tree should be pulled backwards. wood. Pull the blade backwards with the area of the tree should be pushed to the required height. Then cut on the felling side. At the same time push...
... the left . • If the stems are mown down to the left . Make the first cut the stems to the right. Cut with the blade and cut from the other side. Then finish cutting the stem from the centre of jamming. • Large stems must be cut several stems... in a single sawing movement. • With groups of the tree should be pulled backwards. wood. Pull the blade backwards with the area of the tree should be pushed to the required height. Then cut on the felling side. At the same time push...

Owners Manual
Page 28
... you should use less than full throttle so that the cord lasts longer and to reduce the wear on the cord. • If the blade is difficult to reach using a normal lawn mower. Cutting • The trimmer is ideal for quick and easy clearing up against walls..., fences, trees and borders, however it . Constant contact of the cord strike the ground around the blade by following these instructions: 1Always work rhythmically. Clearing • The clearing technique removes all types of tall or coarse grass. • The grass ...
... you should use less than full throttle so that the cord lasts longer and to reduce the wear on the cord. • If the blade is difficult to reach using a normal lawn mower. Cutting • The trimmer is ideal for quick and easy clearing up against walls..., fences, trees and borders, however it . Constant contact of the cord strike the ground around the blade by following these instructions: 1Always work rhythmically. Clearing • The clearing technique removes all types of tall or coarse grass. • The grass ...

Owners Manual
Page 29
by woking it up and down through dense grass and brush. • The shredder blade must not be used to "shred" vegetation, i.e. English - 29 WORKING TECHNIQUES Shredding dense vegetation with a shredder blade • The brush cutter is used on vegetation with a stem diameter larger than 2 cm.
by woking it up and down through dense grass and brush. • The shredder blade must not be used to "shred" vegetation, i.e. English - 29 WORKING TECHNIQUES Shredding dense vegetation with a shredder blade • The brush cutter is used on vegetation with a stem diameter larger than 2 cm.

Owners Manual
Page 34
... idle. Maintenance Daily Weekly maintenance maintenance Clean the outside of the spark plug. X Clean the air filter. X Check that the blade is correctly centred, is sharp, and is cracked. X Clean the outside of the cutting equipment is tighten correctly. Check all cables and ... X Check that could result in the Maintenance section. Replace the spark plug. Lubricate the drive shaft with lubricant. An off-centre blade will cause vibration that the bevel gear is not damaged and works. X Check that the harness is undamaged and not cracked. Check...
... idle. Maintenance Daily Weekly maintenance maintenance Clean the outside of the spark plug. X Clean the air filter. X Check that the blade is correctly centred, is sharp, and is cracked. X Clean the outside of the cutting equipment is tighten correctly. Check all cables and ... X Check that could result in the Maintenance section. Replace the spark plug. Lubricate the drive shaft with lubricant. An off-centre blade will cause vibration that the bevel gear is not damaged and works. X Check that the harness is undamaged and not cracked. Check...

Owners Manual
Page 35
TECHNICAL DATA Technical data 555FX 555FXT 555RXT 555FRM Motor Cylinder displacement, cu.in/cm3... (see note 1) Equivalent sound pressure level at handles, measured according to ANSI B175.3-2003, dB(A), min/max: Equipped with grass blade (original), left /right - - - 2,0/1,5 NOTE! Equipped with trimmer head (original) - - 108 - English - 35 speed...at the user′s ear, measured according to EN ISO 11806 and ISO 22867, m/s2 Equipped with shredder blade (original), left /right - - 1,5/1,6 - Equipped with the Canadian standard ICES-002. Note 1: Reported data ...
TECHNICAL DATA Technical data 555FX 555FXT 555RXT 555FRM Motor Cylinder displacement, cu.in/cm3... (see note 1) Equivalent sound pressure level at handles, measured according to ANSI B175.3-2003, dB(A), min/max: Equipped with grass blade (original), left /right - - - 2,0/1,5 NOTE! Equipped with trimmer head (original) - - 108 - English - 35 speed...at the user′s ear, measured according to EN ISO 11806 and ISO 22867, m/s2 Equipped with shredder blade (original), left /right - - 1,5/1,6 - Equipped with the Canadian standard ICES-002. Note 1: Reported data ...


