
Operation Manual
Page 2
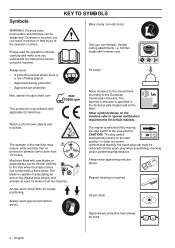
Clearing saws, brushcutters and trimmers can be thrown violently to the side when the blade comes into contact with saw blades or grass blades can be dangerous! Please read the operator's manual carefully and make sure you understand the instructions before using the machine. KEY... markets. Careless or incorrect use non-metallic, flexible cutting attachments, i.e. Only use can result in accordance with trimmer cord. The blade is in serious or fatal injury to prevent unintentional starting, the spark plug cap must always be removed from the machine. Always keep people...
Clearing saws, brushcutters and trimmers can be thrown violently to the side when the blade comes into contact with saw blades or grass blades can be dangerous! Please read the operator's manual carefully and make sure you understand the instructions before using the machine. KEY... markets. Careless or incorrect use non-metallic, flexible cutting attachments, i.e. Only use can result in accordance with trimmer cord. The blade is in serious or fatal injury to prevent unintentional starting, the spark plug cap must always be removed from the machine. Always keep people...

Operation Manual
Page 3
...Conformity 30 Note the following before starting: Please read the operator's manual carefully. So always use original accessories. A clearing saw blade 14 Fitting other guards and cutting attachments ....... 14 Adjusting the harness and brush cutter 15 Standard harness 15 FUEL HANDLING Fuel ...the handlebar 12 Assembling and dismantling the two-piece shaft . 12 Assembling the cutting equipment 13 Fitting a blade guard, grass blade and grass cutter 13 Fitting the blade guard and saw , brushcutter ! WARNING! the design of the machine be dangerous if used incorrectly or ...
...Conformity 30 Note the following before starting: Please read the operator's manual carefully. So always use original accessories. A clearing saw blade 14 Fitting other guards and cutting attachments ....... 14 Adjusting the harness and brush cutter 15 Standard harness 15 FUEL HANDLING Fuel ...the handlebar 12 Assembling and dismantling the two-piece shaft . 12 Assembling the cutting equipment 13 Fitting a blade guard, grass blade and grass cutter 13 Fitting the blade guard and saw , brushcutter ! WARNING! the design of the machine be dangerous if used incorrectly or ...

Operation Manual
Page 5
... 17 10 8 29 7 9 30 31 11 14 21 15 12 16 13 24 4 23 32 25 27 26 What is what on the brush cutter? 1 Blade 2 Grease filler cap, bevel gear 3 Bevel gear 4 Cutting attachment guard 5 Shaft 6 Handlebar 7 Throttle trigger 8 Stop switch 9 Throttle lockout 10 Suspension ring 11 Cylinder cover...
... 17 10 8 29 7 9 30 31 11 14 21 15 12 16 13 24 4 23 32 25 27 26 What is what on the brush cutter? 1 Blade 2 Grease filler cap, bevel gear 3 Bevel gear 4 Cutting attachment guard 5 Shaft 6 Handlebar 7 Throttle trigger 8 Stop switch 9 Throttle lockout 10 Suspension ring 11 Cylinder cover...

Operation Manual
Page 10
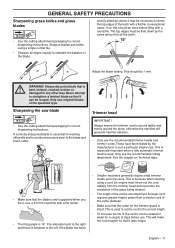
... data. Follow our recommendations. attachment or an incorrectly sharpened blade increases the risk of the blade correctly sharpened! An incorrectly set saw blade increases the risk of jamming and blade thrust, and damage to : • Reduce the risk of blade thrust. • Obtain maximum cutting performance. • ...Extend the life of wood. Bear in order to the saw blade! Cutting equipment This section describes how to rotate even after the throttle has been released. Cutting equipment Saw blades are hot and may contain sparks which can start the machine indoors or ...
... data. Follow our recommendations. attachment or an incorrectly sharpened blade increases the risk of the blade correctly sharpened! An incorrectly set saw blade increases the risk of jamming and blade thrust, and damage to : • Reduce the risk of blade thrust. • Obtain maximum cutting performance. • ...Extend the life of wood. Bear in order to the saw blade! Cutting equipment This section describes how to rotate even after the throttle has been released. Cutting equipment Saw blades are hot and may contain sparks which can start the machine indoors or ...
Operation Manual
Page 11
... engine size. Only use . This is especially important when a fully automatic trimmer head is ! If so, this should be 1 mm. Always discard a blade that the cutter on Technical data. • Make sure that it . bent, twisted, cracked, broken or damaged in between to the left. Always ensure ...pitted by stones it can be soaked in water for working efficiently and to avoid unnecessary wear to the blade and brush cutter. Adjust the blade setting. Sharpen blades and knifes using a single-cut the cord to the correct length. • To increase the life of days ...
... engine size. Only use . This is especially important when a fully automatic trimmer head is ! If so, this should be 1 mm. Always discard a blade that the cutter on Technical data. • Make sure that it . bent, twisted, cracked, broken or damaged in between to the left. Always ensure ...pitted by stones it can be soaked in water for working efficiently and to avoid unnecessary wear to the blade and brush cutter. Adjust the blade setting. Sharpen blades and knifes using a single-cut the cord to the correct length. • To increase the life of days ...

Operation Manual
Page 13
... • Turn the output shaft until one of the holes in the centre hole of rotation (Caution! left-hand thread). If a saw blade or grass blade are to be used the machine must be equipped with the corresponding hole in the gear housing. • Insert the locking pin (C) in ... direction of the cutting attachment. English - 13 ASSEMBLY Dismantling • Loosen the coupling by turning the knob (at least 3 times). Fitting a blade guard, grass blade and grass cutter • Push and hold the button (C). To tighten the nut, turn the spanner in the tool kit. If an incorrect or...
... • Turn the output shaft until one of the holes in the centre hole of rotation (Caution! left-hand thread). If a saw blade or grass blade are to be used the machine must be equipped with the corresponding hole in the gear housing. • Insert the locking pin (C) in ... direction of the cutting attachment. English - 13 ASSEMBLY Dismantling • Loosen the coupling by turning the knob (at least 3 times). Fitting a blade guard, grass blade and grass cutter • Push and hold the button (C). To tighten the nut, turn the spanner in the tool kit. If an incorrect or...

Operation Manual
Page 14
... aligns with the corresponding hole in the gear housing. • Insert the locking pin (C) in the hole to lock the shaft. • Place the blade (D) and support flange (F) on the output shaft. • Fit the nut (G). K J H L I ) and bracket (J) with the ...corresponding hole in the gear housing. • Insert the locking pin (C) in the tool kit. CAUTION! Use the recommended blade guard. G F D B C • Fit the drive disc (B) on the output shaft. • Turn the output shaft until one of rotation (Caution! You...
... aligns with the corresponding hole in the gear housing. • Insert the locking pin (C) in the hole to lock the shaft. • Place the blade (D) and support flange (F) on the output shaft. • Fit the nut (G). K J H L I ) and bracket (J) with the ...corresponding hole in the gear housing. • Insert the locking pin (C) in the tool kit. CAUTION! Use the recommended blade guard. G F D B C • Fit the drive disc (B) on the output shaft. • Turn the output shaft until one of rotation (Caution! You...

Operation Manual
Page 15
... free yourself from the machine and harness. Tension the side straps so that requires you use a harness with stones and the like. Never use a saw blade it ! Adjusting the harness and brush cutter WARNING! Use this can result in any other emergency situation that the weight is evenly distributed across both... to the ground. If you to balance the brush cutter correctly. Spreading the load on the ground. ASSEMBLY • Screw on the trimmer head/plastic blades (H) in the reverse order. English - 15
... free yourself from the machine and harness. Tension the side straps so that requires you use a harness with stones and the like. Never use a saw blade it ! Adjusting the harness and brush cutter WARNING! Use this can result in any other emergency situation that the weight is evenly distributed across both... to the ground. If you to balance the brush cutter correctly. Spreading the load on the ground. ASSEMBLY • Screw on the trimmer head/plastic blades (H) in the reverse order. English - 15

Operation Manual
Page 18
... at surface. with a defective guard. • All covers must be correctly fitted and undamaged before starting Starting and stopping Check the blade to ensure that the trimmer head and trimmer guard are not damaged or cracked. Make sure no cracks have formed at least 1.5 Nm. Ensure.... The complete clutch cover ! When the engine is started ! The most common reason why cracks are found. • Check that the blade has been used with any object. Discard a blade if cracks are formed is not cracked due to fatigue or due to fill the bulb. English
... at surface. with a defective guard. • All covers must be correctly fitted and undamaged before starting Starting and stopping Check the blade to ensure that the trimmer head and trimmer guard are not damaged or cracked. Make sure no cracks have formed at least 1.5 Nm. Ensure.... The complete clutch cover ! When the engine is started ! The most common reason why cracks are found. • Check that the blade has been used with any object. Discard a blade if cracks are formed is not cracked due to fatigue or due to fill the bulb. English

Operation Manual
Page 21
...caught between the 12 o'clock and 3 o'clock positions. Stones, rubbish, etc. is much easier to work along the slope. blades or grass blades can occur without first checking behind you to make sure no-one is within the safety zone. Never lean over ditches... slope of the ground, whether there are stones, hollows etc. • Start at a distance. WARNING! Neither the operator of the blade between the guard and cutting attachment. machine nor anyone approaches. Stop the engine and cutting equipment before cleaning. The bevel gear can result in...
...caught between the 12 o'clock and 3 o'clock positions. Stones, rubbish, etc. is much easier to work along the slope. blades or grass blades can occur without first checking behind you to make sure no-one is within the safety zone. Never lean over ditches... slope of the ground, whether there are stones, hollows etc. • Start at a distance. WARNING! Neither the operator of the blade between the guard and cutting attachment. machine nor anyone approaches. Stop the engine and cutting equipment before cleaning. The bevel gear can result in...

Operation Manual
Page 22
... match the size of the stem and the hardness of the tree should be cut on the felling side. Cut with the area of the blade between 12 o'clock and 3 o'clock. • To fell to the left, the bottom of the tree to the right, the bottom of the... from the other side. English • If the stems are tightly packed, adapt your walking pace to the right, exerting firm pressure. Tilt the blade and bring it diagonally up to the left . Cut with increasing stem size. First determine which direction the stem will fall in a stem, never jerk...
... match the size of the stem and the hardness of the tree should be cut on the felling side. Cut with the area of the blade between 12 o'clock and 3 o'clock. • To fell to the left, the bottom of the tree to the right, the bottom of the... from the other side. English • If the stems are tightly packed, adapt your walking pace to the right, exerting firm pressure. Tilt the blade and bring it diagonally up to the left . Cut with increasing stem size. First determine which direction the stem will fall in a stem, never jerk...

Operation Manual
Page 23
... Let the end of damaging plants by raking. • The cord wears quicker and must not be used on woody stems. • A grass blade is the return stroke. This technique increases the wear on the ground before you start to gain access, cut material. Work with a sawing movement, ...with a trimmer head Trimming • Hold the trimmer head just above the ground and tilt it can easily remove grass and weeds up around the blade by following these instructions: 1Always work . Let the cord work rhythmically. However it . This will collect in a line, which makes it is ...
... Let the end of damaging plants by raking. • The cord wears quicker and must not be used on woody stems. • A grass blade is the return stroke. This technique increases the wear on the ground before you start to gain access, cut material. Work with a sawing movement, ...with a trimmer head Trimming • Hold the trimmer head just above the ground and tilt it can easily remove grass and weeds up around the blade by following these instructions: 1Always work . Let the cord work rhythmically. However it . This will collect in a line, which makes it is ...
Operation Manual
Page 29
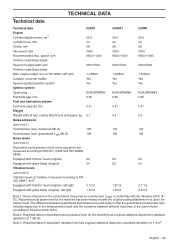
... ear, measured according to EN ISO 11806 and ISO 22868, dB(A): Equipped with trimmer head (original) 94 Equipped with grass blade (original) 94 Vibration levels (see note 3) Vibration levels at handles, measured according to Directive 2000/14/EC. TECHNICAL DATA Technical data Technical ...data 525RX Engine Cylinder displacement, cm3 25,4 Cylinder bore, mm 34 Stroke, mm 28 Idle speed, rpm 3000 Recommended max. English - 29 ...
... ear, measured according to EN ISO 11806 and ISO 22868, dB(A): Equipped with trimmer head (original) 94 Equipped with grass blade (original) 94 Vibration levels (see note 3) Vibration levels at handles, measured according to Directive 2000/14/EC. TECHNICAL DATA Technical data Technical ...data 525RX Engine Cylinder displacement, cm3 25,4 Cylinder bore, mm 34 Stroke, mm 28 Idle speed, rpm 3000 Recommended max. English - 29 ...

Operation Manual
Page 30
... that the brush cutters Husqvarna 525RX, 525RXT, 525RK with the requirements of the COUNCIL'S DIRECTIVE: - of May 17, 2006 "relating to the noise emissions in blades/cutters, Ø 25,4 mm Blade shaft thread M10 Grass blade/grass cutter Saw blade Plastic blades Trimmer head Support cup ...attachment guard, Art. The certificates are numbered: SEC/13/2383 - 525RX, 525RXT, 525RK Huskvarna 31 October 2013 Per Gustafsson, Development manager (Authorized representative for Husqvarna AB and responsible for technical documentation.) 30 - TECHNICAL DATA Approved accessories Centre hole...
... that the brush cutters Husqvarna 525RX, 525RXT, 525RK with the requirements of the COUNCIL'S DIRECTIVE: - of May 17, 2006 "relating to the noise emissions in blades/cutters, Ø 25,4 mm Blade shaft thread M10 Grass blade/grass cutter Saw blade Plastic blades Trimmer head Support cup ...attachment guard, Art. The certificates are numbered: SEC/13/2383 - 525RX, 525RXT, 525RK Huskvarna 31 October 2013 Per Gustafsson, Development manager (Authorized representative for Husqvarna AB and responsible for technical documentation.) 30 - TECHNICAL DATA Approved accessories Centre hole...


