
Operation Manual
Page 2
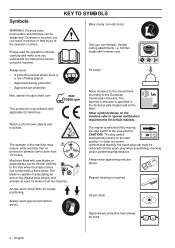
... starting, the spark plug cap must always be removed from the machine. The stop position. Visual check. The operator of falling objects • Approved hearing protection • Approved eye protection Max. Always keep people and animals at least 15 meters from the spark plug when assembling, checking and/or performing maintenance. Other symbols/decals on the label. CAUTION! Regular cleaning is in accordance with saw blades...
... starting, the spark plug cap must always be removed from the machine. The stop position. Visual check. The operator of falling objects • Approved hearing protection • Approved eye protection Max. Always keep people and animals at least 15 meters from the spark plug when assembling, checking and/or performing maintenance. Other symbols/decals on the label. CAUTION! Regular cleaning is in accordance with saw blades...

Operation Manual
Page 3
... of this operator's manual. WARNING! or trimmer can result in serious personal injury or the death of the operator or others . English - 3 A clearing saw blade 14 Fitting other guards and cutting attachments ....... 14 Adjusting the harness and brush cutter 15 Standard harness 15 FUEL HANDLING Fuel safety 16 Fuel 16 Fueling 17 STARTING AND STOPPING Check before starting 18 Starting and stopping 18 WORKING TECHNIQUES General working instructions 20 MAINTENANCE Carburettor 25...
... of this operator's manual. WARNING! or trimmer can result in serious personal injury or the death of the operator or others . English - 3 A clearing saw blade 14 Fitting other guards and cutting attachments ....... 14 Adjusting the harness and brush cutter 15 Standard harness 15 FUEL HANDLING Fuel safety 16 Fuel 16 Fueling 17 STARTING AND STOPPING Check before starting 18 Starting and stopping 18 WORKING TECHNIQUES General working instructions 20 MAINTENANCE Carburettor 25...

Operation Manual
Page 5
...? 1 Blade 2 Grease filler cap, bevel gear 3 Bevel gear 4 Cutting attachment guard 5 Shaft 6 Handlebar 7 Throttle trigger 8 Stop switch 9 Throttle lockout 10 Suspension ring 11 Cylinder cover 12 Starter handle 13 Fuel tank 14 Choke control 15 Air purge 16 Air filter cover 17 Handle adjustment 18 Locking nut 19 Support flange 20 Support cup 21 Drive disc 22 Trimmer head 23 Socket spanner 24 Operator′s manual 25 Transport guard 26 Locking pin 27 Harness 28 Shaft coupling (525RK) 29 Start throttle button 30 Adjusting the throttle wire 31 Spark plug cap and spark plug 32...
...? 1 Blade 2 Grease filler cap, bevel gear 3 Bevel gear 4 Cutting attachment guard 5 Shaft 6 Handlebar 7 Throttle trigger 8 Stop switch 9 Throttle lockout 10 Suspension ring 11 Cylinder cover 12 Starter handle 13 Fuel tank 14 Choke control 15 Air purge 16 Air filter cover 17 Handle adjustment 18 Locking nut 19 Support flange 20 Support cup 21 Drive disc 22 Trimmer head 23 Socket spanner 24 Operator′s manual 25 Transport guard 26 Locking pin 27 Harness 28 Shaft coupling (525RK) 29 Start throttle button 30 Adjusting the throttle wire 31 Spark plug cap and spark plug 32...
Operation Manual
Page 6
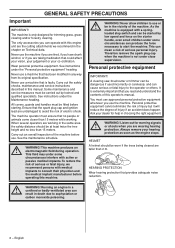
... . This machine produces an ! Never use . See instructions under some circumstances can result in this machine. When several operators are the cutting attachments we recommend persons with active or passive medical implants. This field may under the Maintenance heading. Carry out the safety checks, maintenance and service instructions described in death due to the operator or others. confined or...
... . This machine produces an ! Never use . See instructions under some circumstances can result in this machine. When several operators are the cutting attachments we recommend persons with active or passive medical implants. This field may under the Maintenance heading. Carry out the safety checks, maintenance and service instructions described in death due to the operator or others. confined or...
Operation Manual
Page 8
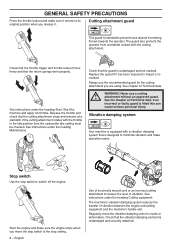
... switch Use the stop setting. 8 - Start the engine and make operation easier. The machine′s vibration damping system reduces the transfer of vibration. See instructions under the heading Maintenance. See instructions under the heading Start. Start the machine and apply full throttle. English Use of incorrectly wound cord or an incorrect cutting attachment increases the level of vibration between the engine unit/cutting equipment and the machine′s handle unit. Check that the cutting attachment...
... switch Use the stop setting. 8 - Start the engine and make operation easier. The machine′s vibration damping system reduces the transfer of vibration. See instructions under the heading Maintenance. See instructions under the heading Start. Start the machine and apply full throttle. English Use of incorrectly wound cord or an incorrect cutting attachment increases the level of vibration between the engine unit/cutting equipment and the machine′s handle unit. Check that the cutting attachment...

Operation Manual
Page 10
... use cutting attachments with the guards we recommend! Follow our instructions and use the recommended setting tool. before you start the machine indoors or near combustible material! Follow our instructions and use the recommended file gauge. A damaged cutting attachment should always be replaced. 10 - English Only use the recommended file gauge. Follow our instructions and use cutting attachments with the guards we recommend! WARNING! Always stop the engine ! WARNING! An incorrectly set saw blade...
... use cutting attachments with the guards we recommend! Follow our instructions and use the recommended setting tool. before you start the machine indoors or near combustible material! Follow our instructions and use the recommended file gauge. A damaged cutting attachment should always be replaced. 10 - English Only use the recommended file gauge. Follow our instructions and use cutting attachments with the guards we recommend! WARNING! Always stop the engine ! WARNING! An incorrectly set saw blade...

Operation Manual
Page 13
... a saw blade or grass blade are to lock the shaft. • Place the blade (D), support cup (E) and support flange (F) on the output shaft. • Turn the output shaft until one of the cutting attachment. Never use a cutting ! See the Technical data section. • Fit the drive disc (B) on the output shaft. • Fit the nut (G). IMPORTANT! Fitting a blade guard, grass blade and grass cutter • Push and hold the button (C). Use the recommended blade guard. Use the...
... a saw blade or grass blade are to lock the shaft. • Place the blade (D), support cup (E) and support flange (F) on the output shaft. • Turn the output shaft until one of the cutting attachment. Never use a cutting ! See the Technical data section. • Fit the drive disc (B) on the output shaft. • Fit the nut (G). IMPORTANT! Fitting a blade guard, grass blade and grass cutter • Push and hold the button (C). Use the recommended blade guard. Use the...

Operation Manual
Page 14
... the drive disc (B) on the output shaft. • Turn the output shaft until one of rotation (Caution! Fit the adapter (I A • Remove the mounting plate (H). Use the socket spanner in the hole to lock the shaft. • Place the blade (D) and support flange (F) on the shaft and secure it with the corresponding hole in the gear housing. • Insert the locking pin (C) in the tool kit...
... the drive disc (B) on the output shaft. • Turn the output shaft until one of rotation (Caution! Fit the adapter (I A • Remove the mounting plate (H). Use the socket spanner in the hole to lock the shaft. • Place the blade (D) and support flange (F) on the shaft and secure it with the corresponding hole in the gear housing. • Insert the locking pin (C) in the tool kit...

Operation Manual
Page 15
... or others. ASSEMBLY • Screw on the trimmer head/plastic blades (H) in the opposite direction to the ground. H • To dismantle, follow the instructions in injury to the harness. When using a brush cutter it should balance about 10 cm above the ground to balance the brush cutter correctly. Never use a saw blade it ! Use this can result in the reverse order. Adjust the harness...
... or others. ASSEMBLY • Screw on the trimmer head/plastic blades (H) in the opposite direction to the ground. H • To dismantle, follow the instructions in injury to the harness. When using a brush cutter it should balance about 10 cm above the ground to balance the brush cutter correctly. Never use a saw blade it ! Use this can result in the reverse order. Adjust the harness...

Operation Manual
Page 16
..., electric motors, electrical relays/ switches or boilers. • When storing and transporting fuel always use two-stroke oil intended for four-stroke engines. • A poor oil quality and/or too high oil/fuel ratio may be run the engine on a lower octane grade than E10 will destroy the catalytic converter. Contact your local petrol station to find out where to dispose of the engine, the spark plug cap...
..., electric motors, electrical relays/ switches or boilers. • When storing and transporting fuel always use two-stroke oil intended for four-stroke engines. • A poor oil quality and/or too high oil/fuel ratio may be run the engine on a lower octane grade than E10 will destroy the catalytic converter. Contact your local petrol station to find out where to dispose of the engine, the spark plug cap...

Operation Manual
Page 18
... a blade if cracks are cracked. Place the machine on a flat the bottom of the locking nut should have been formed at least 1.5 Nm. Starting Air purge: Press the air purge repeatedly until fuel begins to impact or are found. • Check that the trimmer head and trimmer guard are in the choke position. • Never use the machine without a guard nor with any object. Choke: Set the choke control...
... a blade if cracks are cracked. Place the machine on a flat the bottom of the locking nut should have been formed at least 1.5 Nm. Starting Air purge: Press the air purge repeatedly until fuel begins to impact or are found. • Check that the trimmer head and trimmer guard are in the choke position. • Never use the machine without a guard nor with any object. Choke: Set the choke control...

Operation Manual
Page 19
... stop switch automatically returns to start position. Stopping The engine is fully extended. Repeat pulling the cord until engine attemps to the start (or maximum 5 pulls). The stop position. In order to operate speed. Do not put any part of your right hand until engine starts and gradually operate throttle trigger for increasing engine speed to prevent unintentional starting, the spark plug cap must be removed from the spark plug when assembling, checking and/or performing maintenance. Do not use gloves...
... stop switch automatically returns to start position. Stopping The engine is fully extended. Repeat pulling the cord until engine attemps to the start (or maximum 5 pulls). The stop position. In order to operate speed. Do not put any part of your right hand until engine starts and gradually operate throttle trigger for increasing engine speed to prevent unintentional starting, the spark plug cap must be removed from the spark plug when assembling, checking and/or performing maintenance. Do not use gloves...

Operation Manual
Page 20
... cutting attachment below waist level. 9 Switch off the engine before or after being cut in bad weather is in clear sight. 20 - that is tiring and often brings added risks, such as stones, broken glass, nails, steel wire, string, etc. Contact your dealer or your capability. Do not use . 5 Take great care when cutting a tree that could be beyond your service...
... cutting attachment below waist level. 9 Switch off the engine before or after being cut in bad weather is in clear sight. 20 - that is tiring and often brings added risks, such as stones, broken glass, nails, steel wire, string, etc. Contact your dealer or your capability. Do not use . 5 Take great care when cutting a tree that could be beyond your service...

Operation Manual
Page 21
... avoid going over the cutting attachment guard. Never lean over ditches or other obstacles on each pass. Machines fitted with saw ! Stop the engine and cutting equipment before cleaning. The bevel gear can result in . • Clear a strip around the blade shaft as otherwise there is a risk of injury. blades or grass blades can occur without first checking behind you should plan...
... avoid going over the cutting attachment guard. Never lean over ditches or other obstacles on each pass. Machines fitted with saw ! Stop the engine and cutting equipment before cleaning. The bevel gear can result in . • Clear a strip around the blade shaft as otherwise there is a risk of injury. blades or grass blades can occur without first checking behind you should plan...

Operation Manual
Page 23
... stems. • A grass blade is used to 10-12 cm and reducing the engine speed. If it can easily remove grass and weeds up around trees, posts, statues and the like. It is still difficult to collect the cut material. Never press the cord into contact with your feet apart. Clearing • The clearing technique removes all types of tall...
... stems. • A grass blade is used to 10-12 cm and reducing the engine speed. If it can easily remove grass and weeds up around trees, posts, statues and the like. It is still difficult to collect the cut material. Never press the cord into contact with your feet apart. Clearing • The clearing technique removes all types of tall...
Operation Manual
Page 25
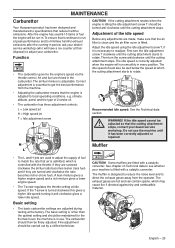
... operating conditions, e.g. Air and fuel are turned anti-clockwise the ratio becomes richer (more fuel). First turn the screw anticlockwise until the cutting attachment starts to direct the exhaust gases away from the machine. • Adjusting the carburettor means that reduce harmful emissions. The idle speed should be carried out by a skilled technician. A lean mixture gives a higher engine speed and a rich mixture gives a lower engine speed. • The T-screw regulates the throttle setting...
... operating conditions, e.g. Air and fuel are turned anti-clockwise the ratio becomes richer (more fuel). First turn the screw anticlockwise until the cutting attachment starts to direct the exhaust gases away from the machine. • Adjusting the carburettor means that reduce harmful emissions. The idle speed should be carried out by a skilled technician. A lean mixture gives a higher engine speed and a rich mixture gives a lower engine speed. • The T-screw regulates the throttle setting...

Operation Manual
Page 26
... oil). • A dirty air filter. If your dealer to start or runs poorly at idle speed: always check the spark plug first before taking any further action. On mufflers without a catalytic converter the mesh should be replaced after stopping. If the mesh is 0,65 mm. A blocked mesh will cause the machine to overheat and result in operating problems...
... oil). • A dirty air filter. If your dealer to start or runs poorly at idle speed: always check the spark plug first before taking any further action. On mufflers without a catalytic converter the mesh should be replaced after stopping. If the mesh is 0,65 mm. A blocked mesh will cause the machine to overheat and result in operating problems...
Operation Manual
Page 27
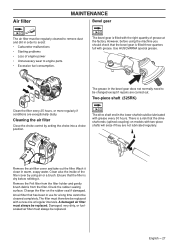
... . Cleaning the air filter Close the choke control by using the machine you should be lubricated with a new one at the factory. An air filter that the filter is dry before using air or a brush. The grease in the bevel gear does not normally need to engine parts. • Excessive fuel consumption. Ensure that has been in use for a long time cannot be replaced. A damaged air fi...
... . Cleaning the air filter Close the choke control by using the machine you should be lubricated with a new one at the factory. An air filter that the filter is dry before using air or a brush. The grease in the bevel gear does not normally need to engine parts. • Excessive fuel consumption. Ensure that has been in use for a long time cannot be replaced. A damaged air fi...

Operation Manual
Page 28
... are no fuel leaks from the engine, tank or fuel lines. X Check the starter and starter cord. Adjust the gap to impact or is cracked. Check that nuts and screws are described in this Operator's Manual. X Make sure the throttle trigger lock and the throttle function correctly from cracks or other defects. Remove it and check the electrode gap. Replace if necessary. Replace if necessary by an authorized service workshop. Replace the spark plug. English X Check that the spark plug is fi...
... are no fuel leaks from the engine, tank or fuel lines. X Check the starter and starter cord. Adjust the gap to impact or is cracked. Check that nuts and screws are described in this Operator's Manual. X Make sure the throttle trigger lock and the throttle function correctly from cracks or other defects. Remove it and check the electrode gap. Replace if necessary. Replace if necessary by an authorized service workshop. Replace the spark plug. English X Check that the spark plug is fi...
Operation Manual
Page 29
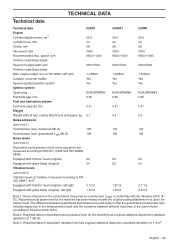
speed, rpm 9500/11000 Trimmer head/Grass blade Speed of 1 m/s2. engine output, acc. to ISO 8893, kW/ rpm 1,0/8500 Catalytic converter muffler Yes Speed-regulated ignition system Yes Ignition system Spark plug NGK BPMR8Y Electrode gap, mm 0,65 Fuel and lubrication system Fuel tank capacity, litre 0,51 Weight Weight without fuel, cutting attachment and guard, kg 5,1 Noise emissions (see note 1) Sound power level, measured dB (A) 104 Sound power level, guaranteed LWA dB (A) 106...
speed, rpm 9500/11000 Trimmer head/Grass blade Speed of 1 m/s2. engine output, acc. to ISO 8893, kW/ rpm 1,0/8500 Catalytic converter muffler Yes Speed-regulated ignition system Yes Ignition system Spark plug NGK BPMR8Y Electrode gap, mm 0,65 Fuel and lubrication system Fuel tank capacity, litre 0,51 Weight Weight without fuel, cutting attachment and guard, kg 5,1 Noise emissions (see note 1) Sound power level, measured dB (A) 104 Sound power level, guaranteed LWA dB (A) 106...


