

Owners Manual
Page 2
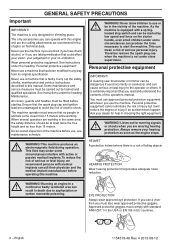
.... Always wear approved protective gloves. The operator of the machine must be dangerous! Visual check. The engine exhaust from the spark plug when assembling, checking and/or performing maintenance. The stop position. Regular cleaning is switched off by moving the stop switch to the stop switch automatically returns to the start position. Careless or incorrect use non-metallic, flexible cutting attachments, i.e. speed of falling objects • Approved hearing...
.... Always wear approved protective gloves. The operator of the machine must be dangerous! Visual check. The engine exhaust from the spark plug when assembling, checking and/or performing maintenance. The stop position. Regular cleaning is switched off by moving the stop switch to the stop switch automatically returns to the start position. Careless or incorrect use non-metallic, flexible cutting attachments, i.e. speed of falling objects • Approved hearing...
Owners Manual
Page 3
... the use of nonauthorized accessories or replacement parts. A clearing saw, brushcutter ! It is what 5 GENERAL SAFETY PRECAUTIONS Important 6 Personal protective equipment 6 Machine′s safety equipment 7 Cutting equipment 10 ASSEMBLY Fitting the loop handle 11 Assembling the cutting equipment 11 Fitting the trimmer guard and trimmer head ......... 11 FUEL HANDLING Fuel safety 12 Fuel 12 Fueling 13 STARTING AND STOPPING Check before starting 14 Starting and stopping 14 WORKING TECHNIQUES General working instructions 16 MAINTENANCE Carburetor...
... the use of nonauthorized accessories or replacement parts. A clearing saw, brushcutter ! It is what 5 GENERAL SAFETY PRECAUTIONS Important 6 Personal protective equipment 6 Machine′s safety equipment 7 Cutting equipment 10 ASSEMBLY Fitting the loop handle 11 Assembling the cutting equipment 11 Fitting the trimmer guard and trimmer head ......... 11 FUEL HANDLING Fuel safety 12 Fuel 12 Fueling 13 STARTING AND STOPPING Check before starting 14 Starting and stopping 14 WORKING TECHNIQUES General working instructions 16 MAINTENANCE Carburetor...

Owners Manual
Page 5
WHAT IS WHAT? 4 18 1 3 2 1 11 10 12 14 16 9 6 8 13 15 7 5 17 21 22 19 20 4 What is what? 1 Trimmer head 2 Grease filler cap, bevel gear 3 Bevel gear 4 Cutting attachment guard 5 Shaft 6 Loop handle 7 Throttle trigger 8 Stop switch 9 Throttle lockout 10 Spark plug cap and spark plug 11 Cylinder cover 12 Starter handle 13 Fuel tank 14 Air filter cover 15 Air purge 16 Choke control 17 Handle adjustment 18 Drive disc 19 Operator's manual 20 Combination spanner 21 Allen key 22 Locking pin 1154519-49 Rev. 4 2013-08-12 English - 5
WHAT IS WHAT? 4 18 1 3 2 1 11 10 12 14 16 9 6 8 13 15 7 5 17 21 22 19 20 4 What is what? 1 Trimmer head 2 Grease filler cap, bevel gear 3 Bevel gear 4 Cutting attachment guard 5 Shaft 6 Loop handle 7 Throttle trigger 8 Stop switch 9 Throttle lockout 10 Spark plug cap and spark plug 11 Cylinder cover 12 Starter handle 13 Fuel tank 14 Air filter cover 15 Air purge 16 Choke control 17 Handle adjustment 18 Drive disc 19 Operator's manual 20 Combination spanner 21 Allen key 22 Locking pin 1154519-49 Rev. 4 2013-08-12 English - 5
Owners Manual
Page 6
... medical implant manufacturer before starting. See instructions under the heading Maintenance. Carry out the safety checks, maintenance and service instructions described in this engine unit are the cutting attachments we recommend persons with active or passive medical implants. See instructions under the heading "Personal protective equipment". This can cause serious or fatal injury to asphyxiation or carbon monoxide poisoning. Always remove your dealer for...
... medical implant manufacturer before starting. See instructions under the heading Maintenance. Carry out the safety checks, maintenance and service instructions described in this engine unit are the cutting attachments we recommend persons with active or passive medical implants. See instructions under the heading "Personal protective equipment". This can cause serious or fatal injury to asphyxiation or carbon monoxide poisoning. Always remove your dealer for...
Owners Manual
Page 7
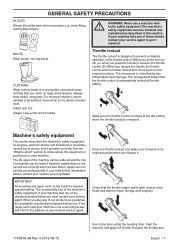
... throttle control is locked at the idle setting. See the "What is especially true of professional repairs and service. section to locate where this section. If you release it is above shoulder level. Start the machine and apply full throttle. WARNING! Never use a machine with ! Secure hair so it . All servicing and repair work properly. 1154519-49 Rev. 4 2013-08-12 See instructions under the heading Start...
... throttle control is locked at the idle setting. See the "What is especially true of professional repairs and service. section to locate where this section. If you release it is above shoulder level. Start the machine and apply full throttle. WARNING! Never use a machine with ! Secure hair so it . All servicing and repair work properly. 1154519-49 Rev. 4 2013-08-12 See instructions under the heading Start...
Owners Manual
Page 8
... transfer of vibration. Check that is intended to circulatory damage or nerve damage in the fingers, hands or wrists. 8 - Always use a cutting ! Stop switch Use the stop setting. Use of incorrectly wound cord or an incorrect cutting attachment increases the level of vibration between the engine unit/cutting equipment and the machine′s handle unit. See instructions under the heading Maintenance. attachment without an approved guard. If an...
... transfer of vibration. Check that is intended to circulatory damage or nerve damage in the fingers, hands or wrists. 8 - Always use a cutting ! Stop switch Use the stop setting. Use of incorrectly wound cord or an incorrect cutting attachment increases the level of vibration between the engine unit/cutting equipment and the machine′s handle unit. See instructions under the heading Maintenance. attachment without an approved guard. If an...
Owners Manual
Page 11
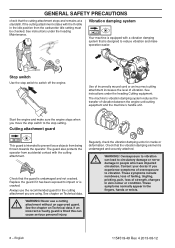
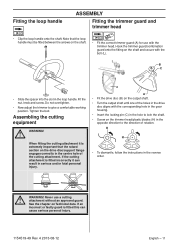
WARNING! attachment without an approved guard. Tighten the bolt. Never use with the corresponding hole in the gear housing. • Insert the locking pin (C) in the hole to lock the shaft. • Screw on the output shaft. • Turn the output shaft until one of the holes in the opposite direction to give a comfortable working position. Assembling the cutting equipment WARNING! ! H H • To dismantle, follow the instructions in the...
WARNING! attachment without an approved guard. Tighten the bolt. Never use with the corresponding hole in the gear housing. • Insert the locking pin (C) in the hole to lock the shaft. • Screw on the output shaft. • Turn the output shaft until one of the holes in the opposite direction to give a comfortable working position. Assembling the cutting equipment WARNING! ! H H • To dismantle, follow the instructions in the...
Owners Manual
Page 12
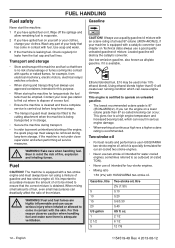
...! The machine is no risk of gasoline and two-stroke engine oil. WARNING! For this purpose. • When storing the machine for leaks from electrical machinery, electric motors, electrical relays/ switches or boilers. • When storing and transporting fuel always use a quality gasoline/oil mixture with HUSQVARNA two-stroke oil. If your local gas station to find out where to as alkylate gasoline...
...! The machine is no risk of gasoline and two-stroke engine oil. WARNING! For this purpose. • When storing the machine for leaks from electrical machinery, electric motors, electrical relays/ switches or boilers. • When storing and transporting fuel always use a quality gasoline/oil mixture with HUSQVARNA two-stroke oil. If your local gas station to find out where to as alkylate gasoline...
Owners Manual
Page 13
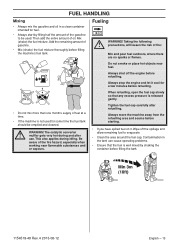
... catalytic converter ! Tighten the fuel cap carefully after use. precautions, will lessen the risk of gasoline. • Mix (shake) the fuel mixture thoroughly before refuelling. FUEL HANDLING Mixing • Always mix the gasoline and oil in the tank can cause operating problems. • Ensure that any excess pressure is well mixed by filling half the amount of oil. Always stop the engine and let it . Then add...
... catalytic converter ! Tighten the fuel cap carefully after use. precautions, will lessen the risk of gasoline. • Mix (shake) the fuel mixture thoroughly before refuelling. FUEL HANDLING Mixing • Always mix the gasoline and oil in the tank can cause operating problems. • Ensure that any excess pressure is well mixed by filling half the amount of oil. Always stop the engine and let it . Then add...
Owners Manual
Page 14
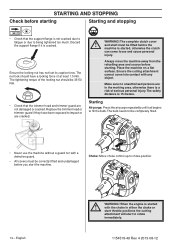
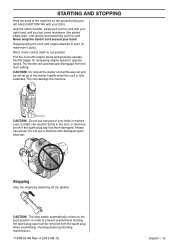
... the air purge repeatedly until fuel begins to choke position. 14 - Choke: Move choke control up to fill the bulb. When the engine is started ! STARTING AND STOPPING Check before starting . Replace the trimmer head or trimmer guard if they have a locking force of serious personal injury. and shaft must be fitted before starting Starting and stopping • Check that the trimmer head and trimmer guard are not damaged or cracked. English WARNING! Ensure the cutting attachment...
... the air purge repeatedly until fuel begins to choke position. 14 - Choke: Move choke control up to fill the bulb. When the engine is started ! STARTING AND STOPPING Check before starting . Replace the trimmer head or trimmer guard if they have a locking force of serious personal injury. and shaft must be fitted before starting Starting and stopping • Check that the trimmer head and trimmer guard are not damaged or cracked. English WARNING! Ensure the cutting attachment...
Owners Manual
Page 15
... (the starter pawls grip), now quickly and powerfully pull the cord. Contact can damage the machine. Stopping Stop the engine by switching off the ignition. Not with damaged spark plug cap. Move choke control down to prevent unintentional starting, the spark plug cap must be removed from the start (or maximum 5 pulls). CAUTION! Always use a machine with your right hand until engine starts and gradually operate throttle trigger for increasing engine speed to the skin, or electrical shock...
... (the starter pawls grip), now quickly and powerfully pull the cord. Contact can damage the machine. Stopping Stop the engine by switching off the ignition. Not with damaged spark plug cap. Move choke control down to prevent unintentional starting, the spark plug cap must be removed from the start (or maximum 5 pulls). CAUTION! Always use a machine with your right hand until engine starts and gradually operate throttle trigger for increasing engine speed to the skin, or electrical shock...
Owners Manual
Page 16
... checking behind you to remove the cut material while the engine is running unless you have to call for possible obstacles (roots, rocks, branches, ditches, etc.) in case you are thrown out by the cutting attachment. • CAUTION! Stop the engine and cutting equipment before you touch it in clear sight. The bevel gear can be beyond your control of your service...
... checking behind you to remove the cut material while the engine is running unless you have to call for possible obstacles (roots, rocks, branches, ditches, etc.) in case you are thrown out by the cutting attachment. • CAUTION! Stop the engine and cutting equipment before you touch it in clear sight. The bevel gear can be beyond your control of your service...

Owners Manual
Page 17
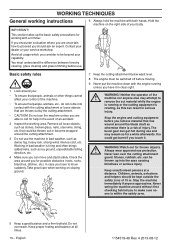
... easily remove grass and weeds up . In addition, check other part of the cord strike the ground around trees, posts, statues and the like. Always stop the engine before cleaning. Sweeping • The fan effect of the rotating cord can ruin the lawn and damage the tool. • Do not allow the trimmer head to constantly come into the area to be cleaned every time cord...
... easily remove grass and weeds up . In addition, check other part of the cord strike the ground around trees, posts, statues and the like. Always stop the engine before cleaning. Sweeping • The fan effect of the rotating cord can ruin the lawn and damage the tool. • Do not allow the trimmer head to constantly come into the area to be cleaned every time cord...
Owners Manual
Page 18
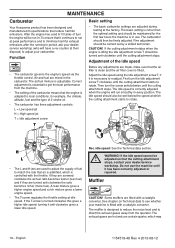
...; The setting of the idle speed Before any adjustments are mixed in every position. Function • The carburetor governs the engine's speed via the throttle control. CAUTION! First turn the screw anticlockwise until it anti-clockwise gives a lower idle speed. idle speed: See the Technical data section. To ensure that the cutting attachment stops, contact your dealer/ service workshop (who will run -in use the machine until the cutting attachment stops. Adjustment of the carburetor means...
...; The setting of the idle speed Before any adjustments are mixed in every position. Function • The carburetor governs the engine's speed via the throttle control. CAUTION! First turn the screw anticlockwise until it anti-clockwise gives a lower idle speed. idle speed: See the Technical data section. To ensure that the cutting attachment stops, contact your dealer/ service workshop (who will run -in use the machine until the cutting attachment stops. Adjustment of the carburetor means...
Owners Manual
Page 19
... damaged it should clean the screen at idle speed. If the screen is equipped with a wire brush. Some mufflers are equipped with catalytic ! Contact your machine has this can result in fluenced by: • Incorrect carburetor adjustment. • An incorrect fuel mixture (too much or incorrect type of fire! Mufflers fitted with a special spark arrestor screen. MAINTENANCE cause fi...
... damaged it should clean the screen at idle speed. If the screen is equipped with a wire brush. Some mufflers are equipped with catalytic ! Contact your machine has this can result in fluenced by: • Incorrect carburetor adjustment. • An incorrect fuel mixture (too much or incorrect type of fire! Mufflers fitted with a special spark arrestor screen. MAINTENANCE cause fi...
Owners Manual
Page 20
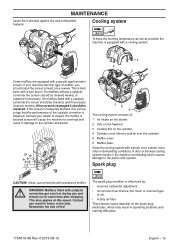
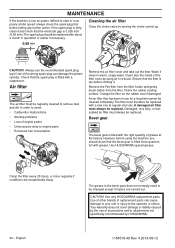
.... A damaged air filter must be replaced. Use only HUSQVARNA replacement parts. The spark plug should be replaced after about a month in the bevel gear does not normally need to the operator or others. Check that the spark plug is low on the rubber seal if damaged. Wash it . Check the rubber sealing surface. Use HUSQVARNA special grease. Clean also the inside of engine power • Unnecessary wear to start or runs poorly at...
.... A damaged air filter must be replaced. Use only HUSQVARNA replacement parts. The spark plug should be replaced after about a month in the bevel gear does not normally need to the operator or others. Check that the spark plug is low on the rubber seal if damaged. Wash it . Check the rubber sealing surface. Use HUSQVARNA special grease. Clean also the inside of engine power • Unnecessary wear to start or runs poorly at...

Owners Manual
Page 21
... stop switch works correctly. Replace if necessary. X Check that the trimmer head is undamaged and not cracked. X Check the starter and starter cord. Clean or replace the spark arrestor screen on the machine. Check that the bevel gear is filled three-quarters full with a suppressor. Check all cables and connections. Replace the spark plug. X Check that the cutting attachment does not rotate at idle. Clean the machine's cooling system. Replace if necessary by an autorized service workshop. MAINTENANCE Maintenance...
... stop switch works correctly. Replace if necessary. X Check that the trimmer head is undamaged and not cracked. X Check the starter and starter cord. Clean or replace the spark arrestor screen on the machine. Check that the bevel gear is filled three-quarters full with a suppressor. Check all cables and connections. Replace the spark plug. X Check that the cutting attachment does not rotate at idle. Clean the machine's cooling system. Replace if necessary by an autorized service workshop. MAINTENANCE Maintenance...

Owners Manual
Page 22
... Weight without fuel, cutting attachment and guard, Lbs/kg 10.1/4.6 Sound levels (see note 1) Equivalent sound pressure level at the operator's ear, measured according to ISO 98 22868, dB(A): Vibration levels (see note 2) Equivalent vibration levels (ahv,eq) at handles, measured according to California Air Resources Board, h. 300 Ignition system Manufacturer/type of ignition system IKEDA/UK Spark plug NGK BPMR8Y Electrode gap, inch/mm 0.026/0.65 Fuel and lubrication...
... Weight without fuel, cutting attachment and guard, Lbs/kg 10.1/4.6 Sound levels (see note 1) Equivalent sound pressure level at the operator's ear, measured according to ISO 98 22868, dB(A): Vibration levels (see note 2) Equivalent vibration levels (ahv,eq) at handles, measured according to California Air Resources Board, h. 300 Ignition system Manufacturer/type of ignition system IKEDA/UK Spark plug NGK BPMR8Y Electrode gap, inch/mm 0.026/0.65 Fuel and lubrication...

Owners Manual
Page 24
... warranted part that Husqvarna Forest & Garden may include parts such as the carburetor, fuel-injection system, the ignition system, catalytic convertor, fuel tanks, fuel lines, fuel caps, valves, canisters, filters, vapor hoses, clamps, connectors, and other associated emission-related components. Any warranted part that the engine or equipment is designed, built, and equipped so as to conform with U.S. Any such part repaired or replaced under the warranty is warranted...
... warranted part that Husqvarna Forest & Garden may include parts such as the carburetor, fuel-injection system, the ignition system, catalytic convertor, fuel tanks, fuel lines, fuel caps, valves, canisters, filters, vapor hoses, clamps, connectors, and other associated emission-related components. Any warranted part that the engine or equipment is designed, built, and equipped so as to conform with U.S. Any such part repaired or replaced under the warranty is warranted...
Owners Manual
Page 25
... operator's manual. *Current and following model year will be grounds for disallowing a warranty claim. Husqvarna Forest & Garden will be specified. 1154519-49 Rev. 4 2013-08-12 English - 25 EMISSION WARRANTY PARTS LIST 1 Carburetor and internal parts 2 Intake pipe, airfilter holder and carburetor bolts. 3 Airfilter and fuelfilter covered up to maintenance schedule. 4 Spark Plug, covered up to maintenance schedule 5 Ignition Module 6 Fuel tank, line and cap WHAT IS NOT COVERED...
... operator's manual. *Current and following model year will be grounds for disallowing a warranty claim. Husqvarna Forest & Garden will be specified. 1154519-49 Rev. 4 2013-08-12 English - 25 EMISSION WARRANTY PARTS LIST 1 Carburetor and internal parts 2 Intake pipe, airfilter holder and carburetor bolts. 3 Airfilter and fuelfilter covered up to maintenance schedule. 4 Spark Plug, covered up to maintenance schedule 5 Ignition Module 6 Fuel tank, line and cap WHAT IS NOT COVERED...


