

Owners Manual
Page 2
... for certain markets. The operator of the machine must always be removed from the machine. 15 m 50FT 15 m 50FT Arrows which show limits for trimmer heads. Always keep people and animals at least 15 metres from the spark plug when assembling, checking and/or performing maintenance. Always wear approved protective gloves... you understand the instructions before using the machine. Always wear approved protective gloves. Only use can be thrown violently to the operator or others. trimmer heads with a fixed object.
... for certain markets. The operator of the machine must always be removed from the machine. 15 m 50FT 15 m 50FT Arrows which show limits for trimmer heads. Always keep people and animals at least 15 metres from the spark plug when assembling, checking and/or performing maintenance. Always wear approved protective gloves... you understand the instructions before using the machine. Always wear approved protective gloves. Only use can be thrown violently to the operator or others. trimmer heads with a fixed object.
Owners Manual
Page 3
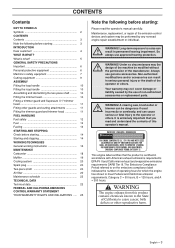
... loop handle 10 Assembling and dismantling the two-piece shaft ......... 10 Fitting the trimmer head 10 Fitting a trimmer guard and Superauto II 1" trimmer head 11 Fitting other guards and cutting attachments 11 Fitting the trimmer guard and trimmer head 11 FUEL HANDLING Fuel safety 12 Fuel 12 Fueling 13 STARTING AND STOPPING Check...
... loop handle 10 Assembling and dismantling the two-piece shaft ......... 10 Fitting the trimmer head 10 Fitting a trimmer guard and Superauto II 1" trimmer head 11 Fitting other guards and cutting attachments 11 Fitting the trimmer guard and trimmer head 11 FUEL HANDLING Fuel safety 12 Fuel 12 Fueling 13 STARTING AND STOPPING Check...

Owners Manual
Page 5
What is what? 1 Trimmer head 2 Grease filler cap, bevel gear 3 Bevel gear 4 Cutting attachment guard 5 Shaft 6 Loop handle 7 Throttle control 8 Stop switch 9 Throttle lockout 10 Cylinder cover 11 Starter handle 12 Fuel tank 13 Choke control 14 Air purge 15 Air filter cover 16 Handle adjustment 17 Shaft coupling 18 Operator's manual 19 Drive disc 20 Socket spanner 21 Locking pin 22 Allen key 23 Spark plug cap and spark plug English - 5 WHAT IS WHAT?
What is what? 1 Trimmer head 2 Grease filler cap, bevel gear 3 Bevel gear 4 Cutting attachment guard 5 Shaft 6 Loop handle 7 Throttle control 8 Stop switch 9 Throttle lockout 10 Cylinder cover 11 Starter handle 12 Fuel tank 13 Choke control 14 Air purge 15 Air filter cover 16 Handle adjustment 17 Shaft coupling 18 Operator's manual 19 Drive disc 20 Socket spanner 21 Locking pin 22 Allen key 23 Spark plug cap and spark plug English - 5 WHAT IS WHAT?
Owners Manual
Page 6
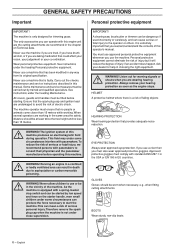
See instructions under the heading Maintenance. The machine operator must use approved personal protective equipment whenever you use a visor then you use the machine. When several operators are tired, if ... operating this manual. The machine is faulty. Never use a machine that could affect your vision, your judgement or your co-ordination. See instructions under the heading Personal protective equipment. Therefore remove the spark plug cap when the machine is extremely important that you are undamaged to the operator or others. GLOVES...
See instructions under the heading Maintenance. The machine operator must use approved personal protective equipment whenever you use a visor then you use the machine. When several operators are tired, if ... operating this manual. The machine is faulty. Never use a machine that could affect your vision, your judgement or your co-ordination. See instructions under the heading Personal protective equipment. Therefore remove the spark plug cap when the machine is extremely important that you are undamaged to the operator or others. GLOVES...
Owners Manual
Page 7
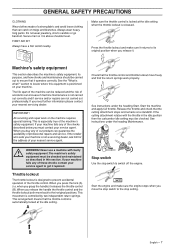
...increase if machine maintenance is not a servicing dealer, ask him for the address of your nearest service agent. See instructions under the heading Start. Stop switch Use the stop switch to locate where this section. If the retailer who sells your nearest servicing dealer. WARNING... cutting attachment stops and remains at the idle setting. This movement is especially true of the throttle control. See instructions under the heading Maintenance. Start the machine and apply full throttle. Release the throttle and check that it . If the cutting attachment rotates with ...
...increase if machine maintenance is not a servicing dealer, ask him for the address of your nearest service agent. See instructions under the heading Start. Stop switch Use the stop switch to locate where this section. If the retailer who sells your nearest servicing dealer. WARNING... cutting attachment stops and remains at the idle setting. This movement is especially true of the throttle control. See instructions under the heading Maintenance. Start the machine and apply full throttle. Release the throttle and check that it . If the cutting attachment rotates with ...

Owners Manual
Page 8
... Technical data. lead to reduce vibration and make operation easier. Never use a cutting attachment ! Your machine is equipped with this can ! See instructions under the heading Cutting equipment. GENERAL SAFETY PRECAUTIONS Cutting attachment guard This guard is intended to direct exhaust fumes away from the user. Vibration damping system Regularly check...
... Technical data. lead to reduce vibration and make operation easier. Never use a cutting attachment ! Your machine is equipped with this can ! See instructions under the heading Cutting equipment. GENERAL SAFETY PRECAUTIONS Cutting attachment guard This guard is intended to direct exhaust fumes away from the user. Vibration damping system Regularly check...
Owners Manual
Page 9
... of the muffler contain ! Ensure that it has been put on approx. 10 times. • Smaller machines generally require small trimmer heads and vice versa. A longer cord requires greater engine power than a shorter cord of the same diameter. • Make sure that : !...CAUTION! Refer to the skin. doing any work on Technical data. WARNING! A faulty cutting attachment may lead to overheat and may ! Trimmer head IMPORTANT! Always ensure the trimmer cord is because when clearing using the socket spanner. 35-50 Nm (3.55 kpm). This is especially important when...
... of the muffler contain ! Ensure that it has been put on approx. 10 times. • Smaller machines generally require small trimmer heads and vice versa. A longer cord requires greater engine power than a shorter cord of the same diameter. • Make sure that : !...CAUTION! Refer to the skin. doing any work on Technical data. WARNING! A faulty cutting attachment may lead to overheat and may ! Trimmer head IMPORTANT! Always ensure the trimmer cord is because when clearing using the socket spanner. 35-50 Nm (3.55 kpm). This is especially important when...
Owners Manual
Page 10
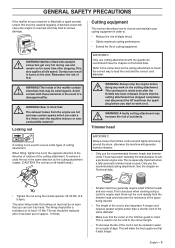
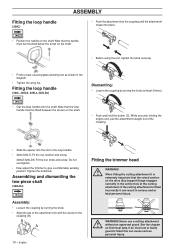
... into the coupling until the attachment snaps into the slot in the loop handle. • 326L/326LS: Fit the nut, washer and screw. 326LX/326LDX: Fit the nut, knob and screw. Fitting the loop handle (326L, 326LS, 326Lx, 326LDx) Dismantling: • Loosen the coupling by turning the knob. • ...; Fit the screw, securing plate and wing nut as shown in the diagram. • Tighten the wing nut. English C Fitting the trimmer head WARNING! ! If an incorrect or faulty guard is fitted incorrectly it is extremely important that the handle must be mounted below the arrow ...
... into the coupling until the attachment snaps into the slot in the loop handle. • 326L/326LS: Fit the nut, washer and screw. 326LX/326LDX: Fit the nut, knob and screw. Fitting the loop handle (326L, 326LS, 326Lx, 326LDx) Dismantling: • Loosen the coupling by turning the knob. • ...; Fit the screw, securing plate and wing nut as shown in the diagram. • Tighten the wing nut. English C Fitting the trimmer head WARNING! ! If an incorrect or faulty guard is fitted incorrectly it is extremely important that the handle must be mounted below the arrow ...
Owners Manual
Page 11
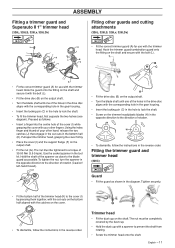
...8226; Place the cover (I ) while grasping the cover with your other guards and cutting attachments (326L, 326LS, 326Lx, 326LDx) L K • Fit the correct trimmer guard (A) for use with the trimmer head. To tighten the nut, turn the spanner in the reverse order. Tighten securely. • Fit...the fitting on the shaft. Use the socket spanner in the diagram. ASSEMBLY Fitting a trimmer guard and Superauto II 1" trimmer head (326L, 326LS, 326Lx, 326LDx) Fitting other hand, release the two catches (J) that engage in the cut -outs on the bottom half aligned with...
...8226; Place the cover (I ) while grasping the cover with your other guards and cutting attachments (326L, 326LS, 326Lx, 326LDx) L K • Fit the correct trimmer guard (A) for use with the trimmer head. To tighten the nut, turn the spanner in the reverse order. Tighten securely. • Fit...the fitting on the shaft. Use the socket spanner in the diagram. ASSEMBLY Fitting a trimmer guard and Superauto II 1" trimmer head (326L, 326LS, 326Lx, 326LDx) Fitting other hand, release the two catches (J) that engage in the cut -outs on the bottom half aligned with...
Owners Manual
Page 14
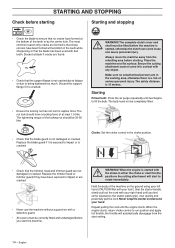
... the refuelling area before starting Starting and stopping • Check the blade to ensure that no unauthorised persons are found. • Check that the trimmer head and trimmer guard are cracked. • Never use the machine without a guard nor with dull teeth. Replace the trimmer... head or trimmer guard if they have formed at least 1.5 Nm. WARNING! When the engine is 15 metres. Grip the starter handle, slowly pull out the ...
... the refuelling area before starting Starting and stopping • Check the blade to ensure that no unauthorised persons are found. • Check that the trimmer head and trimmer guard are cracked. • Never use the machine without a guard nor with dull teeth. Replace the trimmer... head or trimmer guard if they have formed at least 1.5 Nm. WARNING! When the engine is 15 metres. Grip the starter handle, slowly pull out the ...
Owners Manual
Page 17
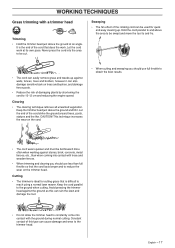
... the ground as this type can cause damage and wear to 10-12 cm and reducing the engine speed. English - 17 Avoid pressing the trimmer head against stones, brick, concrete, metal fences, etc., than full throttle so that the cord lasts longer and to reduce the wear on trees and bushes..., and damage fence posts. • Reduce the risk of damaging plants by shortening the cord to the trimmer head. It is difficult to constantly come into contact with trees and wooden fences. • When trimming and clearing you should use full throttle...
... the ground as this type can cause damage and wear to 10-12 cm and reducing the engine speed. English - 17 Avoid pressing the trimmer head against stones, brick, concrete, metal fences, etc., than full throttle so that the cord lasts longer and to reduce the wear on trees and bushes..., and damage fence posts. • Reduce the risk of damaging plants by shortening the cord to the trimmer head. It is difficult to constantly come into contact with trees and wooden fences. • When trimming and clearing you should use full throttle...
Owners Manual
Page 20
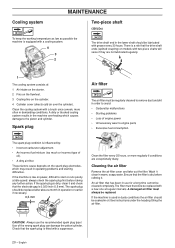
... be replaced. English Clean the filter every 25 hours, or more often in operating problems and starting difficulties. See instructions under the heading Oiling the air filter. Check that the spark plug is a risk that has been in use the recommended spark plug type! A dirty or blocked...
... be replaced. English Clean the filter every 25 hours, or more often in operating problems and starting difficulties. See instructions under the heading Oiling the air filter. Check that the spark plug is a risk that has been in use the recommended spark plug type! A dirty or blocked...

Owners Manual
Page 22
... Clean the outside of cylinder from the engine, tank or fuel lines. Fill if necessary using special grease. Replace the trimmer head if necessary. Replace the spark plug. X Check that the vibration damping elements are described in the Maintenance section. Clean the ...outside of the maintenance that the trimmer head is tighten correctly. Maintenance Daily maintenance Clean the outside of the items are not damaged. X Clean the air filter. Check...
... Clean the outside of cylinder from the engine, tank or fuel lines. Fill if necessary using special grease. Replace the trimmer head if necessary. Replace the spark plug. X Check that the vibration damping elements are described in the Maintenance section. Clean the ...outside of the maintenance that the trimmer head is tighten correctly. Maintenance Daily maintenance Clean the outside of the items are not damaged. X Clean the air filter. Check...

Owners Manual
Page 24
...have been evaluated by Underwriters Laboratories Inc. (UL) and are recommended for the Husqvarna 125LD trimmer, but can also be used in combination with the specified power heads and have been evaluated to applicable ISO- Powerhead model 326C Accessories Blade shaft thread... 3/8 R Plastic blades Trimmer head Arbor shaft thread M10 Plastic blades 326L, 326LS, 326Lx, 326LDx Trimmer head 326LDx Shaft Type Tricut Ø 230 mm (R) Trimmy Hit Junior (R) Trimmy Fix (R) Trimmy Hit VII (R) T25 (R) ...
...have been evaluated by Underwriters Laboratories Inc. (UL) and are recommended for the Husqvarna 125LD trimmer, but can also be used in combination with the specified power heads and have been evaluated to applicable ISO- Powerhead model 326C Accessories Blade shaft thread... 3/8 R Plastic blades Trimmer head Arbor shaft thread M10 Plastic blades 326L, 326LS, 326Lx, 326LDx Trimmer head 326LDx Shaft Type Tricut Ø 230 mm (R) Trimmy Hit Junior (R) Trimmy Fix (R) Trimmy Hit VII (R) T25 (R) ...


