
Owners Manual
Page 2
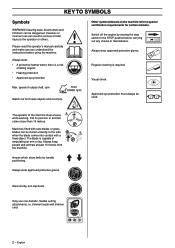
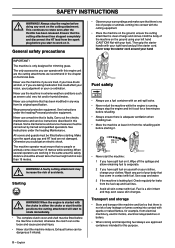
... fitted with trimmer cord. 2 - trimmer heads with saw blades or grass blades can be used. Clearing saws, brushcutters and trimmers can result in serious or fatal injury to the STOP position before using the machine. Switch off the engine by moving the stop switch to the operator or others. Regular cleaning is capable of falling objects • Hearing protection • Approved eye protection Max. speed of the machine...
... fitted with trimmer cord. 2 - trimmer heads with saw blades or grass blades can be used. Clearing saws, brushcutters and trimmers can result in serious or fatal injury to the STOP position before using the machine. Switch off the engine by moving the stop switch to the operator or others. Regular cleaning is capable of falling objects • Hearing protection • Approved eye protection Max. speed of the machine...
Owners Manual
Page 3
... loop handle 12 Assembling and dismantling the two-piece shaft ......... 12 Fitting the trimmer head 13 Fitting other guards and cutting attachments 13 FUEL HANDLING Fuel 14 STARTING AND STOPPING Check before starting 15 Starting and stopping 15 MAINTENANCE Carburetor 17 Muffler 17 Cooling system 17 Spark plug 18 Two-piece shaft 18 Air filter 18 Maintenance schedule 19 TECHNICAL DATA Technical data 20 FEDERAL EMISSION CONTROL WARRANTY STATEMENT YOUR WARRANTY RIGHTS...
... loop handle 12 Assembling and dismantling the two-piece shaft ......... 12 Fitting the trimmer head 13 Fitting other guards and cutting attachments 13 FUEL HANDLING Fuel 14 STARTING AND STOPPING Check before starting 15 Starting and stopping 15 MAINTENANCE Carburetor 17 Muffler 17 Cooling system 17 Spark plug 18 Two-piece shaft 18 Air filter 18 Maintenance schedule 19 TECHNICAL DATA Technical data 20 FEDERAL EMISSION CONTROL WARRANTY STATEMENT YOUR WARRANTY RIGHTS...
Owners Manual
Page 4
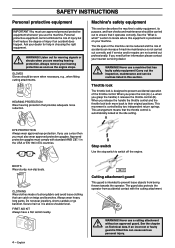
... comply with the cutting attachment. BOOTS Wear sturdy, non-slip boots. Always remove your dealer for warning signals or ! WARNING! Throttle lock The throttle lock is not carried out correctly and if service and/or repairs are wearing hearing protection. This movement is automatically locked at the idle setting. EYE PROTECTION Always wear approved eye protection. Stop switch Use the stop switch to ensure that...
... comply with the cutting attachment. BOOTS Wear sturdy, non-slip boots. Always remove your dealer for warning signals or ! WARNING! Throttle lock The throttle lock is not carried out correctly and if service and/or repairs are wearing hearing protection. This movement is automatically locked at the idle setting. EYE PROTECTION Always wear approved eye protection. Stop switch Use the stop switch to ensure that...
Owners Manual
Page 5
.... For this kind of cutting attachment. The exhaust fumes from the user. Bear in people who have a warm and dry climate there is intended for some types of mesh. Locking nut A locking nut is designed to keep noise levels to a minimum and to vibration. Check whether the muffler on checking, maintaining and servicing your doctor if you should not start the machine...
.... For this kind of cutting attachment. The exhaust fumes from the user. Bear in people who have a warm and dry climate there is intended for some types of mesh. Locking nut A locking nut is designed to keep noise levels to a minimum and to vibration. Check whether the muffler on checking, maintaining and servicing your doctor if you should not start the machine...

Owners Manual
Page 6
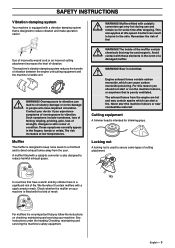
... locked at a standstill. See instructions under the heading Start. Muffler • Never use the recommended guard for the address of the machine′s safety equipment. Vibration damping system • Check that the throttle control and throttle lock move the stop switch to impact or is undamaged and securely attached. When you are using. If the retailer who sells your machine is not a servicing...
... locked at a standstill. See instructions under the heading Start. Muffler • Never use the recommended guard for the address of the machine′s safety equipment. Vibration damping system • Check that the throttle control and throttle lock move the stop switch to impact or is undamaged and securely attached. When you are using. If the retailer who sells your machine is not a servicing...

Owners Manual
Page 7
... nylon lining inside the locking nut must be checked and maintained as described in the same direction as the cutting attachment rotates. (CAUTION! Only use a muffler with a spark arrestor mesh, this section. Always ensure the trimmer cord is used . The nut should be replaced after it , undo the nut in this should be cleaned regularly. This is especially important when a fully automatic trimmer head is equipped...
... nylon lining inside the locking nut must be checked and maintained as described in the same direction as the cutting attachment rotates. (CAUTION! Only use a muffler with a spark arrestor mesh, this section. Always ensure the trimmer cord is used . The nut should be replaced after it , undo the nut in this should be cleaned regularly. This is especially important when a fully automatic trimmer head is equipped...
Owners Manual
Page 8
... covers and guards must be fitted before starting . Check regularly for trimming grass. Starting WARNING! Never use a machine that has come in any work on the cutting attachment. Make sure the spark plug cap and HT lead are tired, if you have spilt fuel on it . • Never start the machine indoors. Never wrap the starter cord around your body that is running. SAFETY INSTRUCTIONS WARNING! Never use...
... covers and guards must be fitted before starting . Check regularly for trimming grass. Starting WARNING! Never use a machine that has come in any work on the cutting attachment. Make sure the spark plug cap and HT lead are tired, if you have spilt fuel on it . • Never start the machine indoors. Never wrap the starter cord around your body that is running. SAFETY INSTRUCTIONS WARNING! Never use...

Owners Manual
Page 9
... care when handling fuel. ! If you encounter a situation where you are able to move and stand safely. WARNING! Never press the cord into contact with clearing saws and trimmers. This technique increases the wear on the cord. 4 Switch off the engine before carrying or transporting the equipment any load on sloping ground. • The cord can easily remove grass and weeds up...
... care when handling fuel. ! If you encounter a situation where you are able to move and stand safely. WARNING! Never press the cord into contact with clearing saws and trimmers. This technique increases the wear on the cord. 4 Switch off the engine before carrying or transporting the equipment any load on sloping ground. • The cord can easily remove grass and weeds up...

Owners Manual
Page 10
... trimmer head against the ground as this can ruin the lawn and damage the tool. • Do not allow the trimmer head to the ground when cutting. Constant contact of the ! WARNING! Never lean over the cutting attachment guard. Keep unauthorised persons at a distance. Stop the machine immediately if anyone else may remain so for cutting grass that has wound around the blade shaft...
... trimmer head against the ground as this can ruin the lawn and damage the tool. • Do not allow the trimmer head to the ground when cutting. Constant contact of the ! WARNING! Never lean over the cutting attachment guard. Keep unauthorised persons at a distance. Stop the machine immediately if anyone else may remain so for cutting grass that has wound around the blade shaft...

Owners Manual
Page 11
LDX What is what? 1 Trimmer head 2 Bevel gear 3 Grease filler cap, bevel gear 4 Cutting attachment guard 5 Shaft 6 Loop handle 7 Stop switch 8 Throttle control 9 Throttle lock 10 Cylinder cover 11 Starter handle 12 Air purge 13 Fuel tank 14 Choke control 15 Air filter cover 16 Handle adjustment 17 Drive disc 18 Allen key 19 Locking pin 20 Shaft coupling 21 Operator's manual English - 11 WHAT IS WHAT?
LDX What is what? 1 Trimmer head 2 Bevel gear 3 Grease filler cap, bevel gear 4 Cutting attachment guard 5 Shaft 6 Loop handle 7 Stop switch 8 Throttle control 9 Throttle lock 10 Cylinder cover 11 Starter handle 12 Air purge 13 Fuel tank 14 Choke control 15 Air filter cover 16 Handle adjustment 17 Drive disc 18 Allen key 19 Locking pin 20 Shaft coupling 21 Operator's manual English - 11 WHAT IS WHAT?
Owners Manual
Page 12
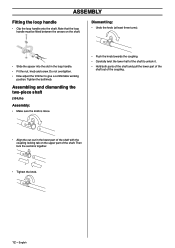
... shaft with the coupling locking tab on the shaft. Then lock the sections together. • Tighten the knob. 12 - Dismantling: • Undo the knob (at least three turns). • Slide the spacer into the slot in the lower part of the coupling. • Align the cut-out in the loop handle. • Fit the nut, knob and screw. Tighten the bolt/knob. ASSEMBLY Fitting the loop handle...
... shaft with the coupling locking tab on the shaft. Then lock the sections together. • Tighten the knob. 12 - Dismantling: • Undo the knob (at least three turns). • Slide the spacer into the slot in the lower part of the coupling. • Align the cut-out in the loop handle. • Fit the nut, knob and screw. Tighten the bolt/knob. ASSEMBLY Fitting the loop handle...

Owners Manual
Page 13
... the output shaft. • Turn the blade shaft until one of rotation (Caution! Hook the guard onto the fitting on the shaft and secure it with the corresponding hole in the gear housing. • Insert the locking pin (C) in the hole to lock the shaft. • Screw on the cover. • To dismantle, follow the instructions in the drive disc aligns with the bolt (L). • Fit...
... the output shaft. • Turn the blade shaft until one of rotation (Caution! Hook the guard onto the fitting on the shaft and secure it with the corresponding hole in the gear housing. • Insert the locking pin (C) in the hole to lock the shaft. • Screw on the cover. • To dismantle, follow the instructions in the drive disc aligns with the bolt (L). • Fit...
Owners Manual
Page 14
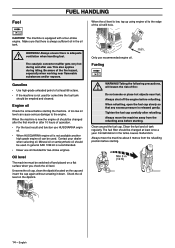
... semisynthetic oil should be used . Fueling WARNING! Clean around the fuel cap. Clean the fuel and oil tank regularly. CAUTION! This also applies during and after refuelling. Engine oil Check the oil level before starting. Unscrew the oil cap, clean the dipstick located on the dipstick. Tighten the fuel cap carefully after use oil intended for some time the fuel tank should be emptied and cleaned. The fuel filter should be switched off the engine before starting the machine. Fuel FUEL HANDLING When the oil level...
... semisynthetic oil should be used . Fueling WARNING! Clean around the fuel cap. Clean the fuel and oil tank regularly. CAUTION! This also applies during and after refuelling. Engine oil Check the oil level before starting. Unscrew the oil cap, clean the dipstick located on the dipstick. Tighten the fuel cap carefully after use oil intended for some time the fuel tank should be emptied and cleaned. The fuel filter should be switched off the engine before starting the machine. Fuel FUEL HANDLING When the oil level...
Owners Manual
Page 15
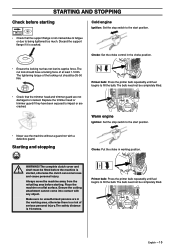
... fatigue or due to the start position. • Never use the machine without a guard nor with any object. shaft must be completely filled. OIL Warm engine Ignition: Set the stop switch to being tightened too much. The bulb need not be fitted before starting Cold engine Ignition: Set the stop switch to the start position. • Check that the trimmer head and trimmer guard are cracked. Choke: Set the choke control in working area, otherwise there...
... fatigue or due to the start position. • Never use the machine without a guard nor with any object. shaft must be completely filled. OIL Warm engine Ignition: Set the stop switch to being tightened too much. The bulb need not be fitted before starting Cold engine Ignition: Set the stop switch to the start position. • Check that the trimmer head and trimmer guard are cracked. Choke: Set the choke control in working area, otherwise there...

Owners Manual
Page 16
... of the machine on the ground using your hand Reset the choke when the engine fires, repeat pulling the cord until you feel some resistance (the starter pawls grip), now quickly and powerfully pull the cord. English the choke in either the choke or start throttle positions the cutting attachment will start to rotate immediately. Grip the starter handle, slowly pull out the cord with your right hand until the...
... of the machine on the ground using your hand Reset the choke when the engine fires, repeat pulling the cord until you feel some resistance (the starter pawls grip), now quickly and powerfully pull the cord. English the choke in either the choke or start throttle positions the cutting attachment will start to rotate immediately. Grip the starter handle, slowly pull out the cord with your right hand until the...
Owners Manual
Page 17
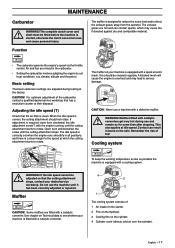
... a cooling system. Air and fuel are fitted with the engine running, until it has been correctly adjusted or repaired. Some mufflers are mixed in all positions, and there is designed to reduce the noise level and to suit local conditions, e.g. shaft must be ! CAUTION! MAINTENANCE Carburetor WARNING! adjusted so that the cutting attachment stops, contact your machine is started, otherwise the clutch can result...
... a cooling system. Air and fuel are fitted with the engine running, until it has been correctly adjusted or repaired. Some mufflers are mixed in all positions, and there is designed to reduce the noise level and to suit local conditions, e.g. shaft must be ! CAUTION! MAINTENANCE Carburetor WARNING! adjusted so that the cutting attachment stops, contact your machine is started, otherwise the clutch can result...
Owners Manual
Page 18
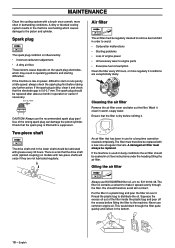
... air filter Always use the recommended spark plug type! The spark plug should be replaced with grease every 30 hours. Knead the plastic bag to start or runs poorly at regular intervals. English Clean the filter every 25 hours, or more often in oil. You should be replaced. If the machine is used in fluenced by: • Incorrect carburetor adjustment. • A dirty air filter. Check...
... air filter Always use the recommended spark plug type! The spark plug should be replaced with grease every 30 hours. Knead the plastic bag to start or runs poorly at regular intervals. English Clean the filter every 25 hours, or more often in oil. You should be replaced. If the machine is used in fluenced by: • Incorrect carburetor adjustment. • A dirty air filter. Check...
Owners Manual
Page 19
...; Check that the bevel gear is filled with grease. The grease in fuel tank. • Check electrical wires and connections. • Replace the spark plug. Your warranty does not cover damage or liability caused by the use of the carburettor and the space around it and check the electrode gap. English - 19 Use HUSQVARNA special grease. Replace the blade guard if it is exposed to be changed except if repairs are tight. Remove it . • Check fuel...
...; Check that the bevel gear is filled with grease. The grease in fuel tank. • Check electrical wires and connections. • Replace the spark plug. Your warranty does not cover damage or liability caused by the use of the carburettor and the space around it and check the electrode gap. English - 19 Use HUSQVARNA special grease. Replace the blade guard if it is exposed to be changed except if repairs are tight. Remove it . • Check fuel...

Owners Manual
Page 20
... Speed of carburetor Walbro Fuel tank capacity, US pint/litre 1,06/0,5 Weight Weight without fuel, cutting attachment and guard, Lbs/kg 11,2/5,1 Sound levels (see note 1) Equivalent sound pressure level at the user′s ear, measured according to ANSI B175.3-1997, dB(A), min/max: 90/97 Vibration levels Vibration levels at the user's ear and vibration on the handles are measured with the following time distribution: 1/2 idle and 1/2 max. engine...
... Speed of carburetor Walbro Fuel tank capacity, US pint/litre 1,06/0,5 Weight Weight without fuel, cutting attachment and guard, Lbs/kg 11,2/5,1 Sound levels (see note 1) Equivalent sound pressure level at the user′s ear, measured according to ANSI B175.3-1997, dB(A), min/max: 90/97 Vibration levels Vibration levels at the user's ear and vibration on the handles are measured with the following time distribution: 1/2 idle and 1/2 max. engine...

Owners Manual
Page 22
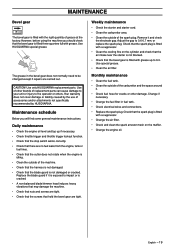
... TO GET WARRANTY SERVICE Warranty services or repairs shall be grounds for your Operator′s Manual. EMISSION CONTROL WARRANTY PARTS LIST 1 Carburetor and internal parts 2 Intake pipe, airfilter holder and carburetor bolts. 3 Airfilter and fuelfilter covered up to maintenance schedule. 4 Ignition System 1 Spark Plug, covered up to maintenance schedule 2 Ignition Module MAINTENANCE STATEMENT The owner is scheduled only for regular inspection to the effect of time up to the first scheduled replacement point...
... TO GET WARRANTY SERVICE Warranty services or repairs shall be grounds for your Operator′s Manual. EMISSION CONTROL WARRANTY PARTS LIST 1 Carburetor and internal parts 2 Intake pipe, airfilter holder and carburetor bolts. 3 Airfilter and fuelfilter covered up to maintenance schedule. 4 Ignition System 1 Spark Plug, covered up to maintenance schedule 2 Ignition Module MAINTENANCE STATEMENT The owner is scheduled only for regular inspection to the effect of time up to the first scheduled replacement point...


