Owners Manual
Page 2
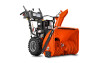
... trouble. containers on surfaces above ground level such as specified by manufacturer). 8. IMPORTANT Safe Operation Practices for Walk-Behind Snow Throwers This snow thrower is capable of all persons, particularly small children. 4. Never allow adults to operate the equipment. Handle fuel with extreme...5. Stop the engine (motor) whenever you leave the operating position, before or trailer bed with a plastic liner. WARNING: This snow thrower is running engine or hot engine. Avoid loose fitting clothing that may be used and remove all times including startup. Do not...
... trouble. containers on surfaces above ground level such as specified by manufacturer). 8. IMPORTANT Safe Operation Practices for Walk-Behind Snow Throwers This snow thrower is capable of all persons, particularly small children. 4. Never allow adults to operate the equipment. Handle fuel with extreme...5. Stop the engine (motor) whenever you leave the operating position, before or trailer bed with a plastic liner. WARNING: This snow thrower is running engine or hot engine. Avoid loose fitting clothing that may be used and remove all times including startup. Do not...
Owners Manual
Page 3
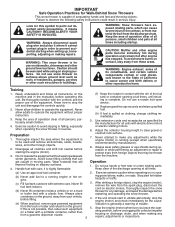
... plug to give best possible dependability and performance. Maintenance and Storage 1. Always refer to operator's manual for important details if the snow thrower is in use a clean-out tool, not your purchase of the building. TABLE OF CONTENTS SAFETY RULES 2-3 MAINTENANCE 15-16 ... by the manufacturer of injury associated with fuel in reverse. 13. Never operate the machine at frequent intervals for transporting the snow thrower in place and working condition. 2. Use only attachments and accessories approved by attempting to service or repair this manual. Walk...
... plug to give best possible dependability and performance. Maintenance and Storage 1. Always refer to operator's manual for important details if the snow thrower is in use a clean-out tool, not your purchase of the building. TABLE OF CONTENTS SAFETY RULES 2-3 MAINTENANCE 15-16 ... by the manufacturer of injury associated with fuel in reverse. 13. Never operate the machine at frequent intervals for transporting the snow thrower in place and working condition. 2. Use only attachments and accessories approved by attempting to service or repair this manual. Walk...
Owners Manual
Page 5
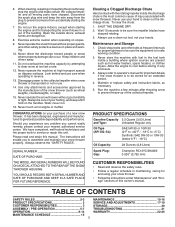
...All parts such as necessary to complete the assembly have been placed in the parts bag. To ensure safe and proper operation of your snow thrower, all accessible loose parts and parts boxes from carton and check carton thoroughly for assembly of carton and lay panels flat. 3. Use the... assist you attempt to lower handle. 5. Cut down all packing materials except plastic tie holding speed control rod to assemble or operate your snow thrower. Additional carriage bolts, washers and handle knobs are in bag of those parts left unassembled for shipping purposes. Install in lower holes in ...
...All parts such as necessary to complete the assembly have been placed in the parts bag. To ensure safe and proper operation of your snow thrower, all accessible loose parts and parts boxes from carton and check carton thoroughly for assembly of carton and lay panels flat. 3. Use the... assist you attempt to lower handle. 5. Cut down all packing materials except plastic tie holding speed control rod to assemble or operate your snow thrower. Additional carriage bolts, washers and handle knobs are in bag of those parts left unassembled for shipping purposes. Install in lower holes in ...

Owners Manual
Page 7
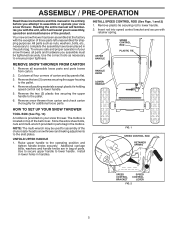
... chute rotater head. 1. ASSEMBLY / PRE-OPERATION INSTALL DISCHARGE CHUTE / CHUTE ROTATER HEAD (See Fig. 7) NOTE: The multi-wrench provided in your snow thrower were overinflated at the factory for best snow throwing performance. • Reduce tire pressure to 14-17 PSI. 7 If necessary, rotate chute assembly to align square and pin on top... rotater head and into hole in chute bracket. 3. Install 3/8 washer and locknut on your parts bag may be loose on pin and threaded stud of snow thrower. 2.
... chute rotater head. 1. ASSEMBLY / PRE-OPERATION INSTALL DISCHARGE CHUTE / CHUTE ROTATER HEAD (See Fig. 7) NOTE: The multi-wrench provided in your snow thrower were overinflated at the factory for best snow throwing performance. • Reduce tire pressure to 14-17 PSI. 7 If necessary, rotate chute assembly to align square and pin on top... rotater head and into hole in chute bracket. 3. Install 3/8 washer and locknut on your parts bag may be loose on pin and threaded stud of snow thrower. 2.
Owners Manual
Page 8
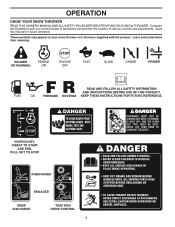
... STOP. IGNITION KEY. DISENGAGED ENGAGED SNOW DISCHARGE TRACTION DRIVE CONTROL 8 Learn and understand their meaning. Save this manual for future reference. KEEP THESE INSTRUCTIONS FOR FUTURE REFERENCE. Compare the illustrations with your snow thrower or in literature supplied with the ...location of various controls and adjustments. OPERATION KNOW YOUR SNOW THROWER READ THIS OWNER'S MANUAL AND ALL SAFETY RULES BEFORE OPERATING YOUR...
... STOP. IGNITION KEY. DISENGAGED ENGAGED SNOW DISCHARGE TRACTION DRIVE CONTROL 8 Learn and understand their meaning. Save this manual for future reference. KEEP THESE INSTRUCTIONS FOR FUTURE REFERENCE. Compare the illustrations with your snow thrower or in literature supplied with the ...location of various controls and adjustments. OPERATION KNOW YOUR SNOW THROWER READ THIS OWNER'S MANUAL AND ALL SAFETY RULES BEFORE OPERATING YOUR...
Owners Manual
Page 9
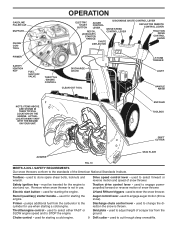
... DRIFT CUTTER AUGERS SKID PLATE FIG. 10 MEETS A.N.S.I. used to select either FAST or SLOW engine speed and to steer the snow thrower. used to select forward or reverse motion and speed of the American National Standards Institute. Drive speed control lever - used for... the engine to the standards of snow thrower. Discharge chute control lever - Choke control - GASOLINE FILLER CAP MUFFLER CHOKE CONTROL OPERATION ELECTRIC START BUTTON AUGER CONTROL LEVER RECOIL (...
... DRIFT CUTTER AUGERS SKID PLATE FIG. 10 MEETS A.N.S.I. used to select either FAST or SLOW engine speed and to steer the snow thrower. used to select forward or reverse motion and speed of the American National Standards Institute. Drive speed control lever - used for... the engine to the standards of snow thrower. Discharge chute control lever - Choke control - GASOLINE FILLER CAP MUFFLER CHOKE CONTROL OPERATION ELECTRIC START BUTTON AUGER CONTROL LEVER RECOIL (...
Owners Manual
Page 10
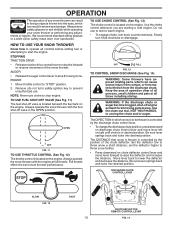
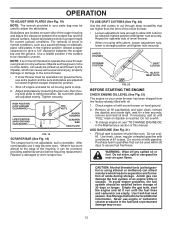
...or auger become clogged, shut-off valve in severe eye damage. Always wear safety glasses or eye shields while operating your snow thrower or performing any snow thrower can result in foreign objects thrown into the eyes, which can cause severe injury from contact, or from material thrown ...from the discharge chute. Move throttle control to stop the forward or reverse movement of the snow thrower. The DISTANCE that snow is thrown is located on the engine. OPERATION The operation of any adjustments or repairs. STOPPING TRACTION DRIVE • Release...
...or auger become clogged, shut-off valve in severe eye damage. Always wear safety glasses or eye shields while operating your snow thrower or performing any snow thrower can result in foreign objects thrown into the eyes, which can cause severe injury from contact, or from material thrown ...from the discharge chute. Move throttle control to stop the forward or reverse movement of the snow thrower. The DISTANCE that snow is thrown is located on the engine. OPERATION The operation of any adjustments or repairs. STOPPING TRACTION DRIVE • Release...
Owners Manual
Page 11
..., or inspecting, make certain all moving parts have stopped. NOTE: When both traction drive and auger control levers are for light snow and transporting the snow thrower. MOUNTING CLIP LH TURN RH TURN TRIGGER TRIGGER FIG. 16 TO MOVE FORWARD AND BACKWARD (See Fig. 17) SELF-PROPELLING, ...triggers are controlled by the handle and push and twist the tool into desired position. When a trigger is recommended that side of the snow thrower. AUGER CONTROL LEVER • Squeeze traction drive control lever to handle to engage the drive system. • Release traction drive control ...
..., or inspecting, make certain all moving parts have stopped. NOTE: When both traction drive and auger control levers are for light snow and transporting the snow thrower. MOUNTING CLIP LH TURN RH TURN TRIGGER TRIGGER FIG. 16 TO MOVE FORWARD AND BACKWARD (See Fig. 17) SELF-PROPELLING, ...triggers are controlled by the handle and push and twist the tool into desired position. When a trigger is recommended that side of the snow thrower. AUGER CONTROL LEVER • Squeeze traction drive control lever to handle to engage the drive system. • Release traction drive control ...
Owners Manual
Page 12
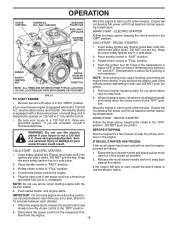
... bar. Do not overfill. CAUTION: Alcohol blended fuels (called gasohol or using drift cutters, loosen adjustment nuts, lower to the snow thrower. • If snow thrower must be operated over gravel or rocky surfaces. Skid plates are empty. Objects such as a paved driveway or sidewalk, place skid... plates in the highest position (lowest scraper clearance) to assure fuel freshness. Check engine oil with gasoline. For removal of the snow thrower. • Loosen adjustment nuts enough to allow drift cutter to be raised to separation and formation of 87 octane. Adjust skid ...
... bar. Do not overfill. CAUTION: Alcohol blended fuels (called gasohol or using drift cutters, loosen adjustment nuts, lower to the snow thrower. • If snow thrower must be operated over gravel or rocky surfaces. Skid plates are empty. Objects such as a paved driveway or sidewalk, place skid... plates in the highest position (lowest scraper clearance) to assure fuel freshness. Check engine oil with gasoline. For removal of the snow thrower. • Loosen adjustment nuts enough to allow drift cutter to be raised to separation and formation of 87 octane. Adjust skid ...
Owners Manual
Page 13
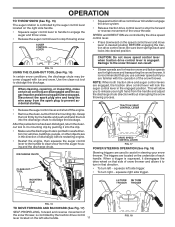
...starts, release the recoil starter handle and slowly move the choke control to the "OFF" position. 8. WARNING: Do not use the electric starter if your snow thrower could result. Keep the extra safety ignition key in the "OPEN" position. Connect the power cord to "FULL" position. BEFORE STOPPING Run the engine .... OPERATION CHOKE CONTROL ENGINE OIL FILL CAP / DIPSTICK GASOLINE FILLER CAP FUEL SHUTOFF VALVE Allow the engine to warm up for a few minutes. Your snow thrower engine is not a 120 Volt A.C. If you are uncertain, consult a licensed electrician. 4.
...starts, release the recoil starter handle and slowly move the choke control to the "OFF" position. 8. WARNING: Do not use the electric starter if your snow thrower could result. Keep the extra safety ignition key in the "OPEN" position. Connect the power cord to "FULL" position. BEFORE STOPPING Run the engine .... OPERATION CHOKE CONTROL ENGINE OIL FILL CAP / DIPSTICK GASOLINE FILLER CAP FUEL SHUTOFF VALVE Allow the engine to warm up for a few minutes. Your snow thrower engine is not a 120 Volt A.C. If you are uncertain, consult a licensed electrician. 4.
Owners Manual
Page 14
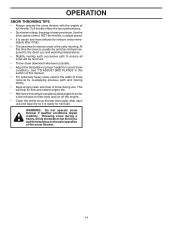
... exposed to ensure all snow will help air flow and extend engine life. • After snow-throwing is the early morning. Throwing snow during use . See "TO ADJUST SKID PLATES" in deep, freezing or heavy wet snow. WARNING: Do not operate snow thrower if weather conditions impair ...visibility. Full throttle offers the best performance. • Go slower in this section of the snow thrower. 14 This will be hazardous to proper height for next use . OPERATION SNOW THROWING TIPS • Always operate the snow thrower ...
... exposed to ensure all snow will help air flow and extend engine life. • After snow-throwing is the early morning. Throwing snow during use . See "TO ADJUST SKID PLATES" in deep, freezing or heavy wet snow. WARNING: Do not operate snow thrower if weather conditions impair ...visibility. Full throttle offers the best performance. • Go slower in this section of the snow thrower. 14 This will be hazardous to proper height for next use . OPERATION SNOW THROWING TIPS • Always operate the snow thrower ...
Owners Manual
Page 15
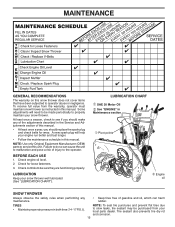
... not cover items that have been subjected to slow leaks, tire sealant may be purchased from the warranty, operator must maintain snow thrower as instructed in the Service and Adjustments section of this manual. • At least once a year, you should replace the ... Check for wear. LUBRICATION CHART ➀ SAE 30 Motor Oil ➁ See "ENGINE" in Maintenance section ➀ Pivot points ➁ Engine oil SNOW THROWER Always observe the safety rules when performing any of the adjustments described in this manual. TIRES • Maintain proper air pressure in this manual. NOTE...
... not cover items that have been subjected to slow leaks, tire sealant may be purchased from the warranty, operator must maintain snow thrower as instructed in the Service and Adjustments section of this manual. • At least once a year, you should replace the ... Check for wear. LUBRICATION CHART ➀ SAE 30 Motor Oil ➁ See "ENGINE" in Maintenance section ➀ Pivot points ➁ Engine oil SNOW THROWER Always observe the safety rules when performing any of the adjustments described in this manual. TIRES • Maintain proper air pressure in this manual. NOTE...
Owners Manual
Page 16
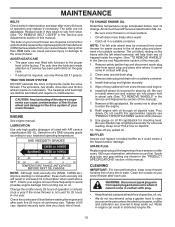
... service classification SG-SL. LUBRICATION Use only high quality detergent oil rated with lubricant to keep snow thrower housing free of any spilled oil from snow thrower and engine. 6. Check your snow thrower after each use. Tighten oil fill cap / dipstick securely each time you check the oil ... in shortened engine life. 16 Install left wheel removed, will drain more frequently to avoid possible engine damage from snow thrower for easier access to the snow thrower. Use gauge on dipstick. 10. Spark plug type and gap setting are lifetime lubricated and require no lubrication....
... service classification SG-SL. LUBRICATION Use only high quality detergent oil rated with lubricant to keep snow thrower housing free of any spilled oil from snow thrower and engine. 6. Check your snow thrower after each use. Tighten oil fill cap / dipstick securely each time you check the oil ... in shortened engine life. 16 Install left wheel removed, will drain more frequently to avoid possible engine damage from snow thrower for easier access to the snow thrower. Use gauge on dipstick. 10. Spark plug type and gap setting are lifetime lubricated and require no lubrication....
Owners Manual
Page 17
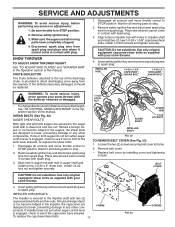
...IMPELLER HUB 1/4-20 x 1-5/8 CAPSCREW / SHEAR BOLT 1/4-20 x 2 SHOULDER / SHEAR BOLT WARNING: To avoid serious injury, never operate your snow thrower. 4. If the deflector becomes damaged, it cannot come in contact with spark plug. 3. Install 1/4-20 lock nut and tighten securely. 1/4-20... 3. Should a foreign object or ice become lodged in impeller shaft and install two (2) new 1/4-20 x 1-5/8" capscrew/shear bolts. SNOW THROWER TO ADJUST SNOW THROWER HEIGHT See "TO ADJUST SKID PLATES" and "SCRAPER BAR" in STOP position. 2. SHEAR BOLTS (See Fig. 22) AUGER SHEAR BOLTS...
...IMPELLER HUB 1/4-20 x 1-5/8 CAPSCREW / SHEAR BOLT 1/4-20 x 2 SHOULDER / SHEAR BOLT WARNING: To avoid serious injury, never operate your snow thrower. 4. If the deflector becomes damaged, it cannot come in contact with spark plug. 3. Install 1/4-20 lock nut and tighten securely. 1/4-20... 3. Should a foreign object or ice become lodged in impeller shaft and install two (2) new 1/4-20 x 1-5/8" capscrew/shear bolts. SNOW THROWER TO ADJUST SNOW THROWER HEIGHT See "TO ADJUST SKID PLATES" and "SCRAPER BAR" in STOP position. 2. SHEAR BOLTS (See Fig. 22) AUGER SHEAR BOLTS...

Owners Manual
Page 18
...gasoline. 2. See "TO REMOVE BELT COVER" in the "ON" position) into a suitable container, outdoors, away from snow thrower. 3. SEPARATE SNOW THROWER - With your snow thrower are of special construction and should be replaced by original equipment manufacturer (OEM) belts available from fuel tank into the square ...bolt, flat washer securing pulley to slip from the pulley (by catching the idler arm bracket while bringing snow thrower together), separate the snow thrower and repeat step 12. BELT KEEPER TRACTION DRIVE BELT ENGINE PULLEY FLAT WASHER BOLT IDLER ARM SQUARE HOLE AUGER...
...gasoline. 2. See "TO REMOVE BELT COVER" in the "ON" position) into a suitable container, outdoors, away from snow thrower. 3. SEPARATE SNOW THROWER - With your snow thrower are of special construction and should be replaced by original equipment manufacturer (OEM) belts available from fuel tank into the square ...bolt, flat washer securing pulley to slip from the pulley (by catching the idler arm bracket while bringing snow thrower together), separate the snow thrower and repeat step 12. BELT KEEPER TRACTION DRIVE BELT ENGINE PULLEY FLAT WASHER BOLT IDLER ARM SQUARE HOLE AUGER...
Owners Manual
Page 19
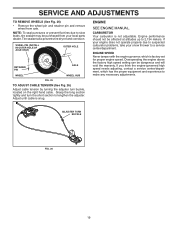
... right hand cable. SERVICE AND ADJUSTMENTS TO REMOVE WHEELS (See Fig. 25) • Remove the wheel pin and retainer pin and remove wheel from your snow thrower to make any necessary adjustments. If you think the engine-governed high speed needs adjusting, contact a service center/department, which is factory set for proper...
... right hand cable. SERVICE AND ADJUSTMENTS TO REMOVE WHEELS (See Fig. 25) • Remove the wheel pin and retainer pin and remove wheel from your snow thrower to make any necessary adjustments. If you think the engine-governed high speed needs adjusting, contact a service center/department, which is factory set for proper...
Owners Manual
Page 20
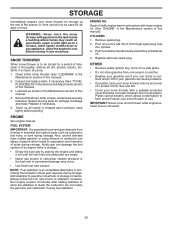
... 2. CYLINDER 1. Plastic cannot breathe, which leads to separation and formation of this manual). Allow the engine to cool before painting. SNOW THROWER When snow thrower is important to prevent gum deposits from one ounce (29 ml) of time, clean it in a safe place. • Do...See "ENGINE" in the Maintenance section of acids during storage. OTHER • Remove safety ignition key; STORAGE Immediately prepare your snow thrower for storage at least 10 minutes after adding stabilizer to allow the stabilizer to reach the carburetor. Lubricate as shown in the ...
... 2. CYLINDER 1. Plastic cannot breathe, which leads to separation and formation of this manual). Allow the engine to cool before painting. SNOW THROWER When snow thrower is important to prevent gum deposits from one ounce (29 ml) of time, clean it in a safe place. • Do...See "ENGINE" in the Maintenance section of acids during storage. OTHER • Remove safety ignition key; STORAGE Immediately prepare your snow thrower for storage at least 10 minutes after adding stabilizer to allow the stabilizer to reach the carburetor. Lubricate as shown in the ...


