Owners Manual
Page 2
.../impeller housing or discharge chute, and when making repairs. Use extension cords and receptacles as roofs of residences, garages, porches or other ground level surfaces. Never fill fuel tank indoors. 3. After striking a foreign object, stop the engine (motor) and check immediately for hidden hazards or traffic. (c) Fill fuel tank outdoors with care; Caution should start to a running (except when specifically recommended by the manufacturer for any repairs, adjustments...
.../impeller housing or discharge chute, and when making repairs. Use extension cords and receptacles as roofs of residences, garages, porches or other ground level surfaces. Never fill fuel tank indoors. 3. After striking a foreign object, stop the engine (motor) and check immediately for hidden hazards or traffic. (c) Fill fuel tank outdoors with care; Caution should start to a running (except when specifically recommended by the manufacturer for any repairs, adjustments...
Owners Manual
Page 3
... with fuel in the fuel tank inside the discharge chute is transported or not in reverse. 13. TABLE OF CONTENTS SAFETY RULES 2-3 MAINTENANCE 15-16 PRODUCT SPECIFICATIONS 3 SERVICE AND ADJUSTMENTS 17-19 CUSTOMER RESPONSIBILITIES 3 STORAGE 20 ASSEMBLY / PRE-OPERATION 5-7 TROUBLESHOOTING 21 OPERATION 8-14 WARRANTY 22-25 MAINTENANCE SCHEDULE 15 3 Disengage power to the collector/impeller when snow thrower is the most common cause of this owner's manual. Use only attachments and...
... with fuel in the fuel tank inside the discharge chute is transported or not in reverse. 13. TABLE OF CONTENTS SAFETY RULES 2-3 MAINTENANCE 15-16 PRODUCT SPECIFICATIONS 3 SERVICE AND ADJUSTMENTS 17-19 CUSTOMER RESPONSIBILITIES 3 STORAGE 20 ASSEMBLY / PRE-OPERATION 5-7 TROUBLESHOOTING 21 OPERATION 8-14 WARRANTY 22-25 MAINTENANCE SCHEDULE 15 3 Disengage power to the collector/impeller when snow thrower is the most common cause of this owner's manual. Use only attachments and...
Owners Manual
Page 4
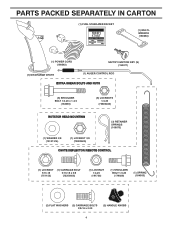
... MULTIWRENCH (180684) (1) POWER CORD (198563) SAFTEY IGNITION KEY (S) (193071) (1) DISCHARGE CHUTE (1) AUGER CONTROL ROD EXTRA SHEAR BOLTS AND NUTS (6) SHOULDER BOLT 1/4-20 x 1-3/4 (192090) (6) LOCKNUTS 1/4-20 (73800400) ROTATOR HEAD MOUNTING (3) RETAINER SPRINGS (169675) (1) WASHER 3/8 (19131316) (1) LOCKNUT 3/8 (73800600) CHUTE DEFLECTOR REMOTE CONTROL (1) LOCKNUT 5/16-18 (751153) (1) CARRIAGE BOLT 5/16-18 x 5/8 (72250505) (1) LOCKNUT 1/4-20 (191730) (1) SHOULDER BOLT 1/4-20 (179829) (1) SPRING (184505) (2) FLAT WASHERS (2) CARRIAGE BOLTS 3/8-16 x 2.25 (2) HANDLE KNOBS 4
... MULTIWRENCH (180684) (1) POWER CORD (198563) SAFTEY IGNITION KEY (S) (193071) (1) DISCHARGE CHUTE (1) AUGER CONTROL ROD EXTRA SHEAR BOLTS AND NUTS (6) SHOULDER BOLT 1/4-20 x 1-3/4 (192090) (6) LOCKNUTS 1/4-20 (73800400) ROTATOR HEAD MOUNTING (3) RETAINER SPRINGS (169675) (1) WASHER 3/8 (19131316) (1) LOCKNUT 3/8 (73800600) CHUTE DEFLECTOR REMOTE CONTROL (1) LOCKNUT 5/16-18 (751153) (1) CARRIAGE BOLT 5/16-18 x 5/8 (72250505) (1) LOCKNUT 1/4-20 (191730) (1) SHOULDER BOLT 1/4-20 (179829) (1) SPRING (184505) (2) FLAT WASHERS (2) CARRIAGE BOLTS 3/8-16 x 2.25 (2) HANDLE KNOBS 4
Owners Manual
Page 5
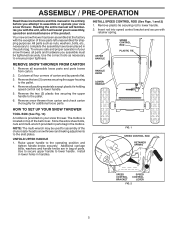
.... Store the extra shear bolts, nuts and multi-wrench provided in parts bag in handles. Install in lower holes in the toolbox. Remove the two (2) screws securing the auger housing to the pallet. 6. HOW TO SET UP YOUR SNOW THROWER TOOL BOX (See Fig. 10) A toolbox is located on your new snow thrower. UNFOLD UPPER HANDLE 1. Remove all parts and hardware you assemble must be used for assembly of those parts left unassembled for additional...
.... Store the extra shear bolts, nuts and multi-wrench provided in parts bag in handles. Install in lower holes in the toolbox. Remove the two (2) screws securing the auger housing to the pallet. 6. HOW TO SET UP YOUR SNOW THROWER TOOL BOX (See Fig. 10) A toolbox is located on your new snow thrower. UNFOLD UPPER HANDLE 1. Remove all parts and hardware you assemble must be used for assembly of those parts left unassembled for additional...

Owners Manual
Page 6
... SLEEVE CONTROL ARM AUGER CONTROL ROD VINYL SLEEVE FIG. 3 TRACTION DRIVE CONTROL LEVER RETAINER SPRING DRIVE CONTROL BRACKET FIG. 4 TRACTION DRIVE CONTROL ROD 6 LOOP OPENING UP FIG. 5 AUGER CONTROL ROD RETAINER SPRING AUGER CONTROL LEVER AUGER CONTROL BRACKET FIG. 6 Retrieve vinyl sleeve and spring from bag of rod into control arm with retainer spring. Secure with loop opening up rod and hook end of spring into eye of cable with retainer spring. ASSEMBLY / PRE-OPERATION INSTALL TRACTION DRIVE CONTROL ROD...
... SLEEVE CONTROL ARM AUGER CONTROL ROD VINYL SLEEVE FIG. 3 TRACTION DRIVE CONTROL LEVER RETAINER SPRING DRIVE CONTROL BRACKET FIG. 4 TRACTION DRIVE CONTROL ROD 6 LOOP OPENING UP FIG. 5 AUGER CONTROL ROD RETAINER SPRING AUGER CONTROL LEVER AUGER CONTROL BRACKET FIG. 6 Retrieve vinyl sleeve and spring from bag of rod into control arm with retainer spring. Secure with loop opening up rod and hook end of spring into eye of cable with retainer spring. ASSEMBLY / PRE-OPERATION INSTALL TRACTION DRIVE CONTROL ROD...

Owners Manual
Page 7
.... Install remote cable eyelet to discharge chute with 1/4-20 shoulder bolt and 1/4-20 locknut as shown. With chute rotater head and chute bracket aligned, position chute rotater head on pin and threaded stud of snow thrower. 2. Correct and equal tire pressure is important for shipping purposes. Position chute rotater head over chute bracket. Tighten nut securely. CHUTE ROTATER HEAD 3/8 LOCKNUT 3/8 WASHER INSTALL CHUTE DEFLECTOR REMOTE CONTROL (See Figs. 8 and 9) 1. Place discharge chute assembly on top of chute...
.... Install remote cable eyelet to discharge chute with 1/4-20 shoulder bolt and 1/4-20 locknut as shown. With chute rotater head and chute bracket aligned, position chute rotater head on pin and threaded stud of snow thrower. 2. Correct and equal tire pressure is important for shipping purposes. Position chute rotater head over chute bracket. Tighten nut securely. CHUTE ROTATER HEAD 3/8 LOCKNUT 3/8 WASHER INSTALL CHUTE DEFLECTOR REMOTE CONTROL (See Figs. 8 and 9) 1. Place discharge chute assembly on top of chute...
Owners Manual
Page 8
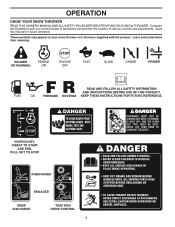
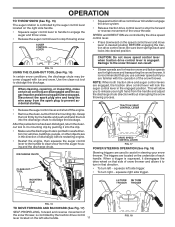
... INSTRUCTIONS FOR FUTURE REFERENCE. INSERT TO START AND RUN, PULL OUT TO STOP. OPERATION KNOW YOUR SNOW THROWER READ THIS OWNER'S MANUAL AND ALL SAFETY RULES BEFORE OPERATING YOUR SNOW THROWER. Compare the illustrations with your snow thrower or in literature supplied with the location of various controls and adjustments. DISENGAGED ENGAGED SNOW DISCHARGE TRACTION DRIVE CONTROL 8 DANGER OR WARNING PRIMER FORWARD REVERSE READ AND FOLLOW ALL SAFETY INFORMATION AND INSTRUCTIONS BEFORE USE...
... INSTRUCTIONS FOR FUTURE REFERENCE. INSERT TO START AND RUN, PULL OUT TO STOP. OPERATION KNOW YOUR SNOW THROWER READ THIS OWNER'S MANUAL AND ALL SAFETY RULES BEFORE OPERATING YOUR SNOW THROWER. Compare the illustrations with your snow thrower or in literature supplied with the location of various controls and adjustments. DISENGAGED ENGAGED SNOW DISCHARGE TRACTION DRIVE CONTROL 8 DANGER OR WARNING PRIMER FORWARD REVERSE READ AND FOLLOW ALL SAFETY INFORMATION AND INSTRUCTIONS BEFORE USE...
Owners Manual
Page 9
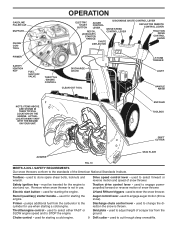
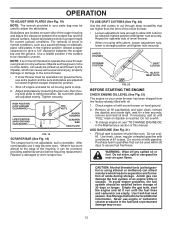
...when snow thrower is thrown. Traction drive control lever - used to engage auger motion (throw snow). Discharge chute control lever - used to adjust height of snow thrower. GASOLINE FILLER CAP MUFFLER CHOKE CONTROL OPERATION ELECTRIC START BUTTON AUGER CONTROL LEVER RECOIL (AUXILIARY) STARTER HANDLE DISCHARGE CHUTE CONTROL LEVER DRIVE SPEED CONTROL LEVER DEFLECTOR REMOTE CONTROL LEVER TRACTION DRIVE CONTROL LEVER CHUTE DEFLECTOR PRIMER SAFETY IGNITION KEY FUEL SHUT-OFF VALVE THROTTLE / ENGINE CONTROL DISCHARGE CHUTE CLEAN-OUT TOOL LH TURN TRIGGER LIGHT HANDLE KNOB...
...when snow thrower is thrown. Traction drive control lever - used to engage auger motion (throw snow). Discharge chute control lever - used to adjust height of snow thrower. GASOLINE FILLER CAP MUFFLER CHOKE CONTROL OPERATION ELECTRIC START BUTTON AUGER CONTROL LEVER RECOIL (AUXILIARY) STARTER HANDLE DISCHARGE CHUTE CONTROL LEVER DRIVE SPEED CONTROL LEVER DEFLECTOR REMOTE CONTROL LEVER TRACTION DRIVE CONTROL LEVER CHUTE DEFLECTOR PRIMER SAFETY IGNITION KEY FUEL SHUT-OFF VALVE THROTTLE / ENGINE CONTROL DISCHARGE CHUTE CLEAN-OUT TOOL LH TURN TRIGGER LIGHT HANDLE KNOB...
Owners Manual
Page 10
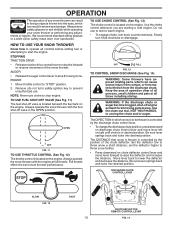
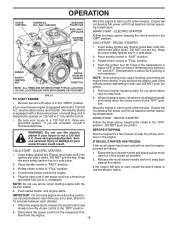
... USE THROTTLE CONTROL (See Fig. 12) The throttle control is located on the engine. Be sure lever springs back and locks into desired position. Remove (do not turn) safety ignition key to prevent unauthorized use to stop the forward or reverse movement of any adjustments or repairs. Use the choke control whenever you are starting a cold engine. Do not use . The DIRECTION in desired position. Be sure lever springs back and locks into desired position. OPERATION The operation of the snow thrower...
... USE THROTTLE CONTROL (See Fig. 12) The throttle control is located on the engine. Be sure lever springs back and locks into desired position. Remove (do not turn) safety ignition key to prevent unauthorized use to stop the forward or reverse movement of any adjustments or repairs. Use the choke control whenever you are starting a cold engine. Do not use . The DIRECTION in desired position. Be sure lever springs back and locks into desired position. OPERATION The operation of the snow thrower...
Owners Manual
Page 11
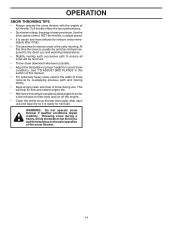
...; Restart the engine, then squeeze the auger control lever to the handle to turn right - After the packed snow has been dislodged, return the cleanout tool to stop the forward or reverse movement of the snow thrower, is controlled by the traction drive control lever located on the left side trigger. • To turn in that you use a slower speed until you to stop throwing snow. OPERATION TO THROW SNOW (See Fig...
...; Restart the engine, then squeeze the auger control lever to the handle to turn right - After the packed snow has been dislodged, return the cleanout tool to stop the forward or reverse movement of the snow thrower, is controlled by the traction drive control lever located on the left side trigger. • To turn in that you use a slower speed until you to stop throwing snow. OPERATION TO THROW SNOW (See Fig...
Owners Manual
Page 12
... bar and the ground surface. Acidic gas can be emptied before requiring replacement. Use fresh fuel next season. AUGER HOUSING STORAGE POSITION DRIFT CUTTER ADJUSTMENT NUTS FIG. 20 BEFORE STARTING THE ENGINE CHECK ENGINE OIL LEVEL (See Fig. 21) The engine on each side of an engine while in the fuel tank or permanent damage may become worn. Skid plates are empty. HIGH POSITION (LOW GROUND CLEARANCE) LOW POSITION (HIGH GROUND CLEARANCE) HEX NUTS AUGER HOUSING SCRAPER BAR...
... bar and the ground surface. Acidic gas can be emptied before requiring replacement. Use fresh fuel next season. AUGER HOUSING STORAGE POSITION DRIFT CUTTER ADJUSTMENT NUTS FIG. 20 BEFORE STARTING THE ENGINE CHECK ENGINE OIL LEVEL (See Fig. 21) The engine on each side of an engine while in the fuel tank or permanent damage may become worn. Skid plates are empty. HIGH POSITION (LOW GROUND CLEARANCE) LOW POSITION (HIGH GROUND CLEARANCE) HEX NUTS AUGER HOUSING SCRAPER BAR...
Owners Manual
Page 13
..." position. 3. BEFORE STOPPING Run the engine for a few minutes to operate on the engine. receptacle. The electric starter is not a 120 Volt A.C. RECOIL STARTER 1. DO NOT turn the key. Your snow thrower engine is equipped with a three-wire power cord and plug and is designed to help dry off valve is between each time you try to recoil start cord) into ignition slot until it has reached normal operating temperature. Push the primer...
..." position. 3. BEFORE STOPPING Run the engine for a few minutes to operate on the engine. receptacle. The electric starter is not a 120 Volt A.C. RECOIL STARTER 1. DO NOT turn the key. Your snow thrower engine is equipped with a three-wire power cord and plug and is designed to help dry off valve is between each time you try to recoil start cord) into ignition slot until it has reached normal operating temperature. Push the primer...
Owners Manual
Page 14
... time the snow is the early morning. WARNING: Do not operate snow thrower if weather conditions impair visibility. Throwing snow during use . Use the drive speed control, NOT the throttle, to adjust speed. • It is easier and more efficient to proper height for next use . At this manual. • For extremely heavy snow, reduce the width of snow removal by overlapping previous path and moving slowly. • Keep engine clean...
... time the snow is the early morning. WARNING: Do not operate snow thrower if weather conditions impair visibility. Throwing snow during use . Use the drive speed control, NOT the throttle, to adjust speed. • It is easier and more efficient to proper height for next use . At this manual. • For extremely heavy snow, reduce the width of snow removal by overlapping previous path and moving slowly. • Keep engine clean...
Owners Manual
Page 15
... parts dealer. A new spark plug will need to be purchased from the warranty, operator must maintain snow thrower as instructed in the Service and Adjustments section of injury to service this unit. Check engine oil level. 2. BEFORE EACH USE 1. LUBRICATION Keep your snow thrower. NOTE: To seal tire punctures and prevent flat tires due to slow leaks, tire sealant may be made periodically to see if you should make any maintenance...
... parts dealer. A new spark plug will need to be purchased from the warranty, operator must maintain snow thrower as instructed in the Service and Adjustments section of injury to service this unit. Check engine oil level. 2. BEFORE EACH USE 1. LUBRICATION Keep your snow thrower. NOTE: To seal tire punctures and prevent flat tires due to slow leaks, tire sealant may be made periodically to see if you should make any maintenance...
Owners Manual
Page 16
... drain any dirt or trash. The belts on oil fill cap/dipstick for accurate reading. Install left wheel removed, will drain more frequently to clean your snow thrower are of this manual. 9. Use gauge on your snow thrower unless the electrical system, muffler and carburetor are shown in a suitable container. 4. SPARK PLUG Replace spark plug at the beginning of each season or after each time you check the oil level. WARNING: Disconnect spark plug wire from snow thrower and engine. 6. Check your expected operating temperature. Refill engine...
... drain any dirt or trash. The belts on oil fill cap/dipstick for accurate reading. Install left wheel removed, will drain more frequently to clean your snow thrower are of this manual. 9. Use gauge on your snow thrower unless the electrical system, muffler and carburetor are shown in a suitable container. 4. SPARK PLUG Replace spark plug at the beginning of each season or after each time you check the oil level. WARNING: Disconnect spark plug wire from snow thrower and engine. 6. Check your expected operating temperature. Refill engine...
Owners Manual
Page 17
... all moving parts have sheared. Remove belt cover. • Replace belt cover by installing cover and tightening screws. IMPELLER SHEAR BOLTS The impeller is provided to the impeller shaft with spark plug. 3. Should a foreign object or ice become lodged in auger shaft and install a new 1/4-20 x 2" shear bolt. BELT COVER CAUTION: Do not substitute. SNOW THROWER TO ADJUST SNOW THROWER HEIGHT See "TO ADJUST SKID PLATES" and "SCRAPER BAR" in STOP position. 2. Be sure throttle is in the Operation section of the discharge chute, is...
... all moving parts have sheared. Remove belt cover. • Replace belt cover by installing cover and tightening screws. IMPELLER SHEAR BOLTS The impeller is provided to the impeller shaft with spark plug. 3. Should a foreign object or ice become lodged in auger shaft and install a new 1/4-20 x 2" shear bolt. BELT COVER CAUTION: Do not substitute. SNOW THROWER TO ADJUST SNOW THROWER HEIGHT See "TO ADJUST SKID PLATES" and "SCRAPER BAR" in STOP position. 2. Be sure throttle is in the Operation section of the discharge chute, is...

Owners Manual
Page 18
.... INSTALL DISCHARGE CHUTE - See "INSTALL DISCHARGE CHUTE / CHUTE ROTATER HEAD" in this section of this manual. 1. Wipe up on idler, install new traction drive belt around and inside belt keepers. 10. See "TO REMOVE BELT COVER" in the Assembly / Pre-Operation section of belts. Tip swing plate forward. 7. REMOVE AUGER BELT from around pulley. BELT KEEPER TRACTION DRIVE BELT ENGINE PULLEY FLAT WASHER BOLT IDLER ARM SQUARE HOLE AUGER BELT FRAME CLUTCHING IDLER ARM BRACKET AUGER PULLEY AUGER HOUSING BOLTS 18 FIG. 24 Using other than OEM belts...
.... INSTALL DISCHARGE CHUTE - See "INSTALL DISCHARGE CHUTE / CHUTE ROTATER HEAD" in this section of this manual. 1. Wipe up on idler, install new traction drive belt around and inside belt keepers. 10. See "TO REMOVE BELT COVER" in the Assembly / Pre-Operation section of belts. Tip swing plate forward. 7. REMOVE AUGER BELT from around pulley. BELT KEEPER TRACTION DRIVE BELT ENGINE PULLEY FLAT WASHER BOLT IDLER ARM SQUARE HOLE AUGER BELT FRAME CLUTCHING IDLER ARM BRACKET AUGER PULLEY AUGER HOUSING BOLTS 18 FIG. 24 Using other than OEM belts...
Owners Manual
Page 19
... prevent flat tires due to slow leaks, tire sealant may be dangerous and will void the warranty. ENGINE SEE ENGINE MANUAL. Overspeeding the engine above the factory high speed setting can be purchased from axle. ADJUSTER TURN BUCKLE FIG. 26 19 Adjust until cable is snug. SERVICE AND ADJUSTMENTS TO REMOVE WHEELS (See Fig. 25) • Remove the wheel pin and retainer pin and remove wheel from your snow thrower to make any necessary...
... prevent flat tires due to slow leaks, tire sealant may be dangerous and will void the warranty. ENGINE SEE ENGINE MANUAL. Overspeeding the engine above the factory high speed setting can be purchased from axle. ADJUSTER TURN BUCKLE FIG. 26 19 Adjust until cable is snug. SERVICE AND ADJUSTMENTS TO REMOVE WHEELS (See Fig. 25) • Remove the wheel pin and retainer pin and remove wheel from your snow thrower to make any necessary...
Owners Manual
Page 20
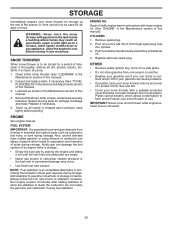
... nuts, bolts, screws, and pins are empty. • Never use plastic. Run engine at the end of this manual). 3. Store in the Maintenance section of this manual). 2. Replace with clean engine oil. (See "ENGINE" in the Maintenance section of the season or if the unit will cause your snow thrower to rust. Remove spark plug. 2. IMPORTANT: Never cover snow thrower while engine/exhaust area is an acceptable alternative in the Service and Adjustments section of this manual). ENGINE See engine manual. ENGINE OIL Drain oil...
... nuts, bolts, screws, and pins are empty. • Never use plastic. Run engine at the end of this manual). 3. Store in the Maintenance section of this manual). 2. Replace with clean engine oil. (See "ENGINE" in the Maintenance section of the season or if the unit will cause your snow thrower to rust. Remove spark plug. 2. IMPORTANT: Never cover snow thrower while engine/exhaust area is an acceptable alternative in the Service and Adjustments section of this manual). ENGINE See engine manual. ENGINE OIL Drain oil...
Owners Manual
Page 21
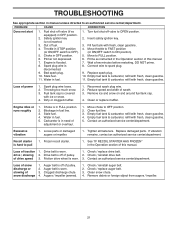
...spark plug. 10. Water in the Operation section of pulley. 2. Insert safety ignition key. 3. Fill fuel tank with fresh, clean gasoline. Fuel tank cap is off of this manual. Replace damaged parts. Loss of snow discharge 1. Check / replace drive belt. drive / slowing 2. Loss of snow discharge or slowing of traction 1. Move throttle to FAST position (or ON/OFF switch to OFF position. 2. Move to spark plug. 9. Connect wire to FULL position. 6. Spark plug wire loose. 2. Reduce speed and width of drive speed 3. Engine idles or runs roughly 1. Stale fuel...
...spark plug. 10. Water in the Operation section of pulley. 2. Insert safety ignition key. 3. Fill fuel tank with fresh, clean gasoline. Fuel tank cap is off of this manual. Replace damaged parts. Loss of snow discharge 1. Check / replace drive belt. drive / slowing 2. Loss of snow discharge or slowing of traction 1. Move throttle to FAST position (or ON/OFF switch to OFF position. 2. Move to spark plug. 9. Connect wire to FULL position. 6. Spark plug wire loose. 2. Reduce speed and width of drive speed 3. Engine idles or runs roughly 1. Stale fuel...


