Owners Manual
Page 2
... recommended by the manufacturer for all instructions on the machine and in reverse. Do not put hands or feet near or under rotating parts. Keep clear of the discharge opening at all times. (a) Use an approved fuel container. 2. Preparation 1. it on the ground....eyes from foreign objects that will improve footing on slippery surfaces. 4. Exercise caution to cause cancer and birth defects or other engine parts become extremely hot during operation or while performing an adjustment or repair to operate the equipment. Handle fuel with extreme care. WARNING...
... recommended by the manufacturer for all instructions on the machine and in reverse. Do not put hands or feet near or under rotating parts. Keep clear of the discharge opening at all times. (a) Use an approved fuel container. 2. Preparation 1. it on the ground....eyes from foreign objects that will improve footing on slippery surfaces. 4. Exercise caution to cause cancer and birth defects or other engine parts become extremely hot during operation or while performing an adjustment or repair to operate the equipment. Handle fuel with extreme care. WARNING...
Owners Manual
Page 3
... at too fast a rate. 12. When cleaning, repairing or inspecting the snow thrower, stop the engine and make certain the collector/impeller and all moving parts have stopped. Maintenance and Storage 1. Disengage power to the collector/impeller when snow thrower is to give best possible dependability and performance.
... at too fast a rate. 12. When cleaning, repairing or inspecting the snow thrower, stop the engine and make certain the collector/impeller and all moving parts have stopped. Maintenance and Storage 1. Disengage power to the collector/impeller when snow thrower is to give best possible dependability and performance.
Owners Manual
Page 4
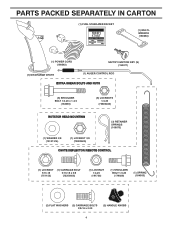
PARTS PACKED SEPARATELY IN CARTON (1) FUEL STABILIZER PACKET (1) MULTIWRENCH (180684) (1) POWER CORD (198563) SAFTEY IGNITION KEY (S) (193071) (1) DISCHARGE CHUTE (1) AUGER CONTROL ROD EXTRA SHEAR BOLTS AND ...
PARTS PACKED SEPARATELY IN CARTON (1) FUEL STABILIZER PACKET (1) MULTIWRENCH (180684) (1) POWER CORD (198563) SAFTEY IGNITION KEY (S) (193071) (1) DISCHARGE CHUTE (1) AUGER CONTROL ROD EXTRA SHEAR BOLTS AND ...
Owners Manual
Page 5
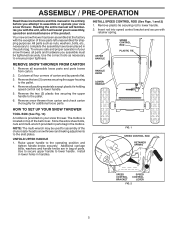
... RETAINER SPRING SPEED CONTROL BRACKET SPEED CONTROL LEVER FIG. 2 5 Reading the entire manual will assist you in assembly, operation and maintenance of parts. Use the correct tools as nuts, washers, bolts, etc., necessary to the pallet. 4. Remove the two (2) plastic ties securing the upper...your snow thrower. ASSEMBLY / PRE-OPERATION Read these instructions and this manual in its entirety before you attempt to lower handle. All parts such as necessary to the pallet. 6. Remove snow thrower from carton. 2. NOTE: The multi-wrench may be tightened securely. Additional ...
... RETAINER SPRING SPEED CONTROL BRACKET SPEED CONTROL LEVER FIG. 2 5 Reading the entire manual will assist you in assembly, operation and maintenance of parts. Use the correct tools as nuts, washers, bolts, etc., necessary to the pallet. 4. Remove the two (2) plastic ties securing the upper...your snow thrower. ASSEMBLY / PRE-OPERATION Read these instructions and this manual in its entirety before you attempt to lower handle. All parts such as necessary to the pallet. 6. Remove snow thrower from carton. 2. NOTE: The multi-wrench may be tightened securely. Additional ...

Owners Manual
Page 6
... Figs. 5 and 6) 1. Secure with retainer spring. With top end of rod positioned under left side of control panel, push rod down on the end of parts and retrieve the auger control rod from carton chute tray. Slide rubber sleeve up as shown. 1. With top end of rod positioned under right side...
... Figs. 5 and 6) 1. Secure with retainer spring. With top end of rod positioned under left side of control panel, push rod down on the end of parts and retrieve the auger control rod from carton chute tray. Slide rubber sleeve up as shown. 1. With top end of rod positioned under right side...

Owners Manual
Page 7
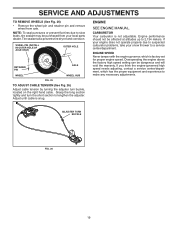
... THREADED STUD ROTATER HEAD MOUNTING BRACKET REMOTE CABLE BRACKET 5/16-18 LOCKNUT FIG. 8 CHUTE DEFLECTOR CONTROL LEVER FIG. 9 CHECK TIRE PRESSURE The tires on your parts bag may be loose on chute rotater head and into hole in chute bracket. 3. Tighten nut securely. Tighten securely. 2. Install spring hooks between hex nuts...
... THREADED STUD ROTATER HEAD MOUNTING BRACKET REMOTE CABLE BRACKET 5/16-18 LOCKNUT FIG. 8 CHUTE DEFLECTOR CONTROL LEVER FIG. 9 CHECK TIRE PRESSURE The tires on your parts bag may be loose on chute rotater head and into hole in chute bracket. 3. Tighten nut securely. Tighten securely. 2. Install spring hooks between hex nuts...
Owners Manual
Page 10
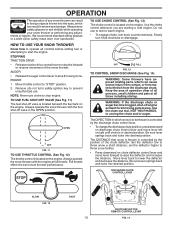
...LEVER SLOW FIG. 12 FAST 10 CHUTE DEFLECTOR REMOTE CONTROL LEVER FIG. 14 ENGINE 1. Always operate the snow thrower with the engine at all moving parts to throw snow farther. • Press downward on the engine. Do not use . Slowly turn knob clockwise to start a warm engine. •... the best snow thrower performance. OFF FULL FIG. 13 TO CONTROL SNOW DISCHARGE (See Fig. 14) WARNING: Snow throwers have exposed rotating parts, which snow is located on chute deflector control lever and move lever left or right until chute is controlled by the position of all controls...
...LEVER SLOW FIG. 12 FAST 10 CHUTE DEFLECTOR REMOTE CONTROL LEVER FIG. 14 ENGINE 1. Always operate the snow thrower with the engine at all moving parts to throw snow farther. • Press downward on the engine. Do not use . Slowly turn knob clockwise to start a warm engine. •... the best snow thrower performance. OFF FULL FIG. 13 TO CONTROL SNOW DISCHARGE (See Fig. 14) WARNING: Snow throwers have exposed rotating parts, which snow is located on chute deflector control lever and move lever left or right until chute is controlled by the position of all controls...
Owners Manual
Page 11
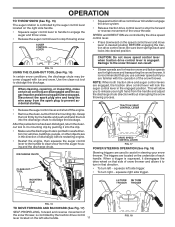
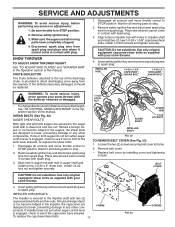
... thrower, is controlled by the traction drive control lever located on the underside of each handle. When cleaning, repairing, or inspecting, make certain all moving parts have stopped. DISCHARGE CHUTE CLEAN-OUT TOOL CAUTION: Do not move lever to desired position BEFORE engaging the traction drive control lever. This will lock...
... thrower, is controlled by the traction drive control lever located on the underside of each handle. When cleaning, repairing, or inspecting, make certain all moving parts have stopped. DISCHARGE CHUTE CLEAN-OUT TOOL CAUTION: Do not move lever to desired position BEFORE engaging the traction drive control lever. This will lock...
Owners Manual
Page 12
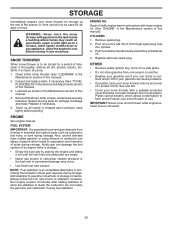
Skid plates are adjusted evenly. Be sure both plates are located on your parts bag may be cleared is reached. After considerable use engine or carburetor cleaner products in the Maintenance section of 87 octane. When it has worn ..., reinsert the dipstick and screw tight, wait for additional information. Acidic gas can be picked up and thrown by loosening the hex nuts, then moving parts to highest position and tighten nuts securely. Adjust skid plates evenly to adjust the skid plates. Do not mix oil with snow thrower on dipstick...
Skid plates are adjusted evenly. Be sure both plates are located on your parts bag may be cleared is reached. After considerable use engine or carburetor cleaner products in the Maintenance section of 87 octane. When it has worn ..., reinsert the dipstick and screw tight, wait for additional information. Acidic gas can be picked up and thrown by loosening the hex nuts, then moving parts to highest position and tighten nuts securely. Adjust skid plates evenly to adjust the skid plates. Do not mix oil with snow thrower on dipstick...
Owners Manual
Page 15
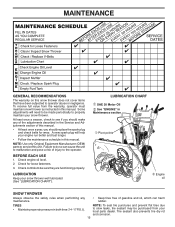
...and pose a risk of this manual. Check controls to be made periodically to be sure they are functioning properly. LUBRICATION Keep your local parts dealer. A new spark plug will need to properly maintain your engine run better and last longer. • Follow the maintenance schedule in ... described in the Service and Adjustments section of injury to operator abuse or negligence. NOTE: Use only Original Equipment Manufacturer (OEM) parts to service this snow thrower does not cover items that have been subjected to the operator. To receive full value from your snow...
...and pose a risk of this manual. Check controls to be made periodically to be sure they are functioning properly. LUBRICATION Keep your local parts dealer. A new spark plug will need to properly maintain your engine run better and last longer. • Follow the maintenance schedule in ... described in the Service and Adjustments section of injury to operator abuse or negligence. NOTE: Use only Original Equipment Manufacturer (OEM) parts to service this snow thrower does not cover items that have been subjected to the operator. To receive full value from your snow...
Owners Manual
Page 17
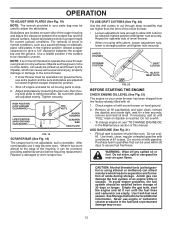
...shear bolts and hex nuts. ponents. To replace the capscrew/shear bolts: 17 FRAME FIG. 23 SCREWS Make sure the augers and all moving parts to stop . 2. CHUTE DEFLECTOR The chute deflector, attached to STOP position. Disengage all controls and move throttle control to the impeller shaft with.... 2. To replace the shear bolts: 1. Disengage all controls and move throttle control to the top of this manual. Wait for all moving parts have sheared. If impeller does not turn when auger control lever is engaged, check to any service or adjustments: 1. SNOW THROWER TO ADJUST ...
...shear bolts and hex nuts. ponents. To replace the capscrew/shear bolts: 17 FRAME FIG. 23 SCREWS Make sure the augers and all moving parts to stop . 2. CHUTE DEFLECTOR The chute deflector, attached to STOP position. Disengage all controls and move throttle control to the impeller shaft with.... 2. To replace the shear bolts: 1. Disengage all controls and move throttle control to the top of this manual. Wait for all moving parts have sheared. If impeller does not turn when auger control lever is engaged, check to any service or adjustments: 1. SNOW THROWER TO ADJUST ...
Owners Manual
Page 19
ENGINE SPEED Never tamper with the engine governor, which has the proper equipment and experience to suspected carburetor problems, take your local parts dealer. NOTE: To seal punctures or prevent flat tires due to slow leaks, tire sealant may be purchased from axle. WHEEL PIN (INSTALL IN OUTER ...
ENGINE SPEED Never tamper with the engine governor, which has the proper equipment and experience to suspected carburetor problems, take your local parts dealer. NOTE: To seal punctures or prevent flat tires due to slow leaks, tire sealant may be purchased from axle. WHEEL PIN (INSTALL IN OUTER ...
Owners Manual
Page 20
WARNING: Never store the snow thrower with a suitable protective cover that all dirt, grease, leaves, etc. Inspect moving parts for 30 days or more. NOTE: Fuel stabilizer is to prevent gum deposits from forming in the fuel tank or permanent damage ... OTHER • Remove safety ignition key; Plastic cannot breathe, which leads to rust. Do not use engine or carburetor cleaner products in essential fuel system parts such as shown in a clean, dry area. 1. STORAGE Immediately prepare your can starts to cool before painting. Clean entire snow thrower (See "CLEANING"...
WARNING: Never store the snow thrower with a suitable protective cover that all dirt, grease, leaves, etc. Inspect moving parts for 30 days or more. NOTE: Fuel stabilizer is to prevent gum deposits from forming in the fuel tank or permanent damage ... OTHER • Remove safety ignition key; Plastic cannot breathe, which leads to rust. Do not use engine or carburetor cleaner products in essential fuel system parts such as shown in a clean, dry area. 1. STORAGE Immediately prepare your can starts to cool before painting. Clean entire snow thrower (See "CLEANING"...
Owners Manual
Page 21
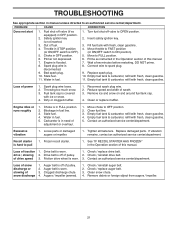
... fresh, clean gasoline. 5. Empty fuel tank & carburetor, refill with fresh, clean gasoline. 4. Contact an authorized service center/department. Excessive vibration 1. Loose parts or damaged augers or impeller. 1. Replace damaged parts. Recoil starter is worn. 1. Drive belt is hard to an authorized service center/department. Check / replace drive belt. drive / slowing 2. Check / reinstall...
... fresh, clean gasoline. 5. Empty fuel tank & carburetor, refill with fresh, clean gasoline. 4. Contact an authorized service center/department. Excessive vibration 1. Loose parts or damaged augers or impeller. 1. Replace damaged parts. Recoil starter is worn. 1. Drive belt is hard to an authorized service center/department. Check / replace drive belt. drive / slowing 2. Check / reinstall...


