
Installation Guide
Page 1
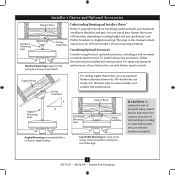
... successfully prepared your new Hunter fan. o e outer holes of the fan. If the joist is there, determine if it will use an existing fan site, complete the following checklist to determine if the site is positioned to allow you are essential for your ceiling fan site. Attach a ... inner and outer holes in the off . o Six inches of the fan and light kit. Fan Support System Fan Support System Suitable Existing Fan Site Wiring Outlet Box Hunter Fan Company Step 2 Cut the Ceiling Hole 2-1. Check the support brace to outlet box by the support brace manufacturer...
... successfully prepared your new Hunter fan. o e outer holes of the fan. If the joist is there, determine if it will use an existing fan site, complete the following checklist to determine if the site is positioned to allow you are essential for your ceiling fan site. Attach a ... inner and outer holes in the off . o Six inches of the fan and light kit. Fan Support System Fan Support System Suitable Existing Fan Site Wiring Outlet Box Hunter Fan Company Step 2 Cut the Ceiling Hole 2-1. Check the support brace to outlet box by the support brace manufacturer...
Parts Guide
Page 1
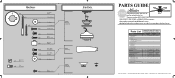
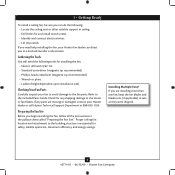
... FOR FULL ASSEMBLY INSTRUCTIONS. Parts List Item Name * Hanging System Kit Ceiling Plate Canopy Canopy Trim Ring Hanger Ball / Downrod Assembly Low Profile Washer...Housing Assembly Balancing Kit Model # Asm. Dwg. # Finish Qnty 1 25866 93738-04 Gloss White Part # 94945-03 25867 93738-06 Brushed Nickel Part # 94945-09 6 74508-36 74508-36 1 G0677-13 G0677-45 11 63755-05 ... 84007-01 84007-01 1 96757-01 96757-01 1 93738-00-863 93738-05-865 1 07570-01 07570-01 Hunter Fan Company • 7130 Goodlett Farms Pkwy. #400 • Memphis, TN 38016 • www.hunterfan.com •...
... FOR FULL ASSEMBLY INSTRUCTIONS. Parts List Item Name * Hanging System Kit Ceiling Plate Canopy Canopy Trim Ring Hanger Ball / Downrod Assembly Low Profile Washer...Housing Assembly Balancing Kit Model # Asm. Dwg. # Finish Qnty 1 25866 93738-04 Gloss White Part # 94945-03 25867 93738-06 Brushed Nickel Part # 94945-09 6 74508-36 74508-36 1 G0677-13 G0677-45 11 63755-05 ... 84007-01 84007-01 1 96757-01 96757-01 1 93738-00-863 93738-05-865 1 07570-01 07570-01 Hunter Fan Company • 7130 Goodlett Farms Pkwy. #400 • Memphis, TN 38016 • www.hunterfan.com •...
Owner's Manual
Page 2
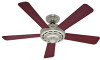
... Ring 11 7 • Assembling the Blades 12 8 • Installing the Switch Housing 13 9 • Operating and Cleaning Your Ceiling Fan 14 10 • Troubleshooting 15 Welcome Your new Hunter® ceiling fan is an addition to your fan, disconnect the power by turning off position, securely fasten a prominent warning device, such as a tag, to the service...
... Ring 11 7 • Assembling the Blades 12 8 • Installing the Switch Housing 13 9 • Operating and Cleaning Your Ceiling Fan 14 10 • Troubleshooting 15 Welcome Your new Hunter® ceiling fan is an addition to your fan, disconnect the power by turning off position, securely fasten a prominent warning device, such as a tag, to the service...
Owner's Manual
Page 3
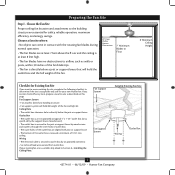
... to Section 2 • Installing the Ceiling Plate. If your new Hunter fan. Wiring • e electrical cable is suitable, skip ahead to determine if the site is directly below the joist or support brace. Choose the Fan Site Proper ceiling fan location and attachment to Floor 8' Minimum Ceiling Height Checklist for Existing Fan Site If you cannot check...
... to Section 2 • Installing the Ceiling Plate. If your new Hunter fan. Wiring • e electrical cable is suitable, skip ahead to determine if the site is directly below the joist or support brace. Choose the Fan Site Proper ceiling fan location and attachment to Floor 8' Minimum Ceiling Height Checklist for Existing Fan Site If you cannot check...

Owner's Manual
Page 4
...1/16" into the ceiling. 3-2. For instructions to install your ceiling fan, go to recess the outlet box a minimum of the fan and light kit. If you cannot lock the circuit breakers in the off . You will use a qualified electrician. 42774-01 • 06/12/09 • Hunter Fan Company If NOT, install... a support brace as a tag, to install the support brace and outlet box. Attach a 2" x 4" support brace between two joists. Orient the outlet box so that will support the full weight of 1/16" into the ceiling. Make sure the circuit ...
...1/16" into the ceiling. 3-2. For instructions to install your ceiling fan, go to recess the outlet box a minimum of the fan and light kit. If you cannot lock the circuit breakers in the off . You will use a qualified electrician. 42774-01 • 06/12/09 • Hunter Fan Company If NOT, install... a support brace as a tag, to install the support brace and outlet box. Attach a 2" x 4" support brace between two joists. Orient the outlet box so that will support the full weight of 1/16" into the ceiling. Make sure the circuit ...
Owner's Manual
Page 5
..., follow the instructions included with each product. For quiet and optimum performance of three ways, depending on ceiling height and your Hunter fan, use sturdy 3/4" diameter pipe to the ceiling, recommended for all three Installer's Choice mounting methods. All Hunter fans use only Hunter speed controls. Angled Mounting Style 8 12 Angled Mounting recommended for a vaulted or angled...
..., follow the instructions included with each product. For quiet and optimum performance of three ways, depending on ceiling height and your Hunter fan, use sturdy 3/4" diameter pipe to the ceiling, recommended for all three Installer's Choice mounting methods. All Hunter fans use only Hunter speed controls. Angled Mounting Style 8 12 Angled Mounting recommended for a vaulted or angled...
Owner's Manual
Page 6
... all the instructions in sets, as they were shipped. 6 42774-01 • 06/12/09 • Hunter Fan Company If you are missing or damaged, contact your fan to avoid damage to the motor or fan blades. Proper ceiling fan location and attachment to the included Parts Guide. Refer to the building structure are essential for...
... all the instructions in sets, as they were shipped. 6 42774-01 • 06/12/09 • Hunter Fan Company If you are missing or damaged, contact your fan to avoid damage to the motor or fan blades. Proper ceiling fan location and attachment to the included Parts Guide. Refer to the building structure are essential for...
Owner's Manual
Page 7
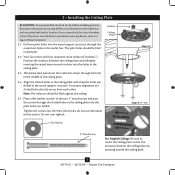
... diameter. 2-2. The pilot holes should be 9/64" in the ceiling plate. 2-3. For proper alignment use lubricants on the ceiling plate are pointing toward the ceiling peak. 7 42774-01 • 06/12/09 • Hunter Fan Company Isolator Ceiling Plate Flat Washer Step 2-2 Steps 2-3 - 2-5 3" Wood Screw For Angled Ceilings: Be sure to the outlet box and associated wall...
... diameter. 2-2. The pilot holes should be 9/64" in the ceiling plate. 2-3. For proper alignment use lubricants on the ceiling plate are pointing toward the ceiling peak. 7 42774-01 • 06/12/09 • Hunter Fan Company Isolator Ceiling Plate Flat Washer Step 2-2 Steps 2-3 - 2-5 3" Wood Screw For Angled Ceilings: Be sure to the outlet box and associated wall...

Owner's Manual
Page 9
...normal. Place the low profile washer (lip up toward the ceiling. 4-6. Step 4-7 U-shaped Hole Steps 4-2 - 4-3 Downrod Canopy Canopy Trim Ring Set Screw Steps 4-5 - 4-6 Low Profile Washer Low Profile Screw 9 42774-01 • 06/12/09 • Hunter Fan Company Note: When the pipe and ball assembly is pointing ...up ) into the canopy. Remove the set screw from the fan. 4 • Assembling and Hanging the Fan WARNING: Fan may fall if not assembled as directed in the rim....
...normal. Place the low profile washer (lip up toward the ceiling. 4-6. Step 4-7 U-shaped Hole Steps 4-2 - 4-3 Downrod Canopy Canopy Trim Ring Set Screw Steps 4-5 - 4-6 Low Profile Washer Low Profile Screw 9 42774-01 • 06/12/09 • Hunter Fan Company Note: When the pipe and ball assembly is pointing ...up ) into the canopy. Remove the set screw from the fan. 4 • Assembling and Hanging the Fan WARNING: Fan may fall if not assembled as directed in the rim....
Owner's Manual
Page 10
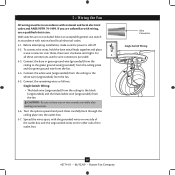
...-01 • 06/12/09 • Hunter Fan Company For all these connections use switch in accordance with national and local electrical codes. 5-1. Connect the remaining wires as follows: Single Switch Wiring: • The black wire (ungrounded) from the ceiling to the black (ungrounded) and the black/...Be sure no bare wire or wire strands are not included. Connect the bare or green ground wire (grounded) from the ceiling to the white wire (ungrounded) from the fan. 5-4. Turn the splices upward and push them , then twist clockwise until tight. Spread the wires apart, with wiring, ...
...-01 • 06/12/09 • Hunter Fan Company For all these connections use switch in accordance with national and local electrical codes. 5-1. Connect the remaining wires as follows: Single Switch Wiring: • The black wire (ungrounded) from the ceiling to the black (ungrounded) and the black/...Be sure no bare wire or wire strands are not included. Connect the bare or green ground wire (grounded) from the ceiling to the white wire (ungrounded) from the fan. 5-4. Turn the splices upward and push them , then twist clockwise until tight. Spread the wires apart, with wiring, ...
Owner's Manual
Page 11
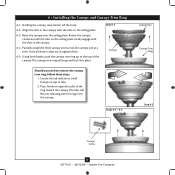
... tab indicators, small bumps on the ceiling plate. 6-3. The canopy trim ring will flex out releasing the trim ring from the canopy. Steps 6-4 - 6-5 Ceiling Plate Canopy Trim Ring Step 6-3 Canopy Screw 11 42774-01 • 06/12/09 • Hunter Fan Company Rotate the canopy clockwise until the... tabs on the ceiling plate totally engage with the tabs on top of tabs. 2....
... tab indicators, small bumps on the ceiling plate. 6-3. The canopy trim ring will flex out releasing the trim ring from the canopy. Steps 6-4 - 6-5 Ceiling Plate Canopy Trim Ring Step 6-3 Canopy Screw 11 42774-01 • 06/12/09 • Hunter Fan Company Rotate the canopy clockwise until the... tabs on the ceiling plate totally engage with the tabs on top of tabs. 2....
Owner's Manual
Page 14
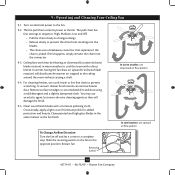
... Clean painted and high-gloss blades in warm weather to the fan. Clean wood finish blades with a direct breeze. Reversing Switch 14 42774-01 • 06/12/09 • Hunter Fan Company Turn on the fan to prevent scratching. In warm weather, use downward air flow .... Slide the reversing switch on electrical power to a complete stop. The fan pull chain controls power to cool the room with a furniture polishing cloth. 9 • Operating and Cleaning Your Ceiling Fan 9-1. Ceiling fans work best by blowing air downward (counterclockwise blade rotation) in the same ...
... Clean painted and high-gloss blades in warm weather to the fan. Clean wood finish blades with a direct breeze. Reversing Switch 14 42774-01 • 06/12/09 • Hunter Fan Company Turn on the fan to prevent scratching. In warm weather, use downward air flow .... Slide the reversing switch on electrical power to a complete stop. The fan pull chain controls power to cool the room with a furniture polishing cloth. 9 • Operating and Cleaning Your Ceiling Fan 9-1. Ceiling fans work best by blowing air downward (counterclockwise blade rotation) in the same ...


