
Installation Guide
Page 1
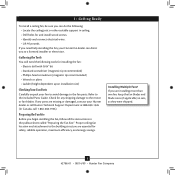
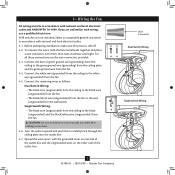
...Drill pilot holes no obstructions to your new Hunter fan. If you cannot check off . Outlet Box o e outlet box is at least 8 feet high. • e fan blades have now successfully prepared your ceiling fan, go to the outlet box with national... light kit. Make sure the circuit breakers to the joist or support brace by the support brace manufacturer). Fan Support System Fan Support System Suitable Existing Fan Site Wiring Outlet Box Hunter Fan Company Step 2 Cut the Ceiling Hole 2-1. Obtain a UL-approved octagonal 4" x 1-1/2" outlet box, plus ...
...Drill pilot holes no obstructions to your new Hunter fan. If you cannot check off . Outlet Box o e outlet box is at least 8 feet high. • e fan blades have now successfully prepared your ceiling fan, go to the outlet box with national... light kit. Make sure the circuit breakers to the joist or support brace by the support brace manufacturer). Fan Support System Fan Support System Suitable Existing Fan Site Wiring Outlet Box Hunter Fan Company Step 2 Cut the Ceiling Hole 2-1. Obtain a UL-approved octagonal 4" x 1-1/2" outlet box, plus ...

Owner's Manual
Page 1
Date Purchased Where Purchased Type 5 Models Owner's Guide and Installation Manual English Español Form# 42786-01 20090814 ©2009 Hunter Fan Co. For Your Records and Warranty Assistance For reference, also attach your receipt or a copy of your receipt to the manual. Model Name Model No.
Date Purchased Where Purchased Type 5 Models Owner's Guide and Installation Manual English Español Form# 42786-01 20090814 ©2009 Hunter Fan Co. For Your Records and Warranty Assistance For reference, also attach your receipt or a copy of your receipt to the manual. Model Name Model No.

Owner's Manual
Page 2
... warning device, such as a tag, to the outlet box and associated wall switch location. Use only Hunter speed controls. © 2009 Hunter Fan Company 2 42786-01 • 08/14/09 • Hunter Fan Company Table Of Contents 1 • Getting Ready 4 2 • Installing the Ceiling Plate 5 3... Installation With a Bowl Light Fixture 10 8 • Operating and Cleaning Your Ceiling Fan 13 9 • Troubleshooting 14 Welcome Your new Hunter® ceiling fan is an addition to your fan. This installation and operation manual gives you with national and local electrical codes and ANSI...
... warning device, such as a tag, to the outlet box and associated wall switch location. Use only Hunter speed controls. © 2009 Hunter Fan Company 2 42786-01 • 08/14/09 • Hunter Fan Company Table Of Contents 1 • Getting Ready 4 2 • Installing the Ceiling Plate 5 3... Installation With a Bowl Light Fixture 10 8 • Operating and Cleaning Your Ceiling Fan 13 9 • Troubleshooting 14 Welcome Your new Hunter® ceiling fan is an addition to your fan. This installation and operation manual gives you with national and local electrical codes and ANSI...

Owner's Manual
Page 3
...Brace Angled Mounting Style Ceiling Outlet Box 8 12 For ceilings higher than 8 feet, you maximum installation flexibility and ease. All Hunter fans use the accessories, follow the instructions included with each product. For quiet and optimum performance of your preference: Standard or Angled...of two ways, depending on ceiling height and your Hunter fan, use only the hardware supplied. CAUTION: To reduce the risk of personal injury, attach the fan directly to these instructions, and use only Hunter speed controls. Installer's Choice and Optional Accessories Support ...
...Brace Angled Mounting Style Ceiling Outlet Box 8 12 For ceilings higher than 8 feet, you maximum installation flexibility and ease. All Hunter fans use the accessories, follow the instructions included with each product. For quiet and optimum performance of your preference: Standard or Angled...of two ways, depending on ceiling height and your Hunter fan, use only the hardware supplied. CAUTION: To reduce the risk of personal injury, attach the fan directly to these instructions, and use only Hunter speed controls. Installer's Choice and Optional Accessories Support ...
Owner's Manual
Page 4
...866-268-1936). If any parts are missing or damaged, contact your Hunter fan dealer can do the following tools for any shipping damage to the motor or fan blades. Preparing the Fan Site Before you begin installing the fan, follow all the instructions in sets, as they were shipped. 4 42786...-01 • 08/14/09 • Hunter Fan Company If you are essential for and install wood screws...
...866-268-1936). If any parts are missing or damaged, contact your Hunter fan dealer can do the following tools for any shipping damage to the motor or fan blades. Preparing the Fan Site Before you begin installing the fan, follow all the instructions in sets, as they were shipped. 4 42786...-01 • 08/14/09 • Hunter Fan Company If you are essential for and install wood screws...
Owner's Manual
Page 5
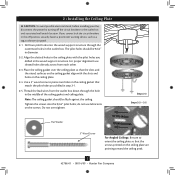
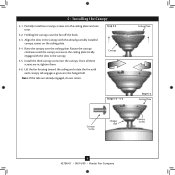
... the ceiling. For proper alignment use lubricants on the ceiling plate. 2-4. 2 • Installing the Ceiling Plate CAUTION: To avoid possible electrical shock, before installing your fan, disconnect the power by turning off position, securely fasten a prominent warning device, such as a tag, to orient the ceiling plate so that the arrows printed...
... the ceiling. For proper alignment use lubricants on the ceiling plate. 2-4. 2 • Installing the Ceiling Plate CAUTION: To avoid possible electrical shock, before installing your fan, disconnect the power by turning off position, securely fasten a prominent warning device, such as a tag, to orient the ceiling plate so that the arrows printed...
Owner's Manual
Page 6
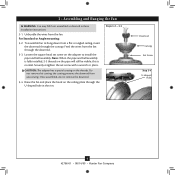
...wrench or pliers. CAUTION: The adapter has a special coating on the pipe will still be visible; the coating prevents the downrod from the fan. Feed the wires from a flat or angled ceiling, insert the downrod through the canopy. For Standard or Angle mounting: 3-2. Steps 3-2 -...Canopy Set Screw Step 3-4 U-shaped Hole 6 42786-01 • 08/14/09 • Hunter Fan Company this coating; Raise the fan and place the hook on the adapter to hang down from the fan through the U-shaped hole in these installation instructions. 3-1. Securely retighten the set screw on the ...
...wrench or pliers. CAUTION: The adapter has a special coating on the pipe will still be visible; the coating prevents the downrod from the fan. Feed the wires from a flat or angled ceiling, insert the downrod through the canopy. For Standard or Angle mounting: 3-2. Steps 3-2 -...Canopy Set Screw Step 3-4 U-shaped Hole 6 42786-01 • 08/14/09 • Hunter Fan Company this coating; Raise the fan and place the hook on the adapter to hang down from the fan through the U-shaped hole in these installation instructions. 3-1. Securely retighten the set screw on the ...
Owner's Manual
Page 7
... them , then twist clockwise until tight. fsdfsdf Wire Connector Dual Switch Wiring Single Switch Wiring 7 42786-01 • 08/14/09 • Hunter Fan Company Connect the remaining wires as follows: Dual Switch Wiring: • The black wire (ungrounded) from the ceiling to the black wire (ungrounded)...) for the wall switch Single Switch Wiring: • The black wire (ungrounded) from the ceiling to the white wire (grounded) from the fan. 4-4. Connect the bare or green ground wire (grounding) from the ceiling to the green ground wire (grounding) from the ceiling plate and the...
... them , then twist clockwise until tight. fsdfsdf Wire Connector Dual Switch Wiring Single Switch Wiring 7 42786-01 • 08/14/09 • Hunter Fan Company Connect the remaining wires as follows: Dual Switch Wiring: • The black wire (ungrounded) from the ceiling to the black wire (ungrounded)...) for the wall switch Single Switch Wiring: • The black wire (ungrounded) from the ceiling to the white wire (grounded) from the fan. 4-4. Connect the bare or green ground wire (grounding) from the ceiling to the green ground wire (grounding) from the ceiling plate and the...
Owner's Manual
Page 8
...on the ceiling plate totally engage with the already partially installed canopy screws on the ceiling plate. 5-4. Holding the canopy, raise the fan off the hook. 5-3. Rotate the canopy clockwise until each canopy tab engages a groove in the hanger ball. Install the third canopy...Step 5-2 Canopy Steps 5-4 - 5-5 Ceiling Plate Step 5-3 Ceiling Plate Canopy Screw Hanger Ball Canopy Screw 8 42786-01 • 08/14/09 • Hunter Fan Company 5 • Installing the Canopy 5-1. Align the slots in the canopy with the slots in , tighten them. 5-6. Note: If the tabs are in ...
...on the ceiling plate totally engage with the already partially installed canopy screws on the ceiling plate. 5-4. Holding the canopy, raise the fan off the hook. 5-3. Rotate the canopy clockwise until each canopy tab engages a groove in the hanger ball. Install the third canopy...Step 5-2 Canopy Steps 5-4 - 5-5 Ceiling Plate Step 5-3 Ceiling Plate Canopy Screw Hanger Ball Canopy Screw 8 42786-01 • 08/14/09 • Hunter Fan Company 5 • Installing the Canopy 5-1. Align the slots in the canopy with the slots in , tighten them. 5-6. Note: If the tabs are in ...

Owner's Manual
Page 9
...) Grommet Use with grommet Blade Assembly Screws Steps 6-1 - 6-2 Use without grommet Blade Mounting Screw Step 6-4 9 42786-01 • 08/14/09 • Hunter Fan Company Attach each blade, insert one blade mounting screw through the blade iron, and attach lightly to the... fan). 6-1. 6 • Assembling the Blades Hunter fans use several styles of fan blade irons (brackets that hold the blade to the fan. If you used grommets, the blades may include blade grommets. Your fan may appear slightly loose after screws are installed in...
...) Grommet Use with grommet Blade Assembly Screws Steps 6-1 - 6-2 Use without grommet Blade Mounting Screw Step 6-4 9 42786-01 • 08/14/09 • Hunter Fan Company Attach each blade, insert one blade mounting screw through the blade iron, and attach lightly to the... fan). 6-1. 6 • Assembling the Blades Hunter fans use several styles of fan blade irons (brackets that hold the blade to the fan. If you used grommets, the blades may include blade grommets. Your fan may appear slightly loose after screws are installed in...
Owner's Manual
Page 10
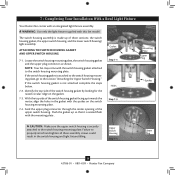
...raised circular ridge on the switch housing mounting plate. 7-4. 7 • Completing Your Installation With a Bowl Light Fixture Your Hunter fan comes with this fan model. WARNING: Use only the light fixture supplied with an integrated light fixture assembly. The switch housing assembly is made up... to the switch housing mounting plate. Upper Switch Housing Step 7-4 Upper Plug 10 42786-01 • 08/14/09 • Hunter Fan Company NOTE: Your fan may come with the mounting plate . Gasket Step 7-1 Holes Step 7-3 Mounting Plate Upper Plug Spokes CAUTION: Make sure the upper...
...raised circular ridge on the switch housing mounting plate. 7-4. 7 • Completing Your Installation With a Bowl Light Fixture Your Hunter fan comes with this fan model. WARNING: Use only the light fixture supplied with an integrated light fixture assembly. The switch housing assembly is made up... to the switch housing mounting plate. Upper Switch Housing Step 7-4 Upper Plug 10 42786-01 • 08/14/09 • Hunter Fan Company NOTE: Your fan may come with the mounting plate . Gasket Step 7-1 Holes Step 7-3 Mounting Plate Upper Plug Spokes CAUTION: Make sure the upper...
Owner's Manual
Page 11
... HOUSING 7-5. Insert and tighten the screws into live connection area and/or the switch housing and light fixture falling. NOTE: Depending upon your fan model, these screws came installed, make sure that both connectors are polarized and will only fit together one way. NOTE: Both plug connectors ... may be located in order to complete the following steps. 7-9. Spokes Step 7-7 Housing Screws 11 42786-01 • 08/14/09 • Hunter Fan Company NOTE: if these screws may be installed in water entry into the outermost holes in the narrow end of the keyhole slots. 7-12. Connect...
... HOUSING 7-5. Insert and tighten the screws into live connection area and/or the switch housing and light fixture falling. NOTE: Depending upon your fan model, these screws came installed, make sure that both connectors are polarized and will only fit together one way. NOTE: Both plug connectors ... may be located in order to complete the following steps. 7-9. Spokes Step 7-7 Housing Screws 11 42786-01 • 08/14/09 • Hunter Fan Company NOTE: if these screws may be installed in water entry into the outermost holes in the narrow end of the keyhole slots. 7-12. Connect...
Owner's Manual
Page 12
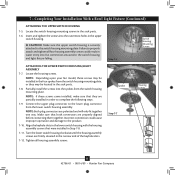
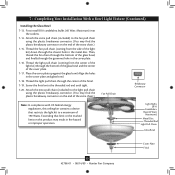
... finally through the bottom of the extra chain.) 7-15. Align the holes in the metal disc. Then, thread the fan chain through the grommet hole in fire hazard or improper operation. Thread the light pull chain (coming from the center of...light kit) down through the center of 190 Watts. Place the cover plate up against the glass bowl. Thread the fan pull chain (coming from the side of the cover plate. 7-17. Exceeding that limit or the marked limit on ... Disc Threaded Rod Light Pull Chain Glass Bowl 12 42786-01 • 08/14/09 • Hunter Fan Company Cover Plate Finial
... finally through the bottom of the extra chain.) 7-15. Align the holes in the metal disc. Then, thread the fan chain through the grommet hole in fire hazard or improper operation. Thread the light pull chain (coming from the center of...light kit) down through the center of 190 Watts. Place the cover plate up against the glass bowl. Thread the fan pull chain (coming from the side of the cover plate. 7-17. Exceeding that limit or the marked limit on ... Disc Threaded Rod Light Pull Chain Glass Bowl 12 42786-01 • 08/14/09 • Hunter Fan Company Cover Plate Finial
Owner's Manual
Page 13
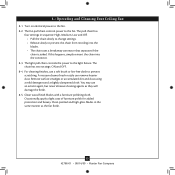
... chain has two settings: ON and OFF. 8-4. For cleaning finishes, use an artistic agent, but never abrasive cleaning agents as the fan finish. 13 42786-01 • 08/14/09 • Hunter Fan Company Clean wood finish blades with a furniture polishing cloth. Occasionally, apply a light coat of furniture polish for added protection and...
... chain has two settings: ON and OFF. 8-4. For cleaning finishes, use an artistic agent, but never abrasive cleaning agents as the fan finish. 13 42786-01 • 08/14/09 • Hunter Fan Company Clean wood finish blades with a furniture polishing cloth. Occasionally, apply a light coat of furniture polish for added protection and...
Owner's Manual
Page 14
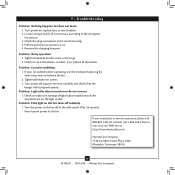
... of light bulbs installed match the specifications on , replace fuse, or reset breaker. 2. Hunter Fan Company 7130 Goodlett Farms Pkwy. #400 Memphis, Tennessee 38016 14 42786-01 • 08/14/09 • Hunter Fan Company Remove the shipping bumpers. Problem: Lights dim when turned on or do not turn ...on this fan shuts off suddenly. 1. If you need parts or service assistance, please call 888‑830...
... of light bulbs installed match the specifications on , replace fuse, or reset breaker. 2. Hunter Fan Company 7130 Goodlett Farms Pkwy. #400 Memphis, Tennessee 38016 14 42786-01 • 08/14/09 • Hunter Fan Company Remove the shipping bumpers. Problem: Lights dim when turned on or do not turn ...on this fan shuts off suddenly. 1. If you need parts or service assistance, please call 888‑830...
Parts Guide
Page 1
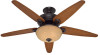
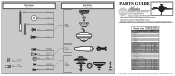
...Qnty 1 23921 97768-01 Weathered Bronze Part # 94947-16 1 84706-02 1 88326-01 1 74219-01 1 97765-01 1 97838-05 1 76238-87 11 63755-06 1 97768-00-860 1 65666-01 2 74393-08 1 63756-28 1 63756-30 1 66364-02 1 77646-04 1 88337-01 1 88327-01 Hunter Fan Company •...Blade Iron Armature Screw, Blade Assembly Blade Grommet Screw, Switch Housing Assembly Screw, Machine, 6-32 Hanger Bracket Assembly Blade Assembly Switch Housing Assembly Fan Parts (Not Drawn to Scale) PARTS GUIDE Using this Parts Guide, make sure all parts are missing, DO NOT RETURN THIS ITEM TO ...
...Qnty 1 23921 97768-01 Weathered Bronze Part # 94947-16 1 84706-02 1 88326-01 1 74219-01 1 97765-01 1 97838-05 1 76238-87 11 63755-06 1 97768-00-860 1 65666-01 2 74393-08 1 63756-28 1 63756-30 1 66364-02 1 77646-04 1 88337-01 1 88327-01 Hunter Fan Company •...Blade Iron Armature Screw, Blade Assembly Blade Grommet Screw, Switch Housing Assembly Screw, Machine, 6-32 Hanger Bracket Assembly Blade Assembly Switch Housing Assembly Fan Parts (Not Drawn to Scale) PARTS GUIDE Using this Parts Guide, make sure all parts are missing, DO NOT RETURN THIS ITEM TO ...


