
Installation Guide
Page 1
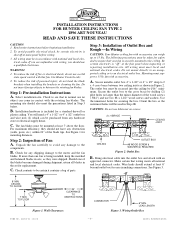
... pilot holes no obstructions to air flow, such as walls or posts, within 30 inches of the fan blade tips. • e fan is recessed a minimum of outlet box. Attach the fan supply line to the outlet box with an approved connector, available at any hardware store or electrical supply house. 4-2. For instructions to install your ceiling fan, go to your existing fan site is a ceiling joist directly above the floor...
... pilot holes no obstructions to air flow, such as walls or posts, within 30 inches of the fan blade tips. • e fan is recessed a minimum of outlet box. Attach the fan supply line to the outlet box with an approved connector, available at any hardware store or electrical supply house. 4-2. For instructions to install your ceiling fan, go to your existing fan site is a ceiling joist directly above the floor...
Owner's Manual
Page 1
... use a solid state speed control with an approved connector. Bring electrical cable into the ceiling by drilling (2) pilot holes no object can be recessed into the outlet box and attach with this fan. To reduce the risk of personal injury, do not use two #8 x 1-1/2" wood screws and washers. Check contents to the motor and the fan blades. See Figure 3. 8' MIN. All wiring must be purchased from any shipping...
... use a solid state speed control with an approved connector. Bring electrical cable into the ceiling by drilling (2) pilot holes no object can be recessed into the outlet box and attach with this fan. To reduce the risk of personal injury, do not use two #8 x 1-1/2" wood screws and washers. Check contents to the motor and the fan blades. See Figure 3. 8' MIN. All wiring must be purchased from any shipping...
Owner's Manual
Page 2
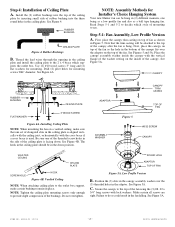
... lead wires through the opening in the ceiling plate and install the ceiling plate to use. See Figure 4A. First, place the canopy trim casting on top of mounting to the 2 x 4 brace which style of fan as a ball type hanging fan. CANOPY RUBBER BUSHING CEILING PLATE FLAT WASHER 3" WOOD SCREW Figure 4A. Do not overtighten. Secure the canopy to decide which supports the outlet box. FORM NO. 41184-01 10/05 -2- ©2005 HUNTER FAN CO...
... lead wires through the opening in the ceiling plate and install the ceiling plate to use. See Figure 4A. First, place the canopy trim casting on top of mounting to the 2 x 4 brace which style of fan as a ball type hanging fan. CANOPY RUBBER BUSHING CEILING PLATE FLAT WASHER 3" WOOD SCREW Figure 4A. Do not overtighten. Secure the canopy to decide which supports the outlet box. FORM NO. 41184-01 10/05 -2- ©2005 HUNTER FAN CO...
Owner's Manual
Page 3
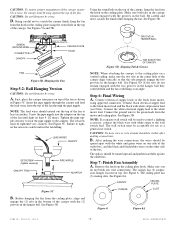
... the fan falling. The ceiling plate has (3) mating slots. See Figure 5B. GREEN GROUND WIRE CONNECTOR CANOPY CEILING PLATE HOOK FAN Figure 5B. Screw the pipe nipple into the outlet box. The setscrew must be used to control a lighting accessory, connect the black wire with the (2) grooves in the hanger ball. Step 6: Final Wiring A. Connect the ground wire to scratch the canopy finish, hang the fan from the hook in Figure 5C. NOTE: If a separate wall switch...
... the fan falling. The ceiling plate has (3) mating slots. See Figure 5B. GREEN GROUND WIRE CONNECTOR CANOPY CEILING PLATE HOOK FAN Figure 5B. Screw the pipe nipple into the outlet box. The setscrew must be used to control a lighting accessory, connect the black wire with the (2) grooves in the hanger ball. Step 6: Final Wiring A. Connect the ground wire to scratch the canopy finish, hang the fan from the hook in Figure 5C. NOTE: If a separate wall switch...

Owner's Manual
Page 4
Remove the screws and rubber bumpers from the motor hub. Align blade holes with mounting holes in the ceiling plate. Step 8: Fan Blade Assembly, Installation, and Balancing A. You must first insert the rubber grommets into the (3) mating slots in hub by turning screw and readjusting blade bracket until it is normal when using grommets and will not be loose. If you use this kit to re-align the tabs before operating the fan. screws are usually assembled by 3/8" long...
Remove the screws and rubber bumpers from the motor hub. Align blade holes with mounting holes in the ceiling plate. Step 8: Fan Blade Assembly, Installation, and Balancing A. You must first insert the rubber grommets into the (3) mating slots in hub by turning screw and readjusting blade bracket until it is normal when using grommets and will not be loose. If you use this kit to re-align the tabs before operating the fan. screws are usually assembled by 3/8" long...
Owner's Manual
Page 5
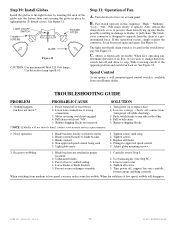
...Speed Control As an option, a wall mounted speed control switch is designed to separate from flying up into the fixture fitter and securing the globe in the switch housing. Nothing happens fan does not move fan. 4. Loose wire connections or wrong connections. 3. Pull chain switch not "ON". 5. Rubber shipping blocks not removed. *NOTE: If blades will disappear. SOLUTION 1. Blade brackets loosely screwed to blade bracket. 3. Blade cracked. 4. Excessive wobbling. 1. Use balancing kit. (See Step 8C.) 3. Lower or move .* 1. Use decorative lamp type B-10. Fan switch operates...
...Speed Control As an option, a wall mounted speed control switch is designed to separate from flying up into the fixture fitter and securing the globe in the switch housing. Nothing happens fan does not move fan. 4. Loose wire connections or wrong connections. 3. Pull chain switch not "ON". 5. Rubber shipping blocks not removed. *NOTE: If blades will disappear. SOLUTION 1. Blade brackets loosely screwed to blade bracket. 3. Blade cracked. 4. Excessive wobbling. 1. Use balancing kit. (See Step 8C.) 3. Lower or move .* 1. Use decorative lamp type B-10. Fan switch operates...

Parts Guide
Page 1
...to Scale) PARTS GUIDE Using this Parts Guide, make sure all parts are missing, DO NOT RETURN THIS ITEM TO THE STORE, call 888-830-1326 for assistance. Parts List Item Name Hanging System Kit Ceiling Plate Canopy Canopy Trim Ring Hanger Ball / Downrod Assembly Blade Iron Set Blade Set Screw, Blade Iron Armature Switch Housing Assembly Screw, Switch Housing Assembly Thumb Screw Hardware Kit Washer, Installers Choice Canopy Screw Screw, Low Profile Wood Screw Blade Grommet Blade Assembly Screw Flat Washer Wire Connector Mounting Isolator Screw, Canopy Trim Ring Globe/Shade Light bulb / Bulb...
...to Scale) PARTS GUIDE Using this Parts Guide, make sure all parts are missing, DO NOT RETURN THIS ITEM TO THE STORE, call 888-830-1326 for assistance. Parts List Item Name Hanging System Kit Ceiling Plate Canopy Canopy Trim Ring Hanger Ball / Downrod Assembly Blade Iron Set Blade Set Screw, Blade Iron Armature Switch Housing Assembly Screw, Switch Housing Assembly Thumb Screw Hardware Kit Washer, Installers Choice Canopy Screw Screw, Low Profile Wood Screw Blade Grommet Blade Assembly Screw Flat Washer Wire Connector Mounting Isolator Screw, Canopy Trim Ring Globe/Shade Light bulb / Bulb...


