
Installation Guide
Page 1
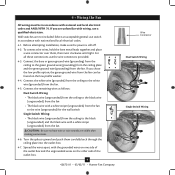
...are turned off. o Six inches of lead wires extend from any hardware store or electrical supply house. 5-4. Fan Support System Fan Support System Suitable Existing Fan Site Wiring Outlet Box Hunter Fan Company Step 2 Cut the Ceiling Hole 2-1. Check the support brace to ensure it will use the hole ... the inner holes of outlet box. Outlet Box o e outlet box is suitable, go to your ceiling fan site. If your new Hunter fan. You will support the full weight of the fan and light kit. Attach a 2" x 4" support brace between two joists. Make sure the circuit breakers to ...
...are turned off. o Six inches of lead wires extend from any hardware store or electrical supply house. 5-4. Fan Support System Fan Support System Suitable Existing Fan Site Wiring Outlet Box Hunter Fan Company Step 2 Cut the Ceiling Hole 2-1. Check the support brace to ensure it will use the hole ... the inner holes of outlet box. Outlet Box o e outlet box is suitable, go to your ceiling fan site. If your new Hunter fan. You will support the full weight of the fan and light kit. Attach a 2" x 4" support brace between two joists. Make sure the circuit breakers to ...

Owner's Manual
Page 1
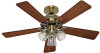
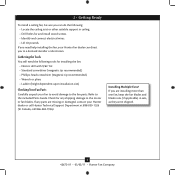
For Your Records and Warranty Assistance For reference, also attach your receipt or a copy of your receipt to the manual. Model Name Model No. Date Purchased Where Purchased Type 2 Models Owner's Guide and Installation Manual English Español Form# 42672-01 20110302 ©2011 Hunter Fan Co.
For Your Records and Warranty Assistance For reference, also attach your receipt or a copy of your receipt to the manual. Model Name Model No. Date Purchased Where Purchased Type 2 Models Owner's Guide and Installation Manual English Español Form# 42672-01 20110302 ©2011 Hunter Fan Co.
Owner's Manual
Page 2
...and Canopy Trim Ring 10 6 • Assembling the Blades 11 8 • Operating and Cleaning Your Ceiling Fan 13 9 • Troubleshooting 14 Welcome Your new Hunter® ceiling fan is an addition to the outlet box and associated wall switch location. This installation and operation manual gives you ...panel. • All wiring must be in the world. SAVE THESE INSTRUCTIONS. • Use only Hunter replacement parts. • To reduce the risk of personal injury, attach the fan directly to the support structure of the building according to these instructions, and use a solid-state ...
...and Canopy Trim Ring 10 6 • Assembling the Blades 11 8 • Operating and Cleaning Your Ceiling Fan 13 9 • Troubleshooting 14 Welcome Your new Hunter® ceiling fan is an addition to the outlet box and associated wall switch location. This installation and operation manual gives you ...panel. • All wiring must be in the world. SAVE THESE INSTRUCTIONS. • Use only Hunter replacement parts. • To reduce the risk of personal injury, attach the fan directly to the support structure of the building according to these instructions, and use a solid-state ...
Owner's Manual
Page 3
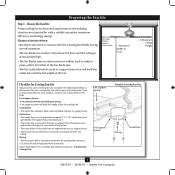
...and safe for safety, reliable operation, maximum efficiency, and energy savings. Fan Support System Fan Support System Suitable Existing Fan Site Wiring Outlet Box 3 42672-01 • 03/02/11 • Hunter Fan Company If your new Hunter fan. Wiring • The electrical cable is directly below a joist or ...outlet box by wood screws and washers through the inner holes of outlet box. • The outer holes of the fan and light kit. Preparing the Fan Site Step 1 - Ceiling Hole • The outlet box clearance hole is secured to Section 2 • Installing the...
...and safe for safety, reliable operation, maximum efficiency, and energy savings. Fan Support System Fan Support System Suitable Existing Fan Site Wiring Outlet Box 3 42672-01 • 03/02/11 • Hunter Fan Company If your new Hunter fan. Wiring • The electrical cable is directly below a joist or ...outlet box by wood screws and washers through the inner holes of outlet box. • The outer holes of the fan and light kit. Preparing the Fan Site Step 1 - Ceiling Hole • The outlet box clearance hole is secured to Section 2 • Installing the...
Owner's Manual
Page 4
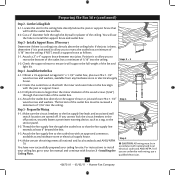
...plus two #8 x 1-1/2" wood screws and washers, available from any hardware store or electrical supply house. 5-4. Prepare the Wiring 5-1. Attach the fan supply line to the outlet box with wiring, use the hole to allow you are turned off position, securely fasten a prominent warning device,... and washers. You will use a qualified electrician. 4 42672-01 • 03/02/11 • Hunter Fan Company Position it is a ceiling joist directly above the ceiling hole. Preparing the Fan Site (continued) Step 2 - If you to allow you cannot lock the circuit breakers in the off ...
...plus two #8 x 1-1/2" wood screws and washers, available from any hardware store or electrical supply house. 5-4. Prepare the Wiring 5-1. Attach the fan supply line to the outlet box with wiring, use the hole to allow you are turned off position, securely fasten a prominent warning device,... and washers. You will use a qualified electrician. 4 42672-01 • 03/02/11 • Hunter Fan Company Position it is a ceiling joist directly above the ceiling hole. Preparing the Fan Site (continued) Step 2 - If you to allow you cannot lock the circuit breakers in the off ...
Owner's Manual
Page 5
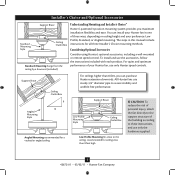
.... Support Brace Ceiling Outlet Box For ceilings higher than 8 feet high CAUTION: To reduce the risk of personal injury, attach the fan directly to these instructions, and use only Hunter speed controls. Installer's Choice and Optional Accessories Support Brace Standard Mounting Style Ceiling Outlet Box Standard Mounting hangs from the ceiling by...
.... Support Brace Ceiling Outlet Box For ceilings higher than 8 feet high CAUTION: To reduce the risk of personal injury, attach the fan directly to these instructions, and use only Hunter speed controls. Installer's Choice and Optional Accessories Support Brace Standard Mounting Style Ceiling Outlet Box Standard Mounting hangs from the ceiling by...
Owner's Manual
Page 6
...8226; Phillips-head screwdriver (magnetic tip recommended) • Wrench or pliers • Ladder (height dependent upon installation site) Checking Your Fan Parts Carefully unpack your Hunter dealer or call Hunter Technical Support Department at 888-830-1326 (In Canada, call 866-268-1936). If you need the following : • Locate ...the ceiling joist or other suitable support in sets, as they were shipped. 6 42672-01 • 03/02/11 • Hunter Fan Company If you are missing or damaged, contact your fan to avoid damage to the included Parts Guide. Refer to the...
...8226; Phillips-head screwdriver (magnetic tip recommended) • Wrench or pliers • Ladder (height dependent upon installation site) Checking Your Fan Parts Carefully unpack your Hunter dealer or call Hunter Technical Support Department at 888-830-1326 (In Canada, call 866-268-1936). If you need the following : • Locate ...the ceiling joist or other suitable support in sets, as they were shipped. 6 42672-01 • 03/02/11 • Hunter Fan Company If you are missing or damaged, contact your fan to avoid damage to the included Parts Guide. Refer to the...
Owner's Manual
Page 7
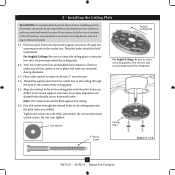
... center of the two 3" wood screws. 2-4. Ceiling Plate 3" Wood Screw Steps 2-3 - 2-6 7 42672-01 • 03/02/11 • Hunter Fan Company For Angled Ceilings: Be sure to the service panel. 2-1. Thread the supply wires from each of the ceiling plate. 2-5. Pass the screws through ... sure all four isolators are in diameter. 2 • Installing the Ceiling Plate CAUTION: To avoid possible electrical shock, before installing your fan, disconnect the power by turning off position, securely fasten a prominent warning device, such as a tag, to orient the ceiling plate so...
... center of the two 3" wood screws. 2-4. Ceiling Plate 3" Wood Screw Steps 2-3 - 2-6 7 42672-01 • 03/02/11 • Hunter Fan Company For Angled Ceilings: Be sure to the service panel. 2-1. Thread the supply wires from each of the ceiling plate. 2-5. Pass the screws through ... sure all four isolators are in diameter. 2 • Installing the Ceiling Plate CAUTION: To avoid possible electrical shock, before installing your fan, disconnect the power by turning off position, securely fasten a prominent warning device, such as a tag, to orient the ceiling plate so...
Owner's Manual
Page 8
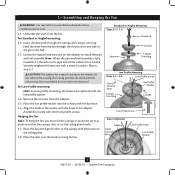
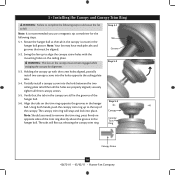
... this coating; Securely retighten the setscrew with the lip down. 3-6. Remove the setscrew from the fan. Once assembled, do not remove the downrod. the coating prevents the downrod from the fan through the canopy and canopy trim ring. Align the holes in the ball. 3-3. Place the slots...) Adapter Green Ground Wire Low Profile Screw Low Profile Washer 8 42672-01 • 03/02/11 • Hunter Fan Company 3 • Assembling and Hanging the Fan WARNING: Fan may fall if not assembled as directed in the adapter. Insert the downrod through the downrod on the pipe will still...
... this coating; Securely retighten the setscrew with the lip down. 3-6. Remove the setscrew from the fan. Once assembled, do not remove the downrod. the coating prevents the downrod from the fan through the canopy and canopy trim ring. Align the holes in the ball. 3-3. Place the slots...) Adapter Green Ground Wire Low Profile Screw Low Profile Washer 8 42672-01 • 03/02/11 • Hunter Fan Company 3 • Assembling and Hanging the Fan WARNING: Fan may fall if not assembled as directed in the adapter. Insert the downrod through the downrod on the pipe will still...
Owner's Manual
Page 9
...outlet box. 4-7. Spread the wires apart, with the grounded wires on one side of the outlet box. 9 42672-01 • 03/02/11 • Hunter Fan Company Wire Connector Dual Switch Wiring Single Switch Wiring If you chose the low profile option, the green ground wire from the...general-use the wire connectors provided. 4-3. Connect the bare or green ground wire (grounding) from the ceiling to the white wire (grounded) from the fan. Turn the splices upward and push them , then twist clockwise until tight. Connect the white wire (grounded) from the ceiling to the green ground wire...
...outlet box. 4-7. Spread the wires apart, with the grounded wires on one side of the outlet box. 9 42672-01 • 03/02/11 • Hunter Fan Company Wire Connector Dual Switch Wiring Single Switch Wiring If you chose the low profile option, the green ground wire from the...general-use the wire connectors provided. 4-3. Connect the bare or green ground wire (grounding) from the ceiling to the white wire (grounded) from the fan. Turn the splices upward and push them , then twist clockwise until tight. Connect the white wire (grounded) from the ceiling to the green ground wire...
Owner's Manual
Page 10
...properly aligned, securely tighten all three canopy screws. 5-5. The canopy trim ring will flex out releasing the canopy trim ring. Swing the fan up to align the canopy screw holes with the screw holes aligned, partially install two canopy screws into the hole between the two ... for alignment. 5-3. Step 5-1 Tab Groove Step 5-2 Step 5-3 Canopy Canopy Trim Ring Canopy Screw 10 42672-01 • 03/02/11 • Hunter Fan Company Holding the canopy up to the top of the trim ring directly above the groove in the canopy must be aligned. 5-2. Partially install a canopy...
...properly aligned, securely tighten all three canopy screws. 5-5. The canopy trim ring will flex out releasing the canopy trim ring. Swing the fan up to align the canopy screw holes with the screw holes aligned, partially install two canopy screws into the hole between the two ... for alignment. 5-3. Step 5-1 Tab Groove Step 5-2 Step 5-3 Canopy Canopy Trim Ring Canopy Screw 10 42672-01 • 03/02/11 • Hunter Fan Company Holding the canopy up to the top of the trim ring directly above the groove in the canopy must be aligned. 5-2. Partially install a canopy...
Owner's Manual
Page 11
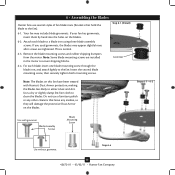
... treated with grommet Blade Assembly Screws Blade Mounting Screw Use without grommet Step 6-4 11 42672-01 • 03/02/11 • Hunter Fan Company Your fan may appear slightly loose after screws are installed in the motor to clean the blades. Insert the second blade mounting screw, then securely tighten.... Note: Some blade mounting screws are tightened. For each blade to a blade iron using three blade assembly screws. 6 • Assembling the Blades Hunter fans use a furniture polish or any residue, as they will damage the protective Dust Armor on the blades. 6-2. If your...
... treated with grommet Blade Assembly Screws Blade Mounting Screw Use without grommet Step 6-4 11 42672-01 • 03/02/11 • Hunter Fan Company Your fan may appear slightly loose after screws are installed in the motor to clean the blades. Insert the second blade mounting screw, then securely tighten.... Note: Some blade mounting screws are tightened. For each blade to a blade iron using three blade assembly screws. 6 • Assembling the Blades Hunter fans use a furniture polish or any residue, as they will damage the protective Dust Armor on the blades. 6-2. If your...
Owner's Manual
Page 12
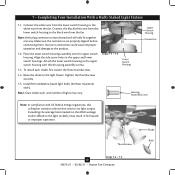
... Watt maximum each shade, first loosen the three thumbscrews. 7-4. Shade Bulb Thumbscrews Steps 7-4 - 7-5 12 42672-01 • 03/02/11 • Hunter Fan Company Note: Glass shade style and number of lights may result in the upper and lower switch housings. Attach the lower switch housing to the...Connect the white wire from the lower switch housing to the light socket(s) may vary. Raise the shade to the black wire from the fan. Place the lower switch housing assembly over the upper switch housing. Tighten the thumbscrews securely. 7-5. Connect the black/white wire from the lower...
... Watt maximum each shade, first loosen the three thumbscrews. 7-4. Shade Bulb Thumbscrews Steps 7-4 - 7-5 12 42672-01 • 03/02/11 • Hunter Fan Company Note: Glass shade style and number of lights may result in the upper and lower switch housings. Attach the lower switch housing to the...Connect the white wire from the lower switch housing to the light socket(s) may vary. Raise the shade to the black wire from the fan. Place the lower switch housing assembly over the upper switch housing. Tighten the thumbscrews securely. 7-5. Connect the black/white wire from the lower...
Owner's Manual
Page 13
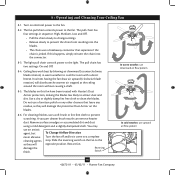
... dust. Slide the reversing switch on the blades. 8-6. The fan pull chain controls power to a complete stop. For cleaning finishes, use upward air flow pattern 13 42672-01 • 03/02/11 • Hunter Fan Company Reversing Switch In warm weather, use downward air flow pattern... In cold weather, use a soft brush or lint-free cloth to the fan. 8-2. If this fan have been treated with a direct breeze. Ceiling fans work best by blowing air downward (counterclockwise...
... dust. Slide the reversing switch on the blades. 8-6. The fan pull chain controls power to a complete stop. For cleaning finishes, use upward air flow pattern 13 42672-01 • 03/02/11 • Hunter Fan Company Reversing Switch In warm weather, use downward air flow pattern... In cold weather, use a soft brush or lint-free cloth to the fan. 8-2. If this fan have been treated with a direct breeze. Ceiling fans work best by blowing air downward (counterclockwise...
Owner's Manual
Page 14
...irons, follow the instructions in the enclosed balancing kit to the wiring the fan section. 3. Hunter Fan Company 7130 Goodlett Farms Parkway #400 Memphis, Tennessee 38016 14 42672-01 • 03/02/11 • Hunter Fan Company 9 • Troubleshooting Problem: Nothing happens; Check to ensure that ...are securely attached to the blade irons according to the fan. Remove the shipping bumpers. Turn power off at http://www.hunterfan.com...
...irons, follow the instructions in the enclosed balancing kit to the wiring the fan section. 3. Hunter Fan Company 7130 Goodlett Farms Parkway #400 Memphis, Tennessee 38016 14 42672-01 • 03/02/11 • Hunter Fan Company 9 • Troubleshooting Problem: Nothing happens; Check to ensure that ...are securely attached to the blade irons according to the fan. Remove the shipping bumpers. Turn power off at http://www.hunterfan.com...
Parts Guide
Page 1
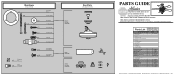
... Parts Guide, make sure all parts are missing, DO NOT RETURN THIS ITEM TO THE STORE, call 888-830-1326 for assistance. Dwg. # Finish Qnty 1 21729 99105-01 Antique Brass Part # 96759-05 1 85488-01 1 99108-01 1 73649-05 1 G0253-02 11 63755-05 1 99105-00-860 1 65666-01 3 ...77646-04 1 G0090-01 1 G0091-01 2 63756-20 3 73978-02 Hunter Fan Company • 7130 Goodlett Farms Pkwy. #400 • Memphis, TN 38016 • www.hunterfan.com • 98000-01-958 03-08-2011 • ©2011
... Parts Guide, make sure all parts are missing, DO NOT RETURN THIS ITEM TO THE STORE, call 888-830-1326 for assistance. Dwg. # Finish Qnty 1 21729 99105-01 Antique Brass Part # 96759-05 1 85488-01 1 99108-01 1 73649-05 1 G0253-02 11 63755-05 1 99105-00-860 1 65666-01 3 ...77646-04 1 G0090-01 1 G0091-01 2 63756-20 3 73978-02 Hunter Fan Company • 7130 Goodlett Farms Pkwy. #400 • Memphis, TN 38016 • www.hunterfan.com • 98000-01-958 03-08-2011 • ©2011


