
Installation Guide
Page 1
...4" x 1-1/2" outlet box • Two #8 x 1-1/2" wood screws and washers • Approved connector for electrical wire Checklist for Existing Fan Site If you are aligned with national and local electrical codes and ANSI/NFPA 70. o e outlet box is secured to outlet ... Wall or Nearest Obstruction Step 1 Choose the Fan Site Proper ceiling fan location and attachment to the building structure are essential for your new Hunter fan. Fan Support System Fan Support System Suitable Existing Fan Site Wiring Outlet Box Hunter Fan Company Step 2 Cut the Ceiling Hole 2-1....
...4" x 1-1/2" outlet box • Two #8 x 1-1/2" wood screws and washers • Approved connector for electrical wire Checklist for Existing Fan Site If you are aligned with national and local electrical codes and ANSI/NFPA 70. o e outlet box is secured to outlet ... Wall or Nearest Obstruction Step 1 Choose the Fan Site Proper ceiling fan location and attachment to the building structure are essential for your new Hunter fan. Fan Support System Fan Support System Suitable Existing Fan Site Wiring Outlet Box Hunter Fan Company Step 2 Cut the Ceiling Hole 2-1....

Owner's Manual
Page 1
Catalog No. Date Purchased Where Purchased Type 2 Models Owner's Guide and Installation Manual English Form# 42631-01 20081013 ©2008 Hunter Fan Co. For Your Records and Warranty Assistance For reference, also attach your receipt or a copy of your receipt to the manual. Model Name Model No.
Catalog No. Date Purchased Where Purchased Type 2 Models Owner's Guide and Installation Manual English Form# 42631-01 20081013 ©2008 Hunter Fan Co. For Your Records and Warranty Assistance For reference, also attach your receipt or a copy of your receipt to the manual. Model Name Model No.
Owner's Manual
Page 2
.... If you complete instructions for many years. SAVE THESE INSTRUCTIONS. • Use only Hunter replacement parts. • To reduce the risk of personal injury, attach the fan directly to the support structure of the building according to supply you are proud of fire...when installing, balancing, or cleaning the fan. Never insert foreign objects between rotating fan blades. • To reduce the risk of our work. Use only Hunter speed controls. © 2008 Hunter Fan Company 2 42631-01 • 10/13/08 • Hunter Fan Company We appreciate the opportunity to these ...
.... If you complete instructions for many years. SAVE THESE INSTRUCTIONS. • Use only Hunter replacement parts. • To reduce the risk of personal injury, attach the fan directly to the support structure of the building according to supply you are proud of fire...when installing, balancing, or cleaning the fan. Never insert foreign objects between rotating fan blades. • To reduce the risk of our work. Use only Hunter speed controls. © 2008 Hunter Fan Company 2 42631-01 • 10/13/08 • Hunter Fan Company We appreciate the opportunity to these ...

Owner's Manual
Page 3
... assure stability and wobble-free performance. The steps in one of three ways, depending on ceiling height and your Hunter fan, use only the hardware supplied. 3 42631-01 • 10/13/08 • Hunter Fan Company To install and use sturdy 3/4" diameter pipe to the support structure of your preference: Low Profile, Standard, or...
... assure stability and wobble-free performance. The steps in one of three ways, depending on ceiling height and your Hunter fan, use only the hardware supplied. 3 42631-01 • 10/13/08 • Hunter Fan Company To install and use sturdy 3/4" diameter pipe to the support structure of your preference: Low Profile, Standard, or...
Owner's Manual
Page 4
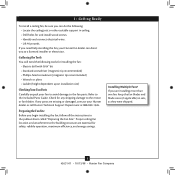
...they were shipped. 4 42631-01 • 10/13/08 • Hunter Fan Company If you are missing or damaged, contact your fan to avoid damage to the included Parts Guide. Refer to the fan parts. If any shipping damage to the building structure are essential for ... • Ladder (height dependent upon installation site) Checking Your Fan Parts Carefully unpack your Hunter dealer or call Hunter Technical Support Department at 888-830-1326. Gathering the Tools You will need help installing the fan, your Hunter fan dealer can do the following tools for and install wood screws....
...they were shipped. 4 42631-01 • 10/13/08 • Hunter Fan Company If you are missing or damaged, contact your fan to avoid damage to the included Parts Guide. Refer to the fan parts. If any shipping damage to the building structure are essential for ... • Ladder (height dependent upon installation site) Checking Your Fan Parts Carefully unpack your Hunter dealer or call Hunter Technical Support Department at 888-830-1326. Gathering the Tools You will need help installing the fan, your Hunter fan dealer can do the following tools for and install wood screws....
Owner's Manual
Page 5
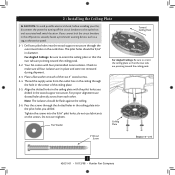
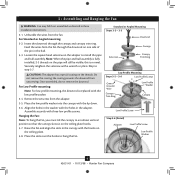
... alignment use lubricants on each other. Ceiling Plate 3" Wood Screw Steps 2-3 - 2-6 5 42631-01 • 10/13/08 • Hunter Fan Company Check to make sure all four isolators are pointing toward the ceiling peak. Place a flat washer on the screws. Note: The isolators should... ceiling plate into the 9/64" pilot holes; 2 • Installing the Ceiling Plate CAUTION: To avoid possible electrical shock, before installing your fan, disconnect the power by turning off position, securely fasten a prominent warning device, such as a tag, to the service panel. 2-1. Tighten ...
... alignment use lubricants on each other. Ceiling Plate 3" Wood Screw Steps 2-3 - 2-6 5 42631-01 • 10/13/08 • Hunter Fan Company Check to make sure all four isolators are pointing toward the ceiling peak. Place a flat washer on the screws. Note: The isolators should... ceiling plate into the 9/64" pilot holes; 2 • Installing the Ceiling Plate CAUTION: To avoid possible electrical shock, before installing your fan, disconnect the power by turning off position, securely fasten a prominent warning device, such as a tag, to the service panel. 2-1. Tighten ...
Owner's Manual
Page 6
... with the holes in the canopy with the hooks on one side of the pin in these installation instructions. 3-1. Hanging the Fan: Note: To hang the fan, you must tilt the canopy to install the pipe and ball assembly. Standard or Angled Mounting Steps 3-2 - 3-3 Downrod Setscrew...Profile Washer Canopy Low Profile Screw Step 3-6 (Detail) Adapter Low Profile Screw Low Profile Washer 6 42631-01 • 10/13/08 • Hunter Fan Company Insert the downrod through the downrod on the ceiling plate. 3-8. this coating; For Low Profile mounting: Note: For low profile mounting, the...
... with the holes in the canopy with the hooks on one side of the pin in these installation instructions. 3-1. Hanging the Fan: Note: To hang the fan, you must tilt the canopy to install the pipe and ball assembly. Standard or Angled Mounting Steps 3-2 - 3-3 Downrod Setscrew...Profile Washer Canopy Low Profile Screw Step 3-6 (Detail) Adapter Low Profile Screw Low Profile Washer 6 42631-01 • 10/13/08 • Hunter Fan Company Insert the downrod through the downrod on the ceiling plate. 3-8. this coating; For Low Profile mounting: Note: For low profile mounting, the...

Owner's Manual
Page 7
...Single Switch Wiring: • The black wire (ungrounded) from the ceiling to the black (ungrounded) and the black/white wire (ungrounded) from the fan CAUTION: Be sure no bare wire or wire strands are not included. Select an acceptable general-use switch in accordance with national and local electrical... of the outlet box and the ungrounded wires on the other side of the outlet box. 7 42631-01 • 10/13/08 • Hunter Fan Company fsdfsdf Wire Connector Dual Switch Wiring Single Switch Wiring To connect the wires, hold the bare metal leads together and place a wire connector over...
...Single Switch Wiring: • The black wire (ungrounded) from the ceiling to the black (ungrounded) and the black/white wire (ungrounded) from the fan CAUTION: Be sure no bare wire or wire strands are not included. Select an acceptable general-use switch in accordance with national and local electrical... of the outlet box and the ungrounded wires on the other side of the outlet box. 7 42631-01 • 10/13/08 • Hunter Fan Company fsdfsdf Wire Connector Dual Switch Wiring Single Switch Wiring To connect the wires, hold the bare metal leads together and place a wire connector over...
Owner's Manual
Page 8
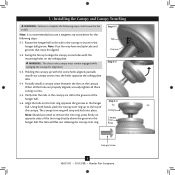
... Canopy Trim Ring Canopy Screw 8 42631-01 • 10/13/08 • Hunter Fan Company 5 • Installing the Canopy and Canopy Trim Ring WARNING: Failure to complete the following steps. 5-1. Note: Your fan may have multiple tabs and grooves that the tabs in the canopy are properly aligned,... a magnetic tip screwdriver for alignment. 5-3. Verify that must remain engaged while swinging the canopy for the following steps could cause the fan to align the canopy screw holes with the screw holes aligned, partially install two canopy screws into place. The canopy trim ring will...
... Canopy Trim Ring Canopy Screw 8 42631-01 • 10/13/08 • Hunter Fan Company 5 • Installing the Canopy and Canopy Trim Ring WARNING: Failure to complete the following steps. 5-1. Note: Your fan may have multiple tabs and grooves that the tabs in the canopy are properly aligned,... a magnetic tip screwdriver for alignment. 5-3. Verify that must remain engaged while swinging the canopy for the following steps could cause the fan to align the canopy screw holes with the screw holes aligned, partially install two canopy screws into place. The canopy trim ring will...
Owner's Manual
Page 9
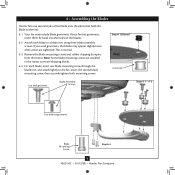
...with grommet Blade Assembly Screws Steps 6-1 - 6-2 Use without grommet Blade Mounting Screw Step 6-4 9 42631-01 • 10/13/08 • Hunter Fan Company For each blade to secure shipping blocks. 6-4. Note: Some blade mounting screws are tightened. This is normal. 6-3. Remove the blade mounting screws... to a blade iron using three blade assembly screws. 6 • Assembling the Blades Hunter fans use several styles of fan blade irons (brackets that hold the blade to the fan. Attach each blade, insert one blade mounting screw through the blade iron, and attach ...
...with grommet Blade Assembly Screws Steps 6-1 - 6-2 Use without grommet Blade Mounting Screw Step 6-4 9 42631-01 • 10/13/08 • Hunter Fan Company For each blade to secure shipping blocks. 6-4. Note: Some blade mounting screws are tightened. This is normal. 6-3. Remove the blade mounting screws... to a blade iron using three blade assembly screws. 6 • Assembling the Blades Hunter fans use several styles of fan blade irons (brackets that hold the blade to the fan. Attach each blade, insert one blade mounting screw through the blade iron, and attach ...
Owner's Manual
Page 10
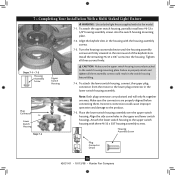
... situated in the narrow end of the keyhole slots. Housing Assembly Screw Plug Connector Detail 10 42631-01 • 10/13/08 • Hunter Fan Company To attach the upper switch housing, partially install two #6-32 x 3/8" housing assembly screws into the housing. To attach the lower switch ... switch housing mounting plate. 7-2. Tighten all three assembly screws could cause improper operation and damage to the upper switch housing with this fan model. 7-1. Place the lower switch housing assembly over the upper switch housing. Attach the lower switch housing to the product. 7-5.
... situated in the narrow end of the keyhole slots. Housing Assembly Screw Plug Connector Detail 10 42631-01 • 10/13/08 • Hunter Fan Company To attach the upper switch housing, partially install two #6-32 x 3/8" housing assembly screws into the housing. To attach the lower switch ... switch housing mounting plate. 7-2. Tighten all three assembly screws could cause improper operation and damage to the upper switch housing with this fan model. 7-1. Place the lower switch housing assembly over the upper switch housing. Attach the lower switch housing to the product. 7-5.

Owner's Manual
Page 11
... of lights may result in fire hazard or improper operation. 11 42631-01 • 10/13/08 • Hunter Fan Company Shade Bulb Thumbscrews Steps 7-7 - 7-8 Note: In compliance with US federal energy regulations, this ceiling fan contains a device that limit or the marked limit on this product may vary. 7-6. To install each ). Install...
... of lights may result in fire hazard or improper operation. 11 42631-01 • 10/13/08 • Hunter Fan Company Shade Bulb Thumbscrews Steps 7-7 - 7-8 Note: In compliance with US federal energy regulations, this ceiling fan contains a device that limit or the marked limit on this product may vary. 7-6. To install each ). Install...
Owner's Manual
Page 12
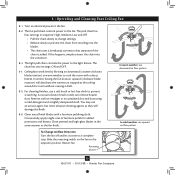
..., but never abrasive cleaning agents as the fan finish. Restart fan. 8 • Operating and Cleaning Your Ceiling Fan 8-1. If this happens, simply reinsert the ... The fan pull chain controls power to a complete stop. The light pull chain controls the power to prevent scratching. Ceiling fans work ...polish for added protection and beauty. Turn on the fan to the fan. 8-2. In winter, having the fan draw air upward (clockwise blade rotation) will damage the... flow pattern To Change Airflow Direction Turn the fan off and let it come to the fan. The chain has two settings: ON and OFF...
..., but never abrasive cleaning agents as the fan finish. Restart fan. 8 • Operating and Cleaning Your Ceiling Fan 8-1. If this happens, simply reinsert the ... The fan pull chain controls power to a complete stop. The light pull chain controls the power to prevent scratching. Ceiling fans work ...polish for added protection and beauty. Turn on the fan to the fan. 8-2. In winter, having the fan draw air upward (clockwise blade rotation) will damage the... flow pattern To Change Airflow Direction Turn the fan off and let it come to the fan. The chain has two settings: ON and OFF...
Owner's Manual
Page 13
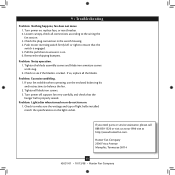
... Problem: Excessive wobbling. 1. Turn power off, support fan very carefully, and check that the switch is on 1. Remove the shipping bumpers. Hunter Fan Company 2500 Frisco Avenue Memphis, Tennessee 38114 13 42631-01 • 10/13/08 • Hunter Fan Company fan does not move. 1. If so, replace all connections...it is engaged. 5. Pull the pull chain to ensure that the hanger ball is cracked. Problem: Noisy operation. 1. If your fan wobbles when operating, use the enclosed balancing kit and instructions to see if the blade is properly seated. Problem: Lights dim when ...
... Problem: Excessive wobbling. 1. Turn power off, support fan very carefully, and check that the switch is on 1. Remove the shipping bumpers. Hunter Fan Company 2500 Frisco Avenue Memphis, Tennessee 38114 13 42631-01 • 10/13/08 • Hunter Fan Company fan does not move. 1. If so, replace all connections...it is engaged. 5. Pull the pull chain to ensure that the hanger ball is cracked. Problem: Noisy operation. 1. If your fan wobbles when operating, use the enclosed balancing kit and instructions to see if the blade is properly seated. Problem: Lights dim when ...
Parts Guide
Page 1
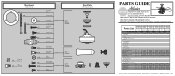
...Shade Model # Asm. REFER TO THE INSTALLATION MANUAL FOR FULL ASSEMBLY INSTRUCTIONS. Dwg. # 20430A 94294-01 20431A 94294-02 20434A 94294-03 20436A 94294-04 20438 94294-06 Finish Qnty 1 Antique Brass Brushed Nickel Bright Brass Part # 96759-05 Part # 96759-09 Part # 96759-01 White Part # 96759-03 New...-08 03077-08 03077-08 3 77646-04 77646-04 77646-04 77646-04 77646-04 3 73560-13 77770-05 73560-13 73560-14 73560-15 Hunter Fan Company • 7130 Goodlett Farms Pkwy. #400 • Memphis, TN 38016 • www.hunterfan.com • 98000-01-661 03-15-2011 • ©...
...Shade Model # Asm. REFER TO THE INSTALLATION MANUAL FOR FULL ASSEMBLY INSTRUCTIONS. Dwg. # 20430A 94294-01 20431A 94294-02 20434A 94294-03 20436A 94294-04 20438 94294-06 Finish Qnty 1 Antique Brass Brushed Nickel Bright Brass Part # 96759-05 Part # 96759-09 Part # 96759-01 White Part # 96759-03 New...-08 03077-08 03077-08 3 77646-04 77646-04 77646-04 77646-04 77646-04 3 73560-13 77770-05 73560-13 73560-14 73560-15 Hunter Fan Company • 7130 Goodlett Farms Pkwy. #400 • Memphis, TN 38016 • www.hunterfan.com • 98000-01-661 03-15-2011 • ©...


