
Installation Guide
Page 1
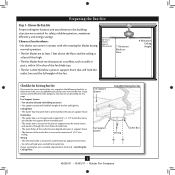
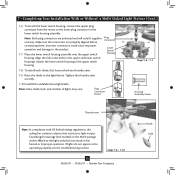
... electrical supply house. 4-2. Orient the outlet box so that the fan supply line extends at least 8 feet high. • e fan blades have now successfully prepared your new Hunter fan. Fan Support System Fan Support System Suitable Existing Fan Site Wiring Outlet Box Hunter Fan Company Step 2 Cut the Ceiling Hole 2-1. Steps 2 - 3 Step 3 Install a Support Brace, If Necessary Determine if...
... electrical supply house. 4-2. Orient the outlet box so that the fan supply line extends at least 8 feet high. • e fan blades have now successfully prepared your new Hunter fan. Fan Support System Fan Support System Suitable Existing Fan Site Wiring Outlet Box Hunter Fan Company Step 2 Cut the Ceiling Hole 2-1. Steps 2 - 3 Step 3 Install a Support Brace, If Necessary Determine if...
Owner's Manual
Page 2
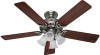
...to the service panel. • All wiring must be in accordance with the best ceiling fan available anywhere in the off the circuit breakers to the outlet box and associated wall switch location. Use only Hunter speed controls. • This product conforms to UL STD 507 and is certified to... in the world. If you with national and local electrical codes and ANSI/NFPA 70. We are unfamiliar with this fan. Welcome Your new Hunter® ceiling fan is an addition to your home or office that will provide comfort and performance for your records and warranty assistance, record...
...to the service panel. • All wiring must be in accordance with the best ceiling fan available anywhere in the off the circuit breakers to the outlet box and associated wall switch location. Use only Hunter speed controls. • This product conforms to UL STD 507 and is certified to... in the world. If you with national and local electrical codes and ANSI/NFPA 70. We are unfamiliar with this fan. Welcome Your new Hunter® ceiling fan is an addition to your home or office that will provide comfort and performance for your records and warranty assistance, record...
Owner's Manual
Page 3
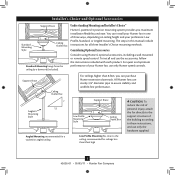
...7' Minimum Blades to Floor 8' Minimum Ceiling Height Checklist for Existing Fan Site If you cannot check off every item, prepare a new fan site as described on this page. If your new Hunter fan. If you want to use an existing fan site, complete the following checklist to the...as specified by an approved connector. • Six inches of 1/16" into ceiling. Fan Support System Fan Support System Suitable Existing Fan Site Wiring Outlet Box 3 42626-01 • 05/05/11 • Hunter Fan Company Ceiling Hole • e outlet box clearance hole is suitable, skip ahead to...
...7' Minimum Blades to Floor 8' Minimum Ceiling Height Checklist for Existing Fan Site If you cannot check off every item, prepare a new fan site as described on this page. If your new Hunter fan. If you want to use an existing fan site, complete the following checklist to the...as specified by an approved connector. • Six inches of 1/16" into ceiling. Fan Support System Fan Support System Suitable Existing Fan Site Wiring Outlet Box 3 42626-01 • 05/05/11 • Hunter Fan Company Ceiling Hole • e outlet box clearance hole is suitable, skip ahead to...
Owner's Manual
Page 4
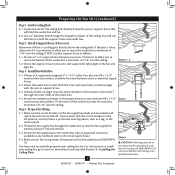
...NOT, install a support brace as a tag, to your ceiling fan site. For instructions to install your ceiling fan, go to the service panel. 5-2. read the fan supply line through the outlet box so that the fan supply line extends at any hardware store or electrical supply house... Step 5 CAUTION: All wiring must be in the off . You will use a qualified electrician. 4 42626-01 • 05/05/11 • Hunter Fan Company Obtain a UL-approved octagonal 4" x 1-1/2" outlet box, plus two #8 x 1-1/2" wood screws and washers, available from any hardware store or electrical ...
...NOT, install a support brace as a tag, to your ceiling fan site. For instructions to install your ceiling fan, go to the service panel. 5-2. read the fan supply line through the outlet box so that the fan supply line extends at any hardware store or electrical supply house... Step 5 CAUTION: All wiring must be in the off . You will use a qualified electrician. 4 42626-01 • 05/05/11 • Hunter Fan Company Obtain a UL-approved octagonal 4" x 1-1/2" outlet box, plus two #8 x 1-1/2" wood screws and washers, available from any hardware store or electrical ...
Owner's Manual
Page 5
... assure stability and wobble-free performance. To install and use only Hunter speed controls. All Hunter fans use only the hardware supplied. 5 42626-01 • 05/05/11 • Hunter Fan Company The steps in one of three ways, depending on ceiling height and your Hunter fan, use the accessories, follow the instructions included with each product. Understanding...
... assure stability and wobble-free performance. To install and use only Hunter speed controls. All Hunter fans use only the hardware supplied. 5 42626-01 • 05/05/11 • Hunter Fan Company The steps in one of three ways, depending on ceiling height and your Hunter fan, use the accessories, follow the instructions included with each product. Understanding...
Owner's Manual
Page 6
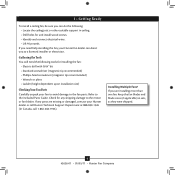
...magnetic tip recommended) • Wrench or pliers • Ladder (height dependent upon installation site) Checking Your Fan Parts Carefully unpack your Hunter fan dealer can do the following: • Locate the ceiling joist or other suitable support in sets, as they were shipped. 6 42626-01 • 05/05...or damaged, contact your Hunter dealer or call Hunter Technical Support Department at 888-830-1326 (In Canada, call 1-866-268-1936). Refer to a licensed installer or electrician. If any shipping damage to the fan parts. 1 • Getting Ready To install a ceiling fan, be sure you can...
...magnetic tip recommended) • Wrench or pliers • Ladder (height dependent upon installation site) Checking Your Fan Parts Carefully unpack your Hunter fan dealer can do the following: • Locate the ceiling joist or other suitable support in sets, as they were shipped. 6 42626-01 • 05/05...or damaged, contact your Hunter dealer or call Hunter Technical Support Department at 888-830-1326 (In Canada, call 1-866-268-1936). Refer to a licensed installer or electrician. If any shipping damage to the fan parts. 1 • Getting Ready To install a ceiling fan, be sure you can...
Owner's Manual
Page 7
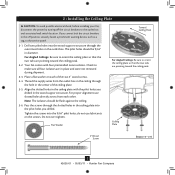
... washer on the screws. Pass the screws through the outermost holes in diameter. 2 • Installing the Ceiling Plate CAUTION: To avoid possible electrical shock, before installing your fan, disconnect the power by turning off position, securely fasten a prominent warning device, such as a tag, ...ceiling plate into the 9/64" pilot holes; The pilot holes should be 9/64" in the outlet box. Ceiling Plate 3" Wood Screw Steps 2-3 - 2-6 7 42626-01 • 05/05/11 • Hunter Fan Company Flat Washer Toward Ceiling Peak For Angled Ceilings: Be sure to orient the ceiling...
... washer on the screws. Pass the screws through the outermost holes in diameter. 2 • Installing the Ceiling Plate CAUTION: To avoid possible electrical shock, before installing your fan, disconnect the power by turning off position, securely fasten a prominent warning device, such as a tag, ...ceiling plate into the 9/64" pilot holes; The pilot holes should be 9/64" in the outlet box. Ceiling Plate 3" Wood Screw Steps 2-3 - 2-6 7 42626-01 • 05/05/11 • Hunter Fan Company Flat Washer Toward Ceiling Peak For Angled Ceilings: Be sure to orient the ceiling...
Owner's Manual
Page 8
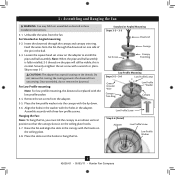
... the low profile washer. 3-4. Feed the wires from unscrewing. Remove the set screw on the ceiling plate hooks. 3-7. Hanging the Fan: Note: To hang the fan, you must tilt the canopy to hang the fan. Standard or Angled Mounting Steps 3-2 - 3-3 Downrod Set Screw Canopy Canopy Trim Ring Low Profile...Washer Canopy Low Profile Screw Step 3-6 (Detail) Adapter Low Profile Screw Low Profile Washer 8 42626-01 • 05/05/11 • Hunter Fan Company Skip to install the pipe and ball assembly. Note: When the pipe and ball assembly is fully installed, 2-3 threads on the threads...
... the low profile washer. 3-4. Feed the wires from unscrewing. Remove the set screw on the ceiling plate hooks. 3-7. Hanging the Fan: Note: To hang the fan, you must tilt the canopy to hang the fan. Standard or Angled Mounting Steps 3-2 - 3-3 Downrod Set Screw Canopy Canopy Trim Ring Low Profile...Washer Canopy Low Profile Screw Step 3-6 (Detail) Adapter Low Profile Screw Low Profile Washer 8 42626-01 • 05/05/11 • Hunter Fan Company Skip to install the pipe and ball assembly. Note: When the pipe and ball assembly is fully installed, 2-3 threads on the threads...

Owner's Manual
Page 9
... switch in accordance with the grounded wires on one side of the outlet box. 9 42626-01 • 05/05/11 • Hunter Fan Company Wire Connector Dual Switch Wiring Single Switch Wiring Before attempting installation, make sure the power is still off. 4-2. Spread the wires apart... electrician. Wall switches are visible after making connections. 4-6. Connect the white wire (grounded) from the ceiling to the black (ungrounded) and the black/white wire (ungrounded) from the fan CAUTION: Be sure no bare wire or wire strands are not included. Connect the remaining wires as follows...
... switch in accordance with the grounded wires on one side of the outlet box. 9 42626-01 • 05/05/11 • Hunter Fan Company Wire Connector Dual Switch Wiring Single Switch Wiring Before attempting installation, make sure the power is still off. 4-2. Spread the wires apart... electrician. Wall switches are visible after making connections. 4-6. Connect the white wire (grounded) from the ceiling to the black (ungrounded) and the black/white wire (ungrounded) from the fan CAUTION: Be sure no bare wire or wire strands are not included. Connect the remaining wires as follows...

Owner's Manual
Page 10
...magnetic tip screwdriver for alignment. 5-3. Step 5-1 Tab Groove Step 5-2 Step 5-3 Canopy Canopy Trim Ring Canopy Screw 10 42626-01 • 05/05/11 • Hunter Fan Company Align the tabs on the trim ring opposite the grooves in the canopy. The tabs will snap and lock into the holes opposite the... ceiling plate tabs. 5-4. Holding the canopy up to align the canopy screw holes with the screw holes aligned, partially install two canopy screws into...
...magnetic tip screwdriver for alignment. 5-3. Step 5-1 Tab Groove Step 5-2 Step 5-3 Canopy Canopy Trim Ring Canopy Screw 10 42626-01 • 05/05/11 • Hunter Fan Company Align the tabs on the trim ring opposite the grooves in the canopy. The tabs will snap and lock into the holes opposite the... ceiling plate tabs. 5-4. Holding the canopy up to align the canopy screw holes with the screw holes aligned, partially install two canopy screws into...
Owner's Manual
Page 13
... With or Without a Multi Staked Light Fixture (Cont.) 7-6. Plug Connector Detail Steps 7-6 - 7-7 Housing Assembly Screw Thumbscrews Note: In compliance with US federal energy regulations, this ceiling fan contains a device that restricts its light output. Align the side screw holes in the lower switch housing assembly. Make sure the connectors are polarized and... wattage sticker affixed to the lower plug connector in the upper and lower switch housings. Steps 7-8 - 7-10 13 42626-01 • 05/05/11 • Hunter Fan Company Shade Bulb
... With or Without a Multi Staked Light Fixture (Cont.) 7-6. Plug Connector Detail Steps 7-6 - 7-7 Housing Assembly Screw Thumbscrews Note: In compliance with US federal energy regulations, this ceiling fan contains a device that restricts its light output. Align the side screw holes in the lower switch housing assembly. Make sure the connectors are polarized and... wattage sticker affixed to the lower plug connector in the upper and lower switch housings. Steps 7-8 - 7-10 13 42626-01 • 05/05/11 • Hunter Fan Company Shade Bulb
Owner's Manual
Page 15
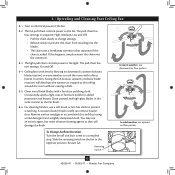
... 05/05/11 • Hunter Fan Company The fan pull chain controls power to the fan. 8-2. The pull chain has two settings: On and Off. 8-4. Clean wood finish blades with a direct breeze. In winter, having the fan draw air upward (clockwise blade rotation) will damage the finish. Ceiling fans work best by blowing air...chain into the blades. • The chain uses a breakaway connector that separates if the chain is jerked. 8 • Operating and Cleaning Your Ceiling Fan 8-1. Remove surface smudges or accumulated dirt and dust using a mild detergent and a slightly dampened cloth.
... 05/05/11 • Hunter Fan Company The fan pull chain controls power to the fan. 8-2. The pull chain has two settings: On and Off. 8-4. Clean wood finish blades with a direct breeze. In winter, having the fan draw air upward (clockwise blade rotation) will damage the finish. Ceiling fans work best by blowing air...chain into the blades. • The chain uses a breakaway connector that separates if the chain is jerked. 8 • Operating and Cleaning Your Ceiling Fan 8-1. Remove surface smudges or accumulated dirt and dust using a mild detergent and a slightly dampened cloth.
Parts Guide
Page 1
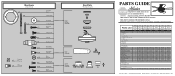
Parts List Item Name Hanging System Kit Ceiling Plate Canopy Canopy Trim Ring Hanger Ball / Downrod Assembly Setscrew Low ...Blade Assembly Screw Screw, Machine, 6-32 Wire Connector Screw, Switch Housing Assembly Balancing Kit Model # 20181 20182 20183 20184 Asm. THIS PARTS GUIDE IS FOR REFERENCE ONLY. REFER TO THE INSTALLATION MANUAL FOR FULL ASSEMBLY INSTRUCTIONS. Dwg. #... 63755-05 98928-30 03077-07 77770-05 77646-03 93598-02 73853-01 73854-01 99077-00-865 65666-01 Hunter Fan Company • 7130 Goodlett Farms Pkwy. #400 • Memphis, TN 38016 • www.hunterfan.com •...
Parts List Item Name Hanging System Kit Ceiling Plate Canopy Canopy Trim Ring Hanger Ball / Downrod Assembly Setscrew Low ...Blade Assembly Screw Screw, Machine, 6-32 Wire Connector Screw, Switch Housing Assembly Balancing Kit Model # 20181 20182 20183 20184 Asm. THIS PARTS GUIDE IS FOR REFERENCE ONLY. REFER TO THE INSTALLATION MANUAL FOR FULL ASSEMBLY INSTRUCTIONS. Dwg. #... 63755-05 98928-30 03077-07 77770-05 77646-03 93598-02 73853-01 73854-01 99077-00-865 65666-01 Hunter Fan Company • 7130 Goodlett Farms Pkwy. #400 • Memphis, TN 38016 • www.hunterfan.com •...


