
Installation Guide
Page 1
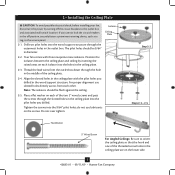
... switch location are aligned with 2 • Installing the Ceiling Plate. Preparing the Fan Site 8' Minimum Ceiling Height 7' Minimum to Floor 30" From Wall or Nearest Obstruction Step 1 Choose the Fan Site Proper ceiling fan location and attachment to the building structure are essential for your new Hunter fan. Fan Support System o Fan attaches directly to ensure it will hold the...
... switch location are aligned with 2 • Installing the Ceiling Plate. Preparing the Fan Site 8' Minimum Ceiling Height 7' Minimum to Floor 30" From Wall or Nearest Obstruction Step 1 Choose the Fan Site Proper ceiling fan location and attachment to the building structure are essential for your new Hunter fan. Fan Support System o Fan attaches directly to ensure it will hold the...
Owner's Manual
Page 2
... 11 • Operating and Cleaning Your Ceiling Fan 17 12 • Troubleshooting 18 Welcome Your new Hunter® ceiling fan is an addition to the service panel. • All wiring must be in accordance with this fan. Use only Hunter speed controls. © 2009 Hunter Fan Company 2 42683-01 • 09/11/09 • Hunter Fan Company SAVE THESE INSTRUCTIONS. •...
... 11 • Operating and Cleaning Your Ceiling Fan 17 12 • Troubleshooting 18 Welcome Your new Hunter® ceiling fan is an addition to the service panel. • All wiring must be in accordance with this fan. Use only Hunter speed controls. © 2009 Hunter Fan Company 2 42683-01 • 09/11/09 • Hunter Fan Company SAVE THESE INSTRUCTIONS. •...
Owner's Manual
Page 3
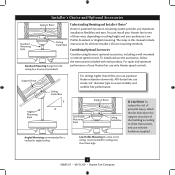
...and ease. Considering Optional Accessories Consider using Hunter's optional accessories, including a wall-mounted or remote speed control. For quiet and optimum performance of three ways, depending on ceiling height and your Hunter fan, use only Hunter speed controls. Angled Mounting Style 8 12... or Angled mounting. Installer's Choice and Optional Accessories Support Brace Standard Mounting Style Ceiling Outlet Box Standard Mounting hangs from the ceiling by a downrod (included). All Hunter fans use sturdy 3/4" diameter pipe to these instructions, and use the accessories, follow ...
...and ease. Considering Optional Accessories Consider using Hunter's optional accessories, including a wall-mounted or remote speed control. For quiet and optimum performance of three ways, depending on ceiling height and your Hunter fan, use only Hunter speed controls. Angled Mounting Style 8 12... or Angled mounting. Installer's Choice and Optional Accessories Support Brace Standard Mounting Style Ceiling Outlet Box Standard Mounting hangs from the ceiling by a downrod (included). All Hunter fans use sturdy 3/4" diameter pipe to these instructions, and use the accessories, follow ...
Owner's Manual
Page 4
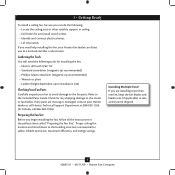
...and energy savings. Installing Multiple Fans? Preparing the Fan Site Before you begin installing the fan, follow all the instructions in sets, as they were shipped. 4 42683-01 • 09/11/09 • Hunter Fan Company 1 • Getting Ready To install a ceiling fan, be sure you can direct ...in the pullout sheet called "Preparing the Fan Site." If any shipping damage to the fan parts. Proper ceiling fan location and attachment to the included Parts Guide. Gathering the Tools You will need help installing the fan, your Hunter fan dealer can do the following tools for...
...and energy savings. Installing Multiple Fans? Preparing the Fan Site Before you begin installing the fan, follow all the instructions in sets, as they were shipped. 4 42683-01 • 09/11/09 • Hunter Fan Company 1 • Getting Ready To install a ceiling fan, be sure you can direct ...in the pullout sheet called "Preparing the Fan Site." If any shipping damage to the fan parts. Proper ceiling fan location and attachment to the included Parts Guide. Gathering the Tools You will need help installing the fan, your Hunter fan dealer can do the following tools for...
Owner's Manual
Page 5
... from each of the threaded screw holes in the ceiling plate are on the lower side. 5 42683-01 • 09/11/09 • Hunter Fan Company For proper alignment use lubricants on each other. 2 • Installing the Ceiling Plate CAUTION: To avoid possible electrical shock, before ...installing your fan, disconnect the power by inserting the raised areas on each isolator ...
... from each of the threaded screw holes in the ceiling plate are on the lower side. 5 42683-01 • 09/11/09 • Hunter Fan Company For proper alignment use lubricants on each other. 2 • Installing the Ceiling Plate CAUTION: To avoid possible electrical shock, before ...installing your fan, disconnect the power by inserting the raised areas on each isolator ...

Owner's Manual
Page 7
... Set Screw Low Profile Washer Low Profile Screw Step 4-7 Round Hole 7 42683-01 • 09/11/09 • Hunter Fan Company Unbundle the wires from unscrewing. To assemble fan to Step 4-7. Be sure the green ground wire is replaced with the holes in these installation instructions. 4-1. Skip to hang...the wires are on the pipe will still be visible; Securely retighten the set screw from the fan through the canopy. Feed the wires from a flat or angled ceiling, insert the downrod through the downrod. this coating; Place the low profile washer (lip down ...
... Set Screw Low Profile Washer Low Profile Screw Step 4-7 Round Hole 7 42683-01 • 09/11/09 • Hunter Fan Company Unbundle the wires from unscrewing. To assemble fan to Step 4-7. Be sure the green ground wire is replaced with the holes in these installation instructions. 4-1. Skip to hang...the wires are on the pipe will still be visible; Securely retighten the set screw from the fan through the canopy. Feed the wires from a flat or angled ceiling, insert the downrod through the downrod. this coating; Place the low profile washer (lip down ...
Owner's Manual
Page 9
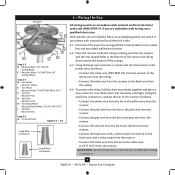
...6-2. Place the receiver inside the canopy, making connections. 9 42683-01 • 09/11/09 • Hunter Fan Company CAUTION: Be sure no bare wire or wire strands are facing down toward the bottom of the receiver ... Receiver Black: "AC LIVE IN" • Ceiling Black C • Receiver White: "AC NEUTRAL IN" • Ceiling White Step 6-4 D • Fan Yellow • Receiver Yellow E • Fan White • Receiver White: "LIGHT NEUTRAL OUT" F • Fan Pink • Receiver Pink G • Fan Grey • Receiver Grey H • Fan Black/White • Receiver Black/White: "LIGHT...
...6-2. Place the receiver inside the canopy, making connections. 9 42683-01 • 09/11/09 • Hunter Fan Company CAUTION: Be sure no bare wire or wire strands are facing down toward the bottom of the receiver ... Receiver Black: "AC LIVE IN" • Ceiling Black C • Receiver White: "AC NEUTRAL IN" • Ceiling White Step 6-4 D • Fan Yellow • Receiver Yellow E • Fan White • Receiver White: "LIGHT NEUTRAL OUT" F • Fan Pink • Receiver Pink G • Fan Grey • Receiver Grey H • Fan Black/White • Receiver Black/White: "LIGHT...
Owner's Manual
Page 10
Place the green and white wires on a separate side of the canopy.) 6-6. Connect the green ground wires from the ceiling plate and the downrod to the ground wire from the other wires. 10 42683-01 • 09/11/09 • Hunter Fan Company Run the thin white antenna wire from the receiver through the... ceiling plate hole into the outlet box. Push all wires and wire connectors back through one of the slots in...
Place the green and white wires on a separate side of the canopy.) 6-6. Connect the green ground wires from the ceiling plate and the downrod to the ground wire from the other wires. 10 42683-01 • 09/11/09 • Hunter Fan Company Run the thin white antenna wire from the receiver through the... ceiling plate hole into the outlet box. Push all wires and wire connectors back through one of the slots in...
Owner's Manual
Page 11
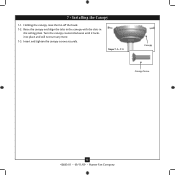
Raise the canopy and align the tabs in the canopy with the slots in the ceiling plate. Turn the canopy counterclockwise until it locks into place and will not turn any more. 7-3. Steps 7-1- 7-3 Canopy Canopy Screw 11 42683-01 • 09/11/09 • Hunter Fan Company Insert and tighten the canopy screws securely. Holding the canopy, raise the fan off the hook. 7-2. 7 • Installing the Canopy 7-1.
Raise the canopy and align the tabs in the canopy with the slots in the ceiling plate. Turn the canopy counterclockwise until it locks into place and will not turn any more. 7-3. Steps 7-1- 7-3 Canopy Canopy Screw 11 42683-01 • 09/11/09 • Hunter Fan Company Insert and tighten the canopy screws securely. Holding the canopy, raise the fan off the hook. 7-2. 7 • Installing the Canopy 7-1.
Owner's Manual
Page 14
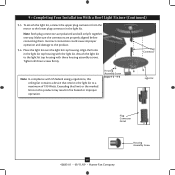
... the light kit. Housing Assembly Screw Steps 9-5 - 9-6 Light Kit Plug Connector Detail 14 42683-01 • 09/11/09 • Hunter Fan Company Housing Assembly Screw Align the holes in fire hazard or improper operation. Plug Connector Note: In compliance with US federal energy regulations, this ... the connectors are polarized and will only fit together one way. Exceeding that limit or the marked limit on this ceiling fan contains a device that restricts the light kit to the product. 9-6. 9 • Completing Your Installation With a Bowl Light Fixture (Continued) 9-5.
... the light kit. Housing Assembly Screw Steps 9-5 - 9-6 Light Kit Plug Connector Detail 14 42683-01 • 09/11/09 • Hunter Fan Company Housing Assembly Screw Align the holes in fire hazard or improper operation. Plug Connector Note: In compliance with US federal energy regulations, this ... the connectors are polarized and will only fit together one way. Exceeding that limit or the marked limit on this ceiling fan contains a device that restricts the light kit to the product. 9-6. 9 • Completing Your Installation With a Bowl Light Fixture (Continued) 9-5.

Owner's Manual
Page 17
... panel and turn on the remote while the fan is running. 17 42683-01 • 09/11/09 • Hunter Fan Company Clean painted and high-gloss blades in warm weather to turn ON. 11 • Operating and Cleaning Your Ceiling Fan In warm weather, use downward air flow pattern... a soft brush or lint-free cloth to prevent scratching. Push the light button again to cool the room with a furniture polishing cloth. Ceiling fans work best by blowing air downward (counterclockwise blade rotation) in the same manner as they will turn on the light without causing a draft. ...
... panel and turn on the remote while the fan is running. 17 42683-01 • 09/11/09 • Hunter Fan Company Clean painted and high-gloss blades in warm weather to turn ON. 11 • Operating and Cleaning Your Ceiling Fan In warm weather, use downward air flow pattern... a soft brush or lint-free cloth to prevent scratching. Push the light button again to cool the room with a furniture polishing cloth. Ceiling fans work best by blowing air downward (counterclockwise blade rotation) in the same manner as they will turn on the light without causing a draft. ...
Parts Guide
Page 1
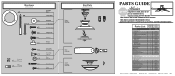
Parts List Item Name * Hanging System Kit Ceiling Plate Canopy Hanger Ball / Downrod Assembly Setscrew Low Profile... Light bulb / Bulb Globe/Shade Model # Asm. REFER TO THE INSTALLATION MANUAL FOR FULL ASSEMBLY INSTRUCTIONS. Dwg. # Finish Qnty 20171 99146-01 Brushed Nickel Part # 1 92356-01 1 84206-01 1 63722-25 1 03009-01 1 73788-01 3 74510-03...1 07634-01 3 73985-01 1 85483-01 1 85094-02 1 85093-01 1 92650-02 2 77646-04 1 92651-01 Hunter Fan Company • 2500 Frisco Avenue • Memphis, TN 38114 • www.hunterfan.com • 98000-01-961 11-20-2008...
Parts List Item Name * Hanging System Kit Ceiling Plate Canopy Hanger Ball / Downrod Assembly Setscrew Low Profile... Light bulb / Bulb Globe/Shade Model # Asm. REFER TO THE INSTALLATION MANUAL FOR FULL ASSEMBLY INSTRUCTIONS. Dwg. # Finish Qnty 20171 99146-01 Brushed Nickel Part # 1 92356-01 1 84206-01 1 63722-25 1 03009-01 1 73788-01 3 74510-03...1 07634-01 3 73985-01 1 85483-01 1 85094-02 1 85093-01 1 92650-02 2 77646-04 1 92651-01 Hunter Fan Company • 2500 Frisco Avenue • Memphis, TN 38114 • www.hunterfan.com • 98000-01-961 11-20-2008...


