

User Manual
Page 7
Installation 55 10.1 Search Channels 55 10.2 Advanced Search 67 10.3 SMATV Search 69 10.4 Software Update 71 10.5 Default Setting 73 11. Service and Support 84 GB 6 Edit Channels 49 9.1 Edit Channels 49 9.2 Edit Favourite List 52 10. Menu Map 76 13. Software Update 74 11.1 OTA (Over the Air 74 12. Trouble Shooting 77 13.1 Trouble Shooting 77 13.2 Error Message 79 14. Contents 9. Specification 80 15. Glossary 82 16.
Installation 55 10.1 Search Channels 55 10.2 Advanced Search 67 10.3 SMATV Search 69 10.4 Software Update 71 10.5 Default Setting 73 11. Service and Support 84 GB 6 Edit Channels 49 9.1 Edit Channels 49 9.2 Edit Favourite List 52 10. Menu Map 76 13. Software Update 74 11.1 OTA (Over the Air 74 12. Trouble Shooting 77 13.1 Trouble Shooting 77 13.2 Error Message 79 14. Contents 9. Specification 80 15. Glossary 82 16.

User Manual
Page 11
.... ** 2. VCR SCART ** Connects to update software. 9. RS-232C ** Connects to the PC to the VCR/DVD using a VCR SCART cable. 5. AUDIO L/R ** Connects to the TV set using HDMI connector. 8. S/PDIF ** Outputs the digital audio signals. 10.ON/OFF ** Powers on/off. TV SCART ** Connects to the TV or VCR and outputs...
.... ** 2. VCR SCART ** Connects to update software. 9. RS-232C ** Connects to the PC to the VCR/DVD using a VCR SCART cable. 5. AUDIO L/R ** Connects to the TV set using HDMI connector. 8. S/PDIF ** Outputs the digital audio signals. 10.ON/OFF ** Powers on/off. TV SCART ** Connects to the TV or VCR and outputs...

User Manual
Page 13
... the EPG. (electronic programme guide) ** 5. MENU ** Displays the main menu. ** 10.TEXT ** Enters the digital text service. ** 11.LIST ** Displays the channel list. ** 12.WIDE ** Sets the display format. ** 13.STANDBY ** Switches between TV and radio modes. ** 3. SOURCE ** Controls the input of video. ** GB 12 TV/RADIO ** Switches between operation and...
... the EPG. (electronic programme guide) ** 5. MENU ** Displays the main menu. ** 10.TEXT ** Enters the digital text service. ** 11.LIST ** Displays the channel list. ** 12.WIDE ** Sets the display format. ** 13.STANDBY ** Switches between TV and radio modes. ** 3. SOURCE ** Controls the input of video. ** GB 12 TV/RADIO ** Switches between operation and...

User Manual
Page 14
... with the HDMI cable as follows. ** GB 13 Select the most appropriate procedure depending on the equipment you have. ** Note: If you encounter any problems setting up your product, please contact your product to the TV, VCR or other devices. 2. Setup This chapter describes how to connect your local product distributor...
... with the HDMI cable as follows. ** GB 13 Select the most appropriate procedure depending on the equipment you have. ** Note: If you encounter any problems setting up your product, please contact your product to the TV, VCR or other devices. 2. Setup This chapter describes how to connect your local product distributor...

User Manual
Page 16
2. GB 15 When there is no A/V receiver available In case you are not equipped with an A/V receiver, connect the product to the TV using the audio cable as follows. ** Note: You can also connect the product to the audio input jack of your TV set using the 3.5 Stereo Jack Cable to 2 RCA Y Cable.
2. GB 15 When there is no A/V receiver available In case you are not equipped with an A/V receiver, connect the product to the TV using the audio cable as follows. ** Note: You can also connect the product to the audio input jack of your TV set using the 3.5 Stereo Jack Cable to 2 RCA Y Cable.
User Manual
Page 22
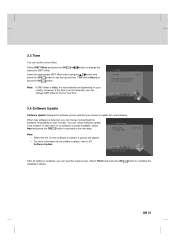
...no software currently available, select Next and press the OK button to proceed to the next step. ** Note: • When there is automatically set depending on your local time. 3.4 Software Update Software Update displays the software version and lets you can view the result screen. However, if the... time is complete, you choose to update the new software. button to set the current time. Software Update. ** After all setting is not set properly, you can refuse software update if not needed. Select GMT Offset and press the OK or values for ...
...no software currently available, select Next and press the OK button to proceed to the next step. ** Note: • When there is automatically set depending on your local time. 3.4 Software Update Software Update displays the software version and lets you can view the result screen. However, if the... time is complete, you choose to update the new software. button to set the current time. Software Update. ** After all setting is not set properly, you can refuse software update if not needed. Select GMT Offset and press the OK or values for ...
User Manual
Page 23
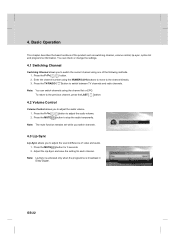
...buttons to move to adjust the audio volume. 2. Press the MUTE button to stop the audio temporarily. ** Note: The mute function remains set while you switch channels. 4.3 Lip-Sync Lip-Sync allows you to adjust the audio volume. 1. Adjust the Lip-Sync and save the...4. Press the P-/P+ button. 2. Press the TV/RADIO button to switch between TV channels and radio channels. ** Note: You can check or change the settings. 4.1 Switching Channel Switching Channel allows you to adjust the sound difference of the product such as switching channel, volume control, lip-sync, option list and...
...buttons to move to adjust the audio volume. 2. Press the MUTE button to stop the audio temporarily. ** Note: The mute function remains set while you switch channels. 4.3 Lip-Sync Lip-Sync allows you to adjust the audio volume. 1. Adjust the Lip-Sync and save the...4. Press the P-/P+ button. 2. Press the TV/RADIO button to switch between TV channels and radio channels. ** Note: You can check or change the settings. 4.1 Switching Channel Switching Channel allows you to adjust the sound difference of the product such as switching channel, volume control, lip-sync, option list and...

User Manual
Page 24
...Press the V-FORMAT button. 2. The current resolution will be displayed. 3. Audio You can select the required audio language in 8.2 Language Setting. • If the programme is available in Dolby Digital, you prefer in Audio if the current programme is broadcast in multiple audio ...languages. 1. Select audio direction (left, right, stereo) using the button. ** Note: • You can select the language you cannot set the audio direction. GB 23 Each time you press the V-FORMAT button, the resolution changes in the following sequence: 576p -> 720p -> 1080i...
...Press the V-FORMAT button. 2. The current resolution will be displayed. 3. Audio You can select the required audio language in 8.2 Language Setting. • If the programme is available in Dolby Digital, you prefer in Audio if the current programme is broadcast in multiple audio ...languages. 1. Select audio direction (left, right, stereo) using the button. ** Note: • You can select the language you cannot set the audio direction. GB 23 Each time you press the V-FORMAT button, the resolution changes in the following sequence: 576p -> 720p -> 1080i...

User Manual
Page 28
... RED button on the remote control while the channel list is updated automatically when changes occur. • The predefined channel list may return to default setting after OTA has been performed. • HD Channels may or may not be available depending on the remote control. Press the LIST button again and...
... RED button on the remote control while the channel list is updated automatically when changes occur. • The predefined channel list may return to default setting after OTA has been performed. • HD Channels may or may not be available depending on the remote control. Press the LIST button again and...

User Manual
Page 38
To reserve a programme, select a future programme and press the OK button. 4. Search Result 1. GB 37 5. After setting more than one required value, select Start and press the OK button to proceed. 2. The search result of the entered values will appear. 3. To search again, press the BLUE button.
To reserve a programme, select a future programme and press the OK button. 4. Search Result 1. GB 37 5. After setting more than one required value, select Start and press the OK button to proceed. 2. The search result of the entered values will appear. 3. To search again, press the BLUE button.

User Manual
Page 41
... Selection will appear. Select On/Off using the OK or button. 3. Select On/Off using the OK or button and press the BACK button to set the value. Select Dolby Digital using the button. Read carefully and select Yes. 7.4 Dolby Digital 1.
... Selection will appear. Select On/Off using the OK or button. 3. Select On/Off using the OK or button and press the BACK button to set the value. Select Dolby Digital using the button. Read carefully and select Yes. 7.4 Dolby Digital 1.

User Manual
Page 42
...-Channel using the OK button. Startup-Channel You can choose to assign a certain channel to be displayed when powering on. 1. Setting the Startup-Channel You can assign a preferred channel as the start channel. 1. Off The last channel you have watched will be displayed when powering on . 2. ...
...-Channel using the OK button. Startup-Channel You can choose to assign a certain channel to be displayed when powering on. 1. Setting the Startup-Channel You can assign a preferred channel as the start channel. 1. Off The last channel you have watched will be displayed when powering on . 2. ...

User Manual
Page 43
... NUMERIC(0-9) buttons. ** Note: The default password is 0000. 8. Select Setting using the button and press the OK button. 4. View All All programmes can set parental control, language setting, time setting, A/V setting and other configuration items to keep limitations where you to enter a password.... screen. 8.1 Parental Control Parental Control allows you want them for each programme according to watch the programme blocked by setting age limits and require a password to the previous menu. Press the MENU button. 2. Select the Censorship Classification using...
... NUMERIC(0-9) buttons. ** Note: The default password is 0000. 8. Select Setting using the button and press the OK button. 4. View All All programmes can set parental control, language setting, time setting, A/V setting and other configuration items to keep limitations where you to enter a password.... screen. 8.1 Parental Control Parental Control allows you want them for each programme according to watch the programme blocked by setting age limits and require a password to the previous menu. Press the MENU button. 2. Select the Censorship Classification using...

User Manual
Page 44
... press 2. Select Enable/Disable using the button. 2. Enable Disable Password is 0000. 3. Installation Lock Installation Lock allows you to block access to the installation menu settings you to installation menu is permitted without password. Access to change the current password. 1. Select the Change Password using the NUMERIC(0-9) buttons. 3. Enter New Password...
... press 2. Select Enable/Disable using the button. 2. Enable Disable Password is 0000. 3. Installation Lock Installation Lock allows you to block access to the installation menu settings you to installation menu is permitted without password. Access to change the current password. 1. Select the Change Password using the NUMERIC(0-9) buttons. 3. Enter New Password...

User Manual
Page 45
... Subtitle Display allows you to show the subtitles automatically. Select the language you press the OPT+ button on the remote control and set the basic language options such as menu language, subtitle display and subtitle font. 1. This service is provided when subtitles are displayed ...automatically in the predefined subtitle language. Select Setting using the OK or button. 2. Select Subtitle Display using the OK or button. Select one option from the given language options and set the language for the menu. 1. Menu Language Menu Language ...
... Subtitle Display allows you to show the subtitles automatically. Select the language you press the OPT+ button on the remote control and set the basic language options such as menu language, subtitle display and subtitle font. 1. This service is provided when subtitles are displayed ...automatically in the predefined subtitle language. Select Setting using the OK or button. 2. Select Subtitle Display using the OK or button. Select one option from the given language options and set the language for the menu. 1. Menu Language Menu Language ...

User Manual
Page 46
...Subtitle Font enables you want to select the font of the subtitle. 1. button. 8.3 Time Setting Time Setting allows you to set the current time or set the current time using GMT Offset. 1. Select Time Setting using the button. 2. GMT Offset You can be changed in 30 minutes/1 hour units. ...the MENU button. 2. button and press the OK 1. A pop-up will appear. Fixed Uses the fixed subtitle font. GB 45 Select Setting using the button. 2. button and press the OK 3. Select GMT Offset using the button. Select one option from Variable and Fixed using the...
...Subtitle Font enables you want to select the font of the subtitle. 1. button. 8.3 Time Setting Time Setting allows you to set the current time or set the current time using GMT Offset. 1. Select Time Setting using the button. 2. GMT Offset You can be changed in 30 minutes/1 hour units. ...the MENU button. 2. button and press the OK 1. A pop-up will appear. Fixed Uses the fixed subtitle font. GB 45 Select Setting using the button. 2. button and press the OK 3. Select GMT Offset using the button. Select one option from Variable and Fixed using the...

User Manual
Page 47
...everyday. Select Enable/Disable using the OK , or NUMERIC(0-9) buttons. When you want the product to be turned off . 1. Enable Uses Power On and sets the time the product should be automatically turned off . When you want the product to radio. 3. Disable Does not use Power Off. ** 3. Then...: To enter a radio channel in Channel No., press the TV/RADIO button to switch to be turned on . 1. Power Off You can set the time you select Enable, enter the Channel No. GB 46 Select Enable/Disable using the or NUMERIC(0-9) buttons. Enable Uses Power Off and...
...everyday. Select Enable/Disable using the OK , or NUMERIC(0-9) buttons. When you want the product to be turned off . 1. Enable Uses Power On and sets the time the product should be automatically turned off . When you want the product to radio. 3. Disable Does not use Power Off. ** 3. Then...: To enter a radio channel in Channel No., press the TV/RADIO button to switch to be turned on . 1. Power Off You can set the time you select Enable, enter the Channel No. GB 46 Select Enable/Disable using the or NUMERIC(0-9) buttons. Enable Uses Power Off and...

User Manual
Page 48
Select one option from CVBS and S-Video using the OK or button. 2. Select Audio Output using the button. Select A/V Setting using the button. 2. Select VCR-SCART using the button. 3. Audio Output 1. Select one option among CVBS, RGB and S-Video using the OK...-SCART 1. Select one option from Mono and Stereo using the button. 2. button and press the OK button and press the OK 1. 8.4 A/V Setting You can set the output of the audio or video. 1. Select Setting using the button. 2. Select TV-SCART using the OK or button. Press the MENU button. 2.
Select one option from CVBS and S-Video using the OK or button. 2. Select Audio Output using the button. Select A/V Setting using the button. 2. Select VCR-SCART using the button. 3. Audio Output 1. Select one option among CVBS, RGB and S-Video using the OK...-SCART 1. Select one option from Mono and Stereo using the button. 2. button and press the OK button and press the OK 1. 8.4 A/V Setting You can set the output of the audio or video. 1. Select Setting using the button. 2. Select TV-SCART using the OK or button. Press the MENU button. 2.

User Manual
Page 49
..., 50, 75 The bigger the number, the more transparent the screen. OSD Transparency You can set the automatic display time of On Screen Display. 1. i Display Time You can set to Disable, the i-plate will not be displayed when you switch the channel. 2. Press the... MENU button. 2. Setting 8.5 Other Settings You can configure other settings. 1. button. Select Setting using the button. 2. GB 48 Select OSD Transparency using the button. button and press the OK 3. Select one ...
..., 50, 75 The bigger the number, the more transparent the screen. OSD Transparency You can set the automatic display time of On Screen Display. 1. i Display Time You can set to Disable, the i-plate will not be displayed when you switch the channel. 2. Press the... MENU button. 2. Setting 8.5 Other Settings You can configure other settings. 1. button. Select Setting using the button. 2. GB 48 Select OSD Transparency using the button. button and press the OK 3. Select one ...
User Manual
Page 56
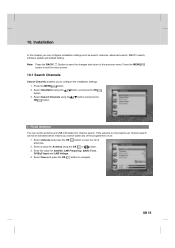
... 2. Select Installation using the OK button. Enter the value for Antenna using the OK or button. 3. Installation In this chapter you can set , channel search cannot be activated which means you to view the list of the programmes on air. 1. button and press the 1. Select...value for Satellite, LNB Frequency, 22kHz Tone, DiSEqC Input and LNB Voltage. 4. button, and press the OK 3. button to configure the installation settings. 1. GB 55 Select Antenna and press the OK antennas. Installation 10. Select Save and press the OK button to the previous menu. Press ...
... 2. Select Installation using the OK button. Enter the value for Antenna using the OK or button. 3. Installation In this chapter you can set , channel search cannot be activated which means you to view the list of the programmes on air. 1. button and press the 1. Select...value for Satellite, LNB Frequency, 22kHz Tone, DiSEqC Input and LNB Voltage. 4. button, and press the OK 3. button to configure the installation settings. 1. GB 55 Select Antenna and press the OK antennas. Installation 10. Select Save and press the OK button to the previous menu. Press ...


