

User Manual
Page 2
...of copyright and copyright law. ** Warranty This warranty does not cover parts which may become defective due to change without HUMAX's prior consent in this copyright protection technology must be copied, used or translated in part or whole without notice. Nagravision...trademarks of Dolby Laboratories. ** This product incorporates copyright protection technology that is protected by Macrovision. Notice Copyright (Copyright © 2007 HUMAX Corporation) Not to be authorized by Macrovision, and is intended for home and other intellectual property rights. CryptoWorks™ is a ...
...of copyright and copyright law. ** Warranty This warranty does not cover parts which may become defective due to change without HUMAX's prior consent in this copyright protection technology must be copied, used or translated in part or whole without notice. Nagravision...trademarks of Dolby Laboratories. ** This product incorporates copyright protection technology that is protected by Macrovision. Notice Copyright (Copyright © 2007 HUMAX Corporation) Not to be authorized by Macrovision, and is intended for home and other intellectual property rights. CryptoWorks™ is a ...

User Manual
Page 3
Business users: Contact your supplier and check the terms and conditions of the purchase contract. GB 2 This symbol indicates important instructions accompanying the product. ** Instruction about the 'WEEE' Symbol This product should not be mixed with other types of wastes and recycle it responsibly to the following precautions. ** Warnings, Cautions and Notes Throughout the whole manual, pay special attention to promote the sustainable reuse of material resources. Please separate this from uncontrolled waste disposal. This product should not be disposed with other ...
Business users: Contact your supplier and check the terms and conditions of the purchase contract. GB 2 This symbol indicates important instructions accompanying the product. ** Instruction about the 'WEEE' Symbol This product should not be mixed with other types of wastes and recycle it responsibly to the following precautions. ** Warnings, Cautions and Notes Throughout the whole manual, pay special attention to promote the sustainable reuse of material resources. Please separate this from uncontrolled waste disposal. This product should not be disposed with other ...

User Manual
Page 4
OVERLOADING ** • Do not overload a wall outlet, extension cord or adapter as these may result in electric fire or shock. ** 3. In addition, no solvents) to dust the product. ** 5. ATTACHMENTS ** • Do not use any maintenance or installation procedures. ** 2. Failure to do so can damage the TV. ** 9. CLEANING ** • Disconnect the product from the wall outlet before connecting or disconnecting the cable from the mains before cleaning. • Use a light damp cloth (no objects filled with international safety standards. CONNECTION TO THE TV ** • Disconnect ...
OVERLOADING ** • Do not overload a wall outlet, extension cord or adapter as these may result in electric fire or shock. ** 3. In addition, no solvents) to dust the product. ** 5. ATTACHMENTS ** • Do not use any maintenance or installation procedures. ** 2. Failure to do so can damage the TV. ** 9. CLEANING ** • Disconnect the product from the wall outlet before connecting or disconnecting the cable from the mains before cleaning. • Use a light damp cloth (no objects filled with international safety standards. CONNECTION TO THE TV ** • Disconnect ...

User Manual
Page 5
Safety and Warning 10.LOCATION ** • Place the product indoors to avoid exposing it to lightning, rain or sun. • Do not place it near a radiator or heat register. • Make sure it has more than 10 cm clearance from any object, and do not place the product on a bed, sofa, rug, or other similar surface. • If you place the product on a rack or a bookcase, ensure that there is adequate ventilation and that have followed the manufacturer's instructions for the modules or Smartcards. Make sure to contact your local product distributor if the product is required, be ...
Safety and Warning 10.LOCATION ** • Place the product indoors to avoid exposing it to lightning, rain or sun. • Do not place it near a radiator or heat register. • Make sure it has more than 10 cm clearance from any object, and do not place the product on a bed, sofa, rug, or other similar surface. • If you place the product on a rack or a bookcase, ensure that there is adequate ventilation and that have followed the manufacturer's instructions for the modules or Smartcards. Make sure to contact your local product distributor if the product is required, be ...

User Manual
Page 7
Software Update 74 11.1 OTA (Over the Air 74 12. Menu Map 76 13. Service and Support 84 GB 6 Contents 9. Installation 55 10.1 Search Channels 55 10.2 Advanced Search 67 10.3 SMATV Search 69 10.4 Software Update 71 10.5 Default Setting 73 11. Trouble Shooting 77 13.1 Trouble Shooting 77 13.2 Error Message 79 14. Specification 80 15. Glossary 82 16. Edit Channels 49 9.1 Edit Channels 49 9.2 Edit Favourite List 52 10.
Software Update 74 11.1 OTA (Over the Air 74 12. Menu Map 76 13. Service and Support 84 GB 6 Contents 9. Installation 55 10.1 Search Channels 55 10.2 Advanced Search 67 10.3 SMATV Search 69 10.4 Software Update 71 10.5 Default Setting 73 11. Trouble Shooting 77 13.1 Trouble Shooting 77 13.2 Error Message 79 14. Specification 80 15. Glossary 82 16. Edit Channels 49 9.1 Edit Channels 49 9.2 Edit Favourite List 52 10.
User Manual
Page 8
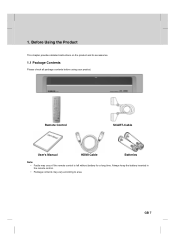
Before Using the Product This chapter provides detailed instructions on the product and its accessories. 1.1 Package Contents Please check all package contents before using your product. ** ** Remote Control ** SCART-Cable User's Manual HDMI-Cable Batteries ** Note: • Faults may vary according to area. GB 7 1. Before Using the Product 1. Always keep the battery inserted in the remote control. • Package contents may occur if the remote control is left without battery for a long time.
Before Using the Product This chapter provides detailed instructions on the product and its accessories. 1.1 Package Contents Please check all package contents before using your product. ** ** Remote Control ** SCART-Cable User's Manual HDMI-Cable Batteries ** Note: • Faults may vary according to area. GB 7 1. Before Using the Product 1. Always keep the battery inserted in the remote control. • Package contents may occur if the remote control is left without battery for a long time.

User Manual
Page 9
P-/P + BUTTON ** Moves the TV/radio channel up or down. 4. CI-MODULE SLOT ** A slot for two CI modules GB 8 VOL-/VOL+ BUTTON ** Adjusts the audio volume. 5. 1. STANDBY BUTTON ** Switches between TV and radio modes. 3. VIDEO FORMAT ** Changes the resolution of video. 6. TV/RADIO BUTTON ** Switches between operation and standby modes. 2. Before Using the Product 1.2 Front Panel ** ** 1.
P-/P + BUTTON ** Moves the TV/radio channel up or down. 4. CI-MODULE SLOT ** A slot for two CI modules GB 8 VOL-/VOL+ BUTTON ** Adjusts the audio volume. 5. 1. STANDBY BUTTON ** Switches between TV and radio modes. 3. VIDEO FORMAT ** Changes the resolution of video. 6. TV/RADIO BUTTON ** Switches between operation and standby modes. 2. Before Using the Product 1.2 Front Panel ** ** 1.

User Manual
Page 10
Irdeto, Conax and more. Open the right-hand flap on a subscription basis and can only be enjoyed via a Conditional Access component. 1. Inserting a CI (with the Smartcard) horizontal. 4. There are different kinds of CI Modules, suitable for laptops. Keep the CI module (with Smartcard) A CI module looks like a PC map (PCMCIA) for different coding systems; Additionally to the CI module, a Smartcard is needed to air, most TV and radio/music channels are available on the front of the module and insert the Smartcard into the slot. ** GB 9 1.3 Conditional Access Although some TV and...
Irdeto, Conax and more. Open the right-hand flap on a subscription basis and can only be enjoyed via a Conditional Access component. 1. Inserting a CI (with the Smartcard) horizontal. 4. There are different kinds of CI Modules, suitable for laptops. Keep the CI module (with Smartcard) A CI module looks like a PC map (PCMCIA) for different coding systems; Additionally to the CI module, a Smartcard is needed to air, most TV and radio/music channels are available on the front of the module and insert the Smartcard into the slot. ** GB 9 1.3 Conditional Access Although some TV and...

User Manual
Page 11
LNB OUT ** Connects to the TV or VCR and outputs video signals. 7. VIDEO ** Connects to another digital satellite receiver. ** 3. S/PDIF ** Outputs the digital audio signals. 10.ON/OFF ** Powers on/off. 1. TV SCART ** Connects to update software. 9. RS-232C ** Connects to the PC to the TV set using a TV SCART cable. 4. AUDIO L/R ** Connects to the TV using a VCR SCART cable. 5. HDMI ** Connects to the TV or VCR and outputs audio signals. 6. GB 10 Before Using the Product 1.4 Rear Panel ** 1. VCR SCART ** Connects to the VCR/DVD using HDMI connector. 8. LNB IN ** ...
LNB OUT ** Connects to the TV or VCR and outputs video signals. 7. VIDEO ** Connects to another digital satellite receiver. ** 3. S/PDIF ** Outputs the digital audio signals. 10.ON/OFF ** Powers on/off. 1. TV SCART ** Connects to update software. 9. RS-232C ** Connects to the PC to the TV set using a TV SCART cable. 4. AUDIO L/R ** Connects to the TV using a VCR SCART cable. 5. HDMI ** Connects to the TV or VCR and outputs audio signals. 6. GB 10 Before Using the Product 1.4 Rear Panel ** 1. VCR SCART ** Connects to the VCR/DVD using HDMI connector. 8. LNB IN ** ...

User Manual
Page 13
NUMERIC(0-9) BUTTONS ** Enters a TV/radio channel number or menu option number. 4. EPG ** Displays the EPG. (electronic programme guide) ** 5. ARROW BUTTONS ** Changes the channel or moves the cursor up, down, left or right. ** 7. TV/RADIO ** Switches between operation and standby modes. ** 14.OPT+ (OPTION) ** Displays the audio, teletext and subtitle language services. ** 15.LAST ** Returns to the previous menu and screen. ** 6. BACK ** Closes and returns to the previous channel. 16.OK ** Selects a menu, or confirms the selected operation. Also displays the channel list while ...
NUMERIC(0-9) BUTTONS ** Enters a TV/radio channel number or menu option number. 4. EPG ** Displays the EPG. (electronic programme guide) ** 5. ARROW BUTTONS ** Changes the channel or moves the cursor up, down, left or right. ** 7. TV/RADIO ** Switches between operation and standby modes. ** 14.OPT+ (OPTION) ** Displays the audio, teletext and subtitle language services. ** 15.LAST ** Returns to the previous menu and screen. ** 6. BACK ** Closes and returns to the previous channel. 16.OK ** Selects a menu, or confirms the selected operation. Also displays the channel list while ...

User Manual
Page 14
In case the TV has a HDMI input connector, a special all-digital interface that provides the highest picture quality, connect the product to the TV with the HDMI cable as follows. ** GB 13 Select the most appropriate procedure depending on the equipment you have. ** Note: If you encounter any problems setting up your product, please contact your product to the TV with the particular equipments for Digital TV. The product provides various interfaces to connect to connect your local product distributor. 2.1 Using HDMI Connector The HDMI connection is recommended for gaining ...
In case the TV has a HDMI input connector, a special all-digital interface that provides the highest picture quality, connect the product to the TV with the HDMI cable as follows. ** GB 13 Select the most appropriate procedure depending on the equipment you have. ** Note: If you encounter any problems setting up your product, please contact your product to the TV with the particular equipments for Digital TV. The product provides various interfaces to connect to connect your local product distributor. 2.1 Using HDMI Connector The HDMI connection is recommended for gaining ...

User Manual
Page 15
2. Setup 2.2 Using DVI Connector The DVI connection using a HDMI to DVI converter is recommended for Digital TV. In case the TV has a DVI input connector, connect the product to the TV with an A/V receiver ** GB 14 When equipped with the HDMI cable using a HDMI to DVI converter as follows. 1.
2. Setup 2.2 Using DVI Connector The DVI connection using a HDMI to DVI converter is recommended for Digital TV. In case the TV has a DVI input connector, connect the product to the TV with an A/V receiver ** GB 14 When equipped with the HDMI cable using a HDMI to DVI converter as follows. 1.

User Manual
Page 16
GB 15 2. When there is no A/V receiver available In case you are not equipped with an A/V receiver, connect the product to the TV using the audio cable as follows. ** Note: You can also connect the product to the audio input jack of your TV set using the 3.5 Stereo Jack Cable to 2 RCA Y Cable.
GB 15 2. When there is no A/V receiver available In case you are not equipped with an A/V receiver, connect the product to the TV using the audio cable as follows. ** Note: You can also connect the product to the audio input jack of your TV set using the 3.5 Stereo Jack Cable to 2 RCA Y Cable.

User Manual
Page 17
Setup 2.3 Using Component Cable The Component connection is recommended for Digital TV. 2. Connect the product to the TV with the Component cable as follows. ** GB 16
Setup 2.3 Using Component Cable The Component connection is recommended for Digital TV. 2. Connect the product to the TV with the Component cable as follows. ** GB 16

User Manual
Page 18
GB 17 2.4 Using SCART Cable The SCART cable connection is recommended for Analog TV or VCR. Connect the product to the TV with the SCART cable as follows. ** ** Note: Connecting your TV directly to the Audio/Video output of the product will assure a more vivid picture and enhance your viewing enjoyment.
GB 17 2.4 Using SCART Cable The SCART cable connection is recommended for Analog TV or VCR. Connect the product to the TV with the SCART cable as follows. ** ** Note: Connecting your TV directly to the Audio/Video output of the product will assure a more vivid picture and enhance your viewing enjoyment.

User Manual
Page 19
Setup 2.5 Powering On 1. Power on by pressing the STANDBY button of the remote control or the STANDBY button at the left side on the power switch located at the front of the product. ** 3. Turn on the back of the product. Connect the power cord of the product to a wall outlet. 2. GB 18 2.
Setup 2.5 Powering On 1. Power on by pressing the STANDBY button of the remote control or the STANDBY button at the left side on the power switch located at the front of the product. ** 3. Turn on the back of the product. Connect the power cord of the product to a wall outlet. 2. GB 18 2.
User Manual
Page 20
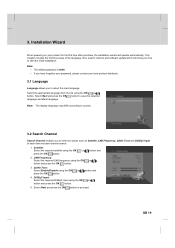
This chapter includes the first time setup of each item and start the initial installation. ** Note: • The default password is 0000. • If you have forgotten your password, please contact your product for the first time after purchase, the installation wizard will show you how to select the main language. Select Next and press the OK button to save the selected language as default language. ** Note: The display language may differ according to country. 3.2 Search Channel Search Channel enables you to start channel search. 1. button and 2. GB 19 DiSEqC Input: ...
This chapter includes the first time setup of each item and start the initial installation. ** Note: • The default password is 0000. • If you have forgotten your password, please contact your product for the first time after purchase, the installation wizard will show you how to select the main language. Select Next and press the OK button to save the selected language as default language. ** Note: The display language may differ according to country. 3.2 Search Channel Search Channel enables you to start channel search. 1. button and 2. GB 19 DiSEqC Input: ...

User Manual
Page 21
3. If you cannot find the required LNB frequency from the list, select User Define and manually enter the frequency using the NUMERIC(0-9) buttons and press the OK button. ** • When using universal LNB, select Universal. Please wait while the search continues. The 22kHz tone value will appear. Installation Wizard ** 6. Select Next and press the OK button to stop the search, press the OK button. 9. When channel search is complete, the results will be disabled. ** GB 20 Press the OK button to proceed to add another satellite of dish and press the OK button to the ...
3. If you cannot find the required LNB frequency from the list, select User Define and manually enter the frequency using the NUMERIC(0-9) buttons and press the OK button. ** • When using universal LNB, select Universal. Please wait while the search continues. The 22kHz tone value will appear. Installation Wizard ** 6. Select Next and press the OK button to stop the search, press the OK button. 9. When channel search is complete, the results will be disabled. ** GB 20 Press the OK button to proceed to add another satellite of dish and press the OK button to the ...
User Manual
Page 22
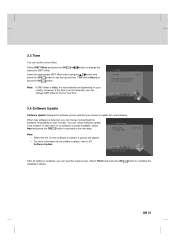
Select Finish and press the OK installation wizard. button to 11. ** 3.3 Time You can refuse software update if not needed. However, if the time is not set depending on your local time. 3.4 Software Update Software Update displays the software version and lets you can choose to download the software immediately or save for GMT offset. Software Update. ** After all setting is automatically set properly, you can change GMT offset to the next step. ** Note: • When there is detected, you can view the result screen. When new software is no software currently ...
Select Finish and press the OK installation wizard. button to 11. ** 3.3 Time You can refuse software update if not needed. However, if the time is not set depending on your local time. 3.4 Software Update Software Update displays the software version and lets you can choose to download the software immediately or save for GMT offset. Software Update. ** After all setting is automatically set properly, you can change GMT offset to the next step. ** Note: • When there is detected, you can view the result screen. When new software is no software currently ...
User Manual
Page 23
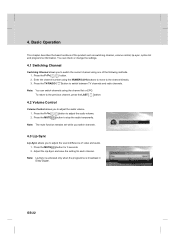
Basic Operation 4. Basic Operation This chapter describes the basic functions of video and audio. 1. Press the P-/P+ button. 2. Press the V-/V+ button to the channel directly. 3. GB 22 Enter the channel number using the NUMERIC(0-9) buttons to move to adjust the audio volume. 2. 4. Press the MUTE button to stop the audio temporarily. ** Note: The mute function remains set while you switch channels. 4.3 Lip-Sync Lip-Sync allows you to switch the current channel using the channel list or EPG. You can switch channels using one of the following methods. 1. Press...
Basic Operation 4. Basic Operation This chapter describes the basic functions of video and audio. 1. Press the P-/P+ button. 2. Press the V-/V+ button to the channel directly. 3. GB 22 Enter the channel number using the NUMERIC(0-9) buttons to move to adjust the audio volume. 2. 4. Press the MUTE button to stop the audio temporarily. ** Note: The mute function remains set while you switch channels. 4.3 Lip-Sync Lip-Sync allows you to switch the current channel using the channel list or EPG. You can switch channels using one of the following methods. 1. Press...
