Hotpoint RVM5160DHBB Support and Manuals
Get Help and Manuals for this Hotpoint item
View All Support Options Below
Free Hotpoint RVM5160DHBB manuals!
Problems with Hotpoint RVM5160DHBB?
Ask a Question
Free Hotpoint RVM5160DHBB manuals!
Problems with Hotpoint RVM5160DHBB?
Ask a Question
Popular Hotpoint RVM5160DHBB Manual Pages
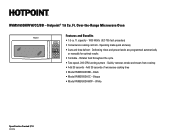
Quick Specs - Page 2
...
or manually for optimal results • Turntable - Bisque • Model RVM5160DHWW - Operating made quick and easy • Auto and time defrost - White
Specification Created 2/14 440026 ft. Ft. Rotates food throughout the cycle • Two-speed, 200-CFM venting system - Add 30 seconds of microwave cooking time • Model RVM5160DHBB - Over-the-Range Microwave Oven
Hotpoint...
Use and Care Manual - Page 1
... 15, 16 Microwave Terms 16 Power Levels 17 Other Features 18-20 Replacing the Light Bulb 23 Exhaust Features 23
Care and Cleaning 24, 25
Troubleshooting Tips Before you call for service . . . . . .25, 26
Consumer Support Optional Kits 8 Warranty 27 Consumer Support 28
Owner's Manual
AVM4160 JNM3161 JVM3160
Write the model and serial numbers here: Model Serial You can...
Use and Care Manual - Page 3
....
„ This microwave oven is specifically designed to heat, dry or cook food, and is not intended for laboratory or industrial use.
„ Some products such as whole eggs and VHDOHGFRQWDLQHUV³IRUH [DPSOHFORVHGMDUV³ are able to explode and should not be serviced by microwave. SAVE THESE INSTRUCTIONS
3 Such use of...
Use and Care Manual - Page 7
... guidelines:
1 Use microwave-safe plastics only and use an extension cord with this manual. GROUNDING INSTRUCTIONS
WARNING! This appliance...INSTRUCTIONS
7
GEAppliances.com
MICROWAVE-SAFE COOKWARE (cont.)
„ Use foil only as to have a qualified electrician or service technician install an outlet near the appliance. If the outlet is a standard 2-prong wall outlet, it replaced...
Use and Care Manual - Page 9
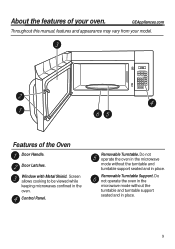
... Latches.
Screen allows cooking to be viewed while keeping microwaves confined in place. Control Panel. Turntable
7
8
9
Surface Light
Power Level
0
Set Clock
Vent
Cancel Off
Start Pause
Features of your model.
About the features of the Oven
Door Handle.
Removable Turntable Support. GEAppliances.com
Throughout this manual, features and appearance may vary from your oven...
Use and Care Manual - Page 10
...
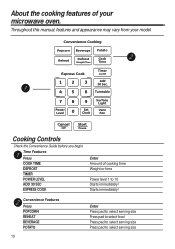
Cooking Controls
Check the Convenience Guide before you begin. Convenience Features Press POPCORN REHEAT BEVERAGE POTATO
10
Enter Press pad to select serving size Press pad to select food Press pad to select serving size Press pad to 10 Starts immediately!
Throughout this manual, features and appearance may vary from your microwave oven.
Use and Care Manual - Page 21

Care and cleaning of your microwave.
Turntable
7
8
9
Surface Light
Power Level
0
Set Clock
Vent
Cancel Off
Start Pause
Parts on the Door Some spatters can be removed with a damp cloth. Remove
greasy spatters with a sudsy cloth, then rinse
with a paper
towel; Never use
abrasive cleaners or sharp utensils on any part of baking soda and...
Use and Care Manual - Page 24
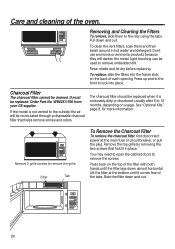
...replace, slide the filters into place.
It must be cleaned. If the model is noticeably dirty or discolored (usually after 6 to 12 months, depending on usage).
Turntable
7
8
9
Surface Light
Power Level
0
Set.... Don't use ammonia or ammonia products because they will be replaced when it in hot water and detergent. Order Part No.
To clean the vent filters, soak them to the ...
Use and Care Manual - Page 27

...2),03/,(':$55$17,(6³
Please have serial and model numbers available when calling for other than the intended purpose or used for service. For The Period of: GE Will Replace
One Year )URPWKHGDWHRIWKH
original purchase
Any part of charge, all labor and related service to your home. For the above limited...
Use and Care Manual - Page 28
... service you can now download Owner's Manuals, order parts, catalogs, or even schedule service on...Instructions contained in China For greater convenience and faster service, you receive from your convenience any day of your questions, and so much more...
GE Consumer Home Services will allow for enhanced communication and prompt service under the terms of the year! Consumer Support...
Installation Instructions - Page 1
... under the warranty. Observe all governing codes and ordinances.
‡ Note to Consumer - Installation Instructions
2YHUWKH5DQJH 0LFURZDYH2YHQ
AVM4160, JNM3161, JVM3160, and RVM5160
Questions? Keep these instructions completely and carefully.
‡ IMPORTANT - Installation of this manual, features and appearance may vary from your model.
49-40675-2 (12-13 GE)
Convenience...
Installation Instructions - Page 7
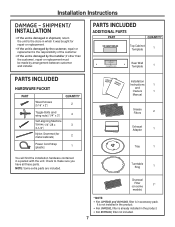
IINNSSTTRALULCATTIIOONNSMOAWNUNAELRS
Installation
Instructions
1
and
Owners
1
Manual
Grease Filters
2
Exhaust Adaptor
1
Tray
1
Turntable Ring
1
Charcoal
Filter (on some
1*
models)
* NOTE: ‡)RU-90DQG$90, filter is the responsibility of the customer.
‡,IWKHXQLWLVGDPDJHGE\WKHLQVWDOOHU (if other than the customer), repair or replacement must be ...
Installation Instructions - Page 8
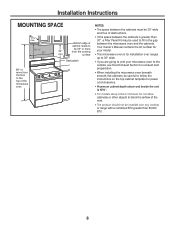
...'s Manual contains the kit number for your model.
‡ This microwave oven is for installation over ranges up to 36s wide.
‡ If you are going to vent your microwave oven to the outside, see Hood Exhaust Section for exhaust duct preparation.
‡When installing the microwave oven beneath smooth, flat cabinets, be careful to follow the instructions...
Installation Instructions - Page 17

Installation Instructions
B OUTSIDE TOP EXHAUST
9HUWLFDO'XFW
INSTALLATION OVERVIEW
B1. Install Exhaust Adaptor B5. Wall Mounting Plate Bolt End
3 Insert the toggle wings... by A, B, C and D.
1 Remove the toggle wings from the wall
to 3ø4s onto each bolt. Mount Microwave Oven B6. Turntable Surface Light
Vent
Cancel Off
Start Pause
B1 ATTACH THE MOUNTING PLATE TO THE WALL
A
B
7RXVH...
Installation Instructions - Page 25
...
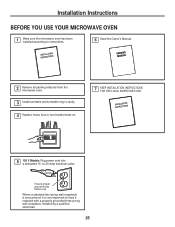
BEFORE YOU USE YOUR MICROWAVE OVEN
1
Make sure the microwave oven has been installed according to instructions.
6 Read the Owner's Manual.
2 Remove all packing material from the
microwave oven.
3 Install turntable and turntable ring in cavity. 4 Replace house fuse or turn breaker back on.
7
KEEP INSTALLATION INSTRUCTIONS FOR THE LOCAL INSPECTOR'S USE.
5 120 V Models: Plug power cord into...
Hotpoint RVM5160DHBB Reviews
We have not received any reviews for Hotpoint yet.