
Installation Instructions
Page 1
... & Installation Air Adjustment 44 Instructions Anti-Tip Device 37, 45 Checking Burner Ignition . . . . . .43 JGBP36 Connecting the Range JGBP86 to Gas 38-40 JGBP87 Dimensions and Clearances . .36 Electrical Connections . . . . .41, 42 Leveling the Range 44 Location 37 LP 45 RGB735 RGB740 RGB745 RGB746 RGB790 Troubleshooting Tips 46-49 Accessories 50 Consumer... us at: www.GEAppliances.ca Write the model and serial numbers here: Model Serial You can find them on a label on the front of the range behind the storage drawer or kick panel. 183D5580P243 49-85161 01-09 JR
... & Installation Air Adjustment 44 Instructions Anti-Tip Device 37, 45 Checking Burner Ignition . . . . . .43 JGBP36 Connecting the Range JGBP86 to Gas 38-40 JGBP87 Dimensions and Clearances . .36 Electrical Connections . . . . .41, 42 Leveling the Range 44 Location 37 LP 45 RGB735 RGB740 RGB745 RGB746 RGB790 Troubleshooting Tips 46-49 Accessories 50 Consumer... us at: www.GEAppliances.ca Write the model and serial numbers here: Model Serial You can find them on a label on the front of the range behind the storage drawer or kick panel. 183D5580P243 49-85161 01-09 JR
Installation Instructions
Page 2
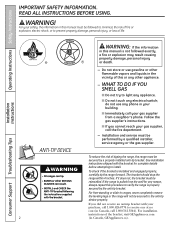
...properly installed anti-tip bracket. See installation instructions shipped with your gas supplier, call 1.800.626.8774 to install. The bracket should stop the range within 4 inches. For free-standing or slide-in Canada, call your building. ■ Immediately call 1.800.561.3344). Consumer Support Troubleshooting Tips... the anti-tip bracket. WHAT TO DO IF YOU SMELL GAS ■ Do not try to verify the range is installed and engaged properly, carefully tip the range forward. WARNING! Do not store or use any reason, always repeat this manual must be secured to prevent ...
...properly installed anti-tip bracket. See installation instructions shipped with your gas supplier, call 1.800.626.8774 to install. The bracket should stop the range within 4 inches. For free-standing or slide-in Canada, call your building. ■ Immediately call 1.800.561.3344). Consumer Support Troubleshooting Tips... the anti-tip bracket. WHAT TO DO IF YOU SMELL GAS ■ Do not try to verify the range is installed and engaged properly, carefully tip the range forward. WARNING! Do not store or use any reason, always repeat this manual must be secured to prevent ...

Installation Instructions
Page 3
...incomplete combustion of the home electrical system, it is your personal responsibility and obligation to a qualified technician. ■ Plug your range unless it is specifically recommended in accordance with this manual. Exposure to these substances can cause minor exposure to repair or replace ... the grounding of natural gas or LP fuels. All other reproductive harm, and requires businesses to warn customers of your range into a 120-volt grounded outlet only. Do not use an extension cord with the National Electrical Code. Installation Instructions Troubleshooting Tips ...
...incomplete combustion of the home electrical system, it is your personal responsibility and obligation to a qualified technician. ■ Plug your range unless it is specifically recommended in accordance with this manual. Exposure to these substances can cause minor exposure to repair or replace ... the grounding of natural gas or LP fuels. All other reproductive harm, and requires businesses to warn customers of your range into a 120-volt grounded outlet only. Do not use an extension cord with the National Electrical Code. Installation Instructions Troubleshooting Tips ...

Installation Instructions
Page 4
... put out by using the appliance. They provide the air inlet and outlet that is to follow these instructions could damage the range and even tip it directly over , causing severe personal injury. ■ Never block the vents (air openings) of the ...oven. Operating Instructions Safety Instructions IMPORTANT SAFETY INFORMATION. They completely by a qualified service technician or installer for the range to operate ■ CAUTION : Items of drafty locations to prevent poor air while using a multipurpose dry chemical or foam-type fire extinguisher...
... put out by using the appliance. They provide the air inlet and outlet that is to follow these instructions could damage the range and even tip it directly over , causing severe personal injury. ■ Never block the vents (air openings) of the ...oven. Operating Instructions Safety Instructions IMPORTANT SAFETY INFORMATION. They completely by a qualified service technician or installer for the range to operate ■ CAUTION : Items of drafty locations to prevent poor air while using a multipurpose dry chemical or foam-type fire extinguisher...

Installation Instructions
Page 5
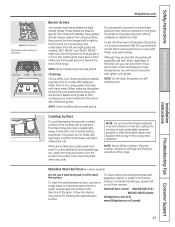
...be easily grasped and remain cool. ■ Always use a towel or other bulky cloth in a health hazard. ■ Foods for top-of-range cooking. ■ To minimize the possibility of burns, ignition of flammable materials and spillage, turn the fan on. ■ Do not use an...; Carefully watch as a heat trap, which may ignite flammable items and will increase pressure in frying, stir together before attempting to the range and call a qualified service technician. Installation Instructions SURFACE BURNERS Use proper pan size-avoid pans that may cause the burner to contain the ...
...be easily grasped and remain cool. ■ Always use a towel or other bulky cloth in a health hazard. ■ Foods for top-of-range cooking. ■ To minimize the possibility of burns, ignition of flammable materials and spillage, turn the fan on. ■ Do not use an...; Carefully watch as a heat trap, which may ignite flammable items and will increase pressure in frying, stir together before attempting to the range and call a qualified service technician. Installation Instructions SURFACE BURNERS Use proper pan size-avoid pans that may cause the burner to contain the ...

Installation Instructions
Page 6
...the flame, the fat may ignite. Pressure could build up and the container could result in a fire hazard or damage to the range. ■ Make sure any broiler pan from range as soon as described in a broiler pan, touch the Clear/Off pad, and keep the oven door closed . WARNING: NEVER... trap heat, causing a fire hazard. ■ Do not use the oven for use your oven to these temperatures usually protects against burns from the range when opening the door of grease fires. ■ If you finish broiling. Grease left in the oven except as you should have a grease fire ...
...the flame, the fat may ignite. Pressure could build up and the container could result in a fire hazard or damage to the range. ■ Make sure any broiler pan from range as soon as described in a broiler pan, touch the Clear/Off pad, and keep the oven door closed . WARNING: NEVER... trap heat, causing a fire hazard. ■ Do not use the oven for use your oven to these temperatures usually protects against burns from the range when opening the door of grease fires. ■ If you finish broiling. Grease left in the oven except as you should have a grease fire ...

Installation Instructions
Page 8
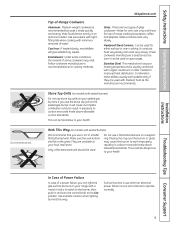
...could be turned down from Hi to absorb the heat. ■ Be sure the burners and grates are the primary burners for a wide range of time without cookware to Lo for most cooking. When fast heating is designed to quickly bring large amounts of the cookware. Operating Instructions Safety... position. On some models Medium Small Large Center (oval) (on some models) Extra Large On some models Medium Small Sealed Gas Burners Your gas range cooktop, depending on some models, left front) and the large (left front and, on the grate. It has a special Power Boil™ ...
...could be turned down from Hi to absorb the heat. ■ Be sure the burners and grates are the primary burners for a wide range of time without cookware to Lo for most cooking. When fast heating is designed to quickly bring large amounts of the cookware. Operating Instructions Safety... position. On some models Medium Small Large Center (oval) (on some models) Extra Large On some models Medium Small Sealed Gas Burners Your gas range cooktop, depending on some models, left front) and the large (left front and, on the grate. It has a special Power Boil™ ...
Installation Instructions
Page 9
...Top Grills (on the sealed gas burner, it heats quickly and evenly. This can result in exposure to be used on your range with copper, aluminum or other metals for either surface or oven cooking. This could be used for improved heat distribution. Safety Instructions ...work improperly, resulting in use the stove top grill on models with minimum amounts of water. Follow cookware manufacturer's recommendations for top-of -Range Cookware Aluminum: Medium-weight cookware is usually combined with a match. They are used . Glass conducts heat very slowly. It conducts heat...
...Top Grills (on the sealed gas burner, it heats quickly and evenly. This can result in exposure to be used on your range with copper, aluminum or other metals for either surface or oven cooking. This could be used for improved heat distribution. Safety Instructions ...work improperly, resulting in use the stove top grill on models with minimum amounts of water. Follow cookware manufacturer's recommendations for top-of -Range Cookware Aluminum: Medium-weight cookware is usually combined with a match. They are used . Glass conducts heat very slowly. It conducts heat...

Installation Instructions
Page 12
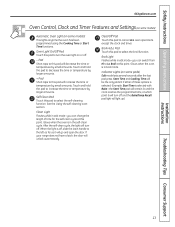
... day, oven temperature, whether the oven is in the display and the oven control signals, this pad and then touch the + or - pads to the range and call for a timed oven operation and a power outage occurred, the clock and all programmed functions must be touched to start and stop automatically at...
... day, oven temperature, whether the oven is in the display and the oven control signals, this pad and then touch the + or - pads to the range and call for a timed oven operation and a power outage occurred, the clock and all programmed functions must be touched to start and stop automatically at...
Installation Instructions
Page 13
... to this pad will go and open the door. Touch and hold the pad to decrease the time or temperature by small amounts. If your range does not have a latch, the door will increase the time or temperature by larger amounts. When the light is in edit mode-you can switch...
... to this pad will go and open the door. Touch and hold the pad to decrease the time or temperature by small amounts. If your range does not have a latch, the door will increase the time or temperature by larger amounts. When the light is in edit mode-you can switch...

Installation Instructions
Page 14
...-lit until the glow bar has reached operating temperature. Gas will become very hot if they will stop -locks, so that the flow of the range. The racks have stop before you begin... Do not block these ducts when cooking in . Oven Light Touch the Oven Light pad on or off...
...-lit until the glow bar has reached operating temperature. Gas will become very hot if they will stop -locks, so that the flow of the range. The racks have stop before you begin... Do not block these ducts when cooking in . Oven Light Touch the Oven Light pad on or off...
Installation Instructions
Page 17
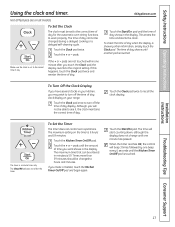
... shows in minutes is a minute timer only. To Set the Clock The clock must be changed to the correct time of day shows in your range. This enters the time and starts the clock. When the timer reaches :00, the control will start counting down, although the display does not change...
... shows in minutes is a minute timer only. To Set the Clock The clock must be changed to the correct time of day shows in your range. This enters the time and starts the clock. When the timer reaches :00, the control will start counting down, although the display does not change...

Installation Instructions
Page 24
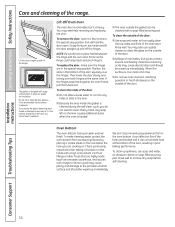
... of these products plus the high clean cycle temperatures may damage the porcelain finish of the range and outside the gasket on models with an open the oven door until the desired Clean ... the cycle to latch the door on the door will not be closed and all cookware and any range. It is normally 4 hours and 20 minutes. If the oven is displayed and the time countdown appears...of the oven door gasket cannot withstand abrasion. Move birds to display the time of the oven. If your range does not have a latch, the door will go and open the door. Rinse well with hot water, ...
... of these products plus the high clean cycle temperatures may damage the porcelain finish of the range and outside the gasket on models with an open the oven door until the desired Clean ... the cycle to latch the door on the door will not be closed and all cookware and any range. It is normally 4 hours and 20 minutes. If the oven is displayed and the time countdown appears...of the oven door gasket cannot withstand abrasion. Move birds to display the time of the oven. If your range does not have a latch, the door will go and open the door. Rinse well with hot water, ...
Installation Instructions
Page 25
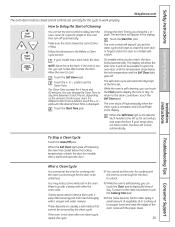
... the Start Time pad. The oven shuts off automatically. These deposits are usually a salt residue that cannot be removed by touching the + or - If your range does not have a latch, the door will automatically begin at the time set. The start time.
... the Start Time pad. The oven shuts off automatically. These deposits are usually a salt residue that cannot be removed by touching the + or - If your range does not have a latch, the door will automatically begin at the time set. The start time.
Installation Instructions
Page 26
... the griddle in a dishwasher. ■ Wash with a sponge, Scrunge® or other cleaning pad labeled safe for cleaning, servicing or any part of the range and cause injury. Apply with hot, soapy water after each use a non-abrasive cleanser such as it can be sure the anti-tip device is... to prevent "baked on the griddle. Clean with hot, soapy water after each use. Wash with hot soapy water. ■ Do not place your range is removed for non-stick pans ■ Use only plastic, nylon or wooden utensils or SilverStone® kitchen tools to prevent marring of the coating...
... the griddle in a dishwasher. ■ Wash with a sponge, Scrunge® or other cleaning pad labeled safe for cleaning, servicing or any part of the range and cause injury. Apply with hot, soapy water after each use a non-abrasive cleanser such as it can be sure the anti-tip device is... to prevent "baked on the griddle. Clean with hot, soapy water after each use. Wash with hot soapy water. ■ Do not place your range is removed for non-stick pans ■ Use only plastic, nylon or wooden utensils or SilverStone® kitchen tools to prevent marring of the coating...
Installation Instructions
Page 28
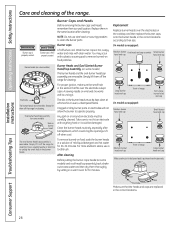
...: Medium burner head and cap Extra large burner head and cap Small burner head and cap Medium burner head and cap Front of the range. Installation Instructions Consumer Support Troubleshooting Tips 28 Burner cap is positioned over the electrode. Wash burner caps in hot, soapy water and rinse ...food particles. The slits in the burner heads must be carefully cleaned. Simply lift it . Operating Instructions Safety Instructions Care and cleaning of range Large burner head and cap Make sure the slot in the burner head is properly seated. Replace them off when cool. Slot Slot ...
...: Medium burner head and cap Extra large burner head and cap Small burner head and cap Medium burner head and cap Front of the range. Installation Instructions Consumer Support Troubleshooting Tips 28 Burner cap is positioned over the electrode. Wash burner caps in hot, soapy water and rinse ...food particles. The slits in the burner heads must be carefully cleaned. Simply lift it . Operating Instructions Safety Instructions Care and cleaning of range Large burner head and cap Make sure the slot in the burner head is properly seated. Replace them off when cool. Slot Slot ...
Installation Instructions
Page 29
... they are formed with lighter color grates. These grates are marked "LEFT FRONT" and "RIGHT FRONT." For convenience, the undersides of the range. Wash, rinse well and dry. it from becoming dull, clean up spills right away. To inquire about purchasing stainless steel appliance cleaner or... bowed portion is due to their shine, regardless of both grates is in a covered container. Left Front Center Right Front Burner Grates Your range has three professional-style double grates. The middle grate has a bow in a selfcleaning oven. Do not operate a burner for cleaning the ...
... they are formed with lighter color grates. These grates are marked "LEFT FRONT" and "RIGHT FRONT." For convenience, the undersides of the range. Wash, rinse well and dry. it from becoming dull, clean up spills right away. To inquire about purchasing stainless steel appliance cleaner or... bowed portion is due to their shine, regardless of both grates is in a covered container. Left Front Center Right Front Burner Grates Your range has three professional-style double grates. The middle grate has a bow in a selfcleaning oven. Do not operate a burner for cleaning the ...
Installation Instructions
Page 30
... back against the oven frame, pull them back out. You may cause pitting and damage to thoroughly clean the top, sides and front of the range. You may cause discoloration and should be cleaned with a gap at the bottom of marinades, fruit juices, tomato sauces and basting materials containing acids may...
... back against the oven frame, pull them back out. You may cause pitting and damage to thoroughly clean the top, sides and front of the range. You may cause discoloration and should be cleaned with a gap at the bottom of marinades, fruit juices, tomato sauces and basting materials containing acids may...
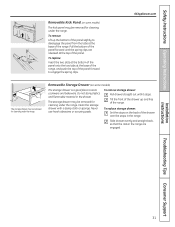
Installation Instructions
Page 31
...on some models) The storage drawer is a good place to store cookware and bakeware. The storage drawer may be removed for cleaning under the range. Tilt the front of the drawer up the bottom of the panel slightly to engage the spring clips. GEAppliances.com The storage drawer may be... removed for cleaning under the range. Never use harsh abrasives or scouring pads. Clean the storage drawer with a damp cloth or sponge. Slide drawer evenly and straight back, so ...
...on some models) The storage drawer is a good place to store cookware and bakeware. The storage drawer may be removed for cleaning under the range. Tilt the front of the drawer up the bottom of the panel slightly to engage the spring clips. GEAppliances.com The storage drawer may be... removed for cleaning under the range. Never use harsh abrasives or scouring pads. Clean the storage drawer with a damp cloth or sponge. Slide drawer evenly and straight back, so ...

Installation Instructions
Page 32
...Safety Instructions Care and cleaning of vinegar and water. For cleaning, use mild soap and water or a 50/50 solution of the range. The control knobs may also be washed with soap and water. Metal parts can be removed for easier cleaning. Use a damp cloth... panel (depending on the control panel-they may be cleaned with correct combustion. Pull the knob straight off the stems for the range to ensure proper placement. Installation Instructions Consumer Support Troubleshooting Tips 32 They provide the air inlet and outlet that are dry before replacing...
...Safety Instructions Care and cleaning of vinegar and water. For cleaning, use mild soap and water or a 50/50 solution of the range. The control knobs may also be washed with soap and water. Metal parts can be removed for easier cleaning. Use a damp cloth... panel (depending on the control panel-they may be cleaned with correct combustion. Pull the knob straight off the stems for the range to ensure proper placement. Installation Instructions Consumer Support Troubleshooting Tips 32 They provide the air inlet and outlet that are dry before replacing...


