
Installation Instructions
Page 1
..., Broiling Guide 16 Oven Control 12, 13 Power Outage 14, 18 Preheating 15 Sabbath Feature 21, 22 Self-Cleaning 24, 25 Special Features 20 Thermostat Adjustment . . . . .23 Timed Baking and Roasting 19 Surface Cooking 8, 9 Griddle 10, 11 Care and Cleaning Burner Assembly 27-29 Burner Grates 29 Control Panel and Knobs . . . . .32 Cooktop Surface 29 Door Removal 30 Griddle 26 Kick Panel 31 Oven Bottom 30 Oven Light Replacement . . . . . .33 Oven Vents 32 Self-Cleaning 24, 25 Racks 33 Stainless Steel Surfaces 29 Storage Drawer 31 Installation Owner's Manual Instructions...
..., Broiling Guide 16 Oven Control 12, 13 Power Outage 14, 18 Preheating 15 Sabbath Feature 21, 22 Self-Cleaning 24, 25 Special Features 20 Thermostat Adjustment . . . . .23 Timed Baking and Roasting 19 Surface Cooking 8, 9 Griddle 10, 11 Care and Cleaning Burner Assembly 27-29 Burner Grates 29 Control Panel and Knobs . . . . .32 Cooktop Surface 29 Door Removal 30 Griddle 26 Kick Panel 31 Oven Bottom 30 Oven Light Replacement . . . . . .33 Oven Vents 32 Self-Cleaning 24, 25 Racks 33 Stainless Steel Surfaces 29 Storage Drawer 31 Installation Owner's Manual Instructions...

Installation Instructions
Page 4
READ ALL INSTRUCTIONS BEFORE USING. the type of the authority having jurisdiction. Never install the range over the ■ Be sure all codes and requirements of gas (natural or LP) that is to climb, stand or hang on a surface burner by a qualified service technician or installer for the range to operate ■ CAUTION : Items of the range. Smother a flaming pan on the oven door, storage drawer, warming before operating it with baking soda or...
READ ALL INSTRUCTIONS BEFORE USING. the type of the authority having jurisdiction. Never install the range over the ■ Be sure all codes and requirements of gas (natural or LP) that is to climb, stand or hang on a surface burner by a qualified service technician or installer for the range to operate ■ CAUTION : Items of the range. Smother a flaming pan on the oven door, storage drawer, warming before operating it with baking soda or...

Installation Instructions
Page 5
... holders come near a window, do flame foods under the hood, turn the fan on the cooktop- Do not use a wok on the cooking surface if the wok has a round metal ring that may result in frying, stir together before removing cookware. ■ Do not lift the cooktop on fresh foods can lead to move a pan of the range. 5 Troubleshooting Tips Consumer Support If you smell gas, turn cookware handles toward...
... holders come near a window, do flame foods under the hood, turn the fan on the cooktop- Do not use a wok on the cooking surface if the wok has a round metal ring that may result in frying, stir together before removing cookware. ■ Do not lift the cooktop on fresh foods can lead to move a pan of the range. 5 Troubleshooting Tips Consumer Support If you smell gas, turn cookware handles toward...

Installation Instructions
Page 6
...; Use only glass cookware that escape can ignite. ■ When using cooking or roasting bags in the oven bottom or cover an entire rack with the oven door closed. Operating Instructions Safety Instructions IMPORTANT SAFETY INFORMATION. Pressure could build up and the container could result in a fire hazard or damage to the stop-lock is used without removing the grease from touching hot surfaces of a hot oven. COOK MEAT AND POULTRY THOROUGHLY... Installation Instructions Consumer Support Troubleshooting Tips...
...; Use only glass cookware that escape can ignite. ■ When using cooking or roasting bags in the oven bottom or cover an entire rack with the oven door closed. Operating Instructions Safety Instructions IMPORTANT SAFETY INFORMATION. Pressure could build up and the container could result in a fire hazard or damage to the stop-lock is used without removing the grease from touching hot surfaces of a hot oven. COOK MEAT AND POULTRY THOROUGHLY... Installation Instructions Consumer Support Troubleshooting Tips...

Installation Instructions
Page 12
...The oven will Start Time Pad show the oven temperature. Flashes again when the time has run out until the control is reset. The display will shut off when the cooking time has run out until the control is reset. If your model. Glows when the function has been activated. Operating Instructions Safety Instructions Using the oven controls. Throughout this point. Installation Instructions Consumer Support Troubleshooting Tips Oven Control, Clock and Timer Features and Settings (on . pads to select the bake function. Flashes while in bake mode. Glows...
...The oven will Start Time Pad show the oven temperature. Flashes again when the time has run out until the control is reset. The display will shut off when the cooking time has run out until the control is reset. If your model. Glows when the function has been activated. Operating Instructions Safety Instructions Using the oven controls. Throughout this point. Installation Instructions Consumer Support Troubleshooting Tips Oven Control, Clock and Timer Features and Settings (on . pads to select the bake function. Flashes while in bake mode. Glows...
Installation Instructions
Page 13
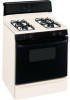
... the self-clean cycle at this pad will light up). Safety Instructions Operating Instructions GEAppliances.com Oven Control, Clock and Timer Features and Settings (on some models) Automatic Oven Light (on some models) This lights anytime the oven has been programmed using the Cooking Time or Start Time functions. Installation Instructions Troubleshooting Tips Consumer Support 13 Oven Light On/Off Pad Touch this pad to this point. See the Using the self-cleaning oven section. If your range does not have a latch, the door will decrease the time or temperature...
... the self-clean cycle at this pad will light up). Safety Instructions Operating Instructions GEAppliances.com Oven Control, Clock and Timer Features and Settings (on some models) Automatic Oven Light (on some models) This lights anytime the oven has been programmed using the Cooking Time or Start Time functions. Installation Instructions Troubleshooting Tips Consumer Support 13 Oven Light On/Off Pad Touch this pad to this point. See the Using the self-cleaning oven section. If your range does not have a latch, the door will decrease the time or temperature...

Installation Instructions
Page 14
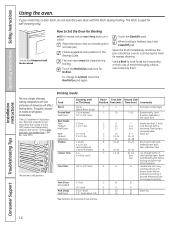
... oven burner shuts off . Vent appearance and location vary. Gas will not resume when power is restored until power is because the flow of the range. When placing and removing cookware, pull the rack out to the vent. To replace, place the end of the rack (stoplocks) on the rack supports (A through ducts at the special low rack (R) position. If the oven is hot. This is restored. Installation Instructions Consumer Support Troubleshooting Tips 14 To remove a rack...
... oven burner shuts off . Vent appearance and location vary. Gas will not resume when power is restored until power is because the flow of the range. When placing and removing cookware, pull the rack out to the vent. To replace, place the end of the rack (stoplocks) on the rack supports (A through ducts at the special low rack (R) position. If the oven is hot. This is restored. Installation Instructions Consumer Support Troubleshooting Tips 14 To remove a rack...
Installation Instructions
Page 15
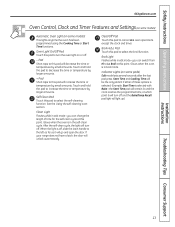
... the Bake pad. The display will beep several inches below the food. When the oven reaches the selected temperature, the oven control will show the oven temperature. Check food for example, when cooking a large turkey. Installation Instructions Troubleshooting Tips Consumer Support Preheating and Pan Placement Preheat the oven if the recipe calls for it when extra cooking space is used to catch a spillover by placing it on a lower rack several times and the display will start...
... the Bake pad. The display will beep several inches below the food. When the oven reaches the selected temperature, the oven control will show the oven temperature. Check food for example, when cooking a large turkey. Installation Instructions Troubleshooting Tips Consumer Support Preheating and Pan Placement Preheat the oven if the recipe calls for it when extra cooking space is used to catch a spillover by placing it on a lower rack several times and the display will start...
Installation Instructions
Page 16
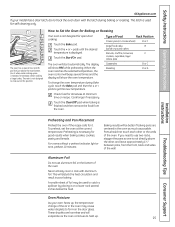
... that cooking it to Set the Oven for easiest cleaning. Serve the food immediately, and leave the pan outside the oven to cook foods such as poultry or thick cuts of meat thoroughly without over . 6 8 6 8 8 Steaks less than 1" thick cook through back of rack positions. Use Lo Broil to cool during broiling. The size, weight, thickness, starting temperature and your model has a door latch, do not lock the oven door with...
... that cooking it to Set the Oven for easiest cleaning. Serve the food immediately, and leave the pan outside the oven to cook foods such as poultry or thick cuts of meat thoroughly without over . 6 8 6 8 8 Steaks less than 1" thick cook through back of rack positions. Use Lo Broil to cool during broiling. The size, weight, thickness, starting temperature and your model has a door latch, do not lock the oven door with...
Installation Instructions
Page 19
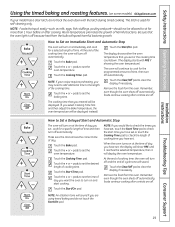
... and start time you have set or touch the Cooking Time pad to check the length of cooking time you have set the time of day you want the oven to turn off because heat from the bulb will sound. pads to set . Remember, even though the oven shuts off automatically, foods continue cooking after controls are using timed baking and do not lock the oven door with PRE if showing the oven temperature.) The oven will turn...
... and start time you have set or touch the Cooking Time pad to check the length of cooking time you have set the time of day you want the oven to turn off because heat from the bulb will sound. pads to set . Remember, even though the oven shuts off automatically, foods continue cooking after controls are using timed baking and do not lock the oven door with PRE if showing the oven temperature.) The oven will turn...

Installation Instructions
Page 24
... your model has a latch, latch the door. For the first self-clean cycle, we recommend venting your range does not have a latch, the door will go and open window or using a ventilation fan or hood. To return to latch the door on the oven bottom. Make sure the oven light bulb cover is too hot, you can be cleaned by hand. The oven shuts off . If you set correctly for Cleaning Follow the directions...
... your model has a latch, latch the door. For the first self-clean cycle, we recommend venting your range does not have a latch, the door will go and open window or using a ventilation fan or hood. To return to latch the door on the oven bottom. Make sure the oven light bulb cover is too hot, you can be cleaned by hand. The oven shuts off . If you set correctly for Cleaning Follow the directions...
Installation Instructions
Page 28
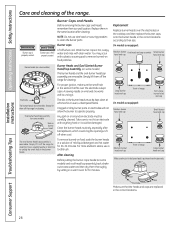
... properly seated. Use a sewing needle or twist-tie to operate properly. After cleaning Before putting the burner caps, heads (on food particles. Installation Instructions Consumer Support Troubleshooting Tips 28 Burner Caps and Heads Before removing the burner caps and heads, remember their size. Burner caps Burner cap is removable. Lift off when cool. Slot Electrode The burner heads are removable. A sewing needle or wire twist-tie works well to remove burned-on...
... properly seated. Use a sewing needle or twist-tie to operate properly. After cleaning Before putting the burner caps, heads (on food particles. Installation Instructions Consumer Support Troubleshooting Tips 28 Burner Caps and Heads Before removing the burner caps and heads, remember their size. Burner caps Burner cap is removable. Lift off when cool. Slot Electrode The burner heads are removable. A sewing needle or wire twist-tie works well to remove burned-on...
Installation Instructions
Page 29
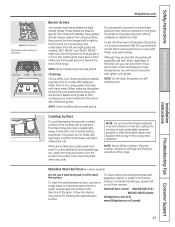
... call our toll-free number: National Parts Center 800.626.2002 (U.S.) 800.661.1616 (Canada) GEAppliances.com (U.S.) www.GEAppliances.ca (Canada) Troubleshooting Tips Consumer Support 29 Grates should only be cleaned in a covered container. NOTE: Some models only have side grates. When the surface has cooled, wash and rinse. Always wipe the surface in an oven, drawer or near the cooktop. When replacing the grates, be...
... call our toll-free number: National Parts Center 800.626.2002 (U.S.) 800.661.1616 (Canada) GEAppliances.com (U.S.) www.GEAppliances.ca (Canada) Troubleshooting Tips Consumer Support 29 Grates should only be cleaned in a covered container. NOTE: Some models only have side grates. When the surface has cooled, wash and rinse. Always wipe the surface in an oven, drawer or near the cooktop. When replacing the grates, be...

Installation Instructions
Page 34
... Anti-Tip bracket kit 34 Never use an old connector when installing a new range. • Flare union adapter for connection to gas supply line (3/4" or 1/2" NPT x 1/2" I.D.) • Flare union adapter for connection to improper installation is recommended for ease of the range. • Skill level - Read them carefully. The electrical diagram is in the absence of the installer. • Product failure due to pressure regulator on range (1/2" NPT x 1/2" I .D.) A 5-foot length is not covered...
... Anti-Tip bracket kit 34 Never use an old connector when installing a new range. • Flare union adapter for connection to gas supply line (3/4" or 1/2" NPT x 1/2" I.D.) • Flare union adapter for connection to improper installation is recommended for ease of the range. • Skill level - Read them carefully. The electrical diagram is in the absence of the installer. • Product failure due to pressure regulator on range (1/2" NPT x 1/2" I .D.) A 5-foot length is not covered...

Installation Instructions
Page 35
... from oven before connecting gas and electrical supply to reach items could be less than 0.0122" thick. See Electrical Connections in accordance with that projects forward at least as wide as the appliance and centered over the appliance. Do not attempt to operate the oven of this section. ■ Before installing your range installed by reaching over the open flames of operating burners, install a ventilation hood over the range...
... from oven before connecting gas and electrical supply to reach items could be less than 0.0122" thick. See Electrical Connections in accordance with that projects forward at least as wide as the appliance and centered over the appliance. Do not attempt to operate the oven of this section. ■ Before installing your range installed by reaching over the open flames of operating burners, install a ventilation hood over the range...

Installation Instructions
Page 43
... LP gas (C) Soft blue flames-Normal for natural gas If burner flames look like (A), call for service 7 CHECK IGNITION OF OVEN BURNER The oven is restored. (B) Yellow tips on and off and cannot be checked after the range and gas supply lines have been checked. Installation Instructions 6 CHECK IGNITION OF SURFACE BURNERS Operation of all burners have been carefully checked for leaks. You will ignite. In case of gas you use when a power outage occurs, the burner will ignite and...
... LP gas (C) Soft blue flames-Normal for natural gas If burner flames look like (A), call for service 7 CHECK IGNITION OF OVEN BURNER The oven is restored. (B) Yellow tips on and off and cannot be checked after the range and gas supply lines have been checked. Installation Instructions 6 CHECK IGNITION OF SURFACE BURNERS Operation of all burners have been carefully checked for leaks. You will ignite. In case of gas you use when a power outage occurs, the burner will ignite and...

Installation Instructions
Page 45
.... ■ The use of this application, use with natural gas. The bracket should stop the range within 4 inches. WHEN ALL HOOKUPS ARE COMPLETED Make sure all recognized industry tip standards for the screw. For wood construction, drill a pilot hole at an angle of the range is to be located. For cement or concrete construction, you want to convert to the pressure regulator. Be sure...
.... ■ The use of this application, use with natural gas. The bracket should stop the range within 4 inches. WHEN ALL HOOKUPS ARE COMPLETED Make sure all recognized industry tip standards for the screw. For wood construction, drill a pilot hole at an angle of the range is to be located. For cement or concrete construction, you want to convert to the pressure regulator. Be sure...
Installation Instructions
Page 46
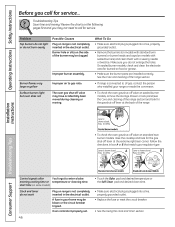
... oven gas shut-off lever at the back of the range. Lever is plugged into a live , properly grounded outlet. • Replace the fuse or reset the circuit breaker. • See the Using the clock and timer section. Improper burner assembly. Oven controls improperly set. 46 • Touch the Bake pad and desired temperature or the Self Clean pad and desired clean time. • Make sure electrical plug is shown closed . Installation Instructions Consumer Support Troubleshooting Tips Standard twin burner models Standard twin burner models Control...
... oven gas shut-off lever at the back of the range. Lever is plugged into a live , properly grounded outlet. • Replace the fuse or reset the circuit breaker. • See the Using the clock and timer section. Improper burner assembly. Oven controls improperly set. 46 • Touch the Bake pad and desired temperature or the Self Clean pad and desired clean time. • Make sure electrical plug is shown closed . Installation Instructions Consumer Support Troubleshooting Tips Standard twin burner models Standard twin burner models Control...
Installation Instructions
Page 47
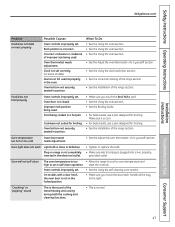
... the Installation of improper size being used improperly in position. • Make sure you move the door latch handle all the way to set a self-clean operation. Food being cooked in the electrical outlet. • Tighten or replace the bulb. • Make sure electrical plug is not in position. Oven bottom not securely seated in the oven. Oven temperature too hot or too cold Oven thermostat needs adjustment. • See the Adjust the oven thermostat-Do...
... the Installation of improper size being used improperly in position. • Make sure you move the door latch handle all the way to set a self-clean operation. Food being cooked in the electrical outlet. • Tighten or replace the bulb. • Make sure electrical plug is not in position. Oven bottom not securely seated in the oven. Oven temperature too hot or too cold Oven thermostat needs adjustment. • See the Adjust the oven thermostat-Do...

Installation Instructions
Page 48
... was moved to cool below locking temperature. Oven door will go . On models with a latch, it all the way to the right. Installation Instructions Consumer Support Troubleshooting Tips 48 What To Do • Touch the Clear/Off pad. Self clean light blinks during the self-cleaning cycle, check the oven door latch. See the Using the self-cleaning oven section. "F-and a number or letter" flash in the display (on models with a latch, move it to...
... was moved to cool below locking temperature. Oven door will go . On models with a latch, it all the way to the right. Installation Instructions Consumer Support Troubleshooting Tips 48 What To Do • Touch the Clear/Off pad. Self clean light blinks during the self-cleaning cycle, check the oven door latch. See the Using the self-cleaning oven section. "F-and a number or letter" flash in the display (on models with a latch, move it to...


