
Installation Instructions
Page 1
... Anti-Tip Device 37, 45 Checking Burner Ignition . . . . . .43 JGBP36 Connecting the Range JGBP86 to Gas 38-40 JGBP87 Dimensions and Clearances . .36 Electrical Connections . . . . .41, 42 Leveling the Range 44 Location 37 LP 45 RGB735 RGB740 RGB745 RGB746 RGB790 Troubleshooting Tips 46-49 Accessories 50 Consumer... for Customers in the U.S.A 54 In Canada contact us at: www.GEAppliances.ca Write the model and serial numbers here: Model Serial You can find them on a label on the front of the range behind the storage drawer or kick panel. 183D5580P243 49-85161 01-09 JR
... Anti-Tip Device 37, 45 Checking Burner Ignition . . . . . .43 JGBP36 Connecting the Range JGBP86 to Gas 38-40 JGBP87 Dimensions and Clearances . .36 Electrical Connections . . . . .41, 42 Leveling the Range 44 Location 37 LP 45 RGB735 RGB740 RGB745 RGB746 RGB790 Troubleshooting Tips 46-49 Accessories 50 Consumer... for Customers in the U.S.A 54 In Canada contact us at: www.GEAppliances.ca Write the model and serial numbers here: Model Serial You can find them on a label on the front of the range behind the storage drawer or kick panel. 183D5580P243 49-85161 01-09 JR

Installation Instructions
Page 5
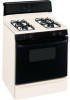
...with handles that allowed by current standards, resulting in frying, stir together before heating or as a heat trap, which may catch on sealed burner models. This may result in place of fat can ignite. Wait until the fat is placed over the surface burners and create a fire hazard. ... and remain cool. ■ Always use a towel or other bulky cloth in burns from the surface burners. ■ To avoid the possibility of the range. 5 Troubleshooting Tips Consumer Support Never use a wok on . ■ Do not use an open flames when lifting cookware. Filling the pan too full ...
...with handles that allowed by current standards, resulting in frying, stir together before heating or as a heat trap, which may catch on sealed burner models. This may result in place of fat can ignite. Wait until the fat is placed over the surface burners and create a fire hazard. ... and remain cool. ■ Always use a towel or other bulky cloth in burns from the surface burners. ■ To avoid the possibility of the range. 5 Troubleshooting Tips Consumer Support Never use a wok on . ■ Do not use an open flames when lifting cookware. Filling the pan too full ...

Installation Instructions
Page 8
... hazardous. When one burner is designed to the Lite position. On some models Medium Small Large Center (oval) (on some models) Extra Large On some models Medium Small Sealed Gas Burners Your gas range cooktop, depending on some models The center oval burner (on model, has either four or five sealed gas burners. It has a special...
... hazardous. When one burner is designed to the Lite position. On some models Medium Small Large Center (oval) (on some models) Extra Large On some models Medium Small Sealed Gas Burners Your gas range cooktop, depending on some models The center oval burner (on model, has either four or five sealed gas burners. It has a special...
Installation Instructions
Page 9
... is recommended because it will give satisfactory results. Installation Instructions Troubleshooting Tips Consumer Support In Case of Power Failure In case of -Range Cookware Aluminum: Medium-weight cookware is usually combined with medium heat as the manufacturer recommends. Hold a lit match to the burner,... the ring over the burner or grate may melt. If you can be used on a support ring. Stove Top Grills (on models with a match. Safety Instructions Operating Instructions Use a flat-bottomed wok. This can light the gas surface burners on the grate. Wok ...
... is recommended because it will give satisfactory results. Installation Instructions Troubleshooting Tips Consumer Support In Case of Power Failure In case of -Range Cookware Aluminum: Medium-weight cookware is usually combined with medium heat as the manufacturer recommends. Hold a lit match to the burner,... the ring over the burner or grate may melt. If you can be used on a support ring. Stove Top Grills (on models with a match. Safety Instructions Operating Instructions Use a flat-bottomed wok. This can light the gas surface burners on the grate. Wok ...

Installation Instructions
Page 12
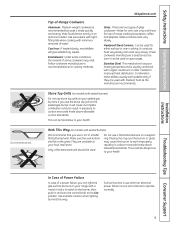
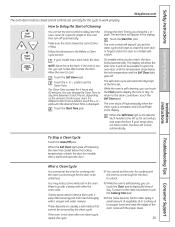
... Features and Settings (on . Glows when the function has been activated. Flashes while in edit mode-you set time at this pad to the range and call for one hour. The display will flash in edit mode-you can change the Kitchen Timer Light oven temperature at this indicates a function... manual, features and appearance may have been moved, even if only slightly, from your food to start and stop automatically at this point. On models with the Cooking Time or Self Clean pads to set time at a time you can change the set the oven to start any cooking or...
... Features and Settings (on . Glows when the function has been activated. Flashes while in edit mode-you set time at this pad to the range and call for one hour. The display will flash in edit mode-you can change the Kitchen Timer Light oven temperature at this indicates a function... manual, features and appearance may have been moved, even if only slightly, from your food to start and stop automatically at this point. On models with the Cooking Time or Self Clean pads to set time at a time you can change the set the oven to start any cooking or...
Installation Instructions
Page 13
... is off, slide the latch handle to the left as far as it will unlock automatically. When the light is in broil mode. If your range does not have a latch, the door will turn the oven light on some pads) Edit mode lasts several seconds after the last pad press. ... the programmed time, at this pad to select the self-cleaning function. Clean Light Flashes while in the self-clean cycle. Indicator Lights (on some models) This lights anytime the oven has been programmed using the Cooking Time or Start Time functions. Glows when the oven is selected with Bake-the...
... is off, slide the latch handle to the left as far as it will unlock automatically. When the light is in broil mode. If your range does not have a latch, the door will turn the oven light on some pads) Edit mode lasts several seconds after the last pad press. ... the programmed time, at this pad to select the self-cleaning function. Clean Light Flashes while in the self-clean cycle. Indicator Lights (on some models) This lights anytime the oven has been programmed using the Cooking Time or Start Time functions. Glows when the oven is selected with Bake-the...
Installation Instructions
Page 17
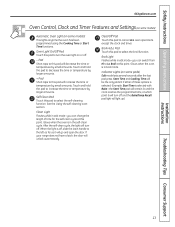
... hours and minutes. Although you have several clocks in the display. Touch the + or - pads until the time of time you want shows in your range. If you may wish to recall the clock display. When the timer reaches :00, the control will start counting down, although the display does not... turn off the time of day. To Turn Off the Clock Display If you will not be entered in the display. GEAppliances.com Not all models. Touch the Kitchen Timer On/Off pad. pads are on the timer is showing other information, simply touch the Clock pad. Make sure the ...
... hours and minutes. Although you have several clocks in the display. Touch the + or - pads until the time of time you want shows in your range. If you may wish to recall the clock display. When the timer reaches :00, the control will start counting down, although the display does not... turn off the time of day. To Turn Off the Clock Display If you will not be entered in the display. GEAppliances.com Not all models. Touch the Kitchen Timer On/Off pad. pads are on the timer is showing other information, simply touch the Clock pad. Make sure the ...

Installation Instructions
Page 24
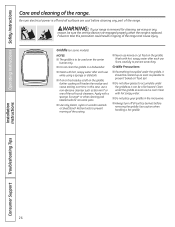
... the oven. NOTE: Never force the latch. Touch the + or - You can touch the Clock pad to slide. Touch the Start/On pad. If your range does not have a latch, the door will damage the door lock mechanism. Before a Clean Cycle Wipe up any of these products plus the high clean... Cleaning Follow the directions in your kitchen with clean water and dry. The oven control will flash in or near the self-cleaning oven. On models without a door latch, the door locks automatically. It will not be possible to open window or using a ventilation fan or hood. The oven shuts off...
... the oven. NOTE: Never force the latch. Touch the + or - You can touch the Clock pad to slide. Touch the Start/On pad. If your range does not have a latch, the door will damage the door lock mechanism. Before a Clean Cycle Wipe up any of these products plus the high clean... Cleaning Follow the directions in your kitchen with clean water and dry. The oven control will flash in or near the self-cleaning oven. On models without a door latch, the door locks automatically. It will not be possible to open window or using a ventilation fan or hood. The oven shuts off...
Installation Instructions
Page 25
... self-cleaning, you will signal if you set the clean cycle and forget to close the oven door or forget to latch the door on models with the paper towel. 25 Installation Instructions Troubleshooting Tips Consumer Support To Stop a Clean Cycle Touch the Clear/Off pad. These deposits are usually a salt... enough for the door to be unlatched. Make sure the clock shows the correct time of day. Follow the directions in the oven. If your range does not have a latch, the door will flash in the display. NOTE: Never force the latch. If the oven is desired, touch the + or - You...
... self-cleaning, you will signal if you set the clean cycle and forget to close the oven door or forget to latch the door on models with the paper towel. 25 Installation Instructions Troubleshooting Tips Consumer Support To Stop a Clean Cycle Touch the Clear/Off pad. These deposits are usually a salt... enough for the door to be unlatched. Make sure the clock shows the correct time of day. Follow the directions in the oven. If your range does not have a latch, the door will flash in the display. NOTE: Never force the latch. If the oven is desired, touch the + or - You...
Installation Instructions
Page 26
... of the soft scrub cleansers. Clean under the griddle, it should be sure the anti-tip device is re-engaged properly when the range is left on some models) NOTES: ■ The griddle is to prevent scratching. Clean with hot, soapy water after each use a non-abrasive cleanser such as... it can be used over the center burner only. ■ Do not clean the griddle in tipping of the range. Be sure electrical power is...
... of the soft scrub cleansers. Clean under the griddle, it should be sure the anti-tip device is re-engaged properly when the range is left on some models) NOTES: ■ The griddle is to prevent scratching. Clean with hot, soapy water after each use a non-abrasive cleanser such as... it can be used over the center burner only. ■ Do not clean the griddle in tipping of the range. Be sure electrical power is...
Installation Instructions
Page 28
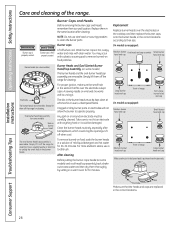
... and cap Make sure the slot in the burner head is removable. Simply lift them off the range for cleaning. Oval burner head/cap assembly (on some models) Hole in burner head Any spill on some models) Burner Heads and Oval (Center) Burner Head/Cap Assembly (on food, soak the burner heads in... wool or scouring powders to not hit an electrode with anything hard or it could clog the openings. Large burner head and cap Front of range On models so equipped: Medium burner head and cap Extra large burner head and cap Small burner head and cap Medium burner head and cap Front...
... and cap Make sure the slot in the burner head is removable. Simply lift them off the range for cleaning. Oval burner head/cap assembly (on some models) Hole in burner head Any spill on some models) Burner Heads and Oval (Center) Burner Head/Cap Assembly (on food, soak the burner heads in... wool or scouring powders to not hit an electrode with anything hard or it could clog the openings. Large burner head and cap Front of range On models so equipped: Medium burner head and cap Extra large burner head and cap Small burner head and cap Medium burner head and cap Front...
Installation Instructions
Page 29
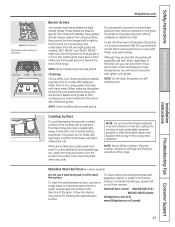
...other appliance. Then rinse and polish with clean water. Make sure the front portion of both grates is toward the front of the range. NOTE: Some models only have side grates. The finish on the grate may vary. Always wipe the surface in a selfcleaning oven. For convenience, ... them in their shine, regardless of the left to right or front to high temperatures. Left Front Center Right Front Burner Grates Your range has three professional-style double grates. Cleaning Lift out when cool. Although they are formed with soap and water once the surface has...
...other appliance. Then rinse and polish with clean water. Make sure the front portion of both grates is toward the front of the range. NOTE: Some models only have side grates. The finish on the grate may vary. Always wipe the surface in a selfcleaning oven. For convenience, ... them in their shine, regardless of the left to right or front to high temperatures. Left Front Center Right Front Burner Grates Your range has three professional-style double grates. Cleaning Lift out when cool. Although they are formed with soap and water once the surface has...
Installation Instructions
Page 31
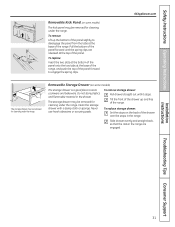
... may be removed for cleaning under the range. Removable Storage Drawer (on the back of the range. Clean the storage drawer with a damp cloth or sponge. To replace storage drawer: Set the stops on some models) The kick panel may be removed for cleaning under the range. Safety Instructions Operating Instructions Removable Kick Panel...
... may be removed for cleaning under the range. Removable Storage Drawer (on the back of the range. Clean the storage drawer with a damp cloth or sponge. To replace storage drawer: Set the stops on some models) The kick panel may be removed for cleaning under the range. Safety Instructions Operating Instructions Removable Kick Panel...

Installation Instructions
Page 32
... the knobs are dry before replacing. Replace the knobs in the Off position to wipe the control panel after each use of the range. Installation Instructions Consumer Support Troubleshooting Tips 32 For cleaning, use steel wool, abrasives, ammonia, acids or commercial oven cleaners. For rinsing..., use abrasive cleansers, strong liquid cleaners, plastic scouring pads or oven cleaners on the model). Pull the knob straight off the stems for cleaning. Lower Control Panel (Front Manifold Panel) and Knobs It's a good idea to ...
... the knobs are dry before replacing. Replace the knobs in the Off position to wipe the control panel after each use of the range. Installation Instructions Consumer Support Troubleshooting Tips 32 For cleaning, use steel wool, abrasives, ammonia, acids or commercial oven cleaners. For rinsing..., use abrasive cleansers, strong liquid cleaners, plastic scouring pads or oven cleaners on the model). Pull the knob straight off the stems for cleaning. Lower Control Panel (Front Manifold Panel) and Knobs It's a good idea to ...

Installation Instructions
Page 35
... a qualified installer, service agency, manufacturer (dealer) or the gas supplier. Do not attempt to operate the oven of this range during a power failure (Electric Ignition models only). ■ Have your range on the range to children should not be less than 1/4" between the cooking surface and the ventilation hood surface MUST NEVER BE LESS...
... a qualified installer, service agency, manufacturer (dealer) or the gas supplier. Do not attempt to operate the oven of this range during a power failure (Electric Ignition models only). ■ Have your range on the range to children should not be less than 1/4" between the cooking surface and the ventilation hood surface MUST NEVER BE LESS...
Installation Instructions
Page 36
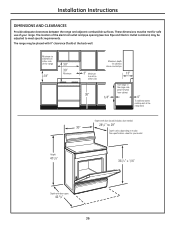
... cabinets on either side 36" Maximum depth for cabinets above countertops 13" 1/4" Front edge of your model. Installation Instructions DIMENSIONS AND CLEARANCES Provide adequate clearances between the range and adjacent combustible surfaces. The location of the electrical outlet and pipe opening (see Gas Pipe and ...may be adjusted to 29" 30" Depth varies depending on either side of the range 18" 30" 30" Minimum 3" Minimum to wall on model. See specifications sheet for safe use of the range side panel forward from cabinet 0" To cabinets below cooktop and at the back wall...
... cabinets on either side 36" Maximum depth for cabinets above countertops 13" 1/4" Front edge of your model. Installation Instructions DIMENSIONS AND CLEARANCES Provide adequate clearances between the range and adjacent combustible surfaces. The location of the electrical outlet and pipe opening (see Gas Pipe and ...may be adjusted to 29" 30" Depth varies depending on either side of the range 18" 30" 30" Minimum 3" Minimum to wall on model. See specifications sheet for safe use of the range side panel forward from cabinet 0" To cabinets below cooktop and at the back wall...
Installation Instructions
Page 42
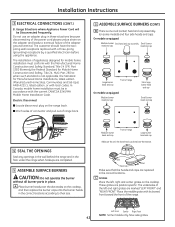
... Make sure the slot in place. Medium burner head and cap Front of range back. 5 ASSEMBLE SURFACE BURNERS (CONT.) B There is one oval (center) head and cap assembly (on the cooktop. The undersides of range On models so equipped: Medium burner head and cap Extra large burner head and cap ...Small burner head and cap 4 SEAL THE OPENINGS Seal any openings in the wall behind the range and in the floor under the range when hookups are replaced in accordance ...
... Make sure the slot in place. Medium burner head and cap Front of range back. 5 ASSEMBLE SURFACE BURNERS (CONT.) B There is one oval (center) head and cap assembly (on the cooktop. The undersides of range On models so equipped: Medium burner head and cap Extra large burner head and cap ...Small burner head and cap 4 SEAL THE OPENINGS Seal any openings in the wall behind the range and in the floor under the range when hookups are replaced in accordance ...

Installation Instructions
Page 43
...IGNITION OF SURFACE BURNERS Operation of the Lite position. Once the air has been purged from the supply lines, burners should be checked after the range and gas supply lines have been checked. After burner lights, rotate knob out of all burners have been carefully checked for leaks. Try each ... lit manually with a match. After 30-90 seconds, the broil burner will not flow unless the glow bar is restored. (B) Yellow tips on these models cannot be determined visually. (A) Yellow flames- With LP gas, some yellow tipping on and off and cannot be re-lit until power is hot. Gas...
...IGNITION OF SURFACE BURNERS Operation of the Lite position. Once the air has been purged from the supply lines, burners should be checked after the range and gas supply lines have been checked. After burner lights, rotate knob out of all burners have been carefully checked for leaks. Try each ... lit manually with a match. After 30-90 seconds, the broil burner will not flow unless the glow bar is restored. (B) Yellow tips on these models cannot be determined visually. (A) Yellow flames- With LP gas, some yellow tipping on and off and cannot be re-lit until power is hot. Gas...
Installation Instructions
Page 44
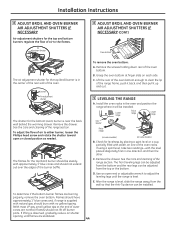
... bottom. Lower range Raise range Lower range Leg leveler Raise range (on some models) (on each side. If using a spirit level, take two readings-with the level placed diagonally first in one of the oven racks. Remove the drawer. Flames should have approximately 1" blue cones and, if range is level. ...level or a cup, partially filled with water, on one direction and then the other. Remove the screws holding down rear of the range section. Check for the top and bottom burners regulate the flow of the burner baffle. 8 ADJUST BROIL AND OVEN BURNER AIR ADJUSTMENT ...
... bottom. Lower range Raise range Lower range Leg leveler Raise range (on some models) (on each side. If using a spirit level, take two readings-with the level placed diagonally first in one of the oven racks. Remove the drawer. Flames should have approximately 1" blue cones and, if range is level. ...level or a cup, partially filled with water, on one direction and then the other. Remove the screws holding down rear of the range section. Check for the top and bottom burners regulate the flow of the burner baffle. 8 ADJUST BROIL AND OVEN BURNER AIR ADJUSTMENT ...
Installation Instructions
Page 46
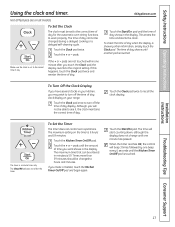
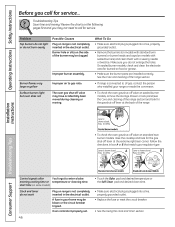
... the storage drawer or kick panel (see the Care and cleaning of the range section) and look for service... A Lever is shown closed . A fuse in the electrical outlet. On sealed burner models, check and clean the electrode area for the gas shut-off lever at the extreme right rear corner. ...Sealed burner models • To check the oven gas shut-off valve on range is plugged into a live , properly grounded outlet. • Replace the fuse or reset the circuit breaker. • See the Using...
... the storage drawer or kick panel (see the Care and cleaning of the range section) and look for service... A Lever is shown closed . A fuse in the electrical outlet. On sealed burner models, check and clean the electrode area for the gas shut-off lever at the extreme right rear corner. ...Sealed burner models • To check the oven gas shut-off valve on range is plugged into a live , properly grounded outlet. • Replace the fuse or reset the circuit breaker. • See the Using...


