
Installation Instructions
Page 1
...30 Oven Light Replacement . . . . . .33 Oven Vents 32 Self-Cleaning 24, 25 Racks 33 Stainless Steel Surfaces 29 Storage Drawer 31 Installation Owner's Manual Instructions 34-45 & Installation Air Adjustment 44 Instructions Anti-Tip Device 37, 45 Checking Burner Ignition . . . . . .43 JGBP36 Connecting the Range JGBP86 to Gas 38-40 JGBP87 Dimensions... and Clearances . .36 Electrical Connections . . . . .41, 42 Leveling the Range 44 Location 37 LP 45 RGB735 RGB740 RGB745 RGB746 RGB790...
...30 Oven Light Replacement . . . . . .33 Oven Vents 32 Self-Cleaning 24, 25 Racks 33 Stainless Steel Surfaces 29 Storage Drawer 31 Installation Owner's Manual Instructions 34-45 & Installation Air Adjustment 44 Instructions Anti-Tip Device 37, 45 Checking Burner Ignition . . . . . .43 JGBP36 Connecting the Range JGBP86 to Gas 38-40 JGBP87 Dimensions... and Clearances . .36 Electrical Connections . . . . .41, 42 Leveling the Range 44 Location 37 LP 45 RGB735 RGB740 RGB745 RGB746 RGB790...

Installation Instructions
Page 35
...of a listed microwave oven or cooking appliance over the appliance. Installation Instructions WARNING! The use NEW flexible connectors when installing a gas appliance. Remove all packing material and literature from the plane of the cooking surface to the bottom of old flexible connectors can ...not less than 18". (See the Dimensions and Clearances illustration in this manual. To reduce the hazard caused by the range up to the plane of the range sides must be maintained, protect the underside of unprotected cabinets. ■ If a 30" clearance between the cooking surface and...
...of a listed microwave oven or cooking appliance over the appliance. Installation Instructions WARNING! The use NEW flexible connectors when installing a gas appliance. Remove all packing material and literature from the plane of the cooking surface to the bottom of old flexible connectors can ...not less than 18". (See the Dimensions and Clearances illustration in this manual. To reduce the hazard caused by the range up to the plane of the range sides must be maintained, protect the underside of unprotected cabinets. ■ If a 30" clearance between the cooking surface and...
Installation Instructions
Page 36
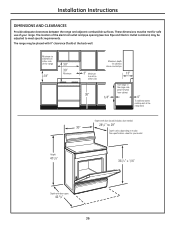
... of the electrical outlet and pipe opening (see Gas Pipe and Electric Outlet Locations) may be placed with 0" clearance (flush) at the range back Depth with door open: 46 3/8" 36 These dimensions must be adjusted to 29" 30" Depth varies depending on either side of the range 18" 30" 30" Minimum 3" Minimum to wall on model. The...
... of the electrical outlet and pipe opening (see Gas Pipe and Electric Outlet Locations) may be placed with 0" clearance (flush) at the range back Depth with door open: 46 3/8" 36 These dimensions must be adjusted to 29" 30" Depth varies depending on either side of the range 18" 30" 30" Minimum 3" Minimum to wall on model. The...