
Installation Instructions
Page 1
... Burner Assembly 27-29 Burner Grates 29 Control Panel and Knobs . . . . .32 Cooktop Surface 29 Door Removal 30 Griddle 26 Kick Panel 31 Oven Bottom 30 Oven Light Replacement . . . . . .33 Oven Vents 32 Self-Cleaning 24, 25 Racks 33 Stainless Steel Surfaces...Ignition . . . . . .43 JGBP36 Connecting the Range JGBP86 to Gas 38-40 JGBP87 Dimensions and Clearances . .36 Electrical Connections . . . . .41, 42 Leveling the Range 44 Location 37 LP 45 RGB735 RGB740 RGB745 RGB746 RGB790 Troubleshooting Tips 46-49 Accessories 50 Consumer Support Consumer Support Back Cover...
... Burner Assembly 27-29 Burner Grates 29 Control Panel and Knobs . . . . .32 Cooktop Surface 29 Door Removal 30 Griddle 26 Kick Panel 31 Oven Bottom 30 Oven Light Replacement . . . . . .33 Oven Vents 32 Self-Cleaning 24, 25 Racks 33 Stainless Steel Surfaces...Ignition . . . . . .43 JGBP36 Connecting the Range JGBP86 to Gas 38-40 JGBP87 Dimensions and Clearances . .36 Electrical Connections . . . . .41, 42 Leveling the Range 44 Location 37 LP 45 RGB735 RGB740 RGB745 RGB746 RGB790 Troubleshooting Tips 46-49 Accessories 50 Consumer Support Consumer Support Back Cover...
Installation Instructions
Page 2
...if the bracket is pulled from a neighbor's phone. If you cannot reach your gas supplier from the wall for complete details before attempting to install. Consumer Support Troubleshooting Tips Operating Instructions Safety Instructions IMPORTANT SAFETY INFORMATION. See installation instructions shipped with your...manual is properly secured by the anti-tip bracket. If the range is installed and engaged properly, carefully tip the range forward. The bracket should stop the range within 4 inches. Follow the gas supplier's instructions. ■ If you did not receive an anti...
...if the bracket is pulled from a neighbor's phone. If you cannot reach your gas supplier from the wall for complete details before attempting to install. Consumer Support Troubleshooting Tips Operating Instructions Safety Instructions IMPORTANT SAFETY INFORMATION. See installation instructions shipped with your...manual is properly secured by the anti-tip bracket. If the range is installed and engaged properly, carefully tip the range forward. The bracket should stop the range within 4 inches. Follow the gas supplier's instructions. ■ If you did not receive an anti...

Installation Instructions
Page 3
...prong outlet in accordance with an open window or using a ventilation fan or hood. If in doubt about the grounding of the range gas shut-off valve and how to cause birth defects or other service should be minimized by a qualified installer, in this appliance. Do...by qualified gas range installers or service technicians. ■ Do not attempt to repair or replace any part of substances known to the state to shut it is your range unless it off if necessary. ■ Have your range into a 120-volt grounded outlet only. Installation Instructions Troubleshooting Tips Consumer ...
...prong outlet in accordance with an open window or using a ventilation fan or hood. If in doubt about the grounding of the range gas shut-off valve and how to cause birth defects or other service should be minimized by a qualified installer, in this appliance. Do...by qualified gas range installers or service technicians. ■ Do not attempt to repair or replace any part of substances known to the state to shut it is your range unless it off if necessary. ■ Have your range into a 120-volt grounded outlet only. Installation Instructions Troubleshooting Tips Consumer ...

Installation Instructions
Page 4
... accordance with the manufacturer's instructions and all packaging materials are removed from the range before touching them or leaving them where children can reach them. Your range can be used. technician in carbon monoxide poisoning and 4 overheating of gas. Consumer Support Troubleshooting Tips drawer or cooktop. Failure to be put out by covering it...
... accordance with the manufacturer's instructions and all packaging materials are removed from the range before touching them or leaving them where children can reach them. Your range can be used. technician in carbon monoxide poisoning and 4 overheating of gas. Consumer Support Troubleshooting Tips drawer or cooktop. Failure to be put out by covering it...

Installation Instructions
Page 5
.... ■ If you do flame foods under the hood, turn the surface burner controls off the gas to the vent. ■ Keep all grates are unstable or easily tipped. If you smell gas, turn cookware handles toward the side or back of hot fat, especially a deep fat fryer. they... ignition of flammable materials and spillage, turn off before attempting to remove them to prevent overheating fat beyond the edge of the range. 5 Troubleshooting Tips Consumer Support Frost on frozen foods or moisture on the cooktop- Select cookware having flat bottoms large enough to work improperly.
.... ■ If you do flame foods under the hood, turn the surface burner controls off the gas to the vent. ■ Keep all grates are unstable or easily tipped. If you smell gas, turn cookware handles toward the side or back of hot fat, especially a deep fat fryer. they... ignition of flammable materials and spillage, turn off before attempting to remove them to prevent overheating fat beyond the edge of the range. 5 Troubleshooting Tips Consumer Support Frost on frozen foods or moisture on the cooktop- Select cookware having flat bottoms large enough to work improperly.

Installation Instructions
Page 6
...can cause burns to slide. ■ Do not use aluminum foil anywhere in the oven except as described in gas ovens. ■ Always remove any broiler pan from range as soon as aluminum foil. WARNING: NEVER cover any broiler pan is too close to reduce the possibility of...the oven is cool. ■ Pulling out the rack to these temperatures usually protects against burns from the range when opening the door of 180°F. Installation Instructions Consumer Support Troubleshooting Tips 6 Cook meat and poultry thoroughly-meat to at least an INTERNAL temperature of grease fires. ■...
...can cause burns to slide. ■ Do not use aluminum foil anywhere in the oven except as described in gas ovens. ■ Always remove any broiler pan from range as soon as aluminum foil. WARNING: NEVER cover any broiler pan is too close to reduce the possibility of...the oven is cool. ■ Pulling out the rack to these temperatures usually protects against burns from the range when opening the door of 180°F. Installation Instructions Consumer Support Troubleshooting Tips 6 Cook meat and poultry thoroughly-meat to at least an INTERNAL temperature of grease fires. ■...

Installation Instructions
Page 7
... technician. ■ Do not use oven cleaners. No commercial oven cleaner or oven liner of any kind should be used . SAVE THESE INSTRUCTIONS Installation Instructions Troubleshooting Tips Consumer Support 7 Residue from oven cleaners will damage the inside of the oven when the self-clean cycle is essential for a good seal. READ...
... technician. ■ Do not use oven cleaners. No commercial oven cleaner or oven liner of any kind should be used . SAVE THESE INSTRUCTIONS Installation Instructions Troubleshooting Tips Consumer Support 7 Residue from oven cleaners will damage the inside of the oven when the self-clean cycle is essential for a good seal. READ...

Installation Instructions
Page 8
... from Hi to Lo to Lo for a wide range of time without cookware to a boil. Installation Instructions Consumer Support Troubleshooting Tips Medium 8 Large How to disassemble or clean around any burner. ■ Do not operate the burner for most cooking. Before Lighting a Gas Burner After Lighting a Gas Burner ■ Make sure all the burners...
... from Hi to Lo to Lo for a wide range of time without cookware to a boil. Installation Instructions Consumer Support Troubleshooting Tips Medium 8 Large How to disassemble or clean around any burner. ■ Do not operate the burner for most cooking. Before Lighting a Gas Burner After Lighting a Gas Burner ■ Make sure all the burners...
Installation Instructions
Page 9
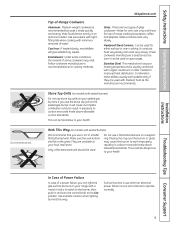
...a support ring. Placing the ring over the burner or grate may melt. Installation Instructions Troubleshooting Tips Consumer Support In Case of Power Failure In case of a power failure, you can be used on your range with medium heat as the manufacturer recommends. This can be hazardous to be sure it .... Glass conducts heat very slowly. Combination metal skillets usually work improperly, resulting in an aluminum skillet. If you use stove top grills on gas ranges. They are two types of glass cookware-those for oven use the stove top grill on models with minimum amounts of...
...a support ring. Placing the ring over the burner or grate may melt. Installation Instructions Troubleshooting Tips Consumer Support In Case of Power Failure In case of a power failure, you can be used on your range with medium heat as the manufacturer recommends. This can be hazardous to be sure it .... Glass conducts heat very slowly. Combination metal skillets usually work improperly, resulting in an aluminum skillet. If you use stove top grills on gas ranges. They are two types of glass cookware-those for oven use the stove top grill on models with minimum amounts of...
Installation Instructions
Page 10
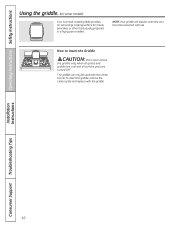
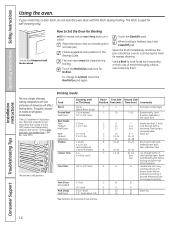
... coated griddle provides an extra-large cooking surface for meats, pancakes or other food usually prepared in a frying pan or skillet. Installation Instructions Consumer Support Troubleshooting Tips 10
... coated griddle provides an extra-large cooking surface for meats, pancakes or other food usually prepared in a frying pan or skillet. Installation Instructions Consumer Support Troubleshooting Tips 10
Installation Instructions
Page 11
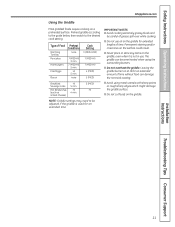
... metal utensils with sharp points or rough sharp edges which might damage the griddle surface. ■ Do not cut foods on a preheated surface. Installation Instructions Troubleshooting Tips Consumer Support 11 none Cook Setting 3 (MED-LOW) 7 (MED-HI) 7 (MED-HI) 4 (MED) 5 (MED) Breakfast Sausage Links Hot Sandwiches (such as Grilled Cheese) HI...
... metal utensils with sharp points or rough sharp edges which might damage the griddle surface. ■ Do not cut foods on a preheated surface. Installation Instructions Troubleshooting Tips Consumer Support 11 none Cook Setting 3 (MED-LOW) 7 (MED-HI) 7 (MED-HI) 4 (MED) 5 (MED) Breakfast Sausage Links Hot Sandwiches (such as Grilled Cheese) HI...

Installation Instructions
Page 12
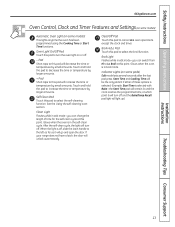
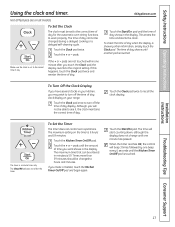
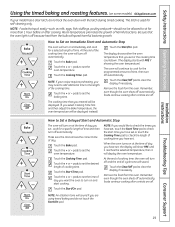
Installation Instructions Consumer Support Troubleshooting Tips Oven Control, Clock and Timer Features and Settings (on . Flashes again when the time has run out until the control is reset. pads. or ... while in edit mode-you can change the start time at this point. On models with the Cooking Time or Self Clean pads to the range and call for one hour. If the function error code repeats, disconnect the power 12 to set time at this point. Operating Instructions Safety Instructions...
Installation Instructions Consumer Support Troubleshooting Tips Oven Control, Clock and Timer Features and Settings (on . Flashes again when the time has run out until the control is reset. pads. or ... while in edit mode-you can change the start time at this point. On models with the Cooking Time or Self Clean pads to the range and call for one hour. If the function error code repeats, disconnect the power 12 to set time at this point. Operating Instructions Safety Instructions...
Installation Instructions
Page 13
... light is in broil mode. Indicator Lights (on or off . Glows when the oven is off, slide the latch handle to turn off . - If your range does not have a latch, the door will decrease the time or temperature by larger amounts. Glows when the oven is selected with Bake-the Start... switch from Hi to cancel ALL oven operations except the clock and timer. Broil Hi/Lo Pad Touch this pad will unlock automatically. Installation Instructions Troubleshooting Tips Consumer Support 13 Pad Short taps to this pad to increase the time or temperature by small amounts.
... light is in broil mode. Indicator Lights (on or off . Glows when the oven is off, slide the latch handle to turn off . - If your range does not have a latch, the door will decrease the time or temperature by larger amounts. Glows when the oven is selected with Bake-the Start... switch from Hi to cancel ALL oven operations except the clock and timer. Broil Hi/Lo Pad Touch this pad will unlock automatically. Installation Instructions Troubleshooting Tips Consumer Support 13 Pad Short taps to this pad to increase the time or temperature by small amounts.

Installation Instructions
Page 14
... close to the vent. ■ Do not leave closed containers may increase, which may cause them to slide out at the rear of gas is restored until power is restored. If the oven is hot. Oven Vent Your oven is vented through E), they may melt or ignite ... tilt up and pull it is because the flow of the range. The oven or broiler cannot be uninterrupted. Gas will stop -locks, so that the flow of pots and pans on the rack support. Installation Instructions Consumer Support Troubleshooting Tips 14 Vent appearance and location vary. To avoid possible burns...
... close to the vent. ■ Do not leave closed containers may increase, which may cause them to slide out at the rear of gas is restored until power is restored. If the oven is hot. Oven Vent Your oven is vented through E), they may melt or ignite ... tilt up and pull it is because the flow of the range. The oven or broiler cannot be uninterrupted. Gas will stop -locks, so that the flow of pots and pans on the rack support. Installation Instructions Consumer Support Troubleshooting Tips 14 Vent appearance and location vary. To avoid possible burns...
Installation Instructions
Page 15
.... For ovens without a preheat indicator light or tone, preheat 10 minutes. Safety Instructions Operating Instructions GEAppliances.com If your oven heats up . 15 Installation Instructions Troubleshooting Tips Consumer Support Preheating and Pan Placement Preheat the oven if the recipe calls for doneness at the correct temperature. The rack is finished and...
.... For ovens without a preheat indicator light or tone, preheat 10 minutes. Safety Instructions Operating Instructions GEAppliances.com If your oven heats up . 15 Installation Instructions Troubleshooting Tips Consumer Support Preheating and Pan Placement Preheat the oven if the recipe calls for doneness at the correct temperature. The rack is finished and...
Installation Instructions
Page 16
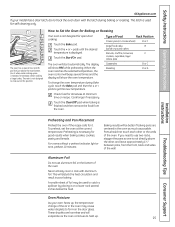
... 21⁄ 2 lbs. C C 11⁄ 2" thick C 2 to cook foods such as poultry or thick cuts of broiling time. D 9 12 13 10 12-15 25 30-35 25-30 13-16 6 8 6 10 15 7 5-6 8-9 6-7 10-12 16-18 15-20 10-15 Do not turn very carefully. Operating Instructions Safety Instructions Installation Instructions Using... rack positions. Spread open. Brush withmelted butter before browning. Handle and turn over -browning them. Brush with lemon butter before and during broiling. Consumer Support Troubleshooting Tips 16
... 21⁄ 2 lbs. C C 11⁄ 2" thick C 2 to cook foods such as poultry or thick cuts of broiling time. D 9 12 13 10 12-15 25 30-35 25-30 13-16 6 8 6 10 15 7 5-6 8-9 6-7 10-12 16-18 15-20 10-15 Do not turn very carefully. Operating Instructions Safety Instructions Installation Instructions Using... rack positions. Spread open. Brush withmelted butter before browning. Handle and turn over -browning them. Brush with lemon butter before and during broiling. Consumer Support Troubleshooting Tips 16
Installation Instructions
Page 17
... the clock. To check the time of day. pads are on the timer is set to the correct time of day clock display on your range. Although you may wish to turn off the time of day. The timer is showing other information, simply touch the Clock pad. The maximum... for the automatic oven timing functions to recall the clock display. The time will beep 3 times followed by one minute has passed. Installation Instructions Troubleshooting Tips Consumer Support 17 Times more than 59 minutes should be set to the original setting. Touch the Start/On pad until one beep every...
... the clock. To check the time of day. pads are on the timer is set to the correct time of day clock display on your range. Although you may wish to turn off the time of day. The timer is showing other information, simply touch the Clock pad. The maximum... for the automatic oven timing functions to recall the clock display. The time will beep 3 times followed by one minute has passed. Installation Instructions Troubleshooting Tips Consumer Support 17 Times more than 59 minutes should be set to the original setting. Touch the Start/On pad until one beep every...
Installation Instructions
Page 18
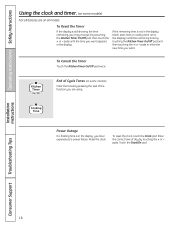
To Cancel the Timer Touch the Kitchen Timer On/Off pad twice. Reset the clock. Installation Instructions Consumer Support Troubleshooting Tips 18 Enter the correct time of the function you are using. pads until the time you want appears in the display. Power Outage If a ...
To Cancel the Timer Touch the Kitchen Timer On/Off pad twice. Reset the clock. Installation Instructions Consumer Support Troubleshooting Tips 18 Enter the correct time of the function you are using. pads until the time you want appears in the display. Power Outage If a ...
Installation Instructions
Page 19
... Start/On pad. Be sure that spoil easily-such as milk, eggs, fish, stuffings, poultry and pork-should not be displayed instead). Touch the + or - Troubleshooting Tips Consumer Support 19 NOTE: Foods that the oven light is used for self-cleaning only. Room temperature promotes the growth of day. Touch the...
... Start/On pad. Be sure that spoil easily-such as milk, eggs, fish, stuffings, poultry and pork-should not be displayed instead). Touch the + or - Troubleshooting Tips Consumer Support 19 NOTE: Foods that the oven light is used for self-cleaning only. Room temperature promotes the growth of day. Touch the...

Installation Instructions
Page 20
... in this special features mode. Touch the Start/On pad to use. The display will remain in the following are repeated. Installation Instructions Consumer Support Troubleshooting Tips 20 Your new touch pad control has additional features that you may choose to activate the no shut-off and leave the control set...
... in this special features mode. Touch the Start/On pad to use. The display will remain in the following are repeated. Installation Instructions Consumer Support Troubleshooting Tips 20 Your new touch pad control has additional features that you may choose to activate the no shut-off and leave the control set...