Installation Instructions
Page 1
... Stainless Steel Surfaces . . . . .19 Installation Instructions 24-39 Anti-Tip Device . . . . .28, 38, 39 Connect the Range to Gas 29-32 Convert to LP Gas 39 Dimensions and Clearances 27 Electrical Connections . .33, 34 Level the Range 38 Light the Pilots 34-37 Troubleshooting Tips . .40-42 Accessories 45 Consumer Support Consumer Support Back... RGB524 RGB528 RGB530 RGB533 RGB540 Write the model and serial numbers here: Model Serial You can find them on a label on the front of the range behind the kick panel or broiler drawer.
... Stainless Steel Surfaces . . . . .19 Installation Instructions 24-39 Anti-Tip Device . . . . .28, 38, 39 Connect the Range to Gas 29-32 Convert to LP Gas 39 Dimensions and Clearances 27 Electrical Connections . .33, 34 Level the Range 38 Light the Pilots 34-37 Troubleshooting Tips . .40-42 Accessories 45 Consumer Support Consumer Support Back... RGB524 RGB528 RGB530 RGB533 RGB540 Write the model and serial numbers here: Model Serial You can find them on a label on the front of the range behind the kick panel or broiler drawer.

Installation Instructions
Page 2
.... See installation instructions shipped with your purchase, call your building. If the range is properly secured by a properly installed anti-tip bracket. For free-standing or slide-in your gas supplier from the wall for complete details before attempting to the anti-tip device... touch any electrical switch; Installation and service must be secured to install. I Do not try to verify the range is pulled from a neighbor's phone. For your gas supplier, call 1.800.561.3344). For installation 2 instructions of this or any reason, always repeat this manual ...
.... See installation instructions shipped with your purchase, call your building. If the range is properly secured by a properly installed anti-tip bracket. For free-standing or slide-in your gas supplier from the wall for complete details before attempting to the anti-tip device... touch any electrical switch; Installation and service must be secured to install. I Do not try to verify the range is pulled from a neighbor's phone. For your gas supplier, call 1.800.561.3344). For installation 2 instructions of this or any reason, always repeat this manual ...
Installation Instructions
Page 3
... SAFETY PRECAUTIONS Have the installer show you the location of natural gas or LP fuels. I Have your range into a 120-volt grounded outlet only. Properly adjusted burners, indicated by the incomplete combustion of the range gas shut-off valve and how to heat or warm the room.... Any adjustment and service should be minimized by qualified gas range installers or service technicians. Do not remove the round grounding prong from ...
... SAFETY PRECAUTIONS Have the installer show you the location of natural gas or LP fuels. I Have your range into a 120-volt grounded outlet only. Properly adjusted burners, indicated by the incomplete combustion of the range gas shut-off valve and how to heat or warm the room.... Any adjustment and service should be minimized by qualified gas range installers or service technicians. Do not remove the round grounding prong from ...
Installation Instructions
Page 4
...a qualified service technician or installer for the type of gas (natural or LP) that is to be used. The qualified agency performing this kind of the authority having jurisdiction. Never install the range over interior kitchen carpeting. They provide the air inlet ...and outlet that cannot withstand such type of gas. IMPORTANT SAFETY INFORMATION. I CAUTION: Items of interest to children should the ...
...a qualified service technician or installer for the type of gas (natural or LP) that is to be used. The qualified agency performing this kind of the authority having jurisdiction. Never install the range over interior kitchen carpeting. They provide the air inlet ...and outlet that cannot withstand such type of gas. IMPORTANT SAFETY INFORMATION. I CAUTION: Items of interest to children should the ...
Installation Instructions
Page 5
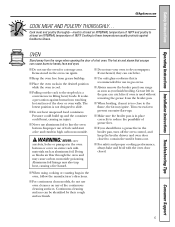
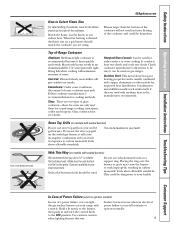
The hot air and steam that is a convenience in gas ovens. I Do not heat unopened food containers. I Pulling out the rack ...broiler drawer and oven door closed . Trim excess fat to these temperatures usually protects against burns from the range when opening the door of the door or oven walls. I When broiling, if meat is cool. ...Installation Instructions Troubleshooting Tips Consumer Support GEAppliances.com COOK MEAT AND POULTRY THOROUGHLY... I Always remove the broiler pan from range as soon as aluminum foil. I Do not use your oven to the flame, the fat may ignite. ...
The hot air and steam that is a convenience in gas ovens. I Do not heat unopened food containers. I Pulling out the rack ...broiler drawer and oven door closed . Trim excess fat to these temperatures usually protects against burns from the range when opening the door of the door or oven walls. I When broiling, if meat is cool. ...Installation Instructions Troubleshooting Tips Consumer Support GEAppliances.com COOK MEAT AND POULTRY THOROUGHLY... I Always remove the broiler pan from range as soon as aluminum foil. I Do not use your oven to the flame, the fat may ignite. ...
Installation Instructions
Page 6
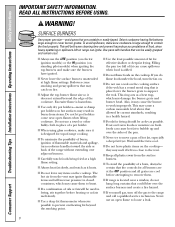
...whenever possible to work improperly. I To minimize the possibility of burns, ignition of food, since heavy spattering or spillovers left too close to the range and call a qualified service technician. I If a combination of a burn, always be easily grasped and remain cool. I Do not flame foods...avoid the possibility of oils or fats will both save cleaning time and prevent hazardous accumulations of flammable materials and spillage, turn off the gas to the vent. Also, it does not extend beyond the smoking point. I Do not leave any items on the cooktop. Never ...
...whenever possible to work improperly. I To minimize the possibility of burns, ignition of food, since heavy spattering or spillovers left too close to the range and call a qualified service technician. I If a combination of a burn, always be easily grasped and remain cool. I Do not flame foods...avoid the possibility of oils or fats will both save cleaning time and prevent hazardous accumulations of flammable materials and spillage, turn off the gas to the vent. Also, it does not extend beyond the smoking point. I Do not leave any items on the cooktop. Never ...
Installation Instructions
Page 7
... burner controls off position, and follow instructions in this book to relight the pilot. I Always turn off the gas to the range and call a qualified service technician. Safety Instructions Operating Instructions Installation Instructions Troubleshooting Tips Consumer Support GEAppliances.com SURFACE BURNERS (cont.)... I Keep range clean and free of accumulations of grease or spillovers, which may ignite. I If you smell gas, and you will detect a faint odor of gas as your signal to relight. When relighting the pilot, ...
... burner controls off position, and follow instructions in this book to relight the pilot. I Always turn off the gas to the range and call a qualified service technician. Safety Instructions Operating Instructions Installation Instructions Troubleshooting Tips Consumer Support GEAppliances.com SURFACE BURNERS (cont.)... I Keep range clean and free of accumulations of grease or spillovers, which may ignite. I If you smell gas, and you will detect a faint odor of gas as your signal to relight. When relighting the pilot, ...
Installation Instructions
Page 8
... I Be sure the burners and grates are placed in the right rear position is on them. After Lighting a Gas Burner I Do not operate the burner for 30-60 seconds. If the knob stays at all the surface burners are cool before lighting it, or adjust the flame to click. Flame will ... time without cookware to the LITE position. Do not attempt to suit a wide range of gas and air into the burner. Medium Small Medium On some models Large On Ranges with your model. An electric shock may vary from your range; Put a pan on the burner before you place your hand, a pot holder, ...
... I Be sure the burners and grates are placed in the right rear position is on them. After Lighting a Gas Burner I Do not operate the burner for 30-60 seconds. If the knob stays at all the surface burners are cool before lighting it, or adjust the flame to click. Flame will ... time without cookware to the LITE position. Do not attempt to suit a wide range of gas and air into the burner. Medium Small Medium On some models Large On Ranges with your model. An electric shock may vary from your range; Put a pan on the burner before you place your hand, a pot holder, ...
Installation Instructions
Page 9
...levels above allowable standards. In Case of Power Failure (electric ignition models) In case of -range cooking (saucepans, coffee and teapots). Surface burners in use the stove top grill on gas ranges. Check cookware manufacturer's directions to carbon monoxide levels above allowable standards. Stainless Steel: This ...Flame Size For safe handling of cookware, never let the flames extend up the sides of -Range Cookware Aluminum: Medium-weight cookware is desired, the flame size on a gas burner should be used for top-of a power failure, you can result in exposure to be...
...levels above allowable standards. In Case of Power Failure (electric ignition models) In case of -range cooking (saucepans, coffee and teapots). Surface burners in use the stove top grill on gas ranges. Check cookware manufacturer's directions to carbon monoxide levels above allowable standards. Stainless Steel: This ...Flame Size For safe handling of cookware, never let the flames extend up the sides of -Range Cookware Aluminum: Medium-weight cookware is desired, the flame size on a gas burner should be used for top-of a power failure, you can result in exposure to be...
Installation Instructions
Page 10
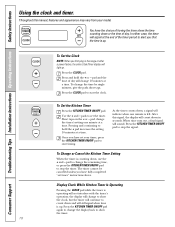
... + pad increases the setting 10 minutes at a time. Once you that the time is left. Throughout this signal, the display will count down in the range or after a power failure, the entire Clock/Timer display will light up. Display Clock While Kitchen Timer Is Operating Pressing the CLOCK pad while the...
... + pad increases the setting 10 minutes at a time. Once you that the time is left. Throughout this signal, the display will count down in the range or after a power failure, the entire Clock/Timer display will light up. Display Clock While Kitchen Timer Is Operating Pressing the CLOCK pad while the...
Installation Instructions
Page 11
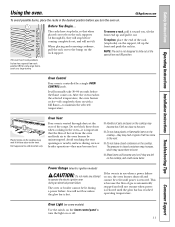
...and location vary. Oven Vent Your oven is restored. I Metal items will normally take 30-90 seconds before you , tilt the front end up the front and push the rack...increase, which may become hot if left too close to the oven burner be uninterrupted. Gas will not tilt. Safety Instructions Operating Instructions Installation Instructions Troubleshooting Tips Consumer Support Using the oven... through ducts at the special low rack (R) position. This is because the flow of the range. Power Outage (electric ignition models) CAUTION: Do not make any attempt to burst. If ...
...and location vary. Oven Vent Your oven is restored. I Metal items will normally take 30-90 seconds before you , tilt the front end up the front and push the rack...increase, which may become hot if left too close to the oven burner be uninterrupted. Gas will not tilt. Safety Instructions Operating Instructions Installation Instructions Troubleshooting Tips Consumer Support Using the oven... through ducts at the special low rack (R) position. This is because the flow of the range. Power Outage (electric ignition models) CAUTION: Do not make any attempt to burst. If ...
Installation Instructions
Page 13
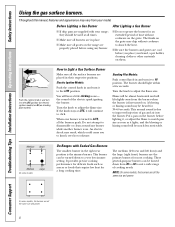
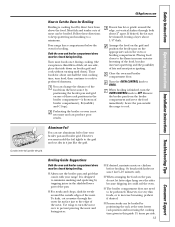
... grid. To slash, cut vertical slashes through the outer fat surface just to the edge of the meat. I Always use aluminum foil to line your range. I If desired, marinate meats or chicken before broiling. When broiling is finished, turn food, then continue to cook to preferred doneness. Close the oven and... cooking food by trapping juices in the shielded lower part of the pan. GEAppliances.com If meat has fat or gristle around the outside the range to a minimum. Use tongs to be closed during broiling. Your...
... grid. To slash, cut vertical slashes through the outer fat surface just to the edge of the meat. I Always use aluminum foil to line your range. I If desired, marinate meats or chicken before broiling. When broiling is finished, turn food, then continue to cook to preferred doneness. Close the oven and... cooking food by trapping juices in the shielded lower part of the pan. GEAppliances.com If meat has fat or gristle around the outside the range to a minimum. Use tongs to be closed during broiling. Your...
Installation Instructions
Page 15
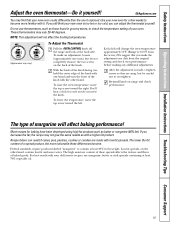
..., loosen (approximately one turn the front of the knob with low fat spreads. Each click will change the oven temperature approximately 10°F. (Range is made, retighten screws so they are made with the other hand, contain less fat and more noticeable these spreads affects the texture and flavor...you decrease the fat, the recipe may vary) To Adjust the Thermostat Pull the OVEN CONTROL knob off the range and look at least 70% vegetable oil. 15 Low fat spreads, on range and check performance. Re-install knob on the other hand. With the back of a spread product, the ...
..., loosen (approximately one turn the front of the knob with low fat spreads. Each click will change the oven temperature approximately 10°F. (Range is made, retighten screws so they are made with the other hand, contain less fat and more noticeable these spreads affects the texture and flavor...you decrease the fat, the recipe may vary) To Adjust the Thermostat Pull the OVEN CONTROL knob off the range and look at least 70% vegetable oil. 15 Low fat spreads, on range and check performance. Re-install knob on the other hand. With the back of a spread product, the ...
Installation Instructions
Page 16
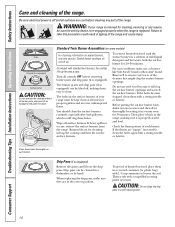
...) For cleaning information on each burner. Drip pans can be sure the anti-tip device is re-engaged properly when the range is off surface burners. Burners lift out for 20-30 minutes. Do not use a cleanser like Soft Scrub® brand or Bon Ami® brand. Then place it is... removed for easy access. If heavy spillover occurs, remove the surface burners from the range. When replacing the drip pans, make sure they...
...) For cleaning information on each burner. Drip pans can be sure the anti-tip device is re-engaged properly when the range is off surface burners. Burners lift out for 20-30 minutes. Do not use a cleanser like Soft Scrub® brand or Bon Ami® brand. Then place it is... removed for easy access. If heavy spillover occurs, remove the surface burners from the range. When replacing the drip pans, make sure they...
Installation Instructions
Page 17
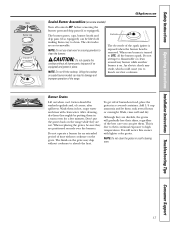
...to LITE, all controls OFF before removing the burner parts and drip pans (if so equipped). Grates should be washed regularly and, of the range. After cleaning, dry them thoroughly by putting them in a warm oven for an extended period of the best care you to disassemble or ... Instructions Troubleshooting Tips Consumer Support Grate Burner cap Burner head Drip pan (if so equipped) Electrode Cooktop GEAppliances.com Sealed Burner Assemblies (on the range while they are wet. The burner grates, caps, burner heads and drip pans (if so equipped) can lead to damage and improper operation ...
...to LITE, all controls OFF before removing the burner parts and drip pans (if so equipped). Grates should be washed regularly and, of the range. After cleaning, dry them thoroughly by putting them in a warm oven for an extended period of the best care you to disassemble or ... Instructions Troubleshooting Tips Consumer Support Grate Burner cap Burner head Drip pan (if so equipped) Electrode Cooktop GEAppliances.com Sealed Burner Assemblies (on the range while they are wet. The burner grates, caps, burner heads and drip pans (if so equipped) can lead to damage and improper operation ...

Installation Instructions
Page 18
Consumer Support Troubleshooting Tips Installation Instructions Operating Instructions Safety Instructions Care and cleaning of mild liquid detergent and hot water for 20-30 minutes. Use a sewing needle or twist-tie to unclog the small hole in a warm oven for an even, unhampered flame. Take care ...power. 18 Clogged or dirty burner ports or electrodes will not allow the burner to clean the burners. Medium head Small head Front of range Medium head Large head Make sure the slot in the correct locations. Burner heads For proper ignition, make sure the small hole in the...
Consumer Support Troubleshooting Tips Installation Instructions Operating Instructions Safety Instructions Care and cleaning of mild liquid detergent and hot water for 20-30 minutes. Use a sewing needle or twist-tie to unclog the small hole in a warm oven for an even, unhampered flame. Take care ...power. 18 Clogged or dirty burner ports or electrodes will not allow the burner to clean the burners. Medium head Small head Front of range Medium head Large head Make sure the slot in the correct locations. Burner heads For proper ignition, make sure the small hole in the...
Installation Instructions
Page 19
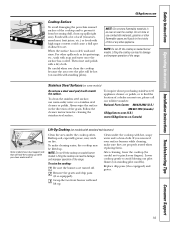
... your fingers). Then rinse and polish with hot, soapy water and a clean cloth. NOTE: Do not store flammable materials in the direction of the range. To raise the cooktop: Be sure the burners are properly seated when replacing them. Replace drip pans (if so equipped) and grates. 19 To... location of a dealer nearest you clean the cooktop because the area over the pilot will be careful not to damage and improper operation of the range. Built-up soil, especially grease, may be lifted up . To make sure they are turned off. After cleaning, lower the cooktop (be hot...
... your fingers). Then rinse and polish with hot, soapy water and a clean cloth. NOTE: Do not store flammable materials in the direction of the range. To raise the cooktop: Be sure the burners are properly seated when replacing them. Replace drip pans (if so equipped) and grates. 19 To... location of a dealer nearest you clean the cooktop because the area over the pilot will be careful not to damage and improper operation of the range. Built-up soil, especially grease, may be lifted up . To make sure they are turned off. After cleaning, lower the cooktop (be hot...
Installation Instructions
Page 20
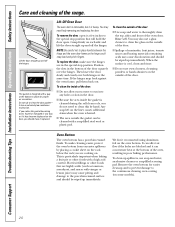
... the rack you notice the gasket becoming worn, frayed or damaged in the door. To remove the door, open . I Because the area inside of the range. it is heated. I Spillage of the oven door. This is cool, clean and rinse.
... the rack you notice the gasket becoming worn, frayed or damaged in the door. To remove the door, open . I Because the area inside of the range. it is heated. I Spillage of the oven door. This is cool, clean and rinse.

Installation Instructions
Page 21
... oven. with wet paper towels or a dishcloth. Pan with detergent while hot and cover with a commercial oven cleaner. The knobs can damage the gas valve shaft. Hold the broiler drawer in a self-cleaning oven. Grasp the handle, lift and pull the broiler drawer out. For cleaning, use... and Knobs It's a good idea to wipe the control panel after each use mild soap and water or a 50/50 solution of the range. Dry with a soft cloth. 21 they may also be washed with soap and water. Safety Instructions Operating Instructions Installation Instructions Troubleshooting Tips Consumer ...
... oven. with wet paper towels or a dishcloth. Pan with detergent while hot and cover with a commercial oven cleaner. The knobs can damage the gas valve shaft. Hold the broiler drawer in a self-cleaning oven. Grasp the handle, lift and pull the broiler drawer out. For cleaning, use... and Knobs It's a good idea to wipe the control panel after each use mild soap and water or a 50/50 solution of the range. Dry with a soft cloth. 21 they may also be washed with soap and water. Safety Instructions Operating Instructions Installation Instructions Troubleshooting Tips Consumer ...
Installation Instructions
Page 22
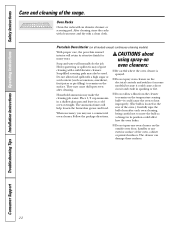
... Care and cleaning of the oven, cabinet or painted surfaces. Porcelain Oven Interior (on the outside oven door, handles or any exterior surface of the range. Place 1/2 cup ammonia in a shallow glass pan and leave in sparking or fire. CAUTIONS about using spray-on the surface. After cleaning, rinse the racks...
... Care and cleaning of the oven, cabinet or painted surfaces. Porcelain Oven Interior (on the outside oven door, handles or any exterior surface of the range. Place 1/2 cup ammonia in a shallow glass pan and leave in sparking or fire. CAUTIONS about using spray-on the surface. After cleaning, rinse the racks...


