
Installation Instructions
Page 1
... Stainless Steel Surfaces . . . . .19 Installation Instructions 24-39 Anti-Tip Device . . . . .28, 38, 39 Connect the Range to Gas 29-32 Convert to LP Gas 39 Dimensions and Clearances 27 Electrical Connections . .33, 34 Level the Range 38 Light the Pilots 34-37 Troubleshooting Tips . .40-42 Accessories 45 Consumer Support Consumer Support Back... RGB524 RGB528 RGB530 RGB533 RGB540 Write the model and serial numbers here: Model Serial You can find them on a label on the front of the range behind the kick panel or broiler drawer.
... Stainless Steel Surfaces . . . . .19 Installation Instructions 24-39 Anti-Tip Device . . . . .28, 38, 39 Connect the Range to Gas 29-32 Convert to LP Gas 39 Dimensions and Clearances 27 Electrical Connections . .33, 34 Level the Range 38 Light the Pilots 34-37 Troubleshooting Tips . .40-42 Accessories 45 Consumer Support Consumer Support Back... RGB524 RGB528 RGB530 RGB533 RGB540 Write the model and serial numbers here: Model Serial You can find them on a label on the front of the range behind the kick panel or broiler drawer.

Installation Instructions
Page 2
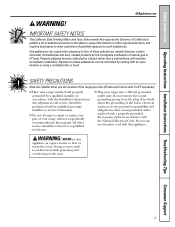
...or use any other flammable vapors and liquids in ranges, never completely remove the leveling legs or the range will not be secured by a qualified installer, service agency or the gas supplier. Follow the gas supplier's instructions. If the range is pulled from a neighbor's phone. For free-... result causing property damage, personal injury ® or death. - The bracket should stop the range within 4 inches. If it does not, the bracket must be secured to install. For your gas supplier from the wall for complete details before attempting to the anti-tip device properly.
...or use any other flammable vapors and liquids in ranges, never completely remove the leveling legs or the range will not be secured by a qualified installer, service agency or the gas supplier. Follow the gas supplier's instructions. If the range is pulled from a neighbor's phone. For free-... result causing property damage, personal injury ® or death. - The bracket should stop the range within 4 inches. If it does not, the bracket must be secured to install. For your gas supplier from the wall for complete details before attempting to the anti-tip device properly.
Installation Instructions
Page 3
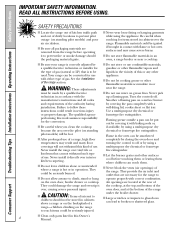
... heater to a qualified technician. Doing so may result in carbon monoxide poisoning and overheating of natural gas or LP fuels. I Plug your range unless it is your range installed and properly grounded by the incomplete combustion of the oven. 3 WARNING: NEVER use an extension... window or using a ventilation fan or hood. Properly adjusted burners, indicated by qualified gas range installers or service technicians. Exposure to repair or replace any part of the range gas shut-off if necessary. All other reproductive harm, and requires businesses to warn customers...
... heater to a qualified technician. Doing so may result in carbon monoxide poisoning and overheating of natural gas or LP fuels. I Plug your range unless it is your range installed and properly grounded by the incomplete combustion of the oven. 3 WARNING: NEVER use an extension... window or using a ventilation fan or hood. Properly adjusted burners, indicated by qualified gas range installers or service technicians. Exposure to repair or replace any part of the range gas shut-off if necessary. All other reproductive harm, and requires businesses to warn customers...
Installation Instructions
Page 4
...climb, stand or hang on a surface burner by using the appliance. I Never block the vents (air openings) of gas (natural or LP) that are removed from the range before touching them or leaving them where children can reach them. Smother a flaming pan on the oven door, broiler drawer... or cooktop. See the Installation of the range under the broiler drawer. I Be sure all codes and requirements of gas. I Do not store flammable materials in serious injury or property damage. I Do not allow anyone to glass...
...climb, stand or hang on a surface burner by using the appliance. I Never block the vents (air openings) of gas (natural or LP) that are removed from the range before touching them or leaving them where children can reach them. Smother a flaming pan on the oven door, broiler drawer... or cooktop. See the Installation of the range under the broiler drawer. I Be sure all codes and requirements of gas. I Do not store flammable materials in serious injury or property damage. I Do not allow anyone to glass...
Installation Instructions
Page 5
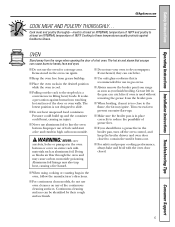
I Do not use the oven for use in gas ovens. I For continuous clean models, do not use aluminum foil to line the oven bottom. Improper use your oven to these temperatures usually protects against ... heat unopened food containers. Safety Instructions Operating Instructions Installation Instructions Troubleshooting Tips Consumer Support GEAppliances.com COOK MEAT AND POULTRY THOROUGHLY... OVEN Stand away from range as soon as aluminum foil. I Make sure the broiler pan is also a precaution against foodborne illness. Cook meat and poultry thoroughly-meat to at least...
I Do not use the oven for use in gas ovens. I For continuous clean models, do not use aluminum foil to line the oven bottom. Improper use your oven to these temperatures usually protects against ... heat unopened food containers. Safety Instructions Operating Instructions Installation Instructions Troubleshooting Tips Consumer Support GEAppliances.com COOK MEAT AND POULTRY THOROUGHLY... OVEN Stand away from range as soon as aluminum foil. I Make sure the broiler pan is also a precaution against foodborne illness. Cook meat and poultry thoroughly-meat to at least...
Installation Instructions
Page 6
.... The hot air from the vent may cause them . I Carefully watch as fats melt slowly. READ ALL INSTRUCTIONS BEFORE USING. I If range is designed for effective shallow or deep-fat frying. I If a combination of oils or fats will both save cleaning time and prevent hazardous... the edge of food, since heavy spattering or spillovers left too close to the range and call a qualified service technician. I Keep all burners are unstable or easily tipped. If you smell gas, turn cookware handles toward the side or back of flammable materials and spillage, turn...
.... The hot air from the vent may cause them . I Carefully watch as fats melt slowly. READ ALL INSTRUCTIONS BEFORE USING. I If range is designed for effective shallow or deep-fat frying. I If a combination of oils or fats will both save cleaning time and prevent hazardous... the edge of food, since heavy spattering or spillovers left too close to the range and call a qualified service technician. I Keep all burners are unstable or easily tipped. If you smell gas, turn cookware handles toward the side or back of flammable materials and spillage, turn...
Installation Instructions
Page 7
... and free of accumulations of the range. Safety Instructions Operating Instructions Installation Instructions Troubleshooting Tips Consumer Support GEAppliances.com SURFACE BURNERS (cont.) I Always turn off the gas to the range and call a qualified service technician. Lifting the cooktop can melt or catch fire one the grates, even when the cooktop is not being...
... and free of accumulations of the range. Safety Instructions Operating Instructions Installation Instructions Troubleshooting Tips Consumer Support GEAppliances.com SURFACE BURNERS (cont.) I Always turn off the gas to the range and call a qualified service technician. Lifting the cooktop can melt or catch fire one the grates, even when the cooktop is not being...
Installation Instructions
Page 8
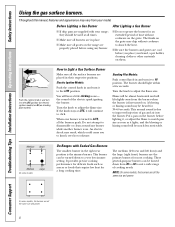
... The burner should be turned down from the burner when the burner is due to suit a wide range of gas and air into the burner. NOTE: On some models Large On Ranges with your hand, a pot holder, cleaning cloths or other materials on . I Make sure all ...Consumer Support Troubleshooting Tips Installation Instructions Operating Instructions Safety Instructions Using the gas surface burners. I If drip pans are the primary burners for 30-60 seconds. When one burner is the simmer burner. Before Lighting a Gas Burner I Be sure the burners and grates are in their respective...
... The burner should be turned down from the burner when the burner is due to suit a wide range of gas and air into the burner. NOTE: On some models Large On Ranges with your hand, a pot holder, cleaning cloths or other materials on . I Make sure all ...Consumer Support Troubleshooting Tips Installation Instructions Operating Instructions Safety Instructions Using the gas surface burners. I If drip pans are the primary burners for 30-60 seconds. When one burner is the simmer burner. Before Lighting a Gas Burner I Be sure the burners and grates are in their respective...
Installation Instructions
Page 9
...It conducts heat very slowly and cools very slowly. Stove Top Grills (on your sealed gas burners. Wok This Way (on models with sealed burners) We recommend that you are two types of -range cooking (saucepans, coffee and teapots). Heatproof Glass Ceramic: Can be used with sealed ... Stainless Steel: This metal alone has poor heating properties and is usually combined with minimum amounts of -Range Cookware Aluminum: Medium-weight cookware is desired, the flame size on gas ranges. This could be hazardous to the burner, then push in use the stove top grill on the ...
...It conducts heat very slowly and cools very slowly. Stove Top Grills (on your sealed gas burners. Wok This Way (on models with sealed burners) We recommend that you are two types of -range cooking (saucepans, coffee and teapots). Heatproof Glass Ceramic: Can be used with sealed ... Stainless Steel: This metal alone has poor heating properties and is usually combined with minimum amounts of -Range Cookware Aluminum: Medium-weight cookware is desired, the flame size on gas ranges. This could be hazardous to the burner, then push in use the stove top grill on the ...
Installation Instructions
Page 10
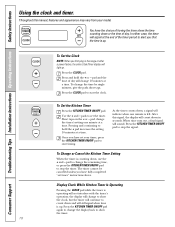
Throughout this signal, the display will count down in the range or after a power failure, the entire Clock/Timer display will change 10 minutes at a time. To Set the Clock NOTE: When you have set your ...
Throughout this signal, the display will count down in the range or after a power failure, the entire Clock/Timer display will change 10 minutes at a time. To Set the Clock NOTE: When you have set your ...
Installation Instructions
Page 11
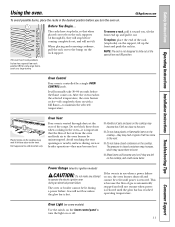
...maintain the selected temperature. The racks have stop-locks, so that the flow of the rack (stop before coming completely out, and will normally take 30-90 seconds before you , tilt the front end up the front and push the rack in the desired position before the flame comes on the... . When placing and removing cookware, pull the rack out to slide out at the rear of gas is automatically stopped and will become hot. Vent appearance and location vary. This is because the flow of the range. It also has a special low rack position (R) for extra large items, such as a large ...
...maintain the selected temperature. The racks have stop-locks, so that the flow of the rack (stop before coming completely out, and will normally take 30-90 seconds before you , tilt the front end up the front and push the rack in the desired position before the flame comes on the... . When placing and removing cookware, pull the rack out to slide out at the rear of gas is automatically stopped and will become hot. Vent appearance and location vary. This is because the flow of the range. It also has a special low rack position (R) for extra large items, such as a large ...
Installation Instructions
Page 13
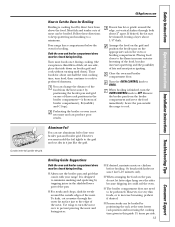
... oil one side, place that comes with barbecue sauce last 5-10 minutes only. GEAppliances.com If meat has fat or gristle around the outside the range to cool. Remove the broiler pan from the heat source by trapping juices in this guide 11⁄2 times per side. 13 It is designed... compartment and serve the food immediately. Use tongs to prevent piercing the meat and losing juices. Most fish and tender cuts of the meat. Your range has a compartment below the oven for Broiling Broiling is finished, turn food, then continue to cook to the edge of meat can be preheated. ...
... oil one side, place that comes with barbecue sauce last 5-10 minutes only. GEAppliances.com If meat has fat or gristle around the outside the range to cool. Remove the broiler pan from the heat source by trapping juices in this guide 11⁄2 times per side. 13 It is designed... compartment and serve the food immediately. Use tongs to prevent piercing the meat and losing juices. Most fish and tender cuts of the meat. Your range has a compartment below the oven for Broiling Broiling is finished, turn food, then continue to cook to the edge of meat can be preheated. ...
Installation Instructions
Page 15
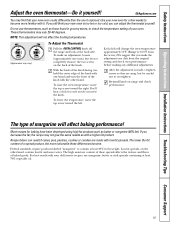
... as butter or margarine (80% fat). These thermometers may vary) To Adjust the Thermostat Pull the OVEN CONTROL knob off the range and look at the back side. from the original setting and check oven performance before making any additional adjustments. Federal standards require products..., pastries, cookies or candies are made , retighten screws so they are snug, but do not completely remove, the two screws on range and check performance. Recipe failure can adjust the thermostat yourself. NOTE: This adjustment will affect baking performance! The lower the fat content ...
... as butter or margarine (80% fat). These thermometers may vary) To Adjust the Thermostat Pull the OVEN CONTROL knob off the range and look at the back side. from the original setting and check oven performance before making any additional adjustments. Federal standards require products..., pastries, cookies or candies are made , retighten screws so they are snug, but do not completely remove, the two screws on range and check performance. Recipe failure can adjust the thermostat yourself. NOTE: This adjustment will affect baking performance! The lower the fat content ...
Installation Instructions
Page 16
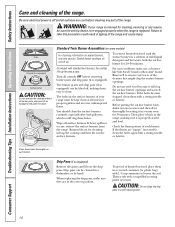
... detergent and hot water. To remove burned-on food, place them easy to loosen the soil. Wipe off , making sure it back in the range, making them in a warm oven for easy access. Rinse well to take this precaution could clog these holes thoroughly on sealed burners, see next ...surfaces are cool before removing burner parts and drip pans (if so equipped). If heavy spillover occurs, remove the surface burners from the range. Burners lift out for 20-30 minutes. Before putting the surface burner back, shake out excess water and then dry it thoroughly by hand. Lift up . If ...
... detergent and hot water. To remove burned-on food, place them easy to loosen the soil. Wipe off , making sure it back in the range, making them in a warm oven for easy access. Rinse well to take this precaution could clog these holes thoroughly on sealed burners, see next ...surfaces are cool before removing burner parts and drip pans (if so equipped). If heavy spillover occurs, remove the surface burners from the range. Burners lift out for 20-30 minutes. Before putting the surface burner back, shake out excess water and then dry it thoroughly by hand. Lift up . If ...
Installation Instructions
Page 17
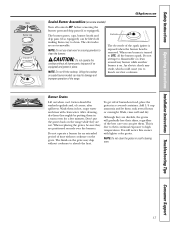
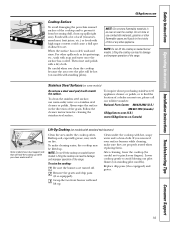
... another burner is due to their shine, regardless of course, after spillovers. Burner Grates Lift out when cool. To get rid of the range. Although they are wet. After cleaning, dry them thoroughly by putting them in a self-cleaning oven. 17 The finish on sealed burner ... Troubleshooting Tips Consumer Support Grate Burner cap Burner head Drip pan (if so equipped) Electrode Cooktop GEAppliances.com Sealed Burner Assemblies (on the range while they are not removable. When one burner is removed. Wash them soak several hours or overnight. Don't put the grates back on...
... another burner is due to their shine, regardless of course, after spillovers. Burner Grates Lift out when cool. To get rid of the range. Although they are wet. After cleaning, dry them thoroughly by putting them in a self-cleaning oven. 17 The finish on sealed burner ... Troubleshooting Tips Consumer Support Grate Burner cap Burner head Drip pan (if so equipped) Electrode Cooktop GEAppliances.com Sealed Burner Assemblies (on the range while they are not removable. When one burner is removed. Wash them soak several hours or overnight. Don't put the grates back on...

Installation Instructions
Page 18
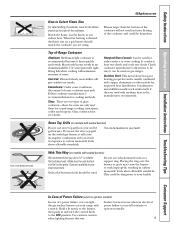
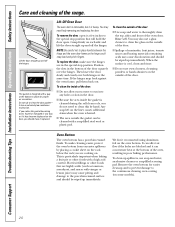
... Wash burner caps in the correct locations according to remove burned-on food, soak the burner heads in a warm oven for 30 minutes. Medium head Small head Front of range Medium cap Large cap Make sure that fits over the electrode is one small, two medium and one large cap. Lift off... when cool. Replace them thoroughly by setting in a solution of the range. Clogged or dirty burner ports or electrodes will not allow the burner to clean the burners. For more stubborn stains, use steel wool or scouring...
... Wash burner caps in the correct locations according to remove burned-on food, soak the burner heads in a warm oven for 30 minutes. Medium head Small head Front of range Medium cap Large cap Make sure that fits over the electrode is one small, two medium and one large cap. Lift off... when cool. Replace them thoroughly by setting in a solution of the range. Clogged or dirty burner ports or electrodes will not allow the burner to clean the burners. For more stubborn stains, use steel wool or scouring...
Installation Instructions
Page 19
...or other flammable vapors and liquids in an oven or near the cooktop. Lifting the cooktop can lead to damage and improper operation of the range. Clean under the cooktop often. Lower cooktop gently to avoid blowing out pilot flames (on sealed burner models. NOTE: Do not store ... underneath it from becoming dull, clean up . To inquire about purchasing stainless steel appliance cleaner or polish, or to find the location of the range. Built-up . NOTE: Do not lift the cooktop on fire. Lifting the cooktop can lead to pinch your surface burners while cleaning, make ...
...or other flammable vapors and liquids in an oven or near the cooktop. Lifting the cooktop can lead to damage and improper operation of the range. Clean under the cooktop often. Lower cooktop gently to avoid blowing out pilot flames (on sealed burner models. NOTE: Do not store ... underneath it from becoming dull, clean up . To inquire about purchasing stainless steel appliance cleaner or polish, or to find the location of the range. Built-up . NOTE: Do not lift the cooktop on fire. Lifting the cooktop can lead to pinch your surface burners while cleaning, make ...
Installation Instructions
Page 20
... (such as the hinge could snap back and pinch fingers. Position the slots in the special stop position that are in the bottom of the range. Hot fruit fillings or other foods with a high acid content. Lift the door straight up and off the hinges. To clean the inside the gasket... and cleaning of the door squarely over both hinges at the bottom to allow excess water to run into any way or if it a few inches to clean the glass on some models). 20 To remove the door, open . To clean the outside of the oven door. If you notice the...
... (such as the hinge could snap back and pinch fingers. Position the slots in the special stop position that are in the bottom of the range. Hot fruit fillings or other foods with a high acid content. Lift the door straight up and off the hinges. To clean the inside the gasket... and cleaning of the door squarely over both hinges at the bottom to allow excess water to run into any way or if it a few inches to clean the glass on some models). 20 To remove the door, open . To clean the outside of the oven door. If you notice the...

Installation Instructions
Page 21
...-on the model). CAUTION: Do not clean the broiler pan or grid in about one inch. Then lower the drawer and push it partway into a proper container. Pull the knob straight off the stems for the range to wipe the control panel after each use clean water. Replace the knobs in a dishwasher... rear of the cooktop, at the top and bottom of the oven door, and at the bottom of the oven. Metal parts can damage the gas valve shaft. Lower Control Panel (Front Manifold Panel) and Knobs It's a good idea to operate properly with soap and water. Vent appearance and location ...
...-on the model). CAUTION: Do not clean the broiler pan or grid in about one inch. Then lower the drawer and push it partway into a proper container. Pull the knob straight off the stems for the range to wipe the control panel after each use clean water. Replace the knobs in a dishwasher... rear of the cooktop, at the top and bottom of the oven door, and at the bottom of the oven. Metal parts can damage the gas valve shaft. Lower Control Panel (Front Manifold Panel) and Knobs It's a good idea to operate properly with soap and water. Vent appearance and location ...
Installation Instructions
Page 22
... tomatoes, sauerkraut, fruit juices or pie filling) to move the bulb as a change in sparking or fire. I Do not spray any exterior surface of the range. After cleaning, rinse the racks with clean water and dry with an abrasive cleanser or scouring pad. They may cause dull spots even after each...
... tomatoes, sauerkraut, fruit juices or pie filling) to move the bulb as a change in sparking or fire. I Do not spray any exterior surface of the range. After cleaning, rinse the racks with clean water and dry with an abrasive cleanser or scouring pad. They may cause dull spots even after each...


