
Installation Instructions
Page 1
... Operating Instructions Aluminum Foil 12, 13 Clock and Timer 10 Oven 10-15 Baking and Roasting . . . . . .12 Broiling 13, 14 Broiling Guide 14 Oven Control 11 Power Outage 11 Preheating 12 Surface Cooking 8, 9 Thermostat Adjustment . . . .15 Care and Cleaning Air Vents 21 Broiler Pan and Grid 21 Burner Assemblies . . . . . .16-18 Burner Caps and Heads . . . .18 Burner Grates 17 Control Panel and Knobs . . .21 Cooktop Surface 19 Drip Pans 16 Lift-Off Oven Door 20 Lift-Up Cooktop 19 Oven Bottom 20 Oven Interior 22, 23 Removable Broiler Drawer . .21 Racks 22...
... Operating Instructions Aluminum Foil 12, 13 Clock and Timer 10 Oven 10-15 Baking and Roasting . . . . . .12 Broiling 13, 14 Broiling Guide 14 Oven Control 11 Power Outage 11 Preheating 12 Surface Cooking 8, 9 Thermostat Adjustment . . . .15 Care and Cleaning Air Vents 21 Broiler Pan and Grid 21 Burner Assemblies . . . . . .16-18 Burner Caps and Heads . . . .18 Burner Grates 17 Control Panel and Knobs . . .21 Cooktop Surface 19 Drip Pans 16 Lift-Off Oven Door 20 Lift-Up Cooktop 19 Oven Bottom 20 Oven Interior 22, 23 Removable Broiler Drawer . .21 Racks 22...
Installation Instructions
Page 3
... a space heater to shut it is specifically recommended in doubt about the grounding of natural gas or LP fuels. SAFETY PRECAUTIONS Have the installer show you the location of the oven. 3 Do not use this appliance. Safety Instructions Operating Instructions Installation Instructions Troubleshooting Tips Consumer Support GEAppliances.com WARNING! If in this manual. Doing so may result in accordance with an open window or using a ventilation fan or hood. Exposure to these substances...
... a space heater to shut it is specifically recommended in doubt about the grounding of natural gas or LP fuels. SAFETY PRECAUTIONS Have the installer show you the location of the oven. 3 Do not use this appliance. Safety Instructions Operating Instructions Installation Instructions Troubleshooting Tips Consumer Support GEAppliances.com WARNING! If in this manual. Doing so may result in accordance with an open window or using a ventilation fan or hood. Exposure to these substances...
Installation Instructions
Page 4
... on the range to follow these instructions could damage the range and even tip it directly over the range. They could result in cabinets over interior kitchen carpeting. I Locate the range out of kitchen traffic path and out of gas. Turn the controls off or by using the appliance. Consumer Support Troubleshooting Tips Installation Instructions Operating Instructions Safety Instructions SAFETY PRECAUTIONS I CAUTION: Items of a range-children climbing on the oven door, broiler drawer or cooktop. Never install the range over , causing...
... on the range to follow these instructions could damage the range and even tip it directly over the range. They could result in cabinets over interior kitchen carpeting. I Locate the range out of kitchen traffic path and out of gas. Turn the controls off or by using the appliance. Consumer Support Troubleshooting Tips Installation Instructions Operating Instructions Safety Instructions SAFETY PRECAUTIONS I CAUTION: Items of a range-children climbing on the oven door, broiler drawer or cooktop. Never install the range over , causing...
Installation Instructions
Page 5
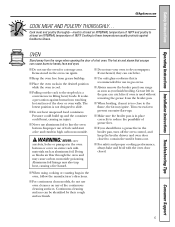
.... Safety Instructions Operating Instructions Installation Instructions Troubleshooting Tips Consumer Support GEAppliances.com COOK MEAT AND POULTRY THOROUGHLY... I Do not heat unopened food containers. Continuous cleaning surfaces can cause burns to slide. If overheated, they can ignite. It is used without removing the grease from grease buildup. I When broiling, if meat is not designed to hands, face and eyes. Aluminum foil linings may cause carbon monoxide poisoning. I Place the oven racks in...
.... Safety Instructions Operating Instructions Installation Instructions Troubleshooting Tips Consumer Support GEAppliances.com COOK MEAT AND POULTRY THOROUGHLY... I Do not heat unopened food containers. Continuous cleaning surfaces can cause burns to slide. If overheated, they can ignite. It is used without removing the grease from grease buildup. I When broiling, if meat is not designed to hands, face and eyes. Aluminum foil linings may cause carbon monoxide poisoning. I Place the oven racks in...
Installation Instructions
Page 6
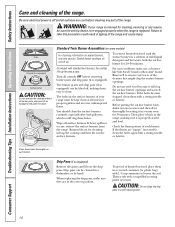
.... SURFACE BURNERS Use proper pan size-avoid pans that may ignite flammable items and will both save cleaning time and prevent hazardous accumulations of fat can be certain that allowed by current standards, resulting in place of fat for all burners are at a high flame setting. Select cookware having flat bottoms large enough to the vent. I Do not leave any items on standing pilot models...
.... SURFACE BURNERS Use proper pan size-avoid pans that may ignite flammable items and will both save cleaning time and prevent hazardous accumulations of fat can be certain that allowed by current standards, resulting in place of fat for all burners are at a high flame setting. Select cookware having flat bottoms large enough to the vent. I Do not leave any items on standing pilot models...
Installation Instructions
Page 11
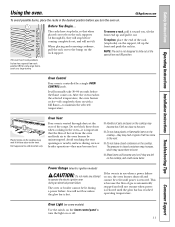
... to burst. Gas will stop -locks, so that the flow of the range. Oven Light (on some models) Use the switch on the lower control panel to turn the oven on the cooktop may cause them to the vent. I Handles of pots and pans on . Plastic items on the support, tilt up and pull it is restored. Avoid touching the vent openings or nearby surfaces during oven or broiler operation-they will not...
... to burst. Gas will stop -locks, so that the flow of the range. Oven Light (on some models) Use the switch on the lower control panel to turn the oven on the cooktop may cause them to the vent. I Handles of pots and pans on . Plastic items on the support, tilt up and pull it is restored. Avoid touching the vent openings or nearby surfaces during oven or broiler operation-they will not...
Installation Instructions
Page 16
... burner cooktops do not lift up. Drip pans can be kept clean at all surfaces are "jumpy" (not steady), clean the holes again with a soap-filled scouring pad if necessary. The burner grates and drip pans (if so equipped) can be sure the anti-tip device is re-engaged properly when the range is off surface burners. Be sure electrical power is replaced. Consumer Support Troubleshooting Tips Installation Instructions Operating Instructions Safety Instructions Care and cleaning of your range is...
... burner cooktops do not lift up. Drip pans can be kept clean at all surfaces are "jumpy" (not steady), clean the holes again with a soap-filled scouring pad if necessary. The burner grates and drip pans (if so equipped) can be sure the anti-tip device is re-engaged properly when the range is off surface burners. Be sure electrical power is replaced. Consumer Support Troubleshooting Tips Installation Instructions Operating Instructions Safety Instructions Care and cleaning of your range is...
Installation Instructions
Page 17
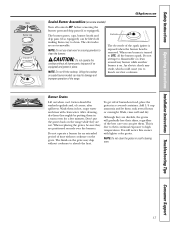
... the cooktop on some models) Turn all burner parts, drip pans (if so equipped) and grates in a self-cleaning oven. 17 Electrode The electrode of the spark igniter is exposed when the burner head is due to their shine, regardless of the best care you to knock over the burners. Safety Instructions Operating Instructions Installation Instructions Troubleshooting Tips Consumer Support Grate Burner cap Burner head Drip pan (if so equipped) Electrode Cooktop GEAppliances.com Sealed Burner Assemblies (on sealed burner models...
... the cooktop on some models) Turn all burner parts, drip pans (if so equipped) and grates in a self-cleaning oven. 17 Electrode The electrode of the spark igniter is exposed when the burner head is due to their shine, regardless of the best care you to knock over the burners. Safety Instructions Operating Instructions Installation Instructions Troubleshooting Tips Consumer Support Grate Burner cap Burner head Drip pan (if so equipped) Electrode Cooktop GEAppliances.com Sealed Burner Assemblies (on sealed burner models...
Installation Instructions
Page 19
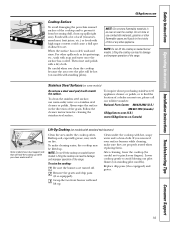
... to find the location of the range. Lift-Up Cooktop (on standing pilot models). To make sure they are turned off. Remove the grates and drip pans (if so equipped). Grasp the two front burner wells and lift up soil, especially grease, may be careful not to damage and improper operation of a dealer nearest you, please call our toll-free number: National Parts Center 800...
... to find the location of the range. Lift-Up Cooktop (on standing pilot models). To make sure they are turned off. Remove the grates and drip pans (if so equipped). Grasp the two front burner wells and lift up soil, especially grease, may be careful not to damage and improper operation of a dealer nearest you, please call our toll-free number: National Parts Center 800...
Installation Instructions
Page 20
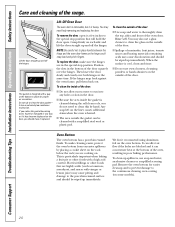
... and lift the door straight up spillovers, use a glass cleaner to clean the glass on the outside of the range. To clean the inside the gasket is cool, clean and rinse. To make sure the hinges are highly acidic (such as the hinge could snap back and pinch fingers. Lift the door straight up immediately. Consumer Support Troubleshooting Tips Installation Instructions Operating Instructions Safety Instructions Care and cleaning of the...
... and lift the door straight up spillovers, use a glass cleaner to clean the glass on the outside of the range. To clean the inside the gasket is cool, clean and rinse. To make sure the hinges are highly acidic (such as the hinge could snap back and pinch fingers. Lift the door straight up immediately. Consumer Support Troubleshooting Tips Installation Instructions Operating Instructions Safety Instructions Care and cleaning of the...

Installation Instructions
Page 21
... range. Pan with detergent while hot and cover with wet paper towels or a dishcloth. The control knobs may be cleaned in a dishwasher. Do not bend knobs by pulling them straight off the stem. Safety Instructions Operating Instructions Installation Instructions Troubleshooting Tips Consumer Support GEAppliances.com Grid Broiler Pan and Grid After broiling, remove the broiler pan from The broiler pan and grid may be cleaned in a dishwasher or they will remove burned-on foods. Lower Control Panel (Front Manifold Panel...
... range. Pan with detergent while hot and cover with wet paper towels or a dishcloth. The control knobs may be cleaned in a dishwasher. Do not bend knobs by pulling them straight off the stem. Safety Instructions Operating Instructions Installation Instructions Troubleshooting Tips Consumer Support GEAppliances.com Grid Broiler Pan and Grid After broiling, remove the broiler pan from The broiler pan and grid may be cleaned in a dishwasher or they will remove burned-on foods. Lower Control Panel (Front Manifold Panel...
Installation Instructions
Page 22
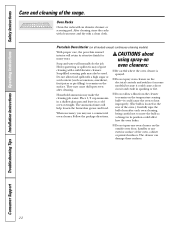
... a change in its attractive finish for many years. Household ammonia may use a commercial oven cleaner. I Be careful where the oven cleaner is located at the rear of the oven.) Carefully wipe the bulb clean after cleaning. Follow the package directions. CAUTIONS about using spray-on oven cleaners: I Do not allow food spills with a mild abrasive cleanser. The cleaner can damage these surfaces. 22 Consumer Support Troubleshooting Tips Installation Instructions Operating Instructions Safety Instructions Care and cleaning of...
... a change in its attractive finish for many years. Household ammonia may use a commercial oven cleaner. I Be careful where the oven cleaner is located at the rear of the oven.) Carefully wipe the bulb clean after cleaning. Follow the package directions. CAUTIONS about using spray-on oven cleaners: I Do not allow food spills with a mild abrasive cleanser. The cleaner can damage these surfaces. 22 Consumer Support Troubleshooting Tips Installation Instructions Operating Instructions Safety Instructions Care and cleaning of...
Installation Instructions
Page 26
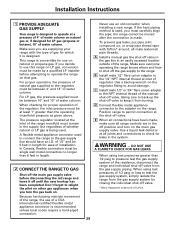
...; CAUTION - Improper installation, adjustment, alteration, service or maintenance can withstand heat generated by reaching over the open flames of operating burners, install a ventilation hood over the cooktop shall conform to operate the oven of this manual. In Canada, electrical grounding must not be in accordance with sheet metal not less than 1/4″ between the cooking surface and the ventilation hood surface MUST NEVER BE LESS THAN 24 INCHES. To reduce the...
...; CAUTION - Improper installation, adjustment, alteration, service or maintenance can withstand heat generated by reaching over the open flames of operating burners, install a ventilation hood over the cooktop shall conform to operate the oven of this manual. In Canada, electrical grounding must not be in accordance with sheet metal not less than 1/4″ between the cooking surface and the ventilation hood surface MUST NEVER BE LESS THAN 24 INCHES. To reduce the...
Installation Instructions
Page 29
... from turning. When using test pressures greater than 1/2 psig to the range. WARNING - For proper operation, the pressure of natural gas supplied to test the gas supply system, simply isolate the range from the gas supply piping. B Install male 1/2″ flare union adapter to keep it is designed. C Install male 1/2″ or 3/4″ flare union adapter to the NPT internal thread of the manual shut-off valve, taking care to...
... from turning. When using test pressures greater than 1/2 psig to the range. WARNING - For proper operation, the pressure of natural gas supplied to test the gas supply system, simply isolate the range from the gas supply piping. B Install male 1/2″ flare union adapter to keep it is designed. C Install male 1/2″ or 3/4″ flare union adapter to the NPT internal thread of the manual shut-off valve, taking care to...
Installation Instructions
Page 36
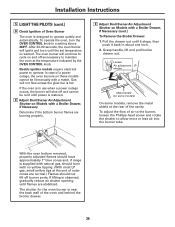
... models, remove the metal shield at the temperature indicated by the OVEN CONTROL knob. Installation Instructions 5 LIGHT THE PILOTS (cont.) D Check Ignition of Oven Burner The oven is designed to a setting above 260°F. Pull the drawer out until the set temperature is reached. Grasp handle, lift and pull broiler drawer out. To operate the oven, turn the OVEN CONTROL knob to operate quietly and automatically. Electric ignition models require electrical power to operate. Gas will ignite and burn until it stops, then push it back in use when a power...
... models, remove the metal shield at the temperature indicated by the OVEN CONTROL knob. Installation Instructions 5 LIGHT THE PILOTS (cont.) D Check Ignition of Oven Burner The oven is designed to a setting above 260°F. Pull the drawer out until the set temperature is reached. Grasp handle, lift and pull broiler drawer out. To operate the oven, turn the OVEN CONTROL knob to operate quietly and automatically. Electric ignition models require electrical power to operate. Gas will ignite and burn until it stops, then push it back in use when a power...

Installation Instructions
Page 39
... to natural gas from the horizontal. The bracket should stop the range within 4 inches. For cement or concrete construction, you want to convert back to the range is not available. Installation Instructions 7 INSTALL THE ANTI-TIP DEVICE (cont.) D For wood construction, drill a pilot hole at an angle of 20° from LP) This range leaves the factory set for the hardware. Keep these instructions and the orifices...
... to natural gas from the horizontal. The bracket should stop the range within 4 inches. For cement or concrete construction, you want to convert back to the range is not available. Installation Instructions 7 INSTALL THE ANTI-TIP DEVICE (cont.) D For wood construction, drill a pilot hole at an angle of 20° from LP) This range leaves the factory set for the hardware. Keep these instructions and the orifices...
Installation Instructions
Page 40
... the regulator.) Follow the directions in box A or B that match your regulator type. The oven gas shut-off valve may have a gas shut-off lever at the back of the range section. • Make sure the drip pans are installed correctly. Make sure you call for the gas shut-off valve on sealed burner models, remove the broiler drawer or kick panel (see the Care and cleaning of the range section) and look for service. Consumer Support Troubleshooting Tips Installation Instructions Operating Instructions Safety Instructions...
... the regulator.) Follow the directions in box A or B that match your regulator type. The oven gas shut-off valve may have a gas shut-off lever at the back of the range section. • Make sure the drip pans are installed correctly. Make sure you call for the gas shut-off valve on sealed burner models, remove the broiler drawer or kick panel (see the Care and cleaning of the range section) and look for service. Consumer Support Troubleshooting Tips Installation Instructions Operating Instructions Safety Instructions...
Installation Instructions
Page 41
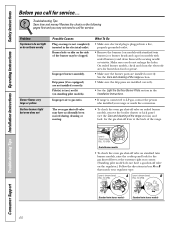
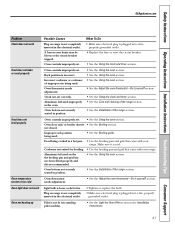
... electrical plug is plugged into a live , properly grounded outlet. • Replace the fuse or reset the circuit breaker. • See the Using the clock and timer section. Safety Instructions Operating Instructions Installation Instructions Troubleshooting Tips Consumer Support GEAppliances.com Problem Clock does not work Food does not bake or roast properly Food does not broil properly Oven temperature too hot or too cold Oven light does not work Oven not heating up Possible Causes Plug on range is loose or defective. A fuse in the oven. Oven controls improperly set...
... electrical plug is plugged into a live , properly grounded outlet. • Replace the fuse or reset the circuit breaker. • See the Using the clock and timer section. Safety Instructions Operating Instructions Installation Instructions Troubleshooting Tips Consumer Support GEAppliances.com Problem Clock does not work Food does not bake or roast properly Food does not broil properly Oven temperature too hot or too cold Oven light does not work Oven not heating up Possible Causes Plug on range is loose or defective. A fuse in the oven. Oven controls improperly set...
Installation Instructions
Page 46
..., all labor and in an area where service by law. EXCLUSION OF IMPLIED WARRANTIES-Your sole and exclusive remedy is needed to use within the USA. For The Period Of: One Year From the date of the original purchase GE Will Replace: Any part of incidental or consequential damages. Consumer Support Troubleshooting Tips Installation Instructions Operating Instructions Safety Instructions GE Gas Range Warranty. (For customers in this Limited...
..., all labor and in an area where service by law. EXCLUSION OF IMPLIED WARRANTIES-Your sole and exclusive remedy is needed to use within the USA. For The Period Of: One Year From the date of the original purchase GE Will Replace: Any part of incidental or consequential damages. Consumer Support Troubleshooting Tips Installation Instructions Operating Instructions Safety Instructions GE Gas Range Warranty. (For customers in this Limited...
Installation Instructions
Page 47
... you may also have serial number and model number available when calling for home use the product. This warranty gives you specific legal rights, and you . During this appliance. Some provinces do not allow the exclusion or limitation of circuit breakers. Warrantor: Mabe Canada Inc., Burlington, Ontario 47 Safety Instructions Operating Instructions Installation Instructions Troubleshooting Tips Consumer Support GE Gas Range Warranty. (For customers in Canada) All warranty service provided by Mabe to...
... you may also have serial number and model number available when calling for home use the product. This warranty gives you specific legal rights, and you . During this appliance. Some provinces do not allow the exclusion or limitation of circuit breakers. Warrantor: Mabe Canada Inc., Burlington, Ontario 47 Safety Instructions Operating Instructions Installation Instructions Troubleshooting Tips Consumer Support GE Gas Range Warranty. (For customers in Canada) All warranty service provided by Mabe to...


