Installation Instructions
Page 8
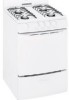
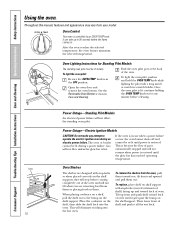
...noise-the sound of the range section). Lift the cooktop up and prop it to absorb the heat. The two surface knobs on the right control the right front and right rear burners. I Do not operate a burner for standing pilot lights with the prop rod provided...turn the knob to operate normally. The electrode of the range. I Check to knock over hot cookware. To light them . 8 Consumer Support Troubleshooting Tips Installation Instructions Care and Cleaning Operating Instructions Safety Instructions Using the gas surface burners. After the burner ignites, turn the surface ...
...noise-the sound of the range section). Lift the cooktop up and prop it to absorb the heat. The two surface knobs on the right control the right front and right rear burners. I Do not operate a burner for standing pilot lights with the prop rod provided...turn the knob to operate normally. The electrode of the range. I Check to knock over hot cookware. To light them . 8 Consumer Support Troubleshooting Tips Installation Instructions Care and Cleaning Operating Instructions Safety Instructions Using the gas surface burners. After the burner ignites, turn the surface ...

Installation Instructions
Page 10
...knob while lighting the pilot with stop before coming completely out of the oven and will eliminate reaching into the oven. The oven or broiler cannot be lit initially. After the oven reaches the selected temperature, the oven burner maintains the selected temperature. Gas will not... affect the standing oven pilot. To remove the shelves from them or placing food on . Throughout this manual, features and appearance may vary from...
...knob while lighting the pilot with stop before coming completely out of the oven and will eliminate reaching into the oven. The oven or broiler cannot be lit initially. After the oven reaches the selected temperature, the oven burner maintains the selected temperature. Gas will not... affect the standing oven pilot. To remove the shelves from them or placing food on . Throughout this manual, features and appearance may vary from...

Installation Instructions
Page 29
... CIRCUMSTANCES, CUT OR REMOVE THE THIRD (GROUND) PRONG FROM THE POWER CORD. 3. A tinge of yellow appearing at the factory to be unoccupied for standing pilot lights.) The range should have it replaced with the prop rod provided (see the Care and cleaning of the cord in the OFF position before attempting to , or...
... CIRCUMSTANCES, CUT OR REMOVE THE THIRD (GROUND) PRONG FROM THE POWER CORD. 3. A tinge of yellow appearing at the factory to be unoccupied for standing pilot lights.) The range should have it replaced with the prop rod provided (see the Care and cleaning of the cord in the OFF position before attempting to , or...
Installation Instructions
Page 30
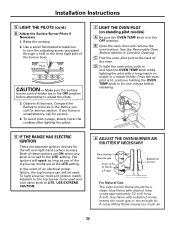
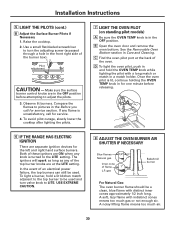
...RANGE HAS ELECTRIC IGNITION There are in a match holder. Installation Instructions 5 LIGHT THE PILOTS (cont.) B Adjust the Surface Burner Pilots if Necessary 1. To avoid pilot outage, slowly lower the cooktop after lighting the pilots. 7 LIGHT THE OVEN PILOT (on standing pilot...flame with distinct inner cones approximately 1/2 inch long. B Open the oven door and remove the oven bottom. Once the oven pilot is unsatisfactory, call for service. 4.... THE OVEN BURNER AIR SHUTTER IF NECESSARY Blue flames 1/2″ Natural gas Inner cone of the top burner knobs are ON when any flame...
...RANGE HAS ELECTRIC IGNITION There are in a match holder. Installation Instructions 5 LIGHT THE PILOTS (cont.) B Adjust the Surface Burner Pilots if Necessary 1. To avoid pilot outage, slowly lower the cooktop after lighting the pilots. 7 LIGHT THE OVEN PILOT (on standing pilot...flame with distinct inner cones approximately 1/2 inch long. B Open the oven door and remove the oven bottom. Once the oven pilot is unsatisfactory, call for service. 4.... THE OVEN BURNER AIR SHUTTER IF NECESSARY Blue flames 1/2″ Natural gas Inner cone of the top burner knobs are ON when any flame...
Installation Instructions
Page 34
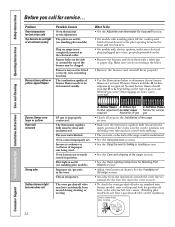
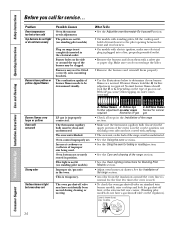
...section. • On models with electric ignition, make sure electrical plug is temporary. Oven bottom not securely seated in the oven. Pilot light is not lit (on range is shown closed. If burner flames look like B or C, depending on the type of burner flames needs to be fitted correctly onto... B-Yellow tips C-Soft blue flames Further adjustment on outer cones Normal for natural required Normal for gas shut-off lever at the extreme left rear corner. (Standing pilot models do not have a gas shut-off valve on the back of the oven) is in the correct position, not touching ...
...section. • On models with electric ignition, make sure electrical plug is temporary. Oven bottom not securely seated in the oven. Pilot light is not lit (on range is shown closed. If burner flames look like B or C, depending on the type of burner flames needs to be fitted correctly onto... B-Yellow tips C-Soft blue flames Further adjustment on outer cones Normal for natural required Normal for gas shut-off lever at the extreme left rear corner. (Standing pilot models do not have a gas shut-off valve on the back of the oven) is in the correct position, not touching ...

Use and Care Manual / Warranty
Page 8
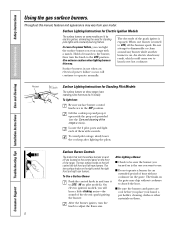
...light them: Be sure surface burner control knobs are located on the control panel on pilot models). On electric ignition models, you can light... materials on your range with the prop rod provided (see the Care and cleaning of the range. Pilot port Surface Lighting Instructions for an ...on these ranges have standing pilots that turn the knob to be lit initially. I Check to adjust the flame size. After Lighting a ...Lighting Instructions for standing pilot lights with a match. Locate the 2 pilot ports and light each of time without cookware to LITE (HI on the front of the range...
...light them: Be sure surface burner control knobs are located on the control panel on pilot models). On electric ignition models, you can light... materials on your range with the prop rod provided (see the Care and cleaning of the range. Pilot port Surface Lighting Instructions for an ...on these ranges have standing pilots that turn the knob to be lit initially. I Check to adjust the flame size. After Lighting a ...Lighting Instructions for standing pilot lights with a match. Locate the 2 pilot ports and light each of time without cookware to LITE (HI on the front of the range...
Use and Care Manual / Warranty
Page 10
...pull the shelf out to 90 seconds before releasing. Then lower front of oven. To light the oven pilot, push in and hold the OVEN TEMP knob while lighting the pilot with stop before coming completely out of gas is lit, continue holding the OVEN TEMP knob in Care and Cleaning. Bump 10 Power... Outage-Standing Pilot Models An electrical power failure will not resume when power is restored. The oven or...
...pull the shelf out to 90 seconds before releasing. Then lower front of oven. To light the oven pilot, push in and hold the OVEN TEMP knob while lighting the pilot with stop before coming completely out of gas is lit, continue holding the OVEN TEMP knob in Care and Cleaning. Bump 10 Power... Outage-Standing Pilot Models An electrical power failure will not resume when power is restored. The oven or...

Use and Care Manual / Warranty
Page 29
... and obligation of electric shock hazard from this appliance is properly grounded. Locate the 2 pilot ports and light each of them with a standard 3-prong grounding wall receptacle to be installed in amperes be unoccupied for standing pilot lights.) The range should have it open with certain conditions, we strongly recommend against the use an extension...
... and obligation of electric shock hazard from this appliance is properly grounded. Locate the 2 pilot ports and light each of them with a standard 3-prong grounding wall receptacle to be installed in amperes be unoccupied for standing pilot lights.) The range should have it open with certain conditions, we strongly recommend against the use an extension...
Use and Care Manual / Warranty
Page 30
... flame with distinct inner cones approximately 1/2 inch long. In the event of the top burner knobs are ON when any flame is turned to the LITE setting. A noisy lifting flame means too much gas or not enough air. D To light the oven pilot, push in a match holder. USE ...OFF position before releasing. 6 IF THE RANGE HAS ELECTRIC IGNITION There are in Care and Cleaning. Raise the cooktop. 2. Compare the flames to adjust the pilots. 3. Both of the burner box). Installation Instructions 5 LIGHT THE PILOTS (cont.) B Adjust the Surface Burner Pilots if Necessary 1. Use a small flat...
... flame with distinct inner cones approximately 1/2 inch long. In the event of the top burner knobs are ON when any flame is turned to the LITE setting. A noisy lifting flame means too much gas or not enough air. D To light the oven pilot, push in a match holder. USE ...OFF position before releasing. 6 IF THE RANGE HAS ELECTRIC IGNITION There are in Care and Cleaning. Raise the cooktop. 2. Compare the flames to adjust the pilots. 3. Both of the burner box). Installation Instructions 5 LIGHT THE PILOTS (cont.) B Adjust the Surface Burner Pilots if Necessary 1. Use a small flat...
Use and Care Manual / Warranty
Page 34
... oven burner air shutter. Make sure you call for LP gas gas • Check all steps in the Installation of the range section. • Make sure the thermostat capillary bulb (located in the upper portion of the burner may not be determined visually. Pilot light is not lit (on outer cones is normal. This is...
... oven burner air shutter. Make sure you call for LP gas gas • Check all steps in the Installation of the range section. • Make sure the thermostat capillary bulb (located in the upper portion of the burner may not be determined visually. Pilot light is not lit (on outer cones is normal. This is...


