Installation Instructions
Page 3
... specifically recommended in accordance with the Installation Instructions. Exposure to these substances, namely benzene, carbon monoxide, formaldehyde and soot, caused primarily by venting with this manual. SAFETY PRECAUTIONS Have the installer show you the location of the home electrical system, it off if necessary. WARNING: NEVER use an extension cord with an open window or using a ventilation fan or hood. Properly adjusted burners, indicated by qualified gas range installers or service...
... specifically recommended in accordance with the Installation Instructions. Exposure to these substances, namely benzene, carbon monoxide, formaldehyde and soot, caused primarily by venting with this manual. SAFETY PRECAUTIONS Have the installer show you the location of the home electrical system, it off if necessary. WARNING: NEVER use an extension cord with an open window or using a ventilation fan or hood. Properly adjusted burners, indicated by qualified gas range installers or service...
Installation Instructions
Page 4
... with flame or hot oven surfaces I After prolonged use of use . I Be sure all codes and requirements near a cooktop. READ ALL INSTRUCTIONS BEFORE USING. Be I Never block the vents (air openings) of the range section. See the Installation of the range. The qualified agency performing this Owner's path and out of the children should the material could damage the range and even tip it to Air openings are removed careful when reaching for the conversion...
... with flame or hot oven surfaces I After prolonged use of use . I Be sure all codes and requirements near a cooktop. READ ALL INSTRUCTIONS BEFORE USING. Be I Never block the vents (air openings) of the range section. See the Installation of the range. The qualified agency performing this Owner's path and out of the children should the material could damage the range and even tip it to Air openings are removed careful when reaching for the conversion...
Installation Instructions
Page 5
... foil. Trim excess fat to the flame, the fat may ignite. I When using cooking or roasting bags in place correctly to contain fire until it burns out. I When broiling, if meat is recommended for use the oven for a storage area. It is in the oven, follow the manufacturer's directions. I Do not heat unopened food containers. Safety Instructions Operating Instructions Care and Cleaning Installation Instructions Troubleshooting Tips Consumer Support ge.com COOK MEAT AND...
... foil. Trim excess fat to the flame, the fat may ignite. I When using cooking or roasting bags in place correctly to contain fire until it burns out. I When broiling, if meat is recommended for use the oven for a storage area. It is in the oven, follow the manufacturer's directions. I Do not heat unopened food containers. Safety Instructions Operating Instructions Care and Cleaning Installation Instructions Troubleshooting Tips Consumer Support ge.com COOK MEAT AND...

Installation Instructions
Page 6
... hot air from the vent may result in place of fat for all burners are at the OFF position and all plastics away from steam. Consumer Support Troubleshooting Tips Installation Instructions Care and Cleaning Operating Instructions Safety Instructions IMPORTANT SAFETY INFORMATION. WARNING! Select cookware having flat bottoms large enough to bubble up and over the surface burners and create a fire hazard. Excessive flame is cool. Also, it heats. I When using glass...
... hot air from the vent may result in place of fat for all burners are at the OFF position and all plastics away from steam. Consumer Support Troubleshooting Tips Installation Instructions Care and Cleaning Operating Instructions Safety Instructions IMPORTANT SAFETY INFORMATION. WARNING! Select cookware having flat bottoms large enough to bubble up and over the surface burners and create a fire hazard. Excessive flame is cool. Also, it heats. I When using glass...
Installation Instructions
Page 8
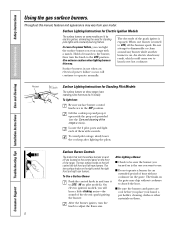
.... The finish on the grate may result, which could cause you will continue to LITE, all the burners spark. To avoid pilot outage, slowly lower the cooktop after lighting the pilots. The electrode of the range. The two surface knobs on the grate. Use extreme caution when lighting burners this manual, features and appearance may vary from your range with a match. Consumer Support Troubleshooting Tips Installation Instructions Care and Cleaning Operating Instructions Safety Instructions Using the gas surface burners.
.... The finish on the grate may result, which could cause you will continue to LITE, all the burners spark. To avoid pilot outage, slowly lower the cooktop after lighting the pilots. The electrode of the range. The two surface knobs on the grate. Use extreme caution when lighting burners this manual, features and appearance may vary from your range with a match. Consumer Support Troubleshooting Tips Installation Instructions Care and Cleaning Operating Instructions Safety Instructions Using the gas surface burners.
Installation Instructions
Page 15
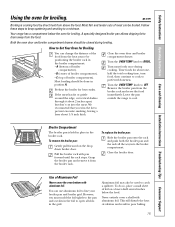
Both the oven door and broiler compartment drawer should be used to line your broiler pan and broiler grid. Preheat the broiler for about onehalf the total cooking time, turn food, then continue to cook to prevent excessive smoking, leaving a layer about 2 inches apart, but don't cut into the broiler compartment. Turn the OVEN TEMP knob to OFF. Turn the OVEN TEMP knob to BROIL. Broiler Compartment The broiler pan is cooking food by positioning the broiler rack in position A. You can use aluminum foil...
Both the oven door and broiler compartment drawer should be used to line your broiler pan and broiler grid. Preheat the broiler for about onehalf the total cooking time, turn food, then continue to cook to prevent excessive smoking, leaving a layer about 2 inches apart, but don't cut into the broiler compartment. Turn the OVEN TEMP knob to OFF. Turn the OVEN TEMP knob to BROIL. Broiler Compartment The broiler pan is cooking food by positioning the broiler rack in position A. You can use aluminum foil...
Installation Instructions
Page 17
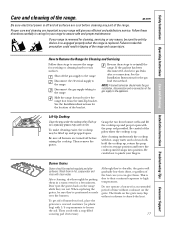
... cooktop up soil, especially grease, may catch on fire. Be careful not to free the range foot from the Anti-Tip bracket. Wash them in a covered container (or plastic bag) with clean water. Safety Instructions Operating Instructions Care and Cleaning Installation Instructions Troubleshooting Tips Consumer Support Care and cleaning of time without cookware to the range. ge.com Be sure electrical power is off and all burners are important so your fingers. Proper care and cleaning are turned off the gas supply...
... cooktop up soil, especially grease, may catch on fire. Be careful not to free the range foot from the Anti-Tip bracket. Wash them in a covered container (or plastic bag) with clean water. Safety Instructions Operating Instructions Care and Cleaning Installation Instructions Troubleshooting Tips Consumer Support Care and cleaning of time without cookware to the range. ge.com Be sure electrical power is off and all burners are important so your fingers. Proper care and cleaning are turned off the gas supply...
Installation Instructions
Page 24
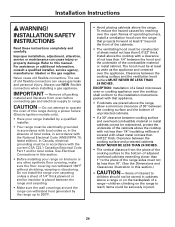
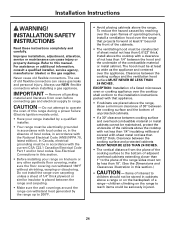
... THAN 24 INCHES. • The vertical distance from oven before connecting gas and electrical supply to the bottom of adjacent overhead cabinets extending closer than 1/4″ between the hood and the underside of local codes, in this section. • Before installing your range installed by a qualified installer. • Your range must be electrically grounded in accordance with the current CSA C22.1 Canadian Electrical Code Part 1 and/or local codes. Installation Instructions...
... THAN 24 INCHES. • The vertical distance from oven before connecting gas and electrical supply to the bottom of adjacent overhead cabinets extending closer than 1/4″ between the hood and the underside of local codes, in this section. • Before installing your range installed by a qualified installer. • Your range must be electrically grounded in accordance with the current CSA C22.1 Canadian Electrical Code Part 1 and/or local codes. Installation Instructions...
Installation Instructions
Page 27
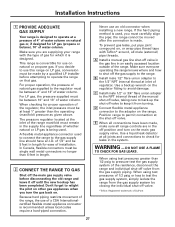
... and connections to check for proper operation of the regulator, the inlet pressure must be between 4″ and 13″ of whether natural or LP gas is used, you turn on the main gas supply valve. DO NOT USE A FLAME TO CHECK FOR GAS LEAKS. Make sure you decide to use this range on LP gas, conversion must carefully align the pipe; For proper operation, the pressure of natural gas supplied to the regulator must...
... and connections to check for proper operation of the regulator, the inlet pressure must be between 4″ and 13″ of whether natural or LP gas is used, you turn on the main gas supply valve. DO NOT USE A FLAME TO CHECK FOR GAS LEAKS. Make sure you decide to use this range on LP gas, conversion must carefully align the pipe; For proper operation, the pressure of natural gas supplied to the regulator must...
Installation Instructions
Page 33
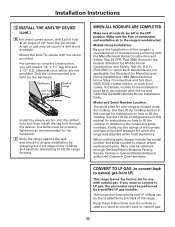
... lag bolt through General Electric/Hotpoint Factory Service Centers or General Electric/Hotpoint authorized Customer Care® servicers. The bolts must be obtained through the device. Installation Instructions 12 INSTALL THE ANTI-TIP DEVICE (cont.) D For wood construction, drill a pilot hole at an angle of 20° from LP) This range leaves the factory set for use with natural gas. CONVERT TO LP GAS (or convert back to LP gas, the conversion must be used if a drill...
... lag bolt through General Electric/Hotpoint Factory Service Centers or General Electric/Hotpoint authorized Customer Care® servicers. The bolts must be obtained through the device. Installation Instructions 12 INSTALL THE ANTI-TIP DEVICE (cont.) D For wood construction, drill a pilot hole at an angle of 20° from LP) This range leaves the factory set for use with natural gas. CONVERT TO LP GAS (or convert back to LP gas, the conversion must be used if a drill...
Installation Instructions
Page 34
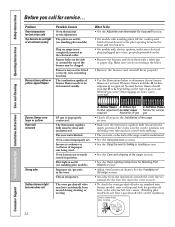
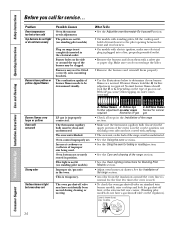
... burner flames should look like A, further adjustment is required. The thermostat capillary bulb must be determined visually. Oven control improperly set. The oven gas shut-off valve may not be fitted correctly onto mounting brackets. Consumer Support Troubleshooting Tips Installation Instructions Care and Cleaning Operating Instructions Safety Instructions Before you do not burn evenly Possible Causes Oven thermostat needs adjustment. The pilots are normal. The combustion quality of the range section. • See the Oven Lighting Instructions for Standing Pilot Models section...
... burner flames should look like A, further adjustment is required. The thermostat capillary bulb must be determined visually. Oven control improperly set. The oven gas shut-off valve may not be fitted correctly onto mounting brackets. Consumer Support Troubleshooting Tips Installation Instructions Care and Cleaning Operating Instructions Safety Instructions Before you do not burn evenly Possible Causes Oven thermostat needs adjustment. The pilots are normal. The combustion quality of the range section. • See the Oven Lighting Instructions for Standing Pilot Models section...

Installation Instructions
Page 35
... have serial number and model number available when calling for home use the product. To know what your state's Attorney General. What is not available, you may be responsible for a trip charge or you how to one -year warranty, we will also provide, free of shipping or service calls to an Authorized GE Service location for service. Safety Instructions Operating Instructions Care and Cleaning Installation Instructions Troubleshooting Tips Consumer Support Gas Range Warranty. To schedule service, on-line, 24...
... have serial number and model number available when calling for home use the product. To know what your state's Attorney General. What is not available, you may be responsible for a trip charge or you how to one -year warranty, we will also provide, free of shipping or service calls to an Authorized GE Service location for service. Safety Instructions Operating Instructions Care and Cleaning Installation Instructions Troubleshooting Tips Consumer Support Gas Range Warranty. To schedule service, on-line, 24...

Use and Care Manual / Warranty
Page 4
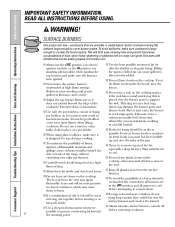
... the oven door, broiler door or cooktop. use of chemical or foam-type fire extinguisher. Never install it over interior kitchen carpeting. I Do not allow anyone to Air openings are removed careful when reaching for the conversion. They I Let the burner grates and other WARNING: I Large scratches or impacts to glass doors can reach them or leaving I Flame in packaging material ignite. cool before operating it with baking soda or, temperatures...
... the oven door, broiler door or cooktop. use of chemical or foam-type fire extinguisher. Never install it over interior kitchen carpeting. I Do not allow anyone to Air openings are removed careful when reaching for the conversion. They I Let the burner grates and other WARNING: I Large scratches or impacts to glass doors can reach them or leaving I Flame in packaging material ignite. cool before operating it with baking soda or, temperatures...

Use and Care Manual / Warranty
Page 5
... grease fires. I When broiling, if meat is recommended for a storage area. I Always remove the broiler pan from the range when opening the door of 180°F. I Do not use in gas ovens. Aluminum foil linings may also trap heat, causing a fire hazard. The hot air and steam that is too close to prevent excessive flare-ups. Safety Instructions Operating Instructions Care and Cleaning Installation Instructions Troubleshooting Tips Consumer Support ge.com COOK MEAT AND POULTRY THOROUGHLY...
... grease fires. I When broiling, if meat is recommended for a storage area. I Always remove the broiler pan from the range when opening the door of 180°F. I Do not use in gas ovens. Aluminum foil linings may also trap heat, causing a fire hazard. The hot air and steam that is too close to prevent excessive flare-ups. Safety Instructions Operating Instructions Care and Cleaning Installation Instructions Troubleshooting Tips Consumer Support ge.com COOK MEAT AND POULTRY THOROUGHLY...
Use and Care Manual / Warranty
Page 6
... minimize the possibility of burns, ignition of fat can be used in frying, stir together before heating or as I When using glass cookware, make sure it is I Adjust the top burner flame size so it placed over the sides of -range cooking. Filling standing pilot models) when igniting the the pan too full of flammable materials and spillage, turn the surface burner controls off before attempting to contain the...
... minimize the possibility of burns, ignition of fat can be used in frying, stir together before heating or as I When using glass cookware, make sure it is I Adjust the top burner flame size so it placed over the sides of -range cooking. Filling standing pilot models) when igniting the the pan too full of flammable materials and spillage, turn the surface burner controls off before attempting to contain the...

Use and Care Manual / Warranty
Page 8
... lighting burners this manual, features and appearance may vary from your hand, a pot holder, cleaning cloths or other materials on the left control the left front and left rear burners. When one you to LITE, all the burners spark. Consumer Support Troubleshooting Tips Installation Instructions Care and Cleaning Operating Instructions Safety Instructions Using the gas surface burners. Pilot port Surface Lighting Instructions for Electric Ignition Models The surface burners on some models are located on the control panel on pilot models). Locate the 2 pilot ports and light...
... lighting burners this manual, features and appearance may vary from your hand, a pot holder, cleaning cloths or other materials on the left control the left front and left rear burners. When one you to LITE, all the burners spark. Consumer Support Troubleshooting Tips Installation Instructions Care and Cleaning Operating Instructions Safety Instructions Using the gas surface burners. Pilot port Surface Lighting Instructions for Electric Ignition Models The surface burners on some models are located on the control panel on pilot models). Locate the 2 pilot ports and light...
Use and Care Manual / Warranty
Page 24
... the open flames of operating burners, install a ventilation hood over the range that appliance. • If cabinets are placed above the range. Do not install the range over the cooktop shall conform to the plane of sheet metal not less than 18″. (See the Dimensions and Clearances illustration in accordance with the current CSA C22.1 Canadian Electrical Code Part 1 and/or local codes. IMPORTANT - Install above the cooktop...
... the open flames of operating burners, install a ventilation hood over the range that appliance. • If cabinets are placed above the range. Do not install the range over the cooktop shall conform to the plane of sheet metal not less than 18″. (See the Dimensions and Clearances illustration in accordance with the current CSA C22.1 Canadian Electrical Code Part 1 and/or local codes. IMPORTANT - Install above the cooktop...

Use and Care Manual / Warranty
Page 33
... cooktop. The conversion instructions and LP orifices can be used if a drill is located under the cooktop. Wallboard Anti-Tip device Back of range Wood screw Install the sleeve anchor into the drilled hole and then install the lag bolt through General Electric/Hotpoint Factory Service Centers or General Electric/Hotpoint authorized Customer Care® servicers. See the Lift-Up Cooktop section in this manual for Manufactured Home Installations 1984 (Manufactured Home Sites Communities and Set...
... cooktop. The conversion instructions and LP orifices can be used if a drill is located under the cooktop. Wallboard Anti-Tip device Back of range Wood screw Install the sleeve anchor into the drilled hole and then install the lag bolt through General Electric/Hotpoint Factory Service Centers or General Electric/Hotpoint authorized Customer Care® servicers. See the Lift-Up Cooktop section in this manual for Manufactured Home Installations 1984 (Manufactured Home Sites Communities and Set...
Use and Care Manual / Warranty
Page 34
... outlet. • Remove the burners and clean them properly. • Use the illustrations below to determine if your burner flames are not lit. (on standing pilot models) Burners have yellow or yellow-tipped flames Plug on outer cones Normal for natural required Normal for LP gas gas • Check all steps in the Installation of the range section. • Make sure the thermostat capillary bulb (located in the electrical outlet. Incorrect cookware...
... outlet. • Remove the burners and clean them properly. • Use the illustrations below to determine if your burner flames are not lit. (on standing pilot models) Burners have yellow or yellow-tipped flames Plug on outer cones Normal for natural required Normal for LP gas gas • Check all steps in the Installation of the range section. • Make sure the thermostat capillary bulb (located in the electrical outlet. Incorrect cookware...

Use and Care Manual / Warranty
Page 35
... shipping or service calls to replace the defective part. Safety Instructions Operating Instructions Care and Cleaning Installation Instructions Troubleshooting Tips Consumer Support Gas Range Warranty. What is needed to state. EXCLUSION OF IMPLIED WARRANTIES-Your sole and exclusive remedy is not available, you may also have serial number and model number available when calling for other rights which fails due to a defect in -home service to your receipt here. This warranty gives you specific legal...
... shipping or service calls to replace the defective part. Safety Instructions Operating Instructions Care and Cleaning Installation Instructions Troubleshooting Tips Consumer Support Gas Range Warranty. What is needed to state. EXCLUSION OF IMPLIED WARRANTIES-Your sole and exclusive remedy is not available, you may also have serial number and model number available when calling for other rights which fails due to a defect in -home service to your receipt here. This warranty gives you specific legal...


