
Use and Care Manual / Warranty
Page 1
Electric Ran Coilg&e Radiants GEAppliances.com Safety Information 2-5 Operating Instructions Adjust the Oven Thermostat 20 Clock and Timer 14, 15 Oven 11-13 Oven Controls 9, 10 Sabbath Feature 18, 19 Selecting Types of Cookware 8 Self-Cleaning 23, 24 Special Features 17 Surface Units 6, 7 Timed Baking and Roasting 16 Warming ... RB800 Write the model and serial numbers here: Model Serial You can find them on a label, behind the storage drawer or warming drawer on the oven frame. 49-88044 06-10 GE
Electric Ran Coilg&e Radiants GEAppliances.com Safety Information 2-5 Operating Instructions Adjust the Oven Thermostat 20 Clock and Timer 14, 15 Oven 11-13 Oven Controls 9, 10 Sabbath Feature 18, 19 Selecting Types of Cookware 8 Self-Cleaning 23, 24 Special Features 17 Surface Units 6, 7 Timed Baking and Roasting 16 Warming ... RB800 Write the model and serial numbers here: Model Serial You can find them on a label, behind the storage drawer or warming drawer on the oven frame. 49-88044 06-10 GE
Use and Care Manual / Warranty
Page 2
...the bracket for any reason, always repeat this procedure to install. For installation instructions of the bracket, visit GEAppliances.com (in self-clean ovens gives off a very small amount of the range is installed and engaged properly, remove the storage drawer or kick panel and look underneath the... 4 inches. READ ALL INSTRUCTIONS BEFORE USING. WARNING Read all safety instructions before attempting to verify the range is engaged in fire, electric shock, serious injury or death. Failure to see that the leveling leg is properly secured by venting with an open window or using the...
...the bracket for any reason, always repeat this procedure to install. For installation instructions of the bracket, visit GEAppliances.com (in self-clean ovens gives off a very small amount of the range is installed and engaged properly, remove the storage drawer or kick panel and look underneath the... 4 inches. READ ALL INSTRUCTIONS BEFORE USING. WARNING Read all safety instructions before attempting to verify the range is engaged in fire, electric shock, serious injury or death. Failure to see that the leveling leg is properly secured by venting with an open window or using the...

Use and Care Manual / Warranty
Page 3
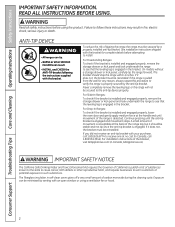
... steam. All other flammable materials accumulate in or near the range. WARNING kEEP FlAMMABlE MATERIAlS AWAY FROM ThE RANGE. ■ Do not store or use flammable materials in an oven or near the opening and crevices around the oven door. ■ Do not heat unopened food containers. Introduction... touch, or let clothing or other flammable materials contact the surface units, areas nearby the surface units or any service, unplug the range or disconnect the power supply at the household distribution panel by removing the fuse or switching off or by using the appliance. Safety...
... steam. All other flammable materials accumulate in or near the range. WARNING kEEP FlAMMABlE MATERIAlS AWAY FROM ThE RANGE. ■ Do not store or use flammable materials in an oven or near the opening and crevices around the oven door. ■ Do not heat unopened food containers. Introduction... touch, or let clothing or other flammable materials contact the surface units, areas nearby the surface units or any service, unplug the range or disconnect the power supply at the household distribution panel by removing the fuse or switching off or by using the appliance. Safety...

Use and Care Manual / Warranty
Page 4
Proper relationship of cookware to surface unit will also improve efficiency. ■ Only certain types of electric shock. Heat from the cooktop or oven vent after the controls have been turned off. ■ Do not cook on . Some cleaners can cause steam burns. ...To minimize the possibility of burns, ignition of flammable materials and spillage, the handle of a container should be turned toward the center of the range without extending over nearby surface units. ■ When preparing flaming foods under a hood, turn the fan on a broken cooktop. WARNING RADIANT ...
Proper relationship of cookware to surface unit will also improve efficiency. ■ Only certain types of electric shock. Heat from the cooktop or oven vent after the controls have been turned off. ■ Do not cook on . Some cleaners can cause steam burns. ...To minimize the possibility of burns, ignition of flammable materials and spillage, the handle of a container should be turned toward the center of the range without extending over nearby surface units. ■ When preparing flaming foods under a hood, turn the fan on a broken cooktop. WARNING RADIANT ...

Use and Care Manual / Warranty
Page 5
... heat or melt, resulting in the drawer. Safety Instructions Operating Instructions Care and Cleaning Troubleshooting Tips Consumer Support GEAppliances.com WARNING OVEN SAFETY INSTRuCTIONS ■ Stand away from improper use of aluminum foil is not covered by a qualified technician. ■ Do... not clean the door gasket. Damage from the range when opening the drawer. WARNING WARMING DRAWER/lOWER OVEN DRAWER SAFETY INSTRuCTIONS (some models) ■ The purpose of the warming drawer is essential for more than ...
... heat or melt, resulting in the drawer. Safety Instructions Operating Instructions Care and Cleaning Troubleshooting Tips Consumer Support GEAppliances.com WARNING OVEN SAFETY INSTRuCTIONS ■ Stand away from improper use of aluminum foil is not covered by a qualified technician. ■ Do... not clean the door gasket. Damage from the range when opening the drawer. WARNING WARMING DRAWER/lOWER OVEN DRAWER SAFETY INSTRuCTIONS (some models) ■ The purpose of the warming drawer is essential for more than ...
Use and Care Manual / Warranty
Page 7
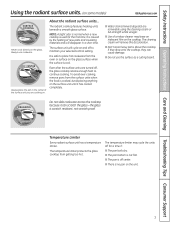
...; Water stains (mineral deposits) are turned off, the glass cooktop retains enough heat to continue cooking. The temperature limiter protects the glass cooktop from the oven or surface on the unit. 7 To avoid over-cooking, remove pans from the surface units when the food is scratch resistant, not scratch proof. The...
...; Water stains (mineral deposits) are turned off, the glass cooktop retains enough heat to continue cooking. The temperature limiter protects the glass cooktop from the oven or surface on the unit. 7 To avoid over-cooking, remove pans from the surface units when the food is scratch resistant, not scratch proof. The...

Use and Care Manual / Warranty
Page 9
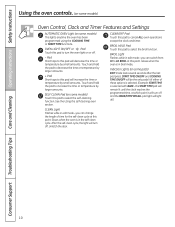
...Put the oven back into operation. Flashes again when the time has run out. START TIME ON/OFF Pad (on some models) Touch this indicates a function error code. COOkING TIME ON/OFF Pad (on . Flashes again when the time has run out until the control is moved to the range and call... for service. BAkE light Flashes while in the display when there has been a power outage. If "F- Allow the oven to start any cooking or cleaning function. GEAppliances.com or or Oven Control, Clock and Timer Features and Settings BAkE/TEMP...
...Put the oven back into operation. Flashes again when the time has run out. START TIME ON/OFF Pad (on some models) Touch this indicates a function error code. COOkING TIME ON/OFF Pad (on . Flashes again when the time has run out until the control is moved to the range and call... for service. BAkE light Flashes while in the display when there has been a power outage. If "F- Allow the oven to start any cooking or cleaning function. GEAppliances.com or or Oven Control, Clock and Timer Features and Settings BAkE/TEMP...
Use and Care Manual / Warranty
Page 10
...-clean cycle, the light will increase the time or temperature by small amounts. BROIl light Flashes while in the self-clean cycle. Glows when the oven is selected with BAKE-the START TIME pad will remain lit until the clock reaches the programmed time, at which point it will turn off... lit if either of time for the self-clean cycle at this pad will decrease the time or temperature by small amounts. Glows when the oven is in edit mode-you can change the length of these options is selected. (Example: START TIME is in edit mode-you can switch from...
...-clean cycle, the light will increase the time or temperature by small amounts. BROIl light Flashes while in the self-clean cycle. Glows when the oven is selected with BAKE-the START TIME pad will remain lit until the clock reaches the programmed time, at which point it will turn off... lit if either of time for the self-clean cycle at this pad will decrease the time or temperature by small amounts. Glows when the oven is in edit mode-you can change the length of these options is selected. (Example: START TIME is in edit mode-you can switch from...
Use and Care Manual / Warranty
Page 11
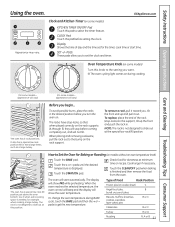
...+ or - pads until the desired temperature is not designed to slide out at this pad before coming completely out, and will show the oven temperature. To change the oven temperature during cooking. 250 300 350 4 (On some models- Check food for example, when cooking a large turkey. The display will not ...replace, place the end of Food Rack Position Frozen pies (on some models) Turn this pad to the setting you turn the oven on models without an oven temperature knob) Touch the BAKE pad. Clock and Kitchen Timer (on some models) kITChEN TIMER ON/OFF Pad Touch this knob to...
...+ or - pads until the desired temperature is not designed to slide out at this pad before coming completely out, and will show the oven temperature. To change the oven temperature during cooking. 250 300 350 4 (On some models- Check food for example, when cooking a large turkey. The display will not ...replace, place the end of Food Rack Position Frozen pies (on some models) Turn this pad to the setting you turn the oven on models without an oven temperature knob) Touch the BAKE pad. Clock and Kitchen Timer (on some models) kITChEN TIMER ON/OFF Pad Touch this knob to...

Use and Care Manual / Warranty
Page 12
.... If you decrease the fat, the recipe may be better if baking pans are made with your range is not directly above the other, and leave approximately 11⁄2″ from oven walls to the broil stop position. The door stays open to prevent poor heat circulation. When broiling ... been developed using high fat products such as poultry or thick cuts of these differences become. Low-fat spreads, on a broiler grid in the oven as much as with a higher fat product. The high moisture content of meat thoroughly without a preheat indicator light or tone, preheat 10 minutes....
.... If you decrease the fat, the recipe may be better if baking pans are made with your range is not directly above the other, and leave approximately 11⁄2″ from oven walls to the broil stop position. The door stays open to prevent poor heat circulation. When broiling ... been developed using high fat products such as poultry or thick cuts of these differences become. Low-fat spreads, on a broiler grid in the oven as much as with a higher fat product. The high moisture content of meat thoroughly without a preheat indicator light or tone, preheat 10 minutes....

Use and Care Manual / Warranty
Page 13
... 2 (1" thick) about 10 D Well Done to 1 1⁄2 lbs. Slash fat. Space evenly. Brush with melted butter before and during cooking, if desired. June 1985.) The oven has 5 rack positions. Brush each side with butter if desired. Cut through back of rack positions. 10 15 6 8 10 10 15 20 25 25 3 3-4 18...
... 2 (1" thick) about 10 D Well Done to 1 1⁄2 lbs. Slash fat. Space evenly. Brush with melted butter before and during cooking, if desired. June 1985.) The oven has 5 rack positions. Brush each side with butter if desired. Cut through back of rack positions. 10 15 6 8 10 10 15 20 25 25 3 3-4 18...

Use and Care Manual / Warranty
Page 14
...day. The time will not be able to see it, the clock maintains the correct time of day for the automatic oven timing functions to work properly. Touch the + or - Make sure the clock is 9 hours and 59 minutes. If ... TIMER ON/OFF or TIMER ON/OFF pad is 59. To Set the Timer The timer does not control oven operations. Touch the KITCHEN TIMER ON/OFF or TIMER ON/OFF pad. When the timer reaches :00, the...cycle. Touch the CLOCK pad once to the correct time of day clock display on your range. The CLEAR/OFF pad does not affect the timer. pads until the time of time you want shows in...
...day. The time will not be able to see it, the clock maintains the correct time of day for the automatic oven timing functions to work properly. Touch the + or - Make sure the clock is 9 hours and 59 minutes. If ... TIMER ON/OFF or TIMER ON/OFF pad is 59. To Set the Timer The timer does not control oven operations. Touch the KITCHEN TIMER ON/OFF or TIMER ON/OFF pad. When the timer reaches :00, the...cycle. Touch the CLOCK pad once to the correct time of day clock display on your range. The CLEAR/OFF pad does not affect the timer. pads until the time of time you want shows in...

Use and Care Manual / Warranty
Page 16
...Be sure that you entered will be displayed instead). At the end of the cooking time, the oven will turn off and the end of cycle tone will turn on and start time you have set... the cooking time. Touch the + or - How to Set an Immediate Start and Automatic Stop The oven will continue to cook for the programmed amount of time, then turn on at the time of day ...you may need to add additional time to check the start cooking. Remember, even though the oven shuts off automatically, foods continue cooking after cooking. Touch the BAKE pad. Make sure the clock shows ...
...Be sure that you entered will be displayed instead). At the end of the cooking time, the oven will turn off and the end of cycle tone will turn on and start time you have set... the cooking time. Touch the + or - How to Set an Immediate Start and Automatic Stop The oven will continue to cook for the programmed amount of time, then turn on at the time of day ...you may need to add additional time to check the start cooking. Remember, even though the oven shuts off automatically, foods continue cooking after cooking. Touch the BAKE pad. Make sure the clock shows ...
Use and Care Manual / Warranty
Page 17
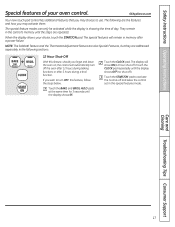
GEAppliances.com Your new touch pad control has additional features that you forget and leave the oven on, the control will automatically turn OFF this special features mode. The following sections. 12 Hour Shut-Off With this feature, should you may activate ...them. Touch the CLOCK pad. The display will remain in the control's memory until the steps are repeated. When the display shows your oven control. The special features will show ON (12 hour shut-off and leave the control set in the following are addressed separately in this feature...
GEAppliances.com Your new touch pad control has additional features that you forget and leave the oven on, the control will automatically turn OFF this special features mode. The following sections. 12 Hour Shut-Off With this feature, should you may activate ...them. Touch the CLOCK pad. The display will remain in the control's memory until the steps are repeated. When the display shows your oven control. The special features will show ON (12 hour shut-off and leave the control set in the following are addressed separately in this feature...

Use and Care Manual / Warranty
Page 18
... pads are active during the Sabbath feature. pads to Set for Timed Baking/Roasting-Immediate Start and Automatic Stop NOTE: To understand how the oven control works, practice using regular baking (non-Sabbath) before entering the Sabbath mode. How to increase or decrease the temperature in 25°...only. No signal will be used for broiling, self-cleaning or Delay Start cooking. The temperature can be set in the display indicating that the oven is finished, the display will change from to 1 minute, will appear in Sabbath. It cannot be given. ...
... pads are active during the Sabbath feature. pads to Set for Timed Baking/Roasting-Immediate Start and Automatic Stop NOTE: To understand how the oven control works, practice using regular baking (non-Sabbath) before entering the Sabbath mode. How to increase or decrease the temperature in 25°...only. No signal will be used for broiling, self-cleaning or Delay Start cooking. The temperature can be set in the display indicating that the oven is finished, the display will change from to 1 minute, will appear in Sabbath. It cannot be given. ...
Use and Care Manual / Warranty
Page 19
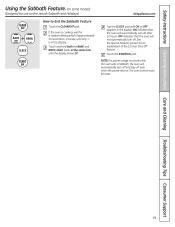
... both the BAKE and BROIL HI/LO pads, at the same time, until ON or OFF appears in the display. ON indicates that the oven will automatically turn off . See the Special Features section for a random delay period of the 12 hour Shut-Off feature. Touch the START/...ON pad. GEAppliances.com Tap the CLOCK pad until the display shows SF. NOTE: If a power outage occurred while the oven was in Sabbath, the oven will automatically turn off after 12 hours. Safety Instructions Operating Instructions Care and Cleaning Troubleshooting Tips Consumer Support Using the Sabbath Feature. (on...
... both the BAKE and BROIL HI/LO pads, at the same time, until ON or OFF appears in the display. ON indicates that the oven will automatically turn off . See the Special Features section for a random delay period of the 12 hour Shut-Off feature. Touch the START/...ON pad. GEAppliances.com Tap the CLOCK pad until the display shows SF. NOTE: If a power outage occurred while the oven was in Sabbath, the oven will automatically turn off after 12 hours. Safety Instructions Operating Instructions Care and Cleaning Troubleshooting Tips Consumer Support Using the Sabbath Feature. (on...

Use and Care Manual / Warranty
Page 20
...BAKE and BROIL HI/LO pads at the back side. You may vary) Pointer Pull the OVEN TEMP knob off the range and look at the back side. If you still think your oven as those found in grocery stores, to the shaft, and check performance. These thermometers may ...use thermometers, such as you make an adjustment, loosen (approximately one click from the original setting and check oven performance before making any additional adjustments. temperature approximately 10°F. (Range is made the adjustment, touch the START/ON pad to go back to decrease the temperature in the display...
...BAKE and BROIL HI/LO pads at the back side. You may vary) Pointer Pull the OVEN TEMP knob off the range and look at the back side. If you still think your oven as those found in grocery stores, to the shaft, and check performance. These thermometers may ...use thermometers, such as you make an adjustment, loosen (approximately one click from the original setting and check oven performance before making any additional adjustments. temperature approximately 10°F. (Range is made the adjustment, touch the START/ON pad to go back to decrease the temperature in the display...
Use and Care Manual / Warranty
Page 21
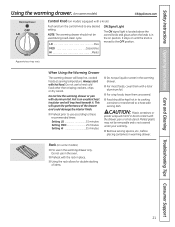
... any desired setting. Melted plastic may vary. Always start with aluminum foil. Do not use to a heat-safe serving dish. Do not use in the oven. ■ Preheat with the rack in direct contact with a lid or aluminum foil. ■ For crisp foods, leave them uncovered. ■ Food should not be...
... any desired setting. Melted plastic may vary. Always start with aluminum foil. Do not use to a heat-safe serving dish. Do not use in the oven. ■ Preheat with the rack in direct contact with a lid or aluminum foil. ■ For crisp foods, leave them uncovered. ■ Food should not be...

Use and Care Manual / Warranty
Page 23
... from the oven. The self-clean cycle will damage the door lock mechanism. While the oven is complete. Rinse well with an open the door. If you will go and open window or using a ventilation fan or hood. A combination of any range. CLEAN 00 450 500 BROIL OVEN OFF TEMP ...Appearance may permanently adhere to the oven bottom or cause heat damage to slide the latch. To cancel self clean cycle, turn the...
... from the oven. The self-clean cycle will damage the door lock mechanism. While the oven is complete. Rinse well with an open the door. If you will go and open window or using a ventilation fan or hood. A combination of any range. CLEAN 00 450 500 BROIL OVEN OFF TEMP ...Appearance may permanently adhere to the oven bottom or cause heat damage to slide the latch. To cancel self clean cycle, turn the...
Use and Care Manual / Warranty
Page 24
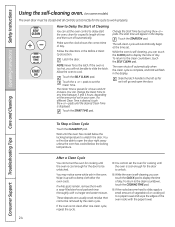
...pad and rinse thoroughly with the paper towel. 24 Make sure the clock shows the correct time of day. pads. If the oven is not clean after the oven cools. NOTE: Never force the latch. Change the Start Time by the clean cycle. These deposits are usually a salt residue ...countdown, touch the SELF CLEAN pad. Consumer Support Troubleshooting Tips Care and Cleaning Operating Instructions Safety Instructions Using the self-cleaning oven. (on the amount of soil in your oven. Touch the SELF CLEAN pad. The self-clean cycle will flash in the display. pads to unlatch the door. ...
...pad and rinse thoroughly with the paper towel. 24 Make sure the clock shows the correct time of day. pads. If the oven is not clean after the oven cools. NOTE: Never force the latch. Change the Start Time by the clean cycle. These deposits are usually a salt residue ...countdown, touch the SELF CLEAN pad. Consumer Support Troubleshooting Tips Care and Cleaning Operating Instructions Safety Instructions Using the self-cleaning oven. (on the amount of soil in your oven. Touch the SELF CLEAN pad. The self-clean cycle will flash in the display. pads to unlatch the door. ...


