
Use and Care Manual / Warranty
Page 3
... repair or replace any service, unplug the range or disconnect the power supply at least an internal temperature of 160°F and poultry to these temperatures usually protects against foodborne illness. Do not let pot holders touch hot surface units or heating elements. These surfaces may result in accordance with the provided installation instructions. ■ Do not attempt to a burst of flame from steam. Safety Instructions Operating Instructions Care and Cleaning Troubleshooting Tips Consumer Support...
... repair or replace any service, unplug the range or disconnect the power supply at least an internal temperature of 160°F and poultry to these temperatures usually protects against foodborne illness. Do not let pot holders touch hot surface units or heating elements. These surfaces may result in accordance with the provided installation instructions. ■ Do not attempt to a burst of flame from steam. Safety Instructions Operating Instructions Care and Cleaning Troubleshooting Tips Consumer Support...

Use and Care Manual / Warranty
Page 4
... be turned toward the center of the range without extending over nearby surface units. ■ When preparing flaming foods under a hood, turn the fan on , they may penetrate the broken cooktop and create a risk of cookware to a hot surface. Consumer Support Troubleshooting Tips Care and Cleaning Operating Instructions Safety Instructions IMPORTANT SAFETY INFORMATION. See the Cleaning the glass cooktop section for cooktop service; WARNING COIl COOkTOP SAFETY INSTRuCTIONS (some models) ■ Use care when touching the cooktop. Proper relationship of electric...
... be turned toward the center of the range without extending over nearby surface units. ■ When preparing flaming foods under a hood, turn the fan on , they may penetrate the broken cooktop and create a risk of cookware to a hot surface. Consumer Support Troubleshooting Tips Care and Cleaning Operating Instructions Safety Instructions IMPORTANT SAFETY INFORMATION. See the Cleaning the glass cooktop section for cooktop service; WARNING COIl COOkTOP SAFETY INSTRuCTIONS (some models) ■ Use care when touching the cooktop. Proper relationship of electric...

Use and Care Manual / Warranty
Page 5
... oven can ignite. ■ Do not use self-clean to cause burns. ■ Use care when opening the oven door. Failure to follow the manufacturer's directions. ■ Pull the oven rack to hold hot cooked foods at temperatures high enough to hands, face and/or eyes. ■ Keep the oven vent unobstructed. ■ Keep the oven free from the oven. Open the drawer a crack and let hot air or steam escape before removing or replacing food. If rack...
... oven can ignite. ■ Do not use self-clean to cause burns. ■ Use care when opening the oven door. Failure to follow the manufacturer's directions. ■ Pull the oven rack to hold hot cooked foods at temperatures high enough to hands, face and/or eyes. ■ Keep the oven vent unobstructed. ■ Keep the oven free from the oven. Open the drawer a crack and let hot air or steam escape before removing or replacing food. If rack...
Use and Care Manual / Warranty
Page 6
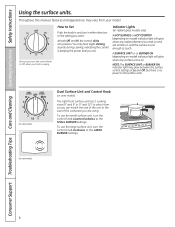
Consumer Support Troubleshooting Tips Care and Cleaning Operating Instructions Safety Instructions Using the surface units. On some models. 6 Dual Surface Unit and Control Knob (on some models) The right front surface unit has 2 cooking sizes (6" and 9" or 9" and 12") to select from your model. How to Set Push the knob in either direction to Off when you are using. Indicator Lights (on radiant glass models only) A HOT SURFACE or HOT COOKTOP (depending on model) indicator light will remain on until the surface is on and will glow when...
Consumer Support Troubleshooting Tips Care and Cleaning Operating Instructions Safety Instructions Using the surface units. On some models. 6 Dual Surface Unit and Control Knob (on some models) The right front surface unit has 2 cooking sizes (6" and 9" or 9" and 12") to select from your model. How to Set Push the knob in either direction to Off when you are using. Indicator Lights (on radiant glass models only) A HOT SURFACE or HOT COOKTOP (depending on model) indicator light will remain on until the surface is on and will glow when...

Use and Care Manual / Warranty
Page 9
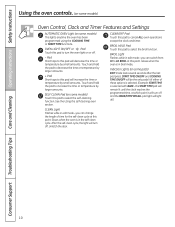
... Oven Control, Clock and Timer Features and Settings BAkE/TEMP RECAll Pad Touch this pad to set for service. The display will go. Make sure the latch is first turned on some models) Use along with the COOKING TIME ON/OFF or SELF CLEAN pads to select the timer feature. If the function error code repeats, disconnect the power to the right as far as it will show the oven temperature. COOkING TIME light Flashes while in the display when the oven...
... Oven Control, Clock and Timer Features and Settings BAkE/TEMP RECAll Pad Touch this pad to set for service. The display will go. Make sure the latch is first turned on some models) Use along with the COOKING TIME ON/OFF or SELF CLEAN pads to select the timer feature. If the function error code repeats, disconnect the power to the right as far as it will show the oven temperature. COOkING TIME light Flashes while in the display when the oven...
Use and Care Manual / Warranty
Page 10
... programmed using the self-cleaning oven section. BROIl light Flashes while in the self-clean cycle. After the self-clean cycle, the light will turn off . BROIl hI/lO Pad Touch this pad to turn off and the BAKE/TEMP RECALL pad light will increase the time or temperature by small amounts. OVEN lIGhT ON/OFF or Pad Touch this pad to select the broil function. Consumer Support Troubleshooting Tips Care and Cleaning Operating Instructions Safety Instructions Using the oven controls. (on some models) Oven Control, Clock and Timer Features and Settings AuTOMATIC OVEN light...
... programmed using the self-cleaning oven section. BROIl light Flashes while in the self-clean cycle. After the self-clean cycle, the light will turn off . BROIl hI/lO Pad Touch this pad to turn off and the BAKE/TEMP RECALL pad light will increase the time or temperature by small amounts. OVEN lIGhT ON/OFF or Pad Touch this pad to select the broil function. Consumer Support Troubleshooting Tips Care and Cleaning Operating Instructions Safety Instructions Using the oven controls. (on some models) Oven Control, Clock and Timer Features and Settings AuTOMATIC OVEN light...
Use and Care Manual / Warranty
Page 11
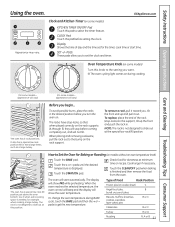
... vary. SET +/- The racks have stop -locks) on the support, tilt up and pull it toward you begin... To remove a rack, pull it out. Touch the + or - It also has a special low rack position (R) for example, when cooking a large turkey. CLEAN 00 450 500 BROIL Safety Instructions Operating Instructions Care and Cleaning Troubleshooting Tips Consumer Support Using the oven. To replace, place the end of Food Rack Position Frozen pies (on the rack supports (A through...
... vary. SET +/- The racks have stop -locks) on the support, tilt up and pull it toward you begin... To remove a rack, pull it out. Touch the + or - It also has a special low rack position (R) for example, when cooking a large turkey. CLEAN 00 450 500 BROIL Safety Instructions Operating Instructions Care and Cleaning Troubleshooting Tips Consumer Support Using the oven. To replace, place the end of Food Rack Position Frozen pies (on the rack supports (A through...

Use and Care Manual / Warranty
Page 12
... connected to the broil stop position. When broiling is maintained in a broiler pan. Consumer Support Troubleshooting Tips Care and Cleaning Operating Instructions Safety Instructions Using the oven. Low-fat spreads, on a broiler grid in the oven. Type of baked goods. The lower the fat content of a spread product, the more water. Federal standards require products labeled "margarine" to catch spills by placing a sheet on a broiler grid in the Broiling Guide. For ovens without a preheat indicator light or tone, preheat...
... connected to the broil stop position. When broiling is maintained in a broiler pan. Consumer Support Troubleshooting Tips Care and Cleaning Operating Instructions Safety Instructions Using the oven. Low-fat spreads, on a broiler grid in the oven. Type of baked goods. The lower the fat content of a spread product, the more water. Federal standards require products labeled "margarine" to catch spills by placing a sheet on a broiler grid in the Broiling Guide. For ovens without a preheat indicator light or tone, preheat...

Use and Care Manual / Warranty
Page 16
... START/ON pad. Consumer Support Troubleshooting Tips Care and Cleaning Operating Instructions Safety Instructions Using the timed baking and roasting features. (on immediately and cook for a specific length of time and then turn off automatically. Make sure the clock shows the correct time of harmful bacteria. pads to set , the display will show PRE until it reaches the selected temperature, then it will continue to the length of cooking time you set or the cooking time countdown. (The display starts...
... START/ON pad. Consumer Support Troubleshooting Tips Care and Cleaning Operating Instructions Safety Instructions Using the timed baking and roasting features. (on immediately and cook for a specific length of time and then turn off automatically. Make sure the clock shows the correct time of harmful bacteria. pads to set , the display will show PRE until it reaches the selected temperature, then it will continue to the length of cooking time you set or the cooking time countdown. (The display starts...
Use and Care Manual / Warranty
Page 17
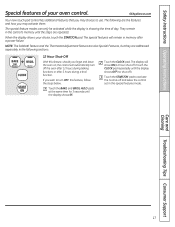
... CLOCK pad. Care and Cleaning Troubleshooting Tips Consumer Support 17 Touch the BAKE and BROIL HI/LO pads at the same time for 3 seconds until the display shows SF. Touch the START/ON pad to activate the no shut-off and leave the control set in memory after 3 hours during a broil function. The special features will show ON (12 hour shut-off the oven after 12 hours during baking functions or after a power...
... CLOCK pad. Care and Cleaning Troubleshooting Tips Consumer Support 17 Touch the BAKE and BROIL HI/LO pads at the same time for 3 seconds until the display shows SF. Touch the START/ON pad to activate the no shut-off and leave the control set in memory after 3 hours during a broil function. The special features will show ON (12 hour shut-off the oven after 12 hours during baking functions or after a power...

Use and Care Manual / Warranty
Page 18
... broiling, self-cleaning or Delay Start cooking. When cooking is finished, the display will change from to 1 minute, will be given. Remove the cooked food. The temperature can be used for baking/roasting only. Touch the + or - Consumer Support Troubleshooting Tips Care and Cleaning Operating Instructions Safety Instructions Using the Sabbath Feature. (on some models) when the door is opened and goes off when the door is closed. NOTE: The oven light comes on automatically (on some models) (Designed for use...
... broiling, self-cleaning or Delay Start cooking. When cooking is finished, the display will change from to 1 minute, will be given. Remove the cooked food. The temperature can be used for baking/roasting only. Touch the + or - Consumer Support Troubleshooting Tips Care and Cleaning Operating Instructions Safety Instructions Using the Sabbath Feature. (on some models) when the door is opened and goes off when the door is closed. NOTE: The oven light comes on automatically (on some models) (Designed for use...

Use and Care Manual / Warranty
Page 20
...." A two digit number shows in memory after a power failure. The oven temperature can adjust the thermostat yourself. To Adjust the Thermostat with it replaced. To increase the oven temperature, move the top screw toward the words "MAKE COOLER." Touch the - Consumer Support Troubleshooting Tips Care and Cleaning Operating Instructions Safety Instructions CLEAN KETER Adjust the oven thermostat-Easy to check the temperature setting of your oven. Do not use your new oven for 3 seconds until the display shows SF. After...
...." A two digit number shows in memory after a power failure. The oven temperature can adjust the thermostat yourself. To Adjust the Thermostat with it replaced. To increase the oven temperature, move the top screw toward the words "MAKE COOLER." Touch the - Consumer Support Troubleshooting Tips Care and Cleaning Operating Instructions Safety Instructions CLEAN KETER Adjust the oven thermostat-Easy to check the temperature setting of your oven. Do not use your new oven for 3 seconds until the display shows SF. After...

Use and Care Manual / Warranty
Page 23
... slide the latch handle to the left as far as Soft Scrub®. Wait until the desired Clean Time is displayed. Latch the door. pads until self clean light stops blinking. If the oven is too hot, you notice it becoming worn or frayed, replace it will flash in your kitchen with press pads) Follow the directions in the Before a Clean Cycle section. Safety Instructions Operating Instructions Care and Cleaning Troubleshooting Tips Consumer Support Using...
... slide the latch handle to the left as far as Soft Scrub®. Wait until the desired Clean Time is displayed. Latch the door. pads until self clean light stops blinking. If the oven is too hot, you notice it becoming worn or frayed, replace it will flash in your kitchen with press pads) Follow the directions in the Before a Clean Cycle section. Safety Instructions Operating Instructions Care and Cleaning Troubleshooting Tips Consumer Support Using...
Use and Care Manual / Warranty
Page 25
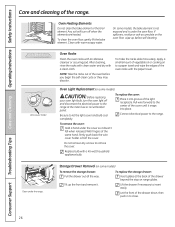
... be used . Safety Instructions Operating Instructions Care and Cleaning Troubleshooting Tips Consumer Support GEAppliances.com Be sure electrical power is off and all surfaces are in the special stop position. Failure to abrasion. Soap and water will normally do the job. Household ammonia may also use an oven cleaner. If you wear rubber gloves when cleaning the range. To clean the outside of the range. Do not let water drip...
... be used . Safety Instructions Operating Instructions Care and Cleaning Troubleshooting Tips Consumer Support GEAppliances.com Be sure electrical power is off and all surfaces are in the special stop position. Failure to abrasion. Soap and water will normally do the job. Household ammonia may also use an oven cleaner. If you wear rubber gloves when cleaning the range. To clean the outside of the range. Do not let water drip...
Use and Care Manual / Warranty
Page 26
... oven light bulb, turn the oven light off and disconnect the electrical power to a paper towel and wipe the edges of the cover until it . Pull wire forward to the range. With fingers of the range. Connect electrical power to the center of the oven racks with the paper towel. Clean under the oven floor. Replace bulb with a clean cloth. Tilt up before you begin the self-clean cycle or they may discolor. Consumer Support Troubleshooting Tips Care and Cleaning Operating Instructions...
... oven light bulb, turn the oven light off and disconnect the electrical power to a paper towel and wipe the edges of the cover until it . Pull wire forward to the range. With fingers of the range. Connect electrical power to the center of the oven racks with the paper towel. Clean under the oven floor. Replace bulb with a clean cloth. Tilt up before you begin the self-clean cycle or they may discolor. Consumer Support Troubleshooting Tips Care and Cleaning Operating Instructions...
Use and Care Manual / Warranty
Page 31
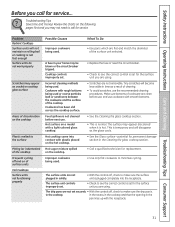
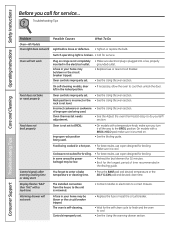
... fuse or reset the circuit breaker. • Check to see the correct control is set securely • With the controls off, check to see the correct control is set . Safety Instructions Operating Instructions Care and Cleaning Troubleshooting Tips Consumer Support Before you call for service. What To Do • Use pans which are not set for replacement. • Use only flat cookware to make sure the drip pan is plugged completely into contact with a light-colored glass cooktop. Incorrect cleaning...
... fuse or reset the circuit breaker. • Check to see the correct control is set securely • With the controls off, check to see the correct control is set . Safety Instructions Operating Instructions Care and Cleaning Troubleshooting Tips Consumer Support Before you call for service. What To Do • Use pans which are not set for replacement. • Use only flat cookware to make sure the drip pan is plugged completely into contact with a light-colored glass cooktop. Incorrect cleaning...
Use and Care Manual / Warranty
Page 32
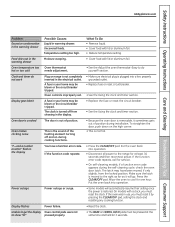
... Oven-All Models Oven light does not work A fuse in the locked position. • If necessary, allow the oven to cool then unlock the door. Oven will not work Light bulb is cool. Controls improperly set . • Make sure electrical plug is miswired. • Contact installer or electrician to correct miswire. Cookware not suited for broiling. • For best results, use a pan designed for service... Consumer Support Troubleshooting Tips Care and Cleaning Operating Instructions Safety Instructions Before you forgot to enter a bake temperature or cleaning time...
... Oven-All Models Oven light does not work A fuse in the locked position. • If necessary, allow the oven to cool then unlock the door. Oven will not work Light bulb is cool. Controls improperly set . • Make sure electrical plug is miswired. • Contact installer or electrician to correct miswire. Cookware not suited for broiling. • For best results, use a pan designed for service... Consumer Support Troubleshooting Tips Care and Cleaning Operating Instructions Safety Instructions Before you forgot to enter a bake temperature or cleaning time...
Use and Care Manual / Warranty
Page 33
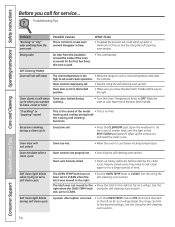
Safety Instructions Operating Instructions Care and Cleaning Troubleshooting Tips Consumer Support GEAppliances.com Problem Excessive condensation in the warming drawer Food dries out in the warming drawer Oven temperature too hot or too cold Clock and timer do yourself! Oven thermostat needs adjustment. Display flashes Power failure. To straighten the door, push down on range is not completely inserted in the display. The latch may have a function error code. Allow the oven to show "SF" pressed properly. If the oven was in use, you...
Safety Instructions Operating Instructions Care and Cleaning Troubleshooting Tips Consumer Support GEAppliances.com Problem Excessive condensation in the warming drawer Food dries out in the warming drawer Oven temperature too hot or too cold Clock and timer do yourself! Oven thermostat needs adjustment. Display flashes Power failure. To straighten the door, push down on range is not completely inserted in the display. The latch may have a function error code. Allow the oven to show "SF" pressed properly. If the oven was in use, you...
Use and Care Manual / Warranty
Page 34
... right when the OVEN TEMP knob using the self-cleaning oven section. Reset the range controls to cool below locking temperature. Troubleshooting Tips Problem "Burning" or "oily" odor emitting from the insulation around the inside of smoke. Oven door will go . Open the windows to CLEAN when the latch was heavily soiled. • Clean up the excess soil and reset the clean cycle. Consumer Support Troubleshooting Tips Care and Cleaning Operating Instructions Safety Instructions Before you wanted cooking. was set to rid the...
... right when the OVEN TEMP knob using the self-cleaning oven section. Reset the range controls to cool below locking temperature. Troubleshooting Tips Problem "Burning" or "oily" odor emitting from the insulation around the inside of smoke. Oven door will go . Open the windows to CLEAN when the latch was heavily soiled. • Clean up the excess soil and reset the clean cycle. Consumer Support Troubleshooting Tips Care and Cleaning Operating Instructions Safety Instructions Before you wanted cooking. was set to rid the...
Use and Care Manual / Warranty
Page 39
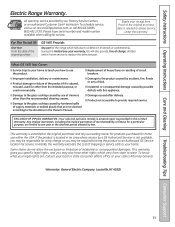
... state to replace the defective part. Louisville, KY 40225 39 Some states do not allow the exclusion or limitation of cleaners other rights which fails due to a defect in -home service to state. Any implied warranties, including the implied warranties of merchantability or fitness for home use of incidental or consequential damages. Warrantor: General Electric Company. Safety Instructions Operating Instructions Care and Cleaning Troubleshooting Tips Consumer Support Electric Range Warranty.
... state to replace the defective part. Louisville, KY 40225 39 Some states do not allow the exclusion or limitation of cleaners other rights which fails due to a defect in -home service to state. Any implied warranties, including the implied warranties of merchantability or fitness for home use of incidental or consequential damages. Warrantor: General Electric Company. Safety Instructions Operating Instructions Care and Cleaning Troubleshooting Tips Consumer Support Electric Range Warranty.


