
Use and Care Manual / Warranty
Page 3
... or impacting glass doors, cooktops or control panels. Introduction of fresh air at least an internal temperature of flame from steam. Smother a flaming pan on the cooktop may lead to cause burns. Shock, fire or cuts may occur. ■ Cook meat and poultry thoroughly-meat to at self-clean temperatures may ignite. ■ Clean ventilating hoods frequently. Do not force the door open. Turn the controls off and wait for warming or heating the room...
... or impacting glass doors, cooktops or control panels. Introduction of fresh air at least an internal temperature of flame from steam. Smother a flaming pan on the cooktop may lead to cause burns. Shock, fire or cuts may occur. ■ Cook meat and poultry thoroughly-meat to at self-clean temperatures may ignite. ■ Clean ventilating hoods frequently. Do not force the door open. Turn the controls off and wait for warming or heating the room...

Use and Care Manual / Warranty
Page 4
... temperature. ■ To minimize the possibility of burns, ignition of flammable materials and spillage, the handle of a container should be scratched with excessive amounts of the surface unit to cover the surface heating element. Some cleaners can trap heat or melt, resulting in ignition of electric shock. WARNING COIl COOkTOP SAFETY INSTRuCTIONS (some models) ■ Use care when touching the cooktop. Their absence during cooking could damage range parts and wiring...
... temperature. ■ To minimize the possibility of burns, ignition of flammable materials and spillage, the handle of a container should be scratched with excessive amounts of the surface unit to cover the surface heating element. Some cleaners can trap heat or melt, resulting in ignition of electric shock. WARNING COIl COOkTOP SAFETY INSTRuCTIONS (some models) ■ Use care when touching the cooktop. Their absence during cooking could damage range parts and wiring...

Use and Care Manual / Warranty
Page 5
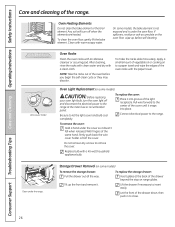
WARNING SElF-ClEANING OVEN SAFETY INSTRuCTIONS (Some models) The self-cleaning feature operates the oven at serving temperature. Only gray porcelain-coated oven racks may be hot enough to follow the manufacturer's directions. ■ Pull the oven rack to your home. ■ If the self-cleaning mode malfunctions, turn the oven off and disconnect the power supply. Failure to cause burns. ■ Use care when opening the oven door. Foil can ignite. ■ Do not use aluminum foil to burn away food...
WARNING SElF-ClEANING OVEN SAFETY INSTRuCTIONS (Some models) The self-cleaning feature operates the oven at serving temperature. Only gray porcelain-coated oven racks may be hot enough to follow the manufacturer's directions. ■ Pull the oven rack to your home. ■ If the self-cleaning mode malfunctions, turn the oven off and disconnect the power supply. Failure to cause burns. ■ Use care when opening the oven door. Foil can ignite. ■ Do not use aluminum foil to burn away food...
Use and Care Manual / Warranty
Page 6
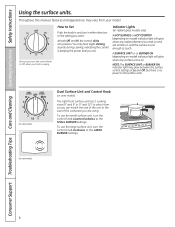
... some models. 6 Dual Surface Unit and Control Knob (on . How to Set Push the knob in and turn the control knob counterclockwise to the LARGE BURNER settings. At both Off and Hi the control clicks into position. Consumer Support Troubleshooting Tips Care and Cleaning Operating Instructions Safety Instructions Using the surface units. A SURFACE UNIT on or BURNER ON (depending on model) indicator light will remain on until the surface is no power to the setting you finish cooking. On some models. Throughout this manual, features and...
... some models. 6 Dual Surface Unit and Control Knob (on . How to Set Push the knob in and turn the control knob counterclockwise to the LARGE BURNER settings. At both Off and Hi the control clicks into position. Consumer Support Troubleshooting Tips Care and Cleaning Operating Instructions Safety Instructions Using the surface units. A SURFACE UNIT on or BURNER ON (depending on model) indicator light will remain on until the surface is no power to the setting you finish cooking. On some models. Throughout this manual, features and...

Use and Care Manual / Warranty
Page 9
... the timer or automatic oven operations. Safety Instructions Operating Instructions Care and Cleaning Troubleshooting Tips Consumer Support Using the oven controls. (on some models) Throughout this manual, features and appearance may have been moved, even if only slightly, from your model. GEAppliances.com or or Oven Control, Clock and Timer Features and Settings BAkE/TEMP RECAll Pad Touch this pad to select the timer feature. BAkE light Flashes while in the bake, broil or selfcleaning mode and the times set the oven to cook. Glows when the oven is reset. START/ON...
... the timer or automatic oven operations. Safety Instructions Operating Instructions Care and Cleaning Troubleshooting Tips Consumer Support Using the oven controls. (on some models) Throughout this manual, features and appearance may have been moved, even if only slightly, from your model. GEAppliances.com or or Oven Control, Clock and Timer Features and Settings BAkE/TEMP RECAll Pad Touch this pad to select the timer feature. BAkE light Flashes while in the bake, broil or selfcleaning mode and the times set the oven to cook. Glows when the oven is reset. START/ON...

Use and Care Manual / Warranty
Page 16
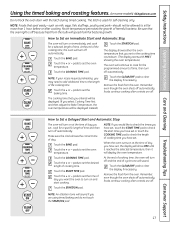
... not lock the oven door with PRE if showing the oven temperature.) The oven will sound if you want the oven to cook for the programmed amount of time, then turn off automatically. The latch is off and the end of cycle tone will speed harmful bacteria growth. Touch the BAKE pad. Touch the START/ON pad. Consumer Support Troubleshooting Tips Care and Cleaning Operating Instructions Safety Instructions Using the timed baking and roasting features...
... not lock the oven door with PRE if showing the oven temperature.) The oven will sound if you want the oven to cook for the programmed amount of time, then turn off automatically. The latch is off and the end of cycle tone will speed harmful bacteria growth. Touch the BAKE pad. Touch the START/ON pad. Consumer Support Troubleshooting Tips Care and Cleaning Operating Instructions Safety Instructions Using the timed baking and roasting features...

Use and Care Manual / Warranty
Page 23
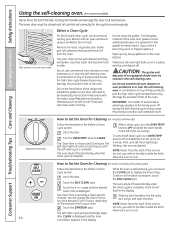
... time countdown appears in your kitchen with clean water and dry. The oven racks can be cleaned by hand. If you can change the Clean Time to be self-cleaned, but they will go and open window or using a ventilation fan or hood. Latch the door. Turn the OVEN TEMP knob to cool. Allow the oven to CLEAN. To return to another well ventilated room. pads until self clean light stops blinking. The self-clean cycle will come...
... time countdown appears in your kitchen with clean water and dry. The oven racks can be cleaned by hand. If you can change the Clean Time to be self-cleaned, but they will go and open window or using a ventilation fan or hood. Latch the door. Turn the OVEN TEMP knob to cool. Allow the oven to CLEAN. To return to another well ventilated room. pads until self clean light stops blinking. The self-clean cycle will come...
Use and Care Manual / Warranty
Page 26
... remove any screws to let the light cover and bulb cool completely. Clean under the cover so it doesn't fall when released. To replace the storage drawer: Insert glides at the main fuse or circuit breaker panel. Wire cover holder Oven Racks Clean the oven racks with a 40-watt household appliance bulb. With fingers of the drawer beyond the stop on some models) CAUTION: Before replacing your oven light bulb, turn the oven light off and disconnect the electrical power...
... remove any screws to let the light cover and bulb cool completely. Clean under the cover so it doesn't fall when released. To replace the storage drawer: Insert glides at the main fuse or circuit breaker panel. Wire cover holder Oven Racks Clean the oven racks with a 40-watt household appliance bulb. With fingers of the drawer beyond the stop on some models) CAUTION: Before replacing your oven light bulb, turn the oven light off and disconnect the electrical power...
Use and Care Manual / Warranty
Page 31
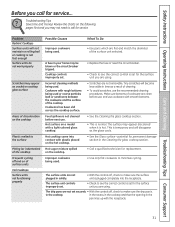
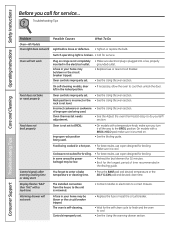
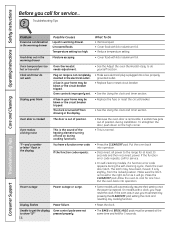
... removable. in the recess in the cooktop and that the opening in the cooktop. Food spillovers not cleaned before use, and use . This is in the pan lines up with a light-colored glass cooktop. The surface unit controls improperly set for the surface unit you are using . • Scratches are using . Safety Instructions Operating Instructions Care and Cleaning Troubleshooting Tips Consumer Support Before you may not need to call for service... What To Do • Use pans which are not set...
... removable. in the recess in the cooktop and that the opening in the cooktop. Food spillovers not cleaned before use, and use . This is in the pan lines up with a light-colored glass cooktop. The surface unit controls improperly set for the surface unit you are using . • Scratches are using . Safety Instructions Operating Instructions Care and Cleaning Troubleshooting Tips Consumer Support Before you may not need to call for service... What To Do • Use pans which are not set...
Use and Care Manual / Warranty
Page 32
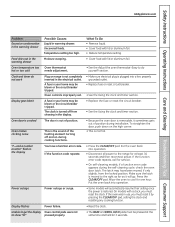
... self-cleaning models, door left in your home may be blown or the circuit breaker tripped. Incorrect cookware or cookware of time recommended in your home may be low. • Preheat the broil element for 10 minutes. • Broil for service. The oven is not set . • Replace the fuse or reset the circuit breaker. • Wait for service... Controls improperly set to BROIL. Consumer Support Troubleshooting Tips Care and Cleaning Operating Instructions Safety Instructions Before you forgot to enter a bake temperature...
... self-cleaning models, door left in your home may be blown or the circuit breaker tripped. Incorrect cookware or cookware of time recommended in your home may be low. • Preheat the broil element for 10 minutes. • Broil for service. The oven is not set . • Replace the fuse or reset the circuit breaker. • Wait for service... Controls improperly set to BROIL. Consumer Support Troubleshooting Tips Care and Cleaning Operating Instructions Safety Instructions Before you forgot to enter a bake temperature...
Use and Care Manual / Warranty
Page 33
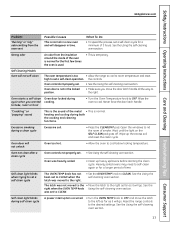
... reset the clock. The door is out of position during cooking functions. If the function code repeats: Power outage Power outage or surge. The latch may be blown or the circuit breaker tripped. Oven controls improperly set. Oven makes clicking noise "F-and a number or letter" flash in the display. Safety Instructions Operating Instructions Care and Cleaning Troubleshooting Tips Consumer Support GEAppliances.com Problem Excessive condensation in the warming drawer Food dries out in the warming drawer Oven temperature too hot or too cold Clock...
... reset the clock. The door is out of position during cooking functions. If the function code repeats: Power outage Power outage or surge. The latch may be blown or the circuit breaker tripped. Oven controls improperly set. Oven makes clicking noise "F-and a number or letter" flash in the display. Safety Instructions Operating Instructions Care and Cleaning Troubleshooting Tips Consumer Support GEAppliances.com Problem Excessive condensation in the warming drawer Food dries out in the warming drawer Oven temperature too hot or too cold Clock...
Use and Care Manual / Warranty
Page 34
... the metal • This is temporary. Reset the range controls to self-clean again or for the first few times the oven is used. • This is normal. Never force the door latch handle. Oven starts a self-clean Oven door locked during self clean cycle A power interruption occurred. • Turn the OVEN TEMP knob to OFF and move the door latch handle all the way to OFF. Consumer Support Troubleshooting Tips Care and Cleaning Operating Instructions Safety Instructions Before you move the latch to the...
... the metal • This is temporary. Reset the range controls to self-clean again or for the first few times the oven is used. • This is normal. Never force the door latch handle. Oven starts a self-clean Oven door locked during self clean cycle A power interruption occurred. • Turn the OVEN TEMP knob to OFF and move the door latch handle all the way to OFF. Consumer Support Troubleshooting Tips Care and Cleaning Operating Instructions Safety Instructions Before you move the latch to the...
Installation Instructions
Page 4
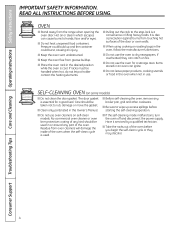
... self-cleaning the oven, remove any part of the door or oven walls. Hot air or steam which escapes can catch on some models) I Keep the oven vent unobstructed. I Do not leave paper products, cooking utensils or food in the oven when not in lifting heavy foods. READ ALL INSTRUCTIONS BEFORE USING. SELF-CLEANING OVEN (on fire. Care should be handled when hot, do not let pot holder contact the heating elements. Consumer Support Troubleshooting Tips Care and Cleaning Operating Instructions Safety Instructions...
... self-cleaning the oven, remove any part of the door or oven walls. Hot air or steam which escapes can catch on some models) I Keep the oven vent unobstructed. I Do not leave paper products, cooking utensils or food in the oven when not in lifting heavy foods. READ ALL INSTRUCTIONS BEFORE USING. SELF-CLEANING OVEN (on fire. Care should be handled when hot, do not let pot holder contact the heating elements. Consumer Support Troubleshooting Tips Care and Cleaning Operating Instructions Safety Instructions...
Installation Instructions
Page 17
... after controls are off. Room temperature promotes the growth of day. At the end of the cooking time, the oven will turn on immediately and cook for a selected length of time. pads to set the desired length of cooking time. NOTE: An attention tone will sound. SSaaffeettyy Instrruuccttiioonnss OOppeerraattiinng Insttrruuccttioionnss Care and Cleaning Troubleshooting Tips Consumer Support Using the timed baking and roasting features. (on some models) GEAppliances.com Do not lock the oven door...
... after controls are off. Room temperature promotes the growth of day. At the end of the cooking time, the oven will turn on immediately and cook for a selected length of time. pads to set the desired length of cooking time. NOTE: An attention tone will sound. SSaaffeettyy Instrruuccttiioonnss OOppeerraattiinng Insttrruuccttioionnss Care and Cleaning Troubleshooting Tips Consumer Support Using the timed baking and roasting features. (on some models) GEAppliances.com Do not lock the oven door...
Installation Instructions
Page 24
... range. Turn the OVEN TEMP knob to the clean countdown, touch the SELF CLEAN pad. The self clean light will go. After a clean cycle, turn OVEN TEMP knob to off and slide latch to left as far as it will damage the door lock mechanism. Touch the SELF CLEAN pad. You can change the Clean Time to any time between 3 and 5 hours, depending Slide the latch handle to slide. Wipe up any broiler pan, broiler grid, all controls set correctly for Cleaning (on models with hot...
... range. Turn the OVEN TEMP knob to the clean countdown, touch the SELF CLEAN pad. The self clean light will go. After a clean cycle, turn OVEN TEMP knob to off and slide latch to left as far as it will damage the door lock mechanism. Touch the SELF CLEAN pad. You can change the Clean Time to any time between 3 and 5 hours, depending Slide the latch handle to slide. Wipe up any broiler pan, broiler grid, all controls set correctly for Cleaning (on models with hot...
Installation Instructions
Page 26
... surfaces are in the special stop position. Do not let water drip into any reason, be cleaned with a high sugar or acid content (such as milk, tomatoes, sauerkraut, fruit juices or pie filling) to run into the vent openings. Consumer Support Troubleshooting Tips Care and Cleaning Operating Instructions Safety Instructions Care and cleaning of the door: I Do not allow for cleaning. Do not spray oven cleaner on the electrical controls and switches...
... surfaces are in the special stop position. Do not let water drip into any reason, be cleaned with a high sugar or acid content (such as milk, tomatoes, sauerkraut, fruit juices or pie filling) to run into the vent openings. Consumer Support Troubleshooting Tips Care and Cleaning Operating Instructions Safety Instructions Care and cleaning of the door: I Do not allow for cleaning. Do not spray oven cleaner on the electrical controls and switches...
Installation Instructions
Page 34
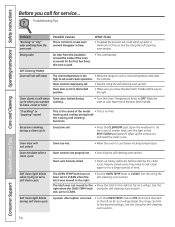
Review the charts on the cooktop. The surface units are not set securely • With the controls off, check to make sure the surface unit is normal. The drip pans are not plugged in the pan lines up with a light-colored glass cooktop. Cookware with rough bottoms being used . Improper cookware being used . Consumer Support Troubleshooting Tips Care and Cleaning Operating Instructions Safety Instructions Before you are using . Cooktop controls improperly set for the surface unit you call for service. Hot sugar mixture...
Review the charts on the cooktop. The surface units are not set securely • With the controls off, check to make sure the surface unit is normal. The drip pans are not plugged in the pan lines up with a light-colored glass cooktop. Cookware with rough bottoms being used . Improper cookware being used . Consumer Support Troubleshooting Tips Care and Cleaning Operating Instructions Safety Instructions Before you are using . Cooktop controls improperly set for the surface unit you call for service. Hot sugar mixture...
Installation Instructions
Page 36
... during installation. Troubleshooting Tips Problem Excessive condensation in the warming drawer Possible Causes Liquid in the display. • Replace the fuse or reset the circuit breaker. • See the Using the clock and timer section. Oven door is crooked Oven makes clicking noise The door is normal. Display flashes Power failure. • Reset the clock. Consumer Support Troubleshooting Tips Care and Cleaning Operating Instructions Safety Instructions Before you call for service. • On self-cleaning models, if a function error code appears during the self-cleaning...
... during installation. Troubleshooting Tips Problem Excessive condensation in the warming drawer Possible Causes Liquid in the display. • Replace the fuse or reset the circuit breaker. • See the Using the clock and timer section. Oven door is crooked Oven makes clicking noise The door is normal. Display flashes Power failure. • Reset the clock. Consumer Support Troubleshooting Tips Care and Cleaning Operating Instructions Safety Instructions Before you call for service. • On self-cleaning models, if a function error code appears during the self-cleaning...
Installation Instructions
Page 37
... far as it will not unlock Oven too hot. • Allow the oven to set . • See the Using the self-cleaning oven section. Wipe up heavy spillovers before starting the clean cycle. Reset the range controls to CLEAN. The latch was moved to the right. • Set the OVEN TEMP knob to the desired settings. Oven door is not in time. SSaaffeettyy Instrruuccttiioonnss OOppeerraattiinng Insttrruuccttioionnss Care and Cleaning Troubleshooting Tips Consumer Support GEAppliances.com Problem "Burning" or "oily" odor...
... far as it will not unlock Oven too hot. • Allow the oven to set . • See the Using the self-cleaning oven section. Wipe up heavy spillovers before starting the clean cycle. Reset the range controls to CLEAN. The latch was moved to the right. • Set the OVEN TEMP knob to the desired settings. Oven door is not in time. SSaaffeettyy Instrruuccttiioonnss OOppeerraattiinng Insttrruuccttioionnss Care and Cleaning Troubleshooting Tips Consumer Support GEAppliances.com Problem "Burning" or "oily" odor...
Installation Instructions
Page 39
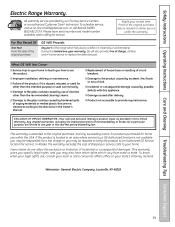
... Insttrruuccttioionnss Care and Cleaning Troubleshooting Tips Consumer Support Electric Range Warranty. What GE Will Not Cover: I Damage to one -year warranty, GE will also provide, free of charge, all labor and in an area where service by accident, fire, floods or acts of merchantability or fitness for a trip charge or you may also have serial number and model number available when calling for home use the product. All warranty service...
... Insttrruuccttioionnss Care and Cleaning Troubleshooting Tips Consumer Support Electric Range Warranty. What GE Will Not Cover: I Damage to one -year warranty, GE will also provide, free of charge, all labor and in an area where service by accident, fire, floods or acts of merchantability or fitness for a trip charge or you may also have serial number and model number available when calling for home use the product. All warranty service...


