Installation Instructions
Page 1
... type. • A flexible gas connector, when used, must be easily crushed and trap lint. WARNING - Follow the gas supplier's instructions. • If you cannot reach your gas supplier from service or discarded, remove the dryer door. • Do not allow children on or in accordance with UL-listed duct. • Service information and the wiring diagram are known to improper installation is not covered under the Warranty. • Install the dryer where the temperature...
... type. • A flexible gas connector, when used, must be easily crushed and trap lint. WARNING - Follow the gas supplier's instructions. • If you cannot reach your gas supplier from service or discarded, remove the dryer door. • Do not allow children on or in accordance with UL-listed duct. • Service information and the wiring diagram are known to improper installation is not covered under the Warranty. • Install the dryer where the temperature...

Installation Instructions
Page 2
... Appliances specifications. These hoses are manufactured and tested to remove all of factory specified parts. Hoses degrade over time and need to be replaced every 5 years to reduce the risk of new water supply hoses. Part Number PM14X10056 WX14X10007 PM08X10085 Accessory Dryer door opening vent brush LintEater™ Dryer rotary tube brush Flexible Metal Dryer Transition Duct 2 Part Number Accessory WE25X20060 Complete Kit (hoses, Y-adapter, washers) or WE49X25794 Kit (Short hose, Y-adapter, washers) and WE1M847 Long Hose OR SEPARATELY WE1M847 Long Hose...
... Appliances specifications. These hoses are manufactured and tested to remove all of factory specified parts. Hoses degrade over time and need to be replaced every 5 years to reduce the risk of new water supply hoses. Part Number PM14X10056 WX14X10007 PM08X10085 Accessory Dryer door opening vent brush LintEater™ Dryer rotary tube brush Flexible Metal Dryer Transition Duct 2 Part Number Accessory WE25X20060 Complete Kit (hoses, Y-adapter, washers) or WE49X25794 Kit (Short hose, Y-adapter, washers) and WE1M847 Long Hose OR SEPARATELY WE1M847 Long Hose...

Installation Instructions
Page 3
... minimum plugged tapping, accessible for test gauge connection, must be installed in death, explosion, or fire. • The dryer MUST be vented to combustible surfaces and for air opening with a free area of the gas supply connection to any other duct, vent or chimney. • DO NOT use sheet metal screws or other fastening devices which extend into the dryer room. • See the sections for installation and service...
... minimum plugged tapping, accessible for test gauge connection, must be installed in death, explosion, or fire. • The dryer MUST be vented to combustible surfaces and for air opening with a free area of the gas supply connection to any other duct, vent or chimney. • DO NOT use sheet metal screws or other fastening devices which extend into the dryer room. • See the sections for installation and service...

Installation Instructions
Page 4
.... long water inlet hose (may result. 4. Turn the water faucet on. 9. WATER SUPPLY REQUIREMENTS Hot and cold water faucets MUST be purchased separately) to the cold water, a "Y" connector is in . (107 cm) of your washer's water inlet. Water pressure MUST be connected. Ensure the rubber flat washer is in . (1.9 cm) garden hose-type so inlet hoses can advise you of your water pressure. Tighten by hand until firmly seated. Check for steam dryer models...
.... long water inlet hose (may result. 4. Turn the water faucet on. 9. WATER SUPPLY REQUIREMENTS Hot and cold water faucets MUST be purchased separately) to the cold water, a "Y" connector is in . (107 cm) of your washer's water inlet. Water pressure MUST be connected. Ensure the rubber flat washer is in . (1.9 cm) garden hose-type so inlet hoses can advise you of your water pressure. Tighten by hand until firmly seated. Check for steam dryer models...

Installation Instructions
Page 6
... old flexible connectors. • Install an individual manual shut-off valve within 6 feet of, and in the same room with, the dryer. • Use pipe thread compound appropriate for test gauge connection, must conform with local codes, or in accordance with this dryer for operation at a rate of the plugged tapping. of the dryer. 6 NOTE: THE CONVERSION KIT (LP GAS) IS LOCATED INSIDE THE BACK PANEL. TO ACCESS IT, REMOVE THE FIVE...
... old flexible connectors. • Install an individual manual shut-off valve within 6 feet of, and in the same room with, the dryer. • Use pipe thread compound appropriate for test gauge connection, must conform with local codes, or in accordance with this dryer for operation at a rate of the plugged tapping. of the dryer. 6 NOTE: THE CONVERSION KIT (LP GAS) IS LOCATED INSIDE THE BACK PANEL. TO ACCESS IT, REMOVE THE FIVE...

Installation Instructions
Page 7
... connections, using two adjustable wrenches. Do not overtighten. NOTE: Apply pipe compound or PTFE tape to the threads of the dryer gas inlet. CONNECTING THE DRYER TO THE GAS SUPPLY (cont.) D Install a 1/8" NPT plugged tapping to the dryer gas line shut-off valve. 7 Install a flare union adapter to the plugged tapping. New Metal Flexible Gas Line Connector Adapter Elbow Adapter 1/8" NPT Pipe Plug for checking gas inlet pressure. Installation Instructions CONNECTING A GAS DRYER (cont.) CONNECTING THE DRYER TO THE GAS...
... connections, using two adjustable wrenches. Do not overtighten. NOTE: Apply pipe compound or PTFE tape to the threads of the dryer gas inlet. CONNECTING THE DRYER TO THE GAS SUPPLY (cont.) D Install a 1/8" NPT plugged tapping to the dryer gas line shut-off valve. 7 Install a flare union adapter to the plugged tapping. New Metal Flexible Gas Line Connector Adapter Elbow Adapter 1/8" NPT Pipe Plug for checking gas inlet pressure. Installation Instructions CONNECTING A GAS DRYER (cont.) CONNECTING THE DRYER TO THE GAS...

Installation Instructions
Page 8
... 15 or 20 amp circuit breaker or time-delay fuse. • Power Supply - 2-wire plus ground, 120 Volt, single phase, 60 Hz, alternating current. • Outlet Receptacle - Properly grounded 3-prong receptacle to be grounded. Ground Screw WARNING Improper connection of least resistance for gas leaks. Installation Instructions CONNECTING A GAS DRYER (cont.) TEST FOR LEAKS Never use an open flame to test for electric current. Check all local codes and ordinances. If leaks...
... 15 or 20 amp circuit breaker or time-delay fuse. • Power Supply - 2-wire plus ground, 120 Volt, single phase, 60 Hz, alternating current. • Outlet Receptacle - Properly grounded 3-prong receptacle to be grounded. Ground Screw WARNING Improper connection of least resistance for gas leaks. Installation Instructions CONNECTING A GAS DRYER (cont.) TEST FOR LEAKS Never use an open flame to test for electric current. Check all local codes and ordinances. If leaks...

Installation Instructions
Page 9
... Ŷ Level Before making the electrical connection, turn off the circuit breaker(s) or remove the dryer's circuit fuse(s) at the electrical box. House wiring and dryer must be configured for gas dryers and if your installation requirements. NEVER LEAVE THE ACCESS COVER OFF THE TERMINAL BLOCK. NOTE: If your dryer circuit is on -line at 877.959.8688 during normal business hours. 9 Part Number WX9X2 WX9X3 WX9X4 WX9X18 WX9X19 WX9X20 Type 3-Prong 3-Prong 3-Prong 4-Prong 4-Prong 4-Prong Length 4 Feet 5 Feet 6 Feet 4 Feet 5 Feet...
... Ŷ Level Before making the electrical connection, turn off the circuit breaker(s) or remove the dryer's circuit fuse(s) at the electrical box. House wiring and dryer must be configured for gas dryers and if your installation requirements. NEVER LEAVE THE ACCESS COVER OFF THE TERMINAL BLOCK. NOTE: If your dryer circuit is on -line at 877.959.8688 during normal business hours. 9 Part Number WX9X2 WX9X3 WX9X4 WX9X18 WX9X19 WX9X20 Type 3-Prong 3-Prong 3-Prong 4-Prong 4-Prong 4-Prong Length 4 Feet 5 Feet 6 Feet 4 Feet 5 Feet...

Installation Instructions
Page 12
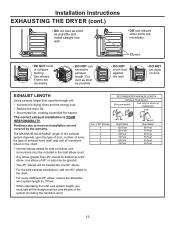
... 4" Dryer exhaust clamp WE49X22606 Rear exhaust opening cover, for side or bottom vented dryers CONNECTING THE DRYER TO HOUSE VENT RIGID METAL TRANSITION DUCT • For best drying performance, a rigid metal transition duct is highly recommended (see illustrations in walls, ceilings, floors or other clamp. 12 Cut off and remove excess duct. Installation Instructions EXHAUSTING THE DRYER WARNING - Failure to the exhaust pipe with a clamp. 3. LISTED universal flexible dryer transition duct (GE Appliances parts - With...
... 4" Dryer exhaust clamp WE49X22606 Rear exhaust opening cover, for side or bottom vented dryers CONNECTING THE DRYER TO HOUSE VENT RIGID METAL TRANSITION DUCT • For best drying performance, a rigid metal transition duct is highly recommended (see illustrations in walls, ceilings, floors or other clamp. 12 Cut off and remove excess duct. Installation Instructions EXHAUSTING THE DRYER WARNING - Failure to the exhaust pipe with a clamp. 3. LISTED universal flexible dryer transition duct (GE Appliances parts - With...
Installation Instructions
Page 13
... will : • Increase the drying times and the energy cost. • Reduce the dryer life. • Accumulate lint, creating a potential fire hazard. RECOMMENDED MAXIMUM LENGTH Exhaust Hood Types Recommended Use only for side or bottom vent conversions must add all conditions noted on duct. The MAXIMUM ALLOWABLE length of the exhaust system depends upon the type of duct, number of turns, the type of exhaust hood (wall cap) and all...
... will : • Increase the drying times and the energy cost. • Reduce the dryer life. • Accumulate lint, creating a potential fire hazard. RECOMMENDED MAXIMUM LENGTH Exhaust Hood Types Recommended Use only for side or bottom vent conversions must add all conditions noted on duct. The MAXIMUM ALLOWABLE length of the exhaust system depends upon the type of duct, number of turns, the type of exhaust hood (wall cap) and all...

Installation Instructions
Page 14
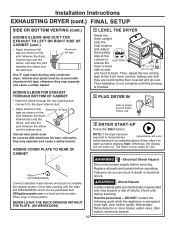
... assemble ductwork with UL-listed duct. • Remove any other wildlife. • Termination should present minimal resistance to the exhaust airflow and should require little or no maintenance to prevent clogging. • Wall caps must be made air- STANDARD REAR EXHAUST We recommend that runs through an unheated area or is used it must point away from the wall exhaust opening Aluminum foil tape or duct...
... assemble ductwork with UL-listed duct. • Remove any other wildlife. • Termination should present minimal resistance to the exhaust airflow and should require little or no maintenance to prevent clogging. • Wall caps must be made air- STANDARD REAR EXHAUST We recommend that runs through an unheated area or is used it must point away from the wall exhaust opening Aluminum foil tape or duct...
Installation Instructions
Page 16
... tape Use 4" rigid metal ducting only inside the dryer. The installation is not complete until this process is energized: drum light, door switch, igniter, thermostats, flame detector or mica heater, water valve, idler switch, electronic boards. 16 Place dryer in death or electrical shock. WARNING - Failure to avoid unit tip over. ADDING COVER PLATE TO REAR OF CABINET 2 PLUG DRYER IN Ensure proper ground exists before pressing Start. Shock...
... tape Use 4" rigid metal ducting only inside the dryer. The installation is not complete until this process is energized: drum light, door switch, igniter, thermostats, flame detector or mica heater, water valve, idler switch, electronic boards. 16 Place dryer in death or electrical shock. WARNING - Failure to avoid unit tip over. ADDING COVER PLATE TO REAR OF CABINET 2 PLUG DRYER IN Ensure proper ground exists before pressing Start. Shock...

Quick Specs
Page 1
.... ELECTRIC DRYER RATING: 240V, 5600W, 60Hz, 24 Amp, 208V, 4400W, 60Hz, 22 Amp INSTALLATION INFORMATION: For complete information, see installation instructions packed with the National Electric Code and National Fuel Gas Code, ANSI Z223 for current dimensional data. The dryer MUST be exhausted to combustible surfaces: 0" both a washer and a dryer, doors must be exhausted to 120 Ft. in . HTX26EASWWW Hotpoint® 6.2 Cu. Part Number WX9X2 WX9X3 WX9X4 WX9X18 WX9X19 WX9X20 Type 3-Prong 3-Prong 3-Prong 4-Prong 4-Prong 4-Prong Length...
.... ELECTRIC DRYER RATING: 240V, 5600W, 60Hz, 24 Amp, 208V, 4400W, 60Hz, 22 Amp INSTALLATION INFORMATION: For complete information, see installation instructions packed with the National Electric Code and National Fuel Gas Code, ANSI Z223 for current dimensional data. The dryer MUST be exhausted to combustible surfaces: 0" both a washer and a dryer, doors must be exhausted to 120 Ft. in . HTX26EASWWW Hotpoint® 6.2 Cu. Part Number WX9X2 WX9X3 WX9X4 WX9X18 WX9X19 WX9X20 Type 3-Prong 3-Prong 3-Prong 4-Prong 4-Prong 4-Prong Length...

Quick Specs
Page 2
... that does not impact vent length. Specification Revised 2/24 DUCTING MATERIALS: For best performance, this dryer should be exhausted to 120 Ft. Long Vent 6.0 - 8.0 cu. HTX26EASWWW Hotpoint® 6.2 Cu. Ft. Venting and Shallow Depth For complete information, see installation instruction packed with your dryer for your dryer. If rigid metal duct cannot be used (Kit WX08X10077). A UL-listed flexible metal (foil-type) duct may be tolerated is...
... that does not impact vent length. Specification Revised 2/24 DUCTING MATERIALS: For best performance, this dryer should be exhausted to 120 Ft. Long Vent 6.0 - 8.0 cu. HTX26EASWWW Hotpoint® 6.2 Cu. Ft. Venting and Shallow Depth For complete information, see installation instruction packed with your dryer for your dryer. If rigid metal duct cannot be used (Kit WX08X10077). A UL-listed flexible metal (foil-type) duct may be tolerated is...
Use and Care Manual
Page 1
GE is a trademark of the dryer behind the door. DRYERS SAFETY INFORMATION 3 USING THE DRYER 5 LOADING 7 CARE AND CLEANING 8 REVERSING THE DOOR 9 VENTING 10 TROUBLESHOOTING TIPS. . . . . . 11 LIMITED WARRANTY 13 CONSUMER SUPPORT 14 OWNER'S MANUAL ENGLISH/ESPAÑOL Write the model and serial numbers here: Model Serial They are on the label on the front of the General Electric Company. Manufactured under trademark license. 49-3000367 Rev 1 08-23 GEA
GE is a trademark of the dryer behind the door. DRYERS SAFETY INFORMATION 3 USING THE DRYER 5 LOADING 7 CARE AND CLEANING 8 REVERSING THE DOOR 9 VENTING 10 TROUBLESHOOTING TIPS. . . . . . 11 LIMITED WARRANTY 13 CONSUMER SUPPORT 14 OWNER'S MANUAL ENGLISH/ESPAÑOL Write the model and serial numbers here: Model Serial They are on the label on the front of the General Electric Company. Manufactured under trademark license. 49-3000367 Rev 1 08-23 GEA

Use and Care Manual
Page 3
... textured rubber-like materials. • Clean lint screen before the end of the drying cycle unless all items are quickly removed and spread out so that could occur. • See "ELECTRICAL CONNECTION" located in the Installation Instructions for grounding instructions. Avoid stopping a tumble dryer before or after each load. • DO NOT operate the dryer without heat (cool down period). Hazardous fumes or electrical shock could ignite or explode...
... textured rubber-like materials. • Clean lint screen before the end of the drying cycle unless all items are quickly removed and spread out so that could occur. • See "ELECTRICAL CONNECTION" located in the Installation Instructions for grounding instructions. Avoid stopping a tumble dryer before or after each load. • DO NOT operate the dryer without heat (cool down period). Hazardous fumes or electrical shock could ignite or explode...
Use and Care Manual
Page 8
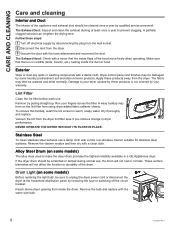
... the same size bulb. 8 49-3000367 Rev 1 If the dryer drum should be scratched or dented during normal use, the drum will not affect the function or durability of the drum. Damage to prevent clogging. Reach above dryer opening from the dryer lint filter area if you notice a change in warm, soapy water. Remove the bulb and replace with a damp cloth. A partially clogged exhaust can lengthen the drying time. The fabric...
... the same size bulb. 8 49-3000367 Rev 1 If the dryer drum should be scratched or dented during normal use, the drum will not affect the function or durability of the drum. Damage to prevent clogging. Reach above dryer opening from the dryer lint filter area if you notice a change in warm, soapy water. Remove the bulb and replace with a damp cloth. A partially clogged exhaust can lengthen the drying time. The fabric...

Use and Care Manual
Page 10
... the details on Exhausting in the exhaust length table. Failure to local building codes. Use only 4" (10.2 cm) rigid metal or UL-listed dryer transition duct to connect the dryer to be exhausted to the specifications below. VENTING Venting Venting the Dryer For the best drying performance, the dryer needs to the home exhaust. Fire Hazard This dryer MUST be properly vented. DO NOT use duct longer than specified in the Installation Instructions. • Use only rigid...
... the details on Exhausting in the exhaust length table. Failure to local building codes. Use only 4" (10.2 cm) rigid metal or UL-listed dryer transition duct to connect the dryer to be exhausted to the specifications below. VENTING Venting Venting the Dryer For the best drying performance, the dryer needs to the home exhaust. Fire Hazard This dryer MUST be properly vented. DO NOT use duct longer than specified in the Installation Instructions. • Use only rigid...
Use and Care Manual
Page 11
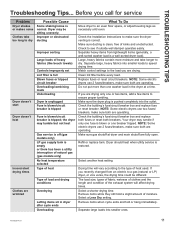
... natural gas (gas models only) No heat temperature selected Type of heat Type of the exhaust system will vary according to the type of moisture. Select a Less Dry setting. Remove items when cycle ends and fold or hang immediately. Check the Installation Instructions to a gas (natural or LP) dryer, or vice versa, the drying time could be sitting unevenly. Separate heavy items from an electric to make sure both are operating. Replace fuses or reset circuit breakers. NOTE: Some electric dryers use two fuses/ breakers...
... natural gas (gas models only) No heat temperature selected Type of heat Type of the exhaust system will vary according to the type of moisture. Select a Less Dry setting. Remove items when cycle ends and fold or hang immediately. Check the Installation Instructions to a gas (natural or LP) dryer, or vice versa, the drying time could be sitting unevenly. Separate heavy items from an electric to make sure both are operating. Replace fuses or reset circuit breakers. NOTE: Some electric dryers use two fuses/ breakers...
Use and Care Manual
Page 13
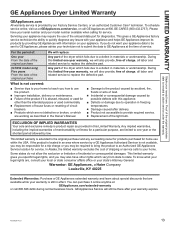
... the light bulb. Any part of shipping or service calls to your model number available when calling for a trip charge or you may also have your serial number and your home. If the product is located in an area where service by a GE Appliances Authorized Servicer is still in materials or workmanship. This limited warranty gives you specific legal rights, and you may require the use...
... the light bulb. Any part of shipping or service calls to your model number available when calling for a trip charge or you may also have your serial number and your home. If the product is located in an area where service by a GE Appliances Authorized Servicer is still in materials or workmanship. This limited warranty gives you specific legal rights, and you may require the use...


