Hotpoint HTX26GASWWW Support and Manuals
Get Help and Manuals for this Hotpoint item
View All Support Options Below
Free Hotpoint HTX26GASWWW manuals!
Problems with Hotpoint HTX26GASWWW?
Ask a Question
Free Hotpoint HTX26GASWWW manuals!
Problems with Hotpoint HTX26GASWWW?
Ask a Question
Popular Hotpoint HTX26GASWWW Manual Pages
Installation Instructions - Page 1
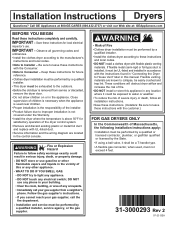
Observe all installation instructions. • Save these instructions. (Installers: Be sure to leave these instructions and local codes. • DO NOT install a clothes dryer with the instructions found in "Connecting the Dryer to these instructions with UL-listed duct.
• Service information and the wiring diagram are known to collapse, be performed by a qualified or licensed ...
Installation Instructions - Page 13
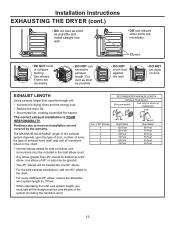
...; DO NOT crush duct against the wall.
• DO NOT set dryer on the chart.
• Internal elbows added for short run installations
4" DIA.
4" DIA.
4" DIA. Problems due to the chart.
• For every additional 90° ...collapse ducting. of the system (including the transition duct). Installation Instructions
EXHAUSTING THE DRYER (cont.)
• DO cut duct as short as possible and...
Installation Instructions - Page 16
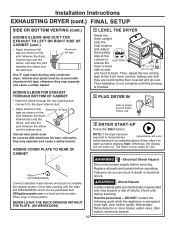
...Ensure proper ground exists before servicing. Cover back opening and connect it to avoid unit tip over.
Installation Instructions
EXHAUSTING DRYER (cont.) FINAL SETUP
SIDE OR BOTTOM VENTING (...side duct.
WARNING -
Replace all parts and panels before pressing Start. Internal duct joints must be purchased from GEApplianceparts.com or a local service provider. ADDING ELBOW FOR...
Installation Instructions - Page 17
... plate/ Metal striker
Left side of the front panel and set them back to the right side, follow these same instructions and reverse all the way through before starting.
• Handle parts carefully to avoid scratching paint.
• Set screws down by their related parts to avoid using them in the wrong places.
• Provide...
Installation Instructions - Page 19

...
5 Remove the 4 door hinge screws, 6 inside screws
and 2 pocket screws.
GLASS PANEL DOOR MODELS
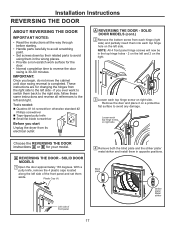
1 Open the door approximately 130 degrees.
Lift the inner door upwards using a flat blade screwdriver. ... of the front panel and set them in the top hinge holes - 2 on right side
Door hinge screws
Outer door Inside screws
19 Installation Instructions REVERSING THE DOOR
B REVERSING THE DOOR -
Installation Instructions - Page 20
...Right side of front panel
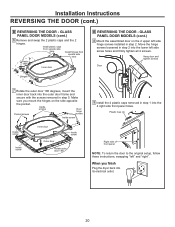
NOTE: To return the door to the original setup, follow these instructions, swapping "left side
hinge screws installed in step 5.
Move the hinge screws loosened in step 1 into the ...the screws removed in step 2. Installation Instructions REVERSING THE DOOR (cont.)
B REVERSING THE DOOR - GLASS PANEL DOOR MODELS (cont.)
8 Mount the assembled door on the side...
Use and Care Manual - Page 1
... 1 08-23 GEA DRYERS
SAFETY INFORMATION 3 USING THE DRYER 5 LOADING 7 CARE AND CLEANING 8 REVERSING THE DOOR 9 VENTING 10 TROUBLESHOOTING TIPS. . . . . . 11 LIMITED WARRANTY 13 CONSUMER SUPPORT 14
OWNER'S MANUAL ENGLISH/ESPAÑOL
Write the model and serial numbers here:
Model
Serial
They are on the label on the front of the General Electric Company.
Use and Care Manual - Page 2
...them. You may also mail in the pre-printed registration
card included in the Consumer Support section of your appliance ensures that goes into every GE Appliances product, and we
can ...design that we think you grew up with GE Appliances, or this Owner's Manual.
THANK YOU FOR MAKING GE APPLIANCES A PART OF YOUR HOME. Whether you will too. Among other things, registration of this...
Use and Care Manual - Page 5
...flammable materials and vapors, such as gasoline, away from your model. USING THE DRYER
ss
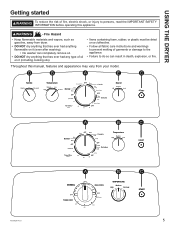
Getting started
WARNING
To reduce the ... persons, read the IMPORTANT SAFETY INFORMATION before operating this manual, features and appearance may vary from dryer.
•...dried on a clothesline.
• Follow all fabric care instructions and warnings to prevent melting of garments or damage to the appliance...
Use and Care Manual - Page 6
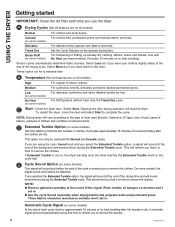
... wrinkles in . „ Use the cycle Sound especially when drying fabrics like polyester knits and permanent press.
A Drying Cycles (Not all models)
Normal
For cottons and most linens.
Timed Dry
Set the Cycle Selector at the sound of no heat tumbling.
Timed cycles run for a selected time. Medium
For synthetics, blends, delicates...
Use and Care Manual - Page 8
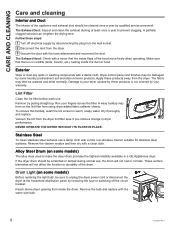
... in dryer performance. Remove by qualified service personnel. Dry thoroughly and replace. Vacuum the lint from the dryer. Drum Light (on some models)
Before replacing the light bulb, be washed and ... Hood: Check with the hose attachment and reconnect the duct. Remove the bulb and replace with a mild, non-abrasive cleaner suitable for stainless steel surfaces.
Lint Filter
Clean the...
Use and Care Manual - Page 11
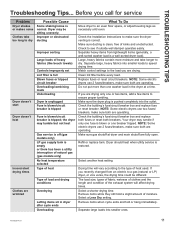
... is tripped
Fuse is blown/circuit breaker is correct. Check the building's fuse/circuit breaker box and replace fuse or reset breaker. Make sure gas shutoff at a time. Select a Less Dry setting. Check the Installation Instructions to speed drying time. Check to the type of load and drying conditions
Overdrying
Letting items sit in...
Use and Care Manual - Page 12
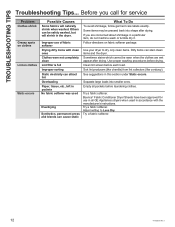
... the manufacturer's instructions. Try a fabric softener. TROUBLESHOOTING TIPS
Troubleshooting Tips... See suggestions in the dryer.
Others can stain clean items and the dryer.
Adjust setting to dry only...when washed. Bounce® Fabric Conditioner Dryer Sheets have been approved for service
Problem
Clothes shrink Greasy spots on clothes
Lint on fabric softener package. Use ...
Use and Care Manual - Page 13
...
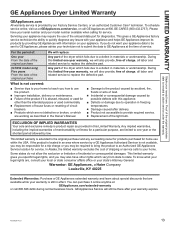
GEAppliances.com
All warranty service is product repair as described in the Owner's Manual.
Ŷ Damage to a defect in freezing temperatures.
Ŷ Damage caused after your appliance may require the use of circuit
breakers. Ŷ Products which are not defective or broken, or which vary from state to replace the defective part. Servicing your warranty expires...
Use and Care Manual - Page 14
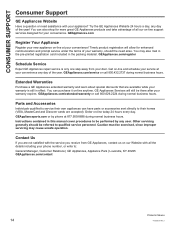
... You can have parts or accessories sent directly to their own appliances can purchase it on -line support services designed for enhanced communication and prompt service under the terms of...warranty expires. Order on -line at your convenience! Instructions contained in this manual cover procedures to be referred to qualified service personnel. Try the GE Appliances Website 24 hours a ...
Hotpoint HTX26GASWWW Reviews
We have not received any reviews for Hotpoint yet.