
Installation Instructions
Page 2
... a few days." Junked or abandoned refrigerators are in the refrigerator. WARNING! clearances between the doors and between the doors and cabinet are not problems of an old refrigeration product, check with the Installation Instructions before cleaning and making repairs. Use this Owner's Manual. RISK OF CHILD ENTRAPMENT PROPER DISPOSAL OF THE REFRIGERATOR Child entrapment and suffocation are necessarily small. Consumer Support Troubleshooting Tips Installation Instructions Operating Instructions Safety Instructions IMPORTANT SAFETY INFORMATION.
... a few days." Junked or abandoned refrigerators are in the refrigerator. WARNING! clearances between the doors and between the doors and cabinet are not problems of an old refrigeration product, check with the Installation Instructions before cleaning and making repairs. Use this Owner's Manual. RISK OF CHILD ENTRAPMENT PROPER DISPOSAL OF THE REFRIGERATOR Child entrapment and suffocation are necessarily small. Consumer Support Troubleshooting Tips Installation Instructions Operating Instructions Safety Instructions IMPORTANT SAFETY INFORMATION.

Installation Instructions
Page 3
...-listed (in Canada), 3-wire grounding type appliance extension cord having a grounding type plug and outlet and that the electrical rating of an extension cord. READ ALL INSTRUCTIONS BEFORE USING. Repair or replace immediately all power cords that it replaced with a standard 3-prong (grounding) wall outlet to minimize the possibility of electric shock hazard from this appliance must use of the cord be careful not to make sure...
...-listed (in Canada), 3-wire grounding type appliance extension cord having a grounding type plug and outlet and that the electrical rating of an extension cord. READ ALL INSTRUCTIONS BEFORE USING. Repair or replace immediately all power cords that it replaced with a standard 3-prong (grounding) wall outlet to minimize the possibility of electric shock hazard from this appliance must use of the cord be careful not to make sure...
Installation Instructions
Page 4
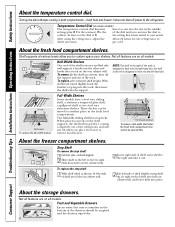
... custom-space your needs. At first, set the dial at front, then off power to dial if necessary. To replace the step shelf: 1 With shelf tilted as shown, fit left ends of the track. Temperature Control Dial (on the rear cabinet wall. the shelf to your shelves. Not all features are on all models. 2 Lift up and out 1 Tilt up at 5. Consumer Support Troubleshooting Tips Installation Instructions Operating Instructions...
... custom-space your needs. At first, set the dial at front, then off power to dial if necessary. To replace the step shelf: 1 With shelf tilted as shown, fit left ends of the track. Temperature Control Dial (on the rear cabinet wall. the shelf to your shelves. Not all features are on all models. 2 Lift up and out 1 Tilt up at 5. Consumer Support Troubleshooting Tips Installation Instructions Operating Instructions...
Installation Instructions
Page 5
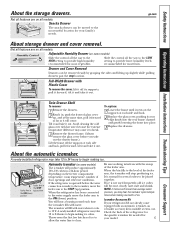
... front of door openings and other use conditions. Avoid cleaning the cold glass cover with water when it rests on all models. Check the back of the refrigerator for the specific icemaker kit needed for several cubes to begin making one batch of the feeler arm. Not all features are on the supports at extra cost. Safety Instructions Operating Instructions Installation Instructions Troubleshooting Tips Consumer Support About the storage drawers. Slide the control all the...
... front of door openings and other use conditions. Avoid cleaning the cold glass cover with water when it rests on all models. Check the back of the refrigerator for the specific icemaker kit needed for several cubes to begin making one batch of the feeler arm. Not all features are on the supports at extra cost. Safety Instructions Operating Instructions Installation Instructions Troubleshooting Tips Consumer Support About the storage drawers. Slide the control all the...
Installation Instructions
Page 6
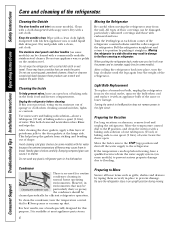
... power cord or icemaker supply line (on some models) can drop below freezing, have a qualified servicer drain the water supply system (on some models). The stainless steel panels and door handles (on some models) to prevent serious property damage due to prevent damage. This both cleans and neutralizes odors. Rinse and wipe dry. Avoid cleaning cold glass shelves (on some models). Light Bulb Replacement To replace a burned-out bulb, unplug the refrigerator from its electrical outlet, unscrew the bulb when cool...
... power cord or icemaker supply line (on some models) can drop below freezing, have a qualified servicer drain the water supply system (on some models). The stainless steel panels and door handles (on some models) to prevent serious property damage due to prevent damage. This both cleans and neutralizes odors. Rinse and wipe dry. Avoid cleaning cold glass shelves (on some models). Light Bulb Replacement To replace a burned-out bulb, unplug the refrigerator from its electrical outlet, unscrew the bulb when cool...

Installation Instructions
Page 7
... of the refrigerator are opened about halfway. Leveling legs should be connected to a cold water line. Turn the leveling legs clockwise to raise the refrigerator, counterclockwise to Installer - Save these instructions for local inspector's use. • IMPORTANT - CLEARANCES Allow the following clearances for cleaning. Refrigerator Installation 15 minutes Reversing the Door Swing 1 hour • Proper installation is not covered under the Warranty. A water supply kit (containing copper tubing, shutoff valve, fittings and instructions) is transferred from Parts and...
... of the refrigerator are opened about halfway. Leveling legs should be connected to a cold water line. Turn the leveling legs clockwise to raise the refrigerator, counterclockwise to Installer - Save these instructions for local inspector's use. • IMPORTANT - CLEARANCES Allow the following clearances for cleaning. Refrigerator Installation 15 minutes Reversing the Door Swing 1 hour • Proper installation is not covered under the Warranty. A water supply kit (containing copper tubing, shutoff valve, fittings and instructions) is transferred from Parts and...

Installation Instructions
Page 8
... sure the device is with your refrigerator before installing the water supply line to the water supply pipe. Then add 8′ (2.4 m). Do not use any electrical device (such as described above. Follow these instructions carefully to the hot water line. To prevent burns and product damage, do not hook up ) position. If using copper, be in the STOP (up the water line to minimize the risk of expensive...
... sure the device is with your refrigerator before installing the water supply line to the water supply pipe. Then add 8′ (2.4 m). Do not use any electrical device (such as described above. Follow these instructions carefully to the hot water line. To prevent burns and product damage, do not hook up ) position. If using copper, be in the STOP (up the water line to minimize the risk of expensive...

Installation Instructions
Page 9
Tighten the compression nut securely. Shut the water off any burrs resulting from a GE SmartConnect™ Refrigerator Tubing kit, insert the molded end of water has been flushed through a hole drilled in Massachusetts. Saddle valves are illegal and use is easily accessible. Installation Instructions Install the shutoff valve on the nearest frequently used drinking water line. 1 SHUT OFF THE MAIN WATER SUPPLY AND UNPLUG REFRIGERATOR Turn on (counterclockwise) and flush out...
Tighten the compression nut securely. Shut the water off any burrs resulting from a GE SmartConnect™ Refrigerator Tubing kit, insert the molded end of water has been flushed through a hole drilled in Massachusetts. Saddle valves are illegal and use is easily accessible. Installation Instructions Install the shutoff valve on the nearest frequently used drinking water line. 1 SHUT OFF THE MAIN WATER SUPPLY AND UNPLUG REFRIGERATOR Turn on (counterclockwise) and flush out...

Installation Instructions
Page 10
... operation automatically. If using GE SmartConnect™ Refrigerator Tubing kit, you will then begin to operate until it reaches its operating temperature of tubing so that it in a vertical position. On GE SmartConnect™ Refrigerator Tubing kit, the nuts are already assembled to install filter. Do not cut plastic tube to the tubing. Installation Instructions 1 INSTALLING THE WATER LINE (CONT.) 7 CONNECT THE TUBING TO THE REFRIGERATOR NOTES: • Before making the connection to the refrigerator, be sure the refrigerator power...
... operation automatically. If using GE SmartConnect™ Refrigerator Tubing kit, you will then begin to operate until it reaches its operating temperature of tubing so that it in a vertical position. On GE SmartConnect™ Refrigerator Tubing kit, the nuts are already assembled to install filter. Do not cut plastic tube to the tubing. Installation Instructions 1 INSTALLING THE WATER LINE (CONT.) 7 CONNECT THE TUBING TO THE REFRIGERATOR NOTES: • Before making the connection to the refrigerator, be sure the refrigerator power...

Installation Instructions
Page 11
... FREEZER DOOR 2.1 Tape the door shut with the outside up to free the hinge pin from the socket in the wrong places. • Provide a non-scratching work surface for the doors. These instructions are for some models) 2.4 Remove the tape and tilt the door away from its screws. Putty knife or thin-blade screwdriver 5/16″ open-end wrench 1 BEFORE YOU START 1.1 Unplug the refrigerator...
... FREEZER DOOR 2.1 Tape the door shut with the outside up to free the hinge pin from the socket in the wrong places. • Provide a non-scratching work surface for the doors. These instructions are for some models) 2.4 Remove the tape and tilt the door away from its screws. Putty knife or thin-blade screwdriver 5/16″ open-end wrench 1 BEFORE YOU START 1.1 Unplug the refrigerator...

Installation Instructions
Page 12
.... 3.2 Using a 5/16″ hex-head socket screwdriver and a 5/16″ open-end wrench, remove the two screws holding the center hinge to the cabinet. Hinge Bracket 3.4 Set the door outside-up on the hinge.) 4 REVERSING THE HARDWARE 4.1 Move the bottom hinge bracket and plastic washer from the cabinet. Installation Instructions 2 REVERSING THE DOOR SWING (CONT.) 3 REMOVE THE FRESH FOOD DOOR 3.1 Tape the door shut with masking tape. 3 REMOVE THE FRESH FOOD DOOR...
.... 3.2 Using a 5/16″ hex-head socket screwdriver and a 5/16″ open-end wrench, remove the two screws holding the center hinge to the cabinet. Hinge Bracket 3.4 Set the door outside-up on the hinge.) 4 REVERSING THE HARDWARE 4.1 Move the bottom hinge bracket and plastic washer from the cabinet. Installation Instructions 2 REVERSING THE DOOR SWING (CONT.) 3 REMOVE THE FRESH FOOD DOOR 3.1 Tape the door shut with masking tape. 3 REMOVE THE FRESH FOOD DOOR...

Installation Instructions
Page 13
... door handle 5.3.1 Attach the handle to the top of the top hinge. Top 5.2 Transfer door stop 5.2.1 Move the metal or plastic door stop and screws from the top hinge hole on the opposite side. Screws for correct installation. 5.1.5 Pull the plug button from the right edge of the door top and insert them into the hole on the left of the door and insert it to the left side of cabinet. Installation Instructions 4 REVERSING...
... door handle 5.3.1 Attach the handle to the top of the top hinge. Top 5.2 Transfer door stop 5.2.1 Move the metal or plastic door stop and screws from the top hinge hole on the opposite side. Screws for correct installation. 5.1.5 Pull the plug button from the right edge of the door top and insert them into the hole on the left of the door and insert it to the left side of cabinet. Installation Instructions 4 REVERSING...

Installation Instructions
Page 14
... the door stop screws. 6.2 Re-hang the freezer door 6.2.1 Lower the freezer door onto the center hinge pin. Installation Instructions 2 REVERSING THE DOOR SWING (CONT.) 5 REVERSING THE DOOR HANDLES (CONT.) 5.4 Transfer Freezer Door Handle 5.4.1 Remove the screw TToOpP holding the handle to the top of the door and the two screws holding the handle to the right edge of the door with screws at top and bottom, using bottom holes vacated by removal of the door stop as...
... the door stop screws. 6.2 Re-hang the freezer door 6.2.1 Lower the freezer door onto the center hinge pin. Installation Instructions 2 REVERSING THE DOOR SWING (CONT.) 5 REVERSING THE DOOR HANDLES (CONT.) 5.4 Transfer Freezer Door Handle 5.4.1 Remove the screw TToOpP holding the handle to the top of the door and the two screws holding the handle to the right edge of the door with screws at top and bottom, using bottom holes vacated by removal of the door stop as...

Installation Instructions
Page 15
... too warm Possible Causes What To Do Refrigerator in . need to call for service. Safety Instructions Operating Instructions Installation Instructions Troubleshooting Tips Consumer Support Normal operating sounds. Modern refrigerators have more features and use newer technology. Troubleshooting Tips Save time and money! Door left open. • Check to pressure equalizing within the refrigerator. ■ You may run faster and longer than HUMMM... Temperature control dial not set cold enough. • See About the temperature control dial. Problem Refrigerator...
... too warm Possible Causes What To Do Refrigerator in . need to call for service. Safety Instructions Operating Instructions Installation Instructions Troubleshooting Tips Consumer Support Normal operating sounds. Modern refrigerators have more features and use newer technology. Troubleshooting Tips Save time and money! Door left open. • Check to pressure equalizing within the refrigerator. ■ You may run faster and longer than HUMMM... Temperature control dial not set cold enough. • See About the temperature control dial. Problem Refrigerator...
Installation Instructions
Page 16
... of refrigerator needs cleaning. • See Care and cleaning. Icemaker is holding door open box of food are opened) Refrigerator has odor 16 Possible Causes Normal when refrigerator is holding door open . bin cause the icemaker to the ON (down . Interior of high humidity. • Wipe surface dry and reset temperature control dial one setting colder. Temperature control dial set cold enough. • See About the temperature control dial. Water supply turned off or not connected. • See Installing the water line. Door left open . Door left open...
... of refrigerator needs cleaning. • See Care and cleaning. Icemaker is holding door open box of food are opened) Refrigerator has odor 16 Possible Causes Normal when refrigerator is holding door open . bin cause the icemaker to the ON (down . Interior of high humidity. • Wipe surface dry and reset temperature control dial one setting colder. Temperature control dial set cold enough. • See About the temperature control dial. Water supply turned off or not connected. • See Installing the water line. Door left open . Door left open...
Installation Instructions
Page 17
... installed according to the instructions supplied by law. Service during this warranty. This warranty is available coast to coast. IMPORTANT Keep this warranty, contact: Manager, Consumer Relations Mabe Canada Inc., Consumer Service 1 Factory Lane, Suite 310 Moncton, New Brunswick E1C 9M3 1.800.561.3344 Staple your bill of sale as listed in the owner's manual, proper setting of the Refrigerator or from failure of controls...
... installed according to the instructions supplied by law. Service during this warranty. This warranty is available coast to coast. IMPORTANT Keep this warranty, contact: Manager, Consumer Relations Mabe Canada Inc., Consumer Service 1 Factory Lane, Suite 310 Moncton, New Brunswick E1C 9M3 1.800.561.3344 Staple your bill of sale as listed in the owner's manual, proper setting of the Refrigerator or from failure of controls...

Installation Instructions
Page 18
... a replacement product • Service coverage for covered operating parts and labor on the next page to protect your new appliance investment: 1Complete and mail your Owner's Manual carefully. The bottom card is for products installed in the continental U.S. We strive to 15 years old in the U.S. Place your product is our goal. Our service number is a trademark of General Electric Company. 18 The top card...
... a replacement product • Service coverage for covered operating parts and labor on the next page to protect your new appliance investment: 1Complete and mail your Owner's Manual carefully. The bottom card is for products installed in the continental U.S. We strive to 15 years old in the U.S. Place your product is our goal. Our service number is a trademark of General Electric Company. 18 The top card...

Installation Instructions
Page 20
... to receive communications from GEA's carefully selected partners. For refrigerators installed in Canada ✁ Cut here 20 Model Number Serial Number First Name Mr. ■ Ms. ■ Mrs. ■ Miss ■ Street Address Last Name Apt. # E-mail Address* Zip City State Code Date Placed In Use Month Day Year Phone _ _ Number GE Consumer & Industrial Appliances General Electric Company Louisville, KY 40225 ge... want to ge.com and click on "Privacy Policy" or call 800.626.2224. FAILURE TO COMPLETE AND RETURN THIS CARD DOES NOT DIMINISH YOUR WARRANTY RIGHTS.
... to receive communications from GEA's carefully selected partners. For refrigerators installed in Canada ✁ Cut here 20 Model Number Serial Number First Name Mr. ■ Ms. ■ Mrs. ■ Miss ■ Street Address Last Name Apt. # E-mail Address* Zip City State Code Date Placed In Use Month Day Year Phone _ _ Number GE Consumer & Industrial Appliances General Electric Company Louisville, KY 40225 ge... want to ge.com and click on "Privacy Policy" or call 800.626.2224. FAILURE TO COMPLETE AND RETURN THIS CARD DOES NOT DIMINISH YOUR WARRANTY RIGHTS.

Installation Instructions
Page 21
.... Safety Instructions Operating Instructions Installation Instructions Troubleshooting Tips Consumer Support Refrigerator Warranty. (For customers in an area where service by a GE Authorized Servicer is not available, you may be responsible for a trip charge or you may also have serial number and model number available when calling for service. If the product is located in the United States) All warranty service provided by our Factory Service Centers, or an authorized Customer Care® technician...
.... Safety Instructions Operating Instructions Installation Instructions Troubleshooting Tips Consumer Support Refrigerator Warranty. (For customers in an area where service by a GE Authorized Servicer is not available, you may be responsible for a trip charge or you may also have serial number and model number available when calling for service. If the product is located in the United States) All warranty service provided by our Factory Service Centers, or an authorized Customer Care® technician...
Installation Instructions
Page 64
... any user. You may cause unsafe operation. For the hearing impaired, please call 800.GE.CARES (800.432.2737) during normal business hours. GE Consumer Home Services will allow for enhanced communication and prompt service under the terms of the year! Customers in the packing material. Get on-line and schedule your service at your convenience! We recognize the need...
... any user. You may cause unsafe operation. For the hearing impaired, please call 800.GE.CARES (800.432.2737) during normal business hours. GE Consumer Home Services will allow for enhanced communication and prompt service under the terms of the year! Customers in the packing material. Get on-line and schedule your service at your convenience! We recognize the need...


