
Owners Manual
Page 1
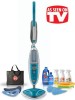
PLEASE DO NOT RETURN THIS PRODUCT TO THE STORE. IF USED COMMERCIALLY WARRANTY IS VOID. ©2011 Techtronic Floor Care Technology Limited. página E1 hoover.com IMPORTANT: READ CAREFULLY BEFORE ASSEMBLY AND USE. Owner's Manual Operating and Servicing Instructions Español - Questions or concerns? All Rights Reserved. #961145002 ID102309-R1 For assistance, please call Customer Service at 1-800-944-9200 Mon-Fri 8am-7pm EST. THIS PRODUCT IS INTENDED FOR HOUSEHOLD USE ONLY.
PLEASE DO NOT RETURN THIS PRODUCT TO THE STORE. IF USED COMMERCIALLY WARRANTY IS VOID. ©2011 Techtronic Floor Care Technology Limited. página E1 hoover.com IMPORTANT: READ CAREFULLY BEFORE ASSEMBLY AND USE. Owner's Manual Operating and Servicing Instructions Español - Questions or concerns? All Rights Reserved. #961145002 ID102309-R1 For assistance, please call Customer Service at 1-800-944-9200 Mon-Fri 8am-7pm EST. THIS PRODUCT IS INTENDED FOR HOUSEHOLD USE ONLY.
Owners Manual
Page 2
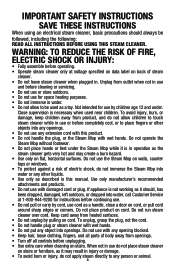
... model number of the steam cleaner is located on back of Steam Mop) Contents Important Safety Instructions 3 Product Assembly...5 Carton Contents...5 Attach Handle...5 Cord Storage...5 How To Use...6 Steam Cleaner Description 6 Before You Begin Cleaning 6 Filling Water Tank 6 Attaching the Microfiber Pad 7 Filling Solution Tank 7 Steam Cleaning Hard Floors 8 Refreshing Carpet...9 After Steam Cleaner Use / Using Cooling Tray 9 Maintenance...10 Water Tank...10 Microfiber Pad...10 Water Filter...10 Storage...11 Troubleshooting...11 Clearing Blockages 12 Service...12 Warranty...
... model number of the steam cleaner is located on back of Steam Mop) Contents Important Safety Instructions 3 Product Assembly...5 Carton Contents...5 Attach Handle...5 Cord Storage...5 How To Use...6 Steam Cleaner Description 6 Before You Begin Cleaning 6 Filling Water Tank 6 Attaching the Microfiber Pad 7 Filling Solution Tank 7 Steam Cleaning Hard Floors 8 Refreshing Carpet...9 After Steam Cleaner Use / Using Cooling Tray 9 Maintenance...10 Water Tank...10 Microfiber Pad...10 Water Filter...10 Storage...11 Troubleshooting...11 Clearing Blockages 12 Service...12 Warranty...
Owners Manual
Page 3
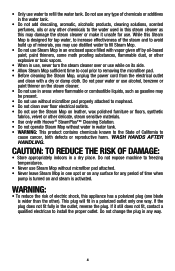
... apply steam directly to be followed, including the following: READ ALL INSTRUCTIONS BEFORE USING THIS Steam cleaner. Use only manufacturer's recommended attachments and products. • Do not use with wet hands. To unplug, grasp the plug, not the cord. • Do not handle plug or steam cleaner with any other objects into water, call Customer Service at voltage specified on data label on stairs. Unplug from openings. • Turn...
... apply steam directly to be followed, including the following: READ ALL INSTRUCTIONS BEFORE USING THIS Steam cleaner. Use only manufacturer's recommended attachments and products. • Do not use with wet hands. To unplug, grasp the plug, not the cord. • Do not handle plug or steam cleaner with any other objects into water, call Customer Service at voltage specified on data label on stairs. Unplug from openings. • Turn...
Owners Manual
Page 4
... type of chemicals or additives in the water tank. • Do not add descaling, aromatic, alcoholic products, cleaning solutions, scented perfumes, oils or any other delicate, steam sensitive materials. • Use only with Hoover® SteamPlus™ Cleaning Solution. • Do not operate Steam Mop without water in use, never turn the steam cleaner over or use Steam Mop without microfiber pad properly attached to install the proper outlet. CAUTION: TO REDUCE THE...
... type of chemicals or additives in the water tank. • Do not add descaling, aromatic, alcoholic products, cleaning solutions, scented perfumes, oils or any other delicate, steam sensitive materials. • Use only with Hoover® SteamPlus™ Cleaning Solution. • Do not operate Steam Mop without water in use, never turn the steam cleaner over or use Steam Mop without microfiber pad properly attached to install the proper outlet. CAUTION: TO REDUCE THE...
Owners Manual
Page 5
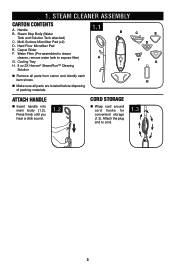
Hard Floor Microfiber Pad E. Handle B. Cooling Tray H. 8 oz 2X Hoover® SteamPlus™ Cleaning Solution 1.1 A B C E D F G „„ Remove all parts are located before disposing of packing materials. 1. Attach the plug end to expose filter) G. Multi-Surface Microfiber Pad (x2) D. Water Filter (Pre-assembled in steam cleaner, remove water tank to cord. 1.3 5 H „„ Make sure all parts from carton and identify each item shown. Steam Mop Body (Water Tank and Solution Tank attached) C. Steam cleaner Assembly Carton contents A. Attach handle „...
Hard Floor Microfiber Pad E. Handle B. Cooling Tray H. 8 oz 2X Hoover® SteamPlus™ Cleaning Solution 1.1 A B C E D F G „„ Remove all parts are located before disposing of packing materials. 1. Attach the plug end to expose filter) G. Multi-Surface Microfiber Pad (x2) D. Water Filter (Pre-assembled in steam cleaner, remove water tank to cord. 1.3 5 H „„ Make sure all parts from carton and identify each item shown. Steam Mop Body (Water Tank and Solution Tank attached) C. Steam cleaner Assembly Carton contents A. Attach handle „...
Owners Manual
Page 6
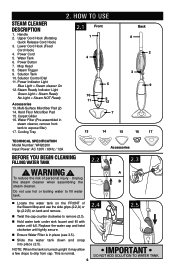
... Cord Hook (Rotating Quick Release Cord Hook) 3. Cooling Tray 2.1 Front 1 4 5 10 11 6 12 7 Back 8 2 3 9 13 14 15 16 17 TECHNICAL SPECIFICATION Model Number: WH20200 Input Power: AC 120V / 60Hz / 12A Accessories Before you begin cleaning filling water tank 2.2 2.3 ! Unplug the steam cleaner when assembling the B steam cleaner. Lower Cord Hook (Fixed Cord Hook) 4. Power Button 7. Solution Control Dial 11. This is turned upright it may allow a few drops to Use Steam cleaner Description 1. Handle 2. NOTE: When the tank is...
... Cord Hook (Rotating Quick Release Cord Hook) 3. Cooling Tray 2.1 Front 1 4 5 10 11 6 12 7 Back 8 2 3 9 13 14 15 16 17 TECHNICAL SPECIFICATION Model Number: WH20200 Input Power: AC 120V / 60Hz / 12A Accessories Before you begin cleaning filling water tank 2.2 2.3 ! Unplug the steam cleaner when assembling the B steam cleaner. Lower Cord Hook (Fixed Cord Hook) 4. Power Button 7. Solution Control Dial 11. This is turned upright it may allow a few drops to Use Steam cleaner Description 1. Handle 2. NOTE: When the tank is...
Owners Manual
Page 7
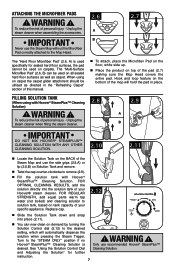
... ! Turn to the desired setting, which will hold the pad in the "Refreshing Carpet" section of your Hoover® steam cleaner. Filling Solution Tank (When using on demand by turning the Solution Control dial (2.12) to the "STEAM ONLY" position if no ! The "Multi-Surface Microfiber Pad" (2.6, B) can now clean on carpet the carpet glider attachment should be used specifically for further instruction. 7 WARNING ! and Adjusting the Solution" for sealed hard floor...
... ! Turn to the desired setting, which will hold the pad in the "Refreshing Carpet" section of your Hoover® steam cleaner. Filling Solution Tank (When using on demand by turning the Solution Control dial (2.12) to the "STEAM ONLY" position if no ! The "Multi-Surface Microfiber Pad" (2.6, B) can now clean on carpet the carpet glider attachment should be used specifically for further instruction. 7 WARNING ! and Adjusting the Solution" for sealed hard floor...
Owners Manual
Page 8
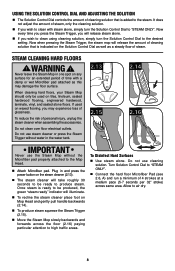
... Steam Mop should only be produced, the green "steam ready" indicator will release the amount of cleaning solution that is added to the steam. WARNING ! Do not use steam cleaner or press the Steam Trigger without water in and press the power button on the steam cleaner (2.13). „„ The steam cleaner will release steam alone. „„ If you wish to clean with a damp or wet Microfiber pad attached...
... Steam Mop should only be produced, the green "steam ready" indicator will release the amount of cleaning solution that is added to the steam. WARNING ! Do not use steam cleaner or press the Steam Trigger without water in and press the power button on the steam cleaner (2.13). „„ The steam cleaner will release steam alone. „„ If you wish to clean with a damp or wet Microfiber pad attached...
Owners Manual
Page 9
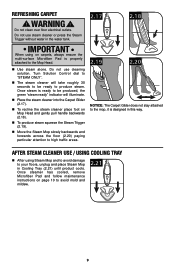
...) until product cools. Once steamer has cooled, remove Microfiber Pad and follow maintenance instructions on carpets, always ensure the multi-surface Microfiber Pad is ready to be ready to the Mop Head. „„ Use steam alone. REFRESHING CARPET ! Once steam is properly attached to produce steam. After Steam cleaner USE / Using Cooling Tray „„ After using on page 10 to your floors, unplug and place Steam Mop in this...
...) until product cools. Once steamer has cooled, remove Microfiber Pad and follow maintenance instructions on carpets, always ensure the multi-surface Microfiber Pad is ready to be ready to the Mop Head. „„ Use steam alone. REFRESHING CARPET ! Once steam is properly attached to produce steam. After Steam cleaner USE / Using Cooling Tray „„ After using on page 10 to your floors, unplug and place Steam Mop in this...
Owners Manual
Page 10
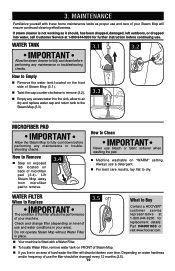
... the Steam Mop to Replace IMPORTANT The condition of the filter affects the performance of microfiber pad (3.4). If steam cleaner is fitted with these home maintenance tasks as it should be changed every 12 months (3.5). 10 Always use a detergent. „„ For best care results, lay flat to Clean IMPORTANT Never use . MAINTENANCE Familiarize yourself with a Water Filter. „„ To locate Water Filter, remove water tank on FRONT of Steam Mop. „...
... the Steam Mop to Replace IMPORTANT The condition of the filter affects the performance of microfiber pad (3.4). If steam cleaner is fitted with these home maintenance tasks as it should be changed every 12 months (3.5). 10 Always use a detergent. „„ For best care results, lay flat to Clean IMPORTANT Never use . MAINTENANCE Familiarize yourself with a Water Filter. „„ To locate Water Filter, remove water tank on FRONT of Steam Mop. „...
Owners Manual
Page 11
...-install water tank, replace in Cooling Tray to prevent damage to floor and store in upright position. „„ You may not be attached correctly. 1. Troubleshooting USE TROUBLESHOOTING GUIDE AS A FIRST STEP TO RESOLVE ANY PROBLEMS YOU MAY BE EXPERIENCING. Unplug Steam Mop before continuing use. ! PROBLEM POSSIBLE CAUSE POSSIBLE SOLUTION Steam Mop won't run 1. Please refer to the "Microfiber Pad" section. refer to the "Filling Water Tank" section - If steam cleaner is...
...-install water tank, replace in Cooling Tray to prevent damage to floor and store in upright position. „„ You may not be attached correctly. 1. Troubleshooting USE TROUBLESHOOTING GUIDE AS A FIRST STEP TO RESOLVE ANY PROBLEMS YOU MAY BE EXPERIENCING. Unplug Steam Mop before continuing use. ! PROBLEM POSSIBLE CAUSE POSSIBLE SOLUTION Steam Mop won't run 1. Please refer to the "Microfiber Pad" section. refer to the "Filling Water Tank" section - If steam cleaner is...
Owners Manual
Page 12
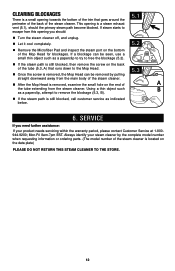
... the steam cleaner. „ After the Mop Head is removed, examine the small hole on the end of A the tube extending from this opening you need further assistance: If your steam cleaner by the complete model number when requesting information or ordering parts. (The model number of the steam cleaner is located on the bottom of the trim that runs down to remove the blockage (5.3, B). seRViCe If...
... the steam cleaner. „ After the Mop Head is removed, examine the small hole on the end of A the tube extending from this opening you need further assistance: If your steam cleaner by the complete model number when requesting information or ordering parts. (The model number of the steam cleaner is located on the bottom of the trim that runs down to remove the blockage (5.3, B). seRViCe If...
Owners Manual
Page 13
... warranted against original defects in accordance with the Owner's Manual, your HOOVER® appliance is not as maid, janitorial and equipment rental services), pads, filter, improper maintenance of the appliance, damage due to correct any replacement or repair performed under the laws of the state of Canada. This warranty does not cover appliances purchased from a party that vary from date...
... warranted against original defects in accordance with the Owner's Manual, your HOOVER® appliance is not as maid, janitorial and equipment rental services), pads, filter, improper maintenance of the appliance, damage due to correct any replacement or repair performed under the laws of the state of Canada. This warranty does not cover appliances purchased from a party that vary from date...


