Product Manual
Page 3
... with a customer service representative; Visit Hoover. Mon- MODEL MFG. Fri 8am- 7pm EST. PLEASE DO NOT RETURN THIS PRODUCT TO THE STORE. 2 MANUFACTURING CODE (Label located on back of vacuum) CONTENTS Important Safety Instructions 3 Vacuum Assembly 5 Carton Contents 5 Attach Handle... 5 Attach Dirt Cup 5 Position Tools 5 How To Use ...6 Vacuum Description 6 On-Off Switch 6 Cord Release 6 Folding Handle 6 ...
... with a customer service representative; Visit Hoover. Mon- MODEL MFG. Fri 8am- 7pm EST. PLEASE DO NOT RETURN THIS PRODUCT TO THE STORE. 2 MANUFACTURING CODE (Label located on back of vacuum) CONTENTS Important Safety Instructions 3 Vacuum Assembly 5 Carton Contents 5 Attach Handle... 5 Attach Dirt Cup 5 Position Tools 5 How To Use ...6 Vacuum Description 6 On-Off Switch 6 Cord Release 6 Folding Handle 6 ...
Product Manual
Page 10
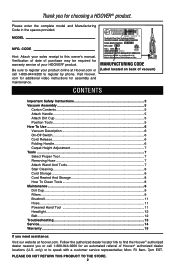
...Dirt Cup 1.1 A *Varies per model) Note: Remove the screw located in the vacuum base and set aside until secure. 1.6 Place Crevice Tool into Wand and slide into vacuum body first. Pivot cup into vacuum base. 1. VACUUM ASSEMBLY CARTON CONTENTS A. Handle* B. Screw (for assembly) I F ATTACH HANDLE ...(varies per model Remove all parts are located before disposing of vacuum as shown. 1.5 1.6 C A B 5 Actual model may vary from carton and identify each item shown. Make sure all parts from images shown. B C...
...Dirt Cup 1.1 A *Varies per model) Note: Remove the screw located in the vacuum base and set aside until secure. 1.6 Place Crevice Tool into Wand and slide into vacuum body first. Pivot cup into vacuum base. 1. VACUUM ASSEMBLY CARTON CONTENTS A. Handle* B. Screw (for assembly) I F ATTACH HANDLE ...(varies per model Remove all parts are located before disposing of vacuum as shown. 1.5 1.6 C A B 5 Actual model may vary from carton and identify each item shown. Make sure all parts from images shown. B C...
Product Manual
Page 11
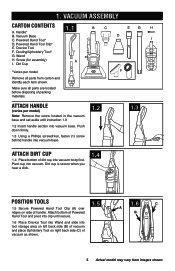
... reel. Filter made with HEPA media 4 12 18 and Carbon Filter* Access 9. Headlight* 19 20 11. To turn vacuum OFF, push switch again. ! To turn vacuum ON, A push ON/OFF switch (A) once. When red tape is almost fully extended. Not to whip when rewinding. ...To return cord for grooming a pet. Dirt Cup 2 7. HOW TO USE VACUUM DESCRIPTION 2.1 1. Crevice Tool 15 14. CORD RELEASE 2.3 A (Available on the cord, the cord has reached its full length. Cord Release 11 22 ...
... reel. Filter made with HEPA media 4 12 18 and Carbon Filter* Access 9. Headlight* 19 20 11. To turn vacuum OFF, push switch again. ! To turn vacuum ON, A push ON/OFF switch (A) once. When red tape is almost fully extended. Not to whip when rewinding. ...To return cord for grooming a pet. Dirt Cup 2 7. HOW TO USE VACUUM DESCRIPTION 2.1 1. Crevice Tool 15 14. CORD RELEASE 2.3 A (Available on the cord, the cord has reached its full length. Cord Release 11 22 ...
Product Manual
Page 14
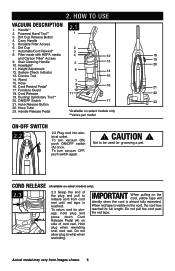
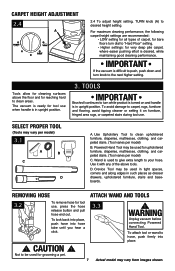
...and handle is in such places as dresser drawers, upholstered furniture, stairs and baseboards. Crevice Tool may vary per model) C. WARNING Unplug vacuum before connecting Powered Hand Tool. To attach tool or wand to desired height setting. CARPET HEIGHT ADJUSTMENT 2.4 A 2.4 To adjust height ...mattresses, clothing, and carpeted stairs. (Tool varies per model) B. Use Upholstery Tool to the next higher setting. D. IMPORTANT If the vacuum is desired, while maintaining good cleaning performance. REMOVING HOSE ATTACH WAND AND TOOLS 3.2 To remove hose for grooming a pet. 7 Actual ...
...and handle is in such places as dresser drawers, upholstered furniture, stairs and baseboards. Crevice Tool may vary per model) C. WARNING Unplug vacuum before connecting Powered Hand Tool. To attach tool or wand to desired height setting. CARPET HEIGHT ADJUSTMENT 2.4 A 2.4 To adjust height ...mattresses, clothing, and carpeted stairs. (Tool varies per model) B. Use Upholstery Tool to the next higher setting. D. IMPORTANT If the vacuum is desired, while maintaining good cleaning performance. REMOVING HOSE ATTACH WAND AND TOOLS 3.2 To remove hose for grooming a pet. 7 Actual ...
Product Manual
Page 15
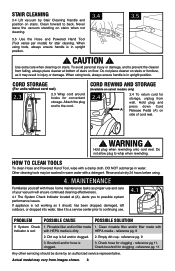
... working as proper use . reference pg. 11. Check brushroll for storage, unplug from images shown. 8 STAIR CLEANING 3.4 Lift vacuum by an authorized service representative. MAINTENANCE Familiarize yourself with a damp cloth. Clean forward to continuing use and care of your... vacuum will ensure continued cleaning effectiveness. 4.1 A 4.1 The System Check Indicator located at bottom of cord reel. ! CORD REWIND AND STORAGE (...
... working as proper use . reference pg. 11. Check brushroll for storage, unplug from images shown. 8 STAIR CLEANING 3.4 Lift vacuum by an authorized service representative. MAINTENANCE Familiarize yourself with a damp cloth. Clean forward to continuing use and care of your... vacuum will ensure continued cleaning effectiveness. 4.1 A 4.1 The System Check Indicator located at bottom of cord reel. ! CORD REWIND AND STORAGE (...
Product Manual
Page 18
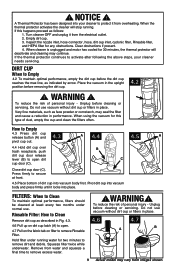
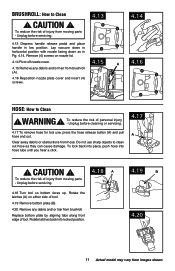
...30 minutes, the thermal protector will stop running water for this happens proceed as described in the upright position before cleaning or servicing. Place the vacuum in Fig. 4.3. 4.6 Pull up on dirt cup latch (A) to open dirt cup door (C). Unplug before the dirt cup reaches the max ... will deactivate and cleaning may continue. Press firmly to secure at least every two months under running . Hold filter under normal use. Do not use vacuum without dirt cup or filters in place. 4.6 4.7 A B 9 Actual model may seal the filter and cause a reduction in place. Turn cleaner OFF...
...30 minutes, the thermal protector will stop running water for this happens proceed as described in the upright position before cleaning or servicing. Place the vacuum in Fig. 4.3. 4.6 Pull up on dirt cup latch (A) to open dirt cup door (C). Unplug before the dirt cup reaches the max ... will deactivate and cleaning may continue. Press firmly to secure at least every two months under running . Hold filter under normal use. Do not use vacuum without dirt cup or filters in place. 4.6 4.7 A B 9 Actual model may seal the filter and cause a reduction in place. Turn cleaner OFF...
Product Manual
Page 19
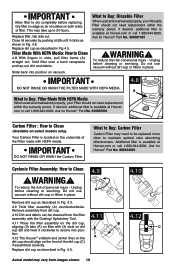
...filter is available at (B) until it clockwise to secure into position on vacuum. Ask for Hoover® Part No. 902404001. Ask for Hoover® Part No. 305687001. To reduce the risk of personal injury - tion. 4.12 The Hoover® emblem and center lines on the A dirt cup should not ...to dry completely before cleaning or servicing. Close lid securely by pushing at Hoover.com or call 1-800-944-9200. Replace dirt cup as described in place. Ask for Hoover® Part No. 304087001 ! Do not use vacuum without dirt cup or filters in place. 4.9 A 4.10 Remove dirt...
...filter is available at (B) until it clockwise to secure into position on vacuum. Ask for Hoover® Part No. 902404001. Ask for Hoover® Part No. 305687001. To reduce the risk of personal injury - tion. 4.12 The Hoover® emblem and center lines on the A dirt cup should not ...to dry completely before cleaning or servicing. Close lid securely by pushing at Hoover.com or call 1-800-944-9200. Replace dirt cup as described in place. Ask for Hoover® Part No. 304087001 ! Do not use vacuum without dirt cup or filters in place. 4.9 A 4.10 Remove dirt...
Product Manual
Page 22
Lay vacuum down in hortizontal position with nozzle facing down as they can cause damage. To lock back into place, push hose into locked position. 4.19 B 4.20 ...
Lay vacuum down in hortizontal position with nozzle facing down as they can cause damage. To lock back into place, push hose into locked position. 4.19 B 4.20 ...
Product Manual
Page 23
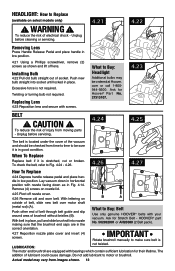
... socket. LUBRICATION: The motor and brushroll are in the What to Buy: Belt Use only genuine HOOVER® belts with nozzle facing down in hortizontal position with your vacuum. Do not add lubricant to be ordered at Hoover. HEADLIGHT: How to Fig. 4.24 - 4.26. 4.26 4.27 How To Replace 4.24 ...Depress handle release pedal and place handle in low position. Unplug before servicing. 4.24 4.25 The belt is located under the cover of the vacuum and should be checked from ...
... socket. LUBRICATION: The motor and brushroll are in the What to Buy: Belt Use only genuine HOOVER® belts with nozzle facing down in hortizontal position with your vacuum. Do not add lubricant to be ordered at Hoover. HEADLIGHT: How to Fig. 4.24 - 4.26. 4.26 4.27 How To Replace 4.24 ...Depress handle release pedal and place handle in low position. Unplug before servicing. 4.24 4.25 The belt is located under the cover of the vacuum and should be checked from ...
Product Manual
Page 26
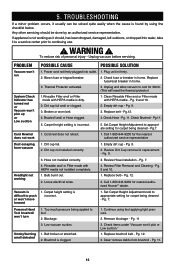
... firmly plugged into water, take it should be solved quite easily when the cause is difficult to appropriate setting for nearest authorized Hoover® dealer. Replace fuse/reset breaker in home. Brushroll and/ or Hose clogged. 4. Carpet height setting is incorrect. .../ or Filter made with HEPA media not installed completely. 1. Smoky/burning 1. smell detected 2. Remove blockage - Clear/ remove debris from vacuum 1. TROUBLESHOOTING If a minor problem occurs, it usually can be done by using tool applying light pressure. 2. Thermal Protector activated. 3. ...
... firmly plugged into water, take it should be solved quite easily when the cause is difficult to appropriate setting for nearest authorized Hoover® dealer. Replace fuse/reset breaker in home. Brushroll and/ or Hose clogged. 4. Carpet height setting is incorrect. .../ or Filter made with HEPA media not installed completely. 1. Smoky/burning 1. smell detected 2. Remove blockage - Clear/ remove debris from vacuum 1. TROUBLESHOOTING If a minor problem occurs, it usually can be done by using tool applying light pressure. 2. Thermal Protector activated. 3. ...

Product Manual
Page 27
...-944-9200; This will only result in Glenwillow for service. Customers) or hoover.ca (Canadian customers). If you . • For an automated referral of the vacuum.) PLEASE DO NOT RETURN THIS PRODUCT TO THE STORE. 14 Always identify your vacuum to find the service outlet nearest you need further assistance: To speak with...
...-944-9200; This will only result in Glenwillow for service. Customers) or hoover.ca (Canadian customers). If you . • For an automated referral of the vacuum.) PLEASE DO NOT RETURN THIS PRODUCT TO THE STORE. 14 Always identify your vacuum to find the service outlet nearest you need further assistance: To speak with...


