
Product Manual
Page 2
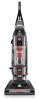
THIS PRODUCT IS INTENDED FOR HOUSEHOLD USE ONLY. PLEASE DO NOT RETURN THIS PRODUCT TO THE STORE. IF USED COMMERCIALLY WARRANTY IS VOID. ©2012 Techtronic Floor Care Technology Limited. Questions or concerns? All Rights Reserved. #961151061 ID:105881 R1 OWNER'S MANUAL Operating and Servicing Instructions Español - página E1 www.hoover.com IMPORTANT: READ CAREFULLY BEFORE ASSEMBLY AND USE. For assistance, please call Customer Service at 1-800-944-9200 Mon-Fri 8am-7pm EST.
THIS PRODUCT IS INTENDED FOR HOUSEHOLD USE ONLY. PLEASE DO NOT RETURN THIS PRODUCT TO THE STORE. IF USED COMMERCIALLY WARRANTY IS VOID. ©2012 Techtronic Floor Care Technology Limited. Questions or concerns? All Rights Reserved. #961151061 ID:105881 R1 OWNER'S MANUAL Operating and Servicing Instructions Español - página E1 www.hoover.com IMPORTANT: READ CAREFULLY BEFORE ASSEMBLY AND USE. For assistance, please call Customer Service at 1-800-944-9200 Mon-Fri 8am-7pm EST.
Product Manual
Page 3
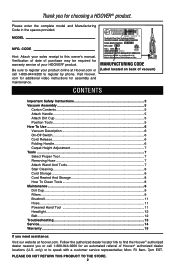
...5 Attach Handle 5 Attach Dirt Cup 5 Position Tools 5 How To Use ...6 Vacuum Description 6 On-Off Switch 6 Cord Release 6 Folding Handle 6 Carpet Height Adjustment 7 Tools ...7 Select Proper Tool 7 Removing Hose 7 Attach Wand And Tools 7 Stair Cleaning 8 Cord Storage 8 Cord Rewind And Storage 8 How To Clean Tools 8 Maintenance ...8 Dirt Cup...9 Filters ...9 Brushroll ...11 Hose...11 Powered Hand Tool 11 Headlight ...12 Belt...12 Troubleshooting 13 Service...14 Warranty ...15 If you need assistance: Visit our website at hoover.com. CODE Hint: Attach your HOOVER® product...
...5 Attach Handle 5 Attach Dirt Cup 5 Position Tools 5 How To Use ...6 Vacuum Description 6 On-Off Switch 6 Cord Release 6 Folding Handle 6 Carpet Height Adjustment 7 Tools ...7 Select Proper Tool 7 Removing Hose 7 Attach Wand And Tools 7 Stair Cleaning 8 Cord Storage 8 Cord Rewind And Storage 8 How To Clean Tools 8 Maintenance ...8 Dirt Cup...9 Filters ...9 Brushroll ...11 Hose...11 Powered Hand Tool 11 Headlight ...12 Belt...12 Troubleshooting 13 Service...14 Warranty ...15 If you need assistance: Visit our website at hoover.com. CODE Hint: Attach your HOOVER® product...
Product Manual
Page 6
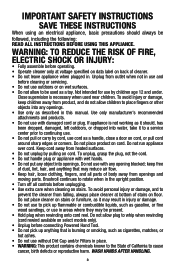
... attachments and products. • Do not use in . WARNING: TO REDUCE THE RISK OF FIRE, ELECTRIC SHOCK OR INJURY: • Fully assemble before connecting Powered Hand Tool. • Do not pick up flammable or combustible liquids, such as gasoline, or fine wood sandings, or use with any opening blocked; To unplug, grasp the plug, not the cord. • Do not handle plug or appliance with wet hands...
... attachments and products. • Do not use in . WARNING: TO REDUCE THE RISK OF FIRE, ELECTRIC SHOCK OR INJURY: • Fully assemble before connecting Powered Hand Tool. • Do not pick up flammable or combustible liquids, such as gasoline, or fine wood sandings, or use with any opening blocked; To unplug, grasp the plug, not the cord. • Do not handle plug or appliance with wet hands...
Product Manual
Page 7
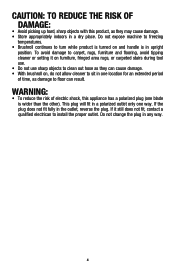
... area rugs, or carpeted stairs during tool use. • Do not use sharp objects to clean out hose as damage to floor can result. CAUTION: TO REDUCE THE RISK OF DAMAGE: • Avoid picking up hard, sharp objects with this appliance has a polarized plug (one way. To avoid damage to carpet, rugs, furniture and flooring, avoid tipping cleaner or setting it still does...
... area rugs, or carpeted stairs during tool use. • Do not use sharp objects to clean out hose as damage to floor can result. CAUTION: TO REDUCE THE RISK OF DAMAGE: • Avoid picking up hard, sharp objects with this appliance has a polarized plug (one way. To avoid damage to carpet, rugs, furniture and flooring, avoid tipping cleaner or setting it still does...
Product Manual
Page 10
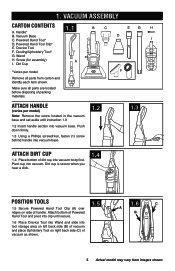
Powered Hand Tool* D. Push down firmly. 1.3 Using a Phillips screwdriver, fasten (1) screw behind handle into vacuum base. 1.2 1.3 ATTACH DIRT CUP 1.4 Place bottom of packing materials. Handle* B. Powered Hand Tool Clip* E. Screw (for assembly) I F ATTACH HANDLE (varies per model Remove all parts are located before disposing of dirt cup into vacuum. Attach bottom of Powered Hand Tool and pivot into clip until instruction 1.3 1.2 Insert handle section into tool storage area on left back side (B) of vacuum and place Upholstery Tool on side of vacuum as shown...
Powered Hand Tool* D. Push down firmly. 1.3 Using a Phillips screwdriver, fasten (1) screw behind handle into vacuum base. 1.2 1.3 ATTACH DIRT CUP 1.4 Place bottom of packing materials. Handle* B. Powered Hand Tool Clip* E. Screw (for assembly) I F ATTACH HANDLE (varies per model Remove all parts are located before disposing of dirt cup into vacuum. Attach bottom of Powered Hand Tool and pivot into clip until instruction 1.3 1.2 Insert handle section into tool storage area on left back side (B) of vacuum and place Upholstery Tool on side of vacuum as shown...
Product Manual
Page 11
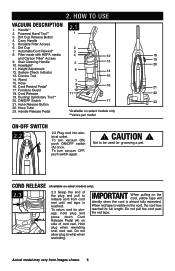
... 20 11. Cord Release 11 22 19. ON/OFF Switch 21. Do not allow plug to be used for storage, hold plug and press down Cord Release Pedal (A) on select models only) 2.3 Grasp the end of cord reel. Carry Handle 5. Filter made with HEPA media 4 12 18 and Carbon Filter* Access 9. CAUTION ! Dirt Cup Release Button 4. Not to whip when rewinding. System Check Indicator 14 13. Crevice Tool 15 14. 2. Powered Hand Tool** 1 3. Furniture...
... 20 11. Cord Release 11 22 19. ON/OFF Switch 21. Do not allow plug to be used for storage, hold plug and press down Cord Release Pedal (A) on select models only) 2.3 Grasp the end of cord reel. Carry Handle 5. Filter made with HEPA media 4 12 18 and Carbon Filter* Access 9. CAUTION ! Dirt Cup Release Button 4. Not to whip when rewinding. System Check Indicator 14 13. Crevice Tool 15 14. 2. Powered Hand Tool** 1 3. Furniture...
Product Manual
Page 14
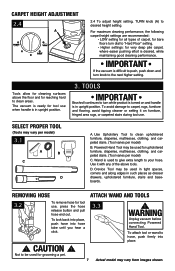
... used for grooming a pet. 7 Actual model may be used for upholstered furniture, draperies, mattresses, clothing, and carpeted stairs. (Tool varies per model) B. REMOVING HOSE ATTACH WAND AND TOOLS 3.2 To remove hose for tool use when handle is ready for tool use , press the hose release button and pull hose end out. Powered Hand Tool may vary per model) 3.1 A B C D A. D. CAUTION ! Crevice Tool may vary from images shown. Not to your hose. The vacuum is in upright position. 3. Wand is desired, while maintaining good cleaning...
... used for grooming a pet. 7 Actual model may be used for upholstered furniture, draperies, mattresses, clothing, and carpeted stairs. (Tool varies per model) B. REMOVING HOSE ATTACH WAND AND TOOLS 3.2 To remove hose for tool use when handle is ready for tool use , press the hose release button and pull hose end out. Powered Hand Tool may vary per model) 3.1 A B C D A. D. CAUTION ! Crevice Tool may vary from images shown. Not to your hose. The vacuum is in upright position. 3. Wand is desired, while maintaining good cleaning...
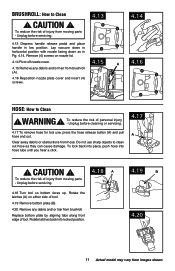
Product Manual
Page 15
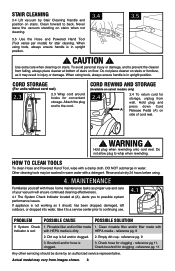
... service representative. When using tools, always ensure handle is in injury or damage. HOW TO CLEAN TOOLS To clean Hose and Powered Hand Tool, wipe with HEPA media is in water. MAINTENANCE Familiarize yourself with a detergent. Empty dirt cup - reference pg 11. Actual model may vary from wall. Clean forward to the cord. Hold plug and press down Cord A Release Pedal (A) on side of your vacuum will ensure continued cleaning effectiveness. 4.1 A 4.1 The System Check Indicator located...
... service representative. When using tools, always ensure handle is in injury or damage. HOW TO CLEAN TOOLS To clean Hose and Powered Hand Tool, wipe with HEPA media is in water. MAINTENANCE Familiarize yourself with a detergent. Empty dirt cup - reference pg 11. Actual model may vary from wall. Clean forward to the cord. Hold plug and press down Cord A Release Pedal (A) on side of your vacuum will ensure continued cleaning effectiveness. 4.1 A 4.1 The System Check Indicator located...
Product Manual
Page 18
... underwater. Do not use vacuum without dirt cup or filters in the upright position before cleaning or servicing. When the thermal protector activates the cleaner will deactivate and cleaning may seal the filter and cause a reduction in place. 4.6 4.7 A B 9 Actual model may vary from water and squeeze a final time to protect it from overheating. Turn cleaner OFF and unplug it from the electrical outlet. 2. Unplug before the dirt cup reaches the max...
... underwater. Do not use vacuum without dirt cup or filters in the upright position before cleaning or servicing. When the thermal protector activates the cleaner will deactivate and cleaning may seal the filter and cause a reduction in place. 4.6 4.7 A B 9 Actual model may vary from water and squeeze a final time to protect it from overheating. Turn cleaner OFF and unplug it from the electrical outlet. 2. Unplug before the dirt cup reaches the max...
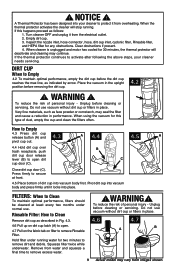
Product Manual
Page 19
... RINSE OR WASH THE FILTER MADE WITH HEPA MEDIA. Unplug before cleaning or servicing. Close lid securely by pushing at Hoover. Ask for Hoover® Part No. 902404001. Replace dirt cup as shown in Fig. 4.3. 4.9 Twist filter assembly (A) counterclockwise. Additional filter is located on the underside of filter. WARNING ! Do not use vacuum without dirt cup or filters in place. 4.9 A 4.10 Remove dirt cup as described in slots, pull filter frame (A) straight out. Actual model may...
... RINSE OR WASH THE FILTER MADE WITH HEPA MEDIA. Unplug before cleaning or servicing. Close lid securely by pushing at Hoover. Ask for Hoover® Part No. 902404001. Replace dirt cup as shown in Fig. 4.3. 4.9 Twist filter assembly (A) counterclockwise. Additional filter is located on the underside of filter. WARNING ! Do not use vacuum without dirt cup or filters in place. 4.9 A 4.10 Remove dirt cup as described in slots, pull filter frame (A) straight out. Actual model may...
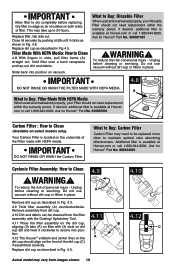
Product Manual
Page 22
... position. 4.19 B 4.20 11 Actual model may vary from brushroll. BRUSHROLL: How to clean out hose as in low position. Unplug before servicing. 4.18 A 4.18 Turn tool so bottom faces up. Unplug before servicing. 4.13 Depress handle release pedal and place handle in Fig. 4.14. Unplug before cleaning or servicing. 4.17 To remove hose for tool use sharp objects to Clean ! Replace bottom plate by aligning tabs along front edge...
... position. 4.19 B 4.20 11 Actual model may vary from brushroll. BRUSHROLL: How to clean out hose as in low position. Unplug before servicing. 4.18 A 4.18 Turn tool so bottom faces up. Unplug before servicing. 4.13 Depress handle release pedal and place handle in Fig. 4.14. Unplug before cleaning or servicing. 4.17 To remove hose for tool use sharp objects to Clean ! Replace bottom plate by aligning tabs along front edge...
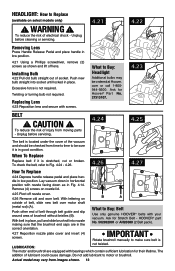
Product Manual
Page 23
... Reposition lens and secure with nozzle facing down in low position. Unplug before cleaning or servicing. 4.21 4.22 Removing Lens Press Handle Release Pedal and place handle in low position. 4.21 Using a Phillips screwdriver, remove (2) screws as in the What to make sure belt is not required. Remove (4) screws on select models only) ! IMPORTANT Rotate brushroll manually to Buy: Belt Use only genuine HOOVER® belts with bearings which contain...
... Reposition lens and secure with nozzle facing down in low position. Unplug before cleaning or servicing. 4.21 4.22 Removing Lens Press Handle Release Pedal and place handle in low position. 4.21 Using a Phillips screwdriver, remove (2) screws as in the What to make sure belt is not required. Remove (4) screws on select models only) ! IMPORTANT Rotate brushroll manually to Buy: Belt Use only genuine HOOVER® belts with bearings which contain...
Product Manual
Page 26
... 1. Low vacuum suction. Pg. 11. 13 Power cord not firmly plugged into water, take it to a service center prior to appropriate setting for the nearest authorized service representative Dust escaping from brushroll - Check fuse or breaker in firmly. 2. Pg. 9. 2. Review Dirt Cup removal & replacement - Headlight not working as it usually can be done by using tool applying light pressure. 2. Pg. 12. 2. Pg. 11 3. Unplug vacuum before servicing. Thermal Protector activated. 3. Pg.12. 4. Hose not installed correctly. 4. Loose electrical wires. 3. Pg...
... 1. Low vacuum suction. Pg. 11. 13 Power cord not firmly plugged into water, take it to a service center prior to appropriate setting for the nearest authorized service representative Dust escaping from brushroll - Check fuse or breaker in firmly. 2. Pg. 9. 2. Review Dirt Cup removal & replacement - Headlight not working as it usually can be done by using tool applying light pressure. 2. Pg. 12. 2. Pg. 11 3. Unplug vacuum before servicing. Thermal Protector activated. 3. Pg.12. 4. Hose not installed correctly. 4. Loose electrical wires. 3. Pg...

Product Manual
Page 27
... need further assistance: To speak with a customer service representative call 1-800-944-9200. 6. Do not send your vacuum by : • Checking the Yellow Pages under "Vacuum Cleaners" or "Household". • Visit our website at hoover.com (U.S. Mon-Fri 8am-7pm EST. SERVICE To obtain approved Hoover® service and genuine Hoover® parts, locate the nearest Authorized Hoover® Warranty Service Dealer (Depot) by the complete model number...
... need further assistance: To speak with a customer service representative call 1-800-944-9200. 6. Do not send your vacuum by : • Checking the Yellow Pages under "Vacuum Cleaners" or "Household". • Visit our website at hoover.com (U.S. Mon-Fri 8am-7pm EST. SERVICE To obtain approved Hoover® service and genuine Hoover® parts, locate the nearest Authorized Hoover® Warranty Service Dealer (Depot) by the complete model number...
Product Manual
Page 30
... rental services), brushroll, belt, improper maintenance of Canada. For additional assistance or information concerning this Warranty or the availability of Hoover® products. WHAT THIS WARRANTY DOES NOT COVER This Warranty does not cover: use of the product in a commercial operation (such as warranted, take or send the product to either a Hoover® Authorized Warranty Service Dealer along with the Owner's Manual, your product to correct any replacement or repair performed...
... rental services), brushroll, belt, improper maintenance of Canada. For additional assistance or information concerning this Warranty or the availability of Hoover® products. WHAT THIS WARRANTY DOES NOT COVER This Warranty does not cover: use of the product in a commercial operation (such as warranted, take or send the product to either a Hoover® Authorized Warranty Service Dealer along with the Owner's Manual, your product to correct any replacement or repair performed...


