Manual
Page 1
THIS PRODUCT IS INTENDED FOR HOUSEHOLD USE ONLY. Questions or concerns? All rights reserved. #961101001-01 ID 100148-R0 PLEASE DO NOT RETURN THIS PRODUCT TO THE STORE. Owner's Manual Operating and Servicing Instructions Español - For assistance, please call Customer Service at 1-800-944-9200 Mon-Fri 8am-7pm EST. IF USED COMMERCIALLY WARRANTY IS VOID. ©2010 Techtronic Floor Care Technology Limited. página E1 www.hoover.com IMPORTANT: READ CAREFULLY BEFORE ASSEMBLY AND USE.
THIS PRODUCT IS INTENDED FOR HOUSEHOLD USE ONLY. Questions or concerns? All rights reserved. #961101001-01 ID 100148-R0 PLEASE DO NOT RETURN THIS PRODUCT TO THE STORE. Owner's Manual Operating and Servicing Instructions Español - For assistance, please call Customer Service at 1-800-944-9200 Mon-Fri 8am-7pm EST. IF USED COMMERCIALLY WARRANTY IS VOID. ©2010 Techtronic Floor Care Technology Limited. página E1 www.hoover.com IMPORTANT: READ CAREFULLY BEFORE ASSEMBLY AND USE.
Manual
Page 2
...code in China Manufacturing code (Label located on bottom of Hoover® authorized dealer locations (U.S. Made in the spaces provided. Follow the authorized dealer locator link to find the Hoover® authorized dealer nearest you or call 1-800-944-9200...automated referral of vacuum) Contents Important Safety Instructions 3 Vacuum Assembly 5 Carton Contents 5 Attach Handle 5 Attach Dirt Cup 5 Position Tools 5 How To Use...6 Vacuum Description 6 On-Off Switch 6 Carry Handle 6 Cord Storage 6 Telescopic D-Grip Handle 7 Handle Positions 7 Tools ...7 Select Proper Tool 7 ...
...code in China Manufacturing code (Label located on bottom of Hoover® authorized dealer locations (U.S. Made in the spaces provided. Follow the authorized dealer locator link to find the Hoover® authorized dealer nearest you or call 1-800-944-9200...automated referral of vacuum) Contents Important Safety Instructions 3 Vacuum Assembly 5 Carton Contents 5 Attach Handle 5 Attach Dirt Cup 5 Position Tools 5 How To Use...6 Vacuum Description 6 On-Off Switch 6 Carry Handle 6 Cord Storage 6 Telescopic D-Grip Handle 7 Handle Positions 7 Tools ...7 Select Proper Tool 7 ...
Manual
Page 3
...appliance when plugged in. keep children away from falling, always place cleaner at voltage specified on data label on stairs. Not intended for use by cord, use with wet hands. • Do not put any opening blocked; Do not run appliance over cord. WARNING: TO REDUCE THE RISK OF...the plug, not the cord. • Do not handle plug or appliance with damaged cord or plug. IMPORTANT SAFETY INSTRUCTIONS SAVE THESE INSTRUCTIONS When using an electrical appliance, basic precautions should , has been dropped, damaged, left outdoors, or dropped into openings. Do not place product on cord, ...
...appliance when plugged in. keep children away from falling, always place cleaner at voltage specified on data label on stairs. Not intended for use by cord, use with wet hands. • Do not put any opening blocked; Do not run appliance over cord. WARNING: TO REDUCE THE RISK OF...the plug, not the cord. • Do not handle plug or appliance with damaged cord or plug. IMPORTANT SAFETY INSTRUCTIONS SAVE THESE INSTRUCTIONS When using an electrical appliance, basic precautions should , has been dropped, damaged, left outdoors, or dropped into openings. Do not place product on cord, ...
Manual
Page 4
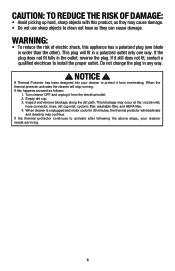
CAUTION: TO REDUCE THE RISK OF DAMAGE: • Avoid picking up hard, sharp objects with this product, as they may cause damage. • Do not use sharp objects to clean out hose as follows: 1. If the plug does not fit fully in any way. ! Do not change the plug in the ...
CAUTION: TO REDUCE THE RISK OF DAMAGE: • Avoid picking up hard, sharp objects with this product, as they may cause damage. • Do not use sharp objects to clean out hose as follows: 1. If the plug does not fit fully in any way. ! Do not change the plug in the ...

Manual
Page 6
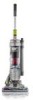
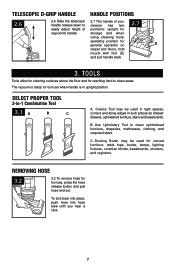
...turn brushroll OFF, push switch again. Filter made with HEPA media 10. Furniture Guard 16. Cord Release 18. This cleaner is intended for household use. *Available on cord hooks for convenient storage. 2.4 Attach the plug end to the cord. 2.5 Twist upper cord hook (D) to allow cord... C The cleaner can be released. 2.5 D 6 Hose Release Button 15. To turn brushroll ON, push ON/OFF switch (B) once. 2. HOW TO USE Vacuum Description 1. Brushroll Reset Button 20. D-Grip Handle 2. Dirt Cup Release Button 7. To turn vacuum ON, push ON/OFF switch (A) once. Wand 3....
...turn brushroll OFF, push switch again. Filter made with HEPA media 10. Furniture Guard 16. Cord Release 18. This cleaner is intended for household use. *Available on cord hooks for convenient storage. 2.4 Attach the plug end to the cord. 2.5 Twist upper cord hook (D) to allow cord... C The cleaner can be released. 2.5 D 6 Hose Release Button 15. To turn brushroll ON, push ON/OFF switch (B) once. 2. HOW TO USE Vacuum Description 1. Brushroll Reset Button 20. D-Grip Handle 2. Dirt Cup Release Button 7. To turn vacuum ON, push ON/OFF switch (A) once. Wand 3....
Manual
Page 7
... hard to clean upholstered furniture, draperies, mattresses, clothing, and carpeted stairs. Removing Hose 3.2 3.2 To remove hose for tool use when handle is ready for tool use , press the hose release button and pull hose end out. hold nozzle with foot (E) and pull handle back. 3. The... vacuum is in upright position. Use Upholstery Tool to clean areas. operating position for carved furniture, table tops, books, lamps, lighting fixtures, venetian blinds, baseboards, shutters,...
... hard to clean upholstered furniture, draperies, mattresses, clothing, and carpeted stairs. Removing Hose 3.2 3.2 To remove hose for tool use when handle is ready for tool use , press the hose release button and pull hose end out. hold nozzle with foot (E) and pull handle back. 3. The... vacuum is in upright position. Use Upholstery Tool to clean areas. operating position for carved furniture, table tops, books, lamps, lighting fixtures, venetian blinds, baseboards, shutters,...
Manual
Page 8
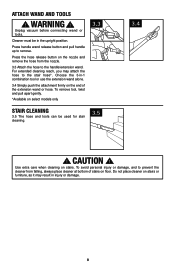
..., and to prevent the cleaner from the nozzle. 3.3 Attach the hose to the handle/extension wand. Choose the 3-in-1 combination tool or use the extension wand alone. 3.4 Simply push the attachment firmly on select models only 3.3 Stair Cleaning 3.5 The hose and tools can be in... injury or damage. 8 Cleaner must be used for stair cleaning. 3.5 3.4 ! Unplug vacuum before connecting wand or tools. Attach Wand and Tools ! WARNING ! Press the hose release button on the...
..., and to prevent the cleaner from the nozzle. 3.3 Attach the hose to the handle/extension wand. Choose the 3-in-1 combination tool or use the extension wand alone. 3.4 Simply push the attachment firmly on select models only 3.3 Stair Cleaning 3.5 The hose and tools can be in... injury or damage. 8 Cleaner must be used for stair cleaning. 3.5 3.4 ! Unplug vacuum before connecting wand or tools. Attach Wand and Tools ! WARNING ! Press the hose release button on the...
Manual
Page 9
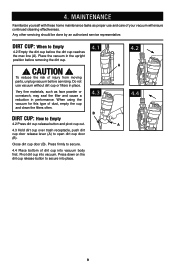
Place the vacuum in performance. Very fine materials, such as proper use vacuum without dirt cup or filters in place. 4. MAINTENANCE Familiarize yourself with these home maintenance tasks as face powder or cornstarch, may seal the filter ... cup before removing the dirt cup. 4.1 ! To reduce the risk of your vacuum will ensure continued cleaning effectiveness. When using the vacuum for this type of dirt cup into vacuum. Do not use and care of injury from moving parts, unplug vacuum before servicing. Close dirt cup door (B). Dirt Cup: When to...
Place the vacuum in performance. Very fine materials, such as proper use vacuum without dirt cup or filters in place. 4. MAINTENANCE Familiarize yourself with these home maintenance tasks as face powder or cornstarch, may seal the filter ... cup before removing the dirt cup. 4.1 ! To reduce the risk of your vacuum will ensure continued cleaning effectiveness. When using the vacuum for this type of dirt cup into vacuum. Do not use and care of injury from moving parts, unplug vacuum before servicing. Close dirt cup door (B). Dirt Cup: When to...
Manual
Page 10
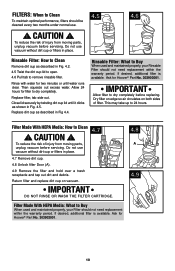
To reduce the risk of injury from moving parts, unplug vacuum before servicing. Rinse with water for Hoover® Part No. 303902001. 4.8 A 4.9 10 Replace filter, tab side out. Do not use . ! Ask for two minutes or until it clicks as shown in Fig. 4.2. 4.5 Twist the dirt cup lid to... open. 4.6 Pull tab to Buy When used and maintained properly, your Filter should not need replacement within the warranty period. This may take up to dry completely. Allow 24 hours for Hoover® Part No. 303903001. Ask for filter to 24 hours. Filter ...
To reduce the risk of injury from moving parts, unplug vacuum before servicing. Rinse with water for Hoover® Part No. 303902001. 4.8 A 4.9 10 Replace filter, tab side out. Do not use . ! Ask for two minutes or until it clicks as shown in Fig. 4.2. 4.5 Twist the dirt cup lid to... open. 4.6 Pull tab to Buy When used and maintained properly, your Filter should not need replacement within the warranty period. This may take up to dry completely. Allow 24 hours for Hoover® Part No. 303903001. Ask for filter to 24 hours. Filter ...
Manual
Page 11
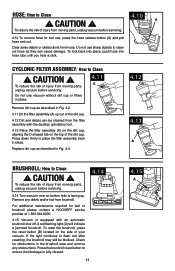
...4.14 11 4.15 A B A red flashing light (A) will indicate a jammed brushroll. Remove any obstructions. Check for belt or brushroll please contact a HOOVER® service provider at 1-800-944-9200. 4.15 Vacuum is facing up out of injury from brushroll. CAUTION ! To reduce the risk of the dirt... cup. 4.12 Dirt and debris can cause damage. Do not use , press the hose release button (A) and pull hose end out. For additional maintenance required for obstructions in Fig. 4.2. 4.11 Lift the filter ...
...4.14 11 4.15 A B A red flashing light (A) will indicate a jammed brushroll. Remove any obstructions. Check for belt or brushroll please contact a HOOVER® service provider at 1-800-944-9200. 4.15 Vacuum is facing up out of injury from brushroll. CAUTION ! To reduce the risk of the dirt... cup. 4.12 Dirt and debris can cause damage. Do not use , press the hose release button (A) and pull hose end out. For additional maintenance required for obstructions in Fig. 4.2. 4.11 Lift the filter ...
Manual
Page 12
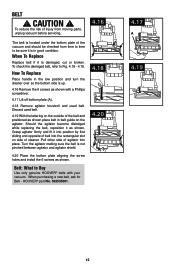
... Belt: What to Fig. 4.16 - 4.18. To check the damaged belt, refer to Buy Use only genuine HOOVER® belts with a Phillips screwdriver. 4.17 Lift off bottom plate (A). 4.18 Remove agitator brushroll and used belt. 4.19 With the lettering on the outside of belt into place. Turn the agitator making sure...damaged, cut or broken. How To Replace Place handle in belt guide on side of agitator into the rectangular slot on the agitator. Discard used belt. When To Replace Replace belt if it is not pinched between agitator and agitator shield. 4.20 Place the bottom plate aligning the ...
... Belt: What to Fig. 4.16 - 4.18. To check the damaged belt, refer to Buy Use only genuine HOOVER® belts with a Phillips screwdriver. 4.17 Lift off bottom plate (A). 4.18 Remove agitator brushroll and used belt. 4.19 With the lettering on the outside of belt into place. Turn the agitator making sure...damaged, cut or broken. How To Replace Place handle in belt guide on side of agitator into the rectangular slot on the agitator. Discard used belt. When To Replace Replace belt if it is not pinched between agitator and agitator shield. 4.20 Place the bottom plate aligning the ...
Manual
Page 13
5. TROUBLESHOOTING If a minor problem occurs, it usually can be done by using the checklist below. WARNING ! unplug vacuum before servicing. Replace fuse/reset breaker in firmly. Automatic brushroll shut-off engaged. 5. with HEPA media not installed completely. 1. ...
5. TROUBLESHOOTING If a minor problem occurs, it usually can be done by using the checklist below. WARNING ! unplug vacuum before servicing. Replace fuse/reset breaker in firmly. Automatic brushroll shut-off engaged. 5. with HEPA media not installed completely. 1. ...

Manual
Page 15
...This warranty gives you . WARRANTY Limited TWO Year Warranty (Domestic Use) WHAT THIS WARRANTY COVERS When used and maintained in normal household use outside the country in which the product was initially purchased and resales of Hoover® products. For an automated referral to authorized service outlets in... ARISING FROM ANY CAUSE WHATSOEVER. WHAT THIS WARRANTY DOES NOT COVER This Warranty does not cover: use of the product in accordance with proof of Hoover®, owner's acts or omissions, use and in a commercial operation (such as warranted, take or send the product to either...
...This warranty gives you . WARRANTY Limited TWO Year Warranty (Domestic Use) WHAT THIS WARRANTY COVERS When used and maintained in normal household use outside the country in which the product was initially purchased and resales of Hoover® products. For an automated referral to authorized service outlets in... ARISING FROM ANY CAUSE WHATSOEVER. WHAT THIS WARRANTY DOES NOT COVER This Warranty does not cover: use of the product in accordance with proof of Hoover®, owner's acts or omissions, use and in a commercial operation (such as warranted, take or send the product to either...


