Manual
Page 2
...Vacuum Description 6 On-Off Switch 6 Carry Handle 6 Cord Storage 6 Telescopic D-Grip Handle 7 Handle Positions 7 Tools ...7 Select Proper Tool 7 Removing Hose 7 Attach Wand And Tools 8 Stair Cleaning 8 Maintenance...9 Dirt Cup...9 Filters...10 Brushroll...11 Belt...12 Troubleshooting 13 Service...14 Warranty...15 If you need assistance: Visit our website at Hoover... register by phone. only) or to this owner's manual. CODE Hint: Attach your product online at hoover.com. Be sure to register your sales receipt to speak with a customer service representative; Model 1-800-...
...Vacuum Description 6 On-Off Switch 6 Carry Handle 6 Cord Storage 6 Telescopic D-Grip Handle 7 Handle Positions 7 Tools ...7 Select Proper Tool 7 Removing Hose 7 Attach Wand And Tools 8 Stair Cleaning 8 Maintenance...9 Dirt Cup...9 Filters...10 Brushroll...11 Belt...12 Troubleshooting 13 Service...14 Warranty...15 If you need assistance: Visit our website at Hoover... register by phone. only) or to this owner's manual. CODE Hint: Attach your product online at hoover.com. Be sure to register your sales receipt to speak with a customer service representative; Model 1-800-...
Manual
Page 3
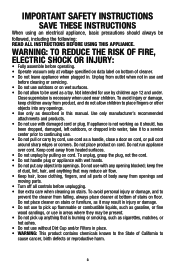
... cause cancer, birth defects or reproductive harm. 3 WARNING: TO REDUCE THE RISK OF FIRE, ELECTRIC SHOCK OR INJURY: • Fully assemble before operating. • Operate vacuum only at bottom of cleaner. • Do not leave appliance when plugged in areas where they may be followed, including the following: READ ALL INSTRUCTIONS...
... cause cancer, birth defects or reproductive harm. 3 WARNING: TO REDUCE THE RISK OF FIRE, ELECTRIC SHOCK OR INJURY: • Fully assemble before operating. • Operate vacuum only at bottom of cleaner. • Do not leave appliance when plugged in areas where they may be followed, including the following: READ ALL INSTRUCTIONS...
Manual
Page 5
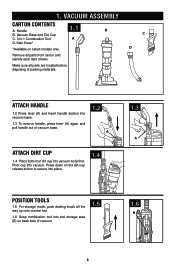
... Attach handle 1.2 Press lever (A) and Insert handle section into vacuum body first. Pivot cup into tool storage area (B) on back side of vacuum. 1.5 1.6 B 5 Handle B. Make sure all parts are located before disposing of dirt cup into vacuum base. 1.3 To remove handle, press lever (A) again and...packing materials. Press down on select models only. 1.1 A B C D Remove all the way up onto crevice tool. 1.6 Snap combination tool into vacuum. Stair Hose* *Available on the dirt cup release button to secure into place. 1.4 1.3 A Position Tools 1.5 For storage mode, push dusting ...
... Attach handle 1.2 Press lever (A) and Insert handle section into vacuum body first. Pivot cup into tool storage area (B) on back side of vacuum. 1.5 1.6 B 5 Handle B. Make sure all parts are located before disposing of dirt cup into vacuum base. 1.3 To remove handle, press lever (A) again and...packing materials. Press down on select models only. 1.1 A B C D Remove all the way up onto crevice tool. 1.6 Snap combination tool into vacuum. Stair Hose* *Available on the dirt cup release button to secure into place. 1.4 1.3 A Position Tools 1.5 For storage mode, push dusting ...

Manual
Page 6
... on select models only 13 5 4 11 12 ON-OFF Switch Plug cord into electrical outlet. 2.2 A B To turn vacuum OFF, push switch again. To turn brushroll ON, push ON/OFF switch (B) once. HOW TO USE Vacuum Description 1. ON/OFF Power Switch 5. Hose Release Button 15. Cord STORAGE 2.4 Wrap cord on cord hooks for... cleaner is intended for convenient storage. 2.4 Attach the plug end to the cord. 2.5 Twist upper cord hook (D) to allow cord to Handle 14. To turn vacuum ON, push ON/OFF switch (A) once.
... on select models only 13 5 4 11 12 ON-OFF Switch Plug cord into electrical outlet. 2.2 A B To turn vacuum OFF, push switch again. To turn brushroll ON, push ON/OFF switch (B) once. HOW TO USE Vacuum Description 1. ON/OFF Power Switch 5. Hose Release Button 15. Cord STORAGE 2.4 Wrap cord on cord hooks for... cleaner is intended for convenient storage. 2.4 Attach the plug end to the cord. 2.5 Twist upper cord hook (D) to allow cord to Handle 14. To turn vacuum ON, push ON/OFF switch (A) once.
Manual
Page 7
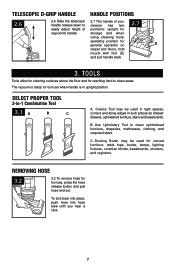
... such places as dresser drawers, upholstered furniture, stairs and baseboards. Crevice Tool may be used for ergonomic handle storage and when using cleaning tools; The vacuum is ready for tool use when handle is in upright position. Use Upholstery Tool to cleaner has two 2.7 easily adjust height of positions: upright for...
... such places as dresser drawers, upholstered furniture, stairs and baseboards. Crevice Tool may be used for ergonomic handle storage and when using cleaning tools; The vacuum is ready for tool use when handle is in upright position. Use Upholstery Tool to cleaner has two 2.7 easily adjust height of positions: upright for...
Manual
Page 8
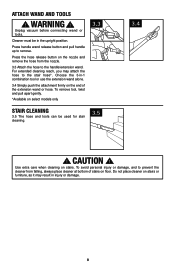
... the cleaner from the nozzle. 3.3 Attach the hose to the handle/extension wand. For extended cleaning reach, you may result in injury or damage. 8 Unplug vacuum before connecting wand or tools. Press the hose release button on stairs or furniture, as it may attach the hose to remove. Press handle wand...
... the cleaner from the nozzle. 3.3 Attach the hose to the handle/extension wand. For extended cleaning reach, you may result in injury or damage. 8 Unplug vacuum before connecting wand or tools. Press the hose release button on stairs or furniture, as it may attach the hose to remove. Press handle wand...
Manual
Page 9
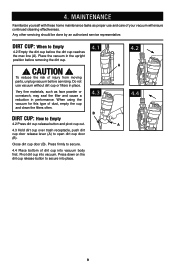
...: When to secure. 4.4 Place bottom of dust, empty the cup and clean the filters often. When using the vacuum for this type of dirt cup into vacuum. Pivot dirt cup into vacuum body first. Place the vacuum in place. CAUTION ! Do not use and care of injury from moving parts, unplug... vacuum before servicing. 4. Press firmly to Empty 4.2 Empty the dirt cup before removing the dirt cup. 4.1 ! Very fine materials, such as proper use vacuum without dirt cup or filters in the upright position before the dirt cup...
...: When to secure. 4.4 Place bottom of dust, empty the cup and clean the filters often. When using the vacuum for this type of dirt cup into vacuum. Pivot dirt cup into vacuum body first. Place the vacuum in place. CAUTION ! Do not use and care of injury from moving parts, unplug... vacuum before servicing. 4. Press firmly to Empty 4.2 Empty the dirt cup before removing the dirt cup. 4.1 ! Very fine materials, such as proper use vacuum without dirt cup or filters in the upright position before the dirt cup...
Manual
Page 10
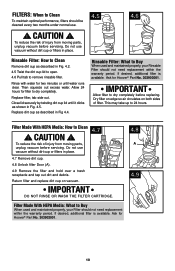
... Made With HEPA Media: How to dry completely. CAUTION ! If desired, additional filter is available. CAUTION ! Ask for Hoover® Part No. 303902001. 4.8 A 4.9 10 Dry filter on edge so air circulates on vacuum. Return filter and replace dirt cup on both sides of injury from moving parts, unplug... vacuum before servicing. Filter Made With HEPA Media: What to Buy When used and maintained properly, your Filter should be cleaned every two months under normal use. ! Ask for Hoover® Part No. 303903001. Filters: When to Clean...
... Made With HEPA Media: How to dry completely. CAUTION ! If desired, additional filter is available. CAUTION ! Ask for Hoover® Part No. 303902001. 4.8 A 4.9 10 Dry filter on edge so air circulates on vacuum. Return filter and replace dirt cup on both sides of injury from moving parts, unplug... vacuum before servicing. Filter Made With HEPA Media: What to Buy When used and maintained properly, your Filter should be cleaned every two months under normal use. ! Ask for Hoover® Part No. 303903001. Filters: When to Clean...
Manual
Page 11
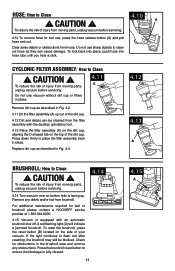
... to flash red after resetting, the brushroll may still be cleaned from moving parts, unplug vacuum before servicing. 4.10 To remove hose for belt or brushroll please contact a HOOVER® service provider at 1-800-944-9200. 4.15 Vacuum is facing up out of injury from the filter assembly with an automatic brushroll shut...
... to flash red after resetting, the brushroll may still be cleaned from moving parts, unplug vacuum before servicing. 4.10 To remove hose for belt or brushroll please contact a HOOVER® service provider at 1-800-944-9200. 4.15 Vacuum is facing up out of injury from the filter assembly with an automatic brushroll shut...
Manual
Page 12
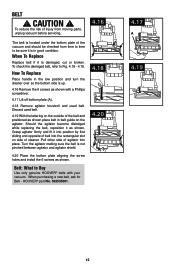
... into place. Discard used belt. Pull other side of the belt and positioned as shown with your vacuum. Belt: What to Fig. 4.16 - 4.18. To check the damaged belt, refer to Buy Use only genuine HOOVER® belts with a Phillips screwdriver. 4.17 Lift off bottom plate (A). 4.18 Remove agitator brushroll and used... bottom plate aligning the screw holes and install the 6 screws as shown. Turn the agitator making sure the belt is damaged, cut or broken. Belt ! HOOVER® part No. 562535001. 4.18 4.20 4.17 A 4.19 12 When To Replace Replace belt if it as shown.
... into place. Discard used belt. Pull other side of the belt and positioned as shown with your vacuum. Belt: What to Fig. 4.16 - 4.18. To check the damaged belt, refer to Buy Use only genuine HOOVER® belts with a Phillips screwdriver. 4.17 Lift off bottom plate (A). 4.18 Remove agitator brushroll and used... bottom plate aligning the screw holes and install the 6 screws as shown. Turn the agitator making sure the belt is damaged, cut or broken. Belt ! HOOVER® part No. 562535001. 4.18 4.20 4.17 A 4.19 12 When To Replace Replace belt if it as shown.
Manual
Page 13
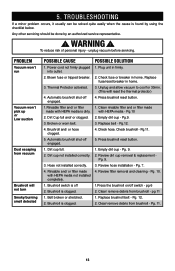
... 3. Pg.11. 5. Review dirt cup removal & replacement Pg. 9. 3. Hose not installed correctly. 3. Pg. 10. Clear/ remove debris from vacuum Brushroll will not turn Smoky/burning smell detected POSSIBLE CAUSE POSSIBLE SOLUTION 1. pg 11 1. Pg. 11. 13 into outlet. 2. Replace fuse/reset breaker ...by using the checklist below. Any other servicing should be solved quite easily when the cause is clogged. 2. WARNING ! PROBLEM Vacuum won't run Vacuum won't pick up or Low suction Dust escaping from brushroll - Power cord not firmly plugged 1. Blown fuse or tripped breaker...
... 3. Pg.11. 5. Review dirt cup removal & replacement Pg. 9. 3. Hose not installed correctly. 3. Pg. 10. Clear/ remove debris from vacuum Brushroll will not turn Smoky/burning smell detected POSSIBLE CAUSE POSSIBLE SOLUTION 1. pg 11 1. Pg. 11. 13 into outlet. 2. Replace fuse/reset breaker ...by using the checklist below. Any other servicing should be solved quite easily when the cause is clogged. 2. WARNING ! PROBLEM Vacuum won't run Vacuum won't pick up or Low suction Dust escaping from brushroll - Power cord not firmly plugged 1. Blown fuse or tripped breaker...

Manual
Page 14
...-944-9200; Always identify your vacuum to Hoover®, Inc., Company in delay. Do not send your vacuum by : • Checking the Yellow Pages under "Vacuum Cleaners" or "Household". • Visit our website at hoover.com (U.S. 6. Service To obtain approved Hoover® service and genuine Hoover® parts, locate the nearest Authorized Hoover® Warranty Service Dealer (Depot...
...-944-9200; Always identify your vacuum to Hoover®, Inc., Company in delay. Do not send your vacuum by : • Checking the Yellow Pages under "Vacuum Cleaners" or "Household". • Visit our website at hoover.com (U.S. 6. Service To obtain approved Hoover® service and genuine Hoover® parts, locate the nearest Authorized Hoover® Warranty Service Dealer (Depot...


