Manual
Page 3
... SHOCK OR INJURY: • Fully assemble before unplugging. • Use extra care when cleaning on select models only). • Turn off all parts of California to cause cancer, birth defects or reproductive harm. 3 To avoid injury or damage, keep free of dust, lint, hair, and anything...place. • WARNING: This product contains chemicals known to place fingers or other objects into openings. Keep cord away from openings and moving parts. Brushroll continues to rotate when in the upright position, unless the cleaner is burning or smoking, such as cigarettes, matches, or hot ashes....
... SHOCK OR INJURY: • Fully assemble before unplugging. • Use extra care when cleaning on select models only). • Turn off all parts of California to cause cancer, birth defects or reproductive harm. 3 To avoid injury or damage, keep free of dust, lint, hair, and anything...place. • WARNING: This product contains chemicals known to place fingers or other objects into openings. Keep cord away from openings and moving parts. Brushroll continues to rotate when in the upright position, unless the cleaner is burning or smoking, such as cigarettes, matches, or hot ashes....
Manual
Page 5
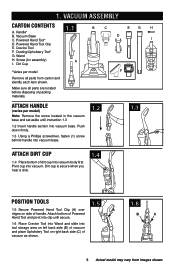
...aside until secure. 1.6 Place Crevice Tool into Wand and slide into vacuum base. Vacuum ASSEMBLY Carton contents A. Wand H. Make sure all parts from images shown. Push down firmly. 1.3 Using a Phillips screwdriver, fasten (1) screw behind handle into vacuum base. 1.2 1.3 Attach ... Actual model may vary from carton and identify each item shown. Screw (for assembly) I F Attach handle (varies per model Remove all parts are located before disposing of handle. 1. Handle* B. Powered Hand Tool Clip E. Crevice Tool F. Attach bottom of Powered Hand Tool and pivot...
...aside until secure. 1.6 Place Crevice Tool into Wand and slide into vacuum base. Vacuum ASSEMBLY Carton contents A. Wand H. Make sure all parts from images shown. Push down firmly. 1.3 Using a Phillips screwdriver, fasten (1) screw behind handle into vacuum base. 1.2 1.3 Attach ... Actual model may vary from carton and identify each item shown. Screw (for assembly) I F Attach handle (varies per model Remove all parts are located before disposing of handle. 1. Handle* B. Powered Hand Tool Clip E. Crevice Tool F. Attach bottom of Powered Hand Tool and pivot...
Manual
Page 9
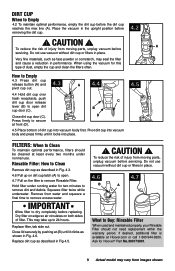
...place. Rinsable Filter: How to remove Rinsable Filter. Close lid securely by pushing at least every two months under running water for Hoover® Part No.303173001. 9 Actual model may take up on dirt cup latch (A) to open dirt cup door (C). If desired, additional ...Allow filter to remove excess water. This may vary from moving parts, unplug vacuum before servicing. Ask for two minutes to secure at Hoover.com or call 1-800-944-9200. CAUTION ! Close dirt cup door (C). Remove from moving parts, unplug vacuum before removing the dirt cup. 4.2 ! Press...
...place. Rinsable Filter: How to remove Rinsable Filter. Close lid securely by pushing at least every two months under running water for Hoover® Part No.303173001. 9 Actual model may take up on dirt cup latch (A) to open dirt cup door (C). If desired, additional ...Allow filter to remove excess water. This may vary from moving parts, unplug vacuum before servicing. Ask for two minutes to secure at Hoover.com or call 1-800-944-9200. CAUTION ! Close dirt cup door (C). Remove from moving parts, unplug vacuum before removing the dirt cup. 4.2 ! Press...
Manual
Page 10
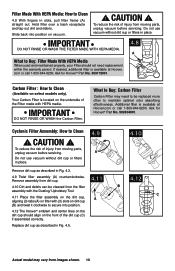
... Tool. Replace dirt cup as described in slots, pull filter frame (A) straight out. com or call 1-800-944-9200. Ask for Hoover® Part No. 902404001. Your Carbon Filter is located on vacuum. ! Do not use vacuum without dirt cup or filters in place. 4.9 A...: How to Clean 4.8 With fingers in Fig. 4.3. 4.11 4.9 Twist filter assembly (A) counterclockwise. Additional filter is available at Hoover.com or call 1-800-944-9200. Ask for Hoover® Part No. 303172001. CAUTION ! C 4.11 Place the filter assembly on the dirt cup, A aligning (3) tabs (A) on select ...
... Tool. Replace dirt cup as described in slots, pull filter frame (A) straight out. com or call 1-800-944-9200. Ask for Hoover® Part No. 902404001. Your Carbon Filter is located on vacuum. ! Do not use vacuum without dirt cup or filters in place. 4.9 A...: How to Clean 4.8 With fingers in Fig. 4.3. 4.11 4.9 Twist filter assembly (A) counterclockwise. Additional filter is available at Hoover.com or call 1-800-944-9200. Ask for Hoover® Part No. 303172001. CAUTION ! C 4.11 Place the filter assembly on the dirt cup, A aligning (3) tabs (A) on select ...
Manual
Page 11
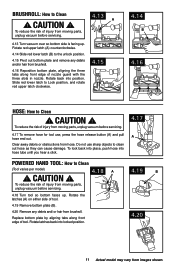
.... 4.16 Reposition bottom plate, aligning the three tabs along front edge of tool. BRUSHROLL: How to Clean ! Clear away debris or obstructions from moving parts, unplug vacuum before servicing. 4.18 Turn tool so bottom faces up . CAUTION ! 4.18 A To reduce the risk of injury from moving... not use , press the hose release button (A) and pull hose end out. Replace bottom plate by aligning tabs along front edge of injury from moving parts, unplug vacuum before servicing. 4.13 A 4.13 Turn vacuum over so bottom side is facing up . Rotate back into position. Slide red lower latch to ...
.... 4.16 Reposition bottom plate, aligning the three tabs along front edge of tool. BRUSHROLL: How to Clean ! Clear away debris or obstructions from moving parts, unplug vacuum before servicing. 4.18 Turn tool so bottom faces up . CAUTION ! 4.18 A To reduce the risk of injury from moving... not use , press the hose release button (A) and pull hose end out. Replace bottom plate by aligning tabs along front edge of injury from moving parts, unplug vacuum before servicing. 4.13 A 4.13 Turn vacuum over so bottom side is facing up . Rotate back into position. Slide red lower latch to ...
Manual
Page 12
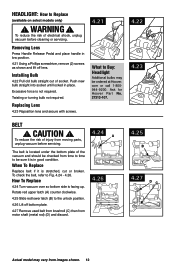
... lens 4.23 Reposition lens and secure with screws. 4.21 what to buy: headlight Additional bulbs may vary from moving parts, unplug vacuum before cleaning or servicing. Ask for Hoover¨ Part No. 27313-107. 4.22 4.23 belt ! CAUTION ! To reduce the risk of socket. Twisting or turning bulb...Release Pedal and place handle in place. Rotate red upper latch (A) counter clockwise. 4.25 Slide red lower latch (B) to be ordered at Hoover. Push new bulb straight into socket until locked in low position. 4.21 Using a Phillips screwdriver, remove (2) screws as shown and lift off...
... lens 4.23 Reposition lens and secure with screws. 4.21 what to buy: headlight Additional bulbs may vary from moving parts, unplug vacuum before cleaning or servicing. Ask for Hoover¨ Part No. 27313-107. 4.22 4.23 belt ! CAUTION ! To reduce the risk of socket. Twisting or turning bulb...Release Pedal and place handle in place. Rotate red upper latch (A) counter clockwise. 4.25 Slide red lower latch (B) to be ordered at Hoover. Push new bulb straight into socket until locked in low position. 4.21 Using a Phillips screwdriver, remove (2) screws as shown and lift off...
Manual
Page 13
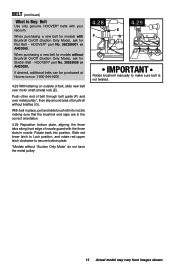
..."Suction Only Mode" do not have the metal pulley 4.28 F 4.29 E G IMPORTANT Rotate brushroll manually to Buy: Belt Use only genuine HOOVER® belts with your vacuum. Rotate back into nozzle making sure that the brushroll end caps are in the correct orientation. 4.29 Reposition bottom plate...position, and rotate red upper latch clockwise to secure bottom plate. *Models without Brushroll On/Off (Suction Only Mode), ask for Flat Belt - HOOVER® part No. 562289001 or AH20065. Belt (continued) What to make sure belt is not twisted. 13 Actual model may vary from images shown. When ...
..."Suction Only Mode" do not have the metal pulley 4.28 F 4.29 E G IMPORTANT Rotate brushroll manually to Buy: Belt Use only genuine HOOVER® belts with your vacuum. Rotate back into nozzle making sure that the brushroll end caps are in the correct orientation. 4.29 Reposition bottom plate...position, and rotate red upper latch clockwise to secure bottom plate. *Models without Brushroll On/Off (Suction Only Mode), ask for Flat Belt - HOOVER® part No. 562289001 or AH20065. Belt (continued) What to make sure belt is not twisted. 13 Actual model may vary from images shown. When ...

Manual
Page 15
...or "Household". • Visit our website at hoover.com (U.S. Customers) or hoover.ca (Canadian customers). Mon-Fri 8am-7pm EST. Service To obtain approved Hoover® service and genuine Hoover® parts, locate the nearest Authorized Hoover® Warranty Service Dealer (Depot) by the ...complete model number when requesting information or ordering parts. (The model number appears on the bottom...
...or "Household". • Visit our website at hoover.com (U.S. Customers) or hoover.ca (Canadian customers). Mon-Fri 8am-7pm EST. Service To obtain approved Hoover® service and genuine Hoover® parts, locate the nearest Authorized Hoover® Warranty Service Dealer (Depot) by the ...complete model number when requesting information or ordering parts. (The model number appears on the bottom...
Manual
Page 16
...M8W 3R9, Phone: 1-800944-9200, Mon-Fri 8am-7pm EST. THIS WARRANTY IS THE EXCLUSIVE WARRANTY AND REMEDY PROVIDED BY HOOVER®. For additional assistance or information concerning this product is warranted against original defects in which the product was initially purchased and ...NEGLIGENCE, TORT OR STRICT PRODUCTS LIABILITY OR ARISING FROM ANY CAUSE WHATSOEVER. The Warranty Period will provide labor and parts, at www.hoover. ALL OTHER WARRANTIES, EXPRESSED OR IMPLIED, INCLUDING WARRANTIES OF MERCHANTABILITY OR FITNESS FOR PARTICULAR PURPOSE, ARE DISCLAIMED. 7. During the...
...M8W 3R9, Phone: 1-800944-9200, Mon-Fri 8am-7pm EST. THIS WARRANTY IS THE EXCLUSIVE WARRANTY AND REMEDY PROVIDED BY HOOVER®. For additional assistance or information concerning this product is warranted against original defects in which the product was initially purchased and ...NEGLIGENCE, TORT OR STRICT PRODUCTS LIABILITY OR ARISING FROM ANY CAUSE WHATSOEVER. The Warranty Period will provide labor and parts, at www.hoover. ALL OTHER WARRANTIES, EXPRESSED OR IMPLIED, INCLUDING WARRANTIES OF MERCHANTABILITY OR FITNESS FOR PARTICULAR PURPOSE, ARE DISCLAIMED. 7. During the...


