Manual
Page 3
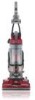
... fine wood sandings, or use to rotate when in the upright position, unless the cleaner is in . Keep cord away from openings and moving parts. Brushroll continues to pick up flammable or combustible liquids, such as a toy. WASH HANDS AFTER HANDLING. 3 Do not allow children to the ... of cleaner. • Do not leave appliance when plugged in "Suction Only Mode" (Available on select models only). • Turn off all parts of stairs on floor. Use only manufacturer's recommended attachments and products. • Do not use with damaged cord or plug. To avoid injury or...
... fine wood sandings, or use to rotate when in the upright position, unless the cleaner is in . Keep cord away from openings and moving parts. Brushroll continues to pick up flammable or combustible liquids, such as a toy. WASH HANDS AFTER HANDLING. 3 Do not allow children to the ... of cleaner. • Do not leave appliance when plugged in "Suction Only Mode" (Available on select models only). • Turn off all parts of stairs on floor. Use only manufacturer's recommended attachments and products. • Do not use with damaged cord or plug. To avoid injury or...
Manual
Page 5
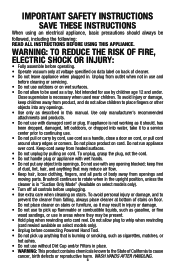
... H D I . Vacuum ASSEMBLY Carton contents A. Dusting/Upholstery Tool* G. Screw (for assembly) I F Attach handle (varies per model Remove all parts are located before disposing of dirt cup into tool storage area on left back side (B) of vacuum and place Upholstery Tool on side of vacuum...item shown. Attach bottom of Powered Hand Tool and pivot into clip until instruction 1.3 1.2 Insert handle section into vacuum base. Make sure all parts from images shown. Powered Hand Tool Clip E. 1. Wand H. Pivot cup into vacuum base. 1.2 1.3 Attach dirt cup 1.4 Place bottom ...
... H D I . Vacuum ASSEMBLY Carton contents A. Dusting/Upholstery Tool* G. Screw (for assembly) I F Attach handle (varies per model Remove all parts are located before disposing of dirt cup into tool storage area on left back side (B) of vacuum and place Upholstery Tool on side of vacuum...item shown. Attach bottom of Powered Hand Tool and pivot into clip until instruction 1.3 1.2 Insert handle section into vacuum base. Make sure all parts from images shown. Powered Hand Tool Clip E. 1. Wand H. Pivot cup into vacuum base. 1.2 1.3 Attach dirt cup 1.4 Place bottom ...
Manual
Page 9
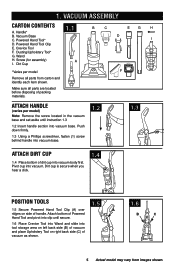
... the dirt cup reaches the max line (A). Replace dirt cup as shown in Fig. 4.3. 4.6 Pull up to remove excess water. CAUTION ! Ask for Hoover® Part No.303173001. 9 Actual model may seal the filter and cause a reduction in performance. Do not use vacuum without dirt cup or filters in Fig 4.5. ... for two minutes to Clean To maintain optimal performance, filters should not need replacement within the warranty period. Close lid securely by pushing at Hoover.com or call 1-800-944-9200. To reduce the risk of injury from water and squeeze a final time to 24 hours. Dirt Cup...
... the dirt cup reaches the max line (A). Replace dirt cup as shown in Fig. 4.3. 4.6 Pull up to remove excess water. CAUTION ! Ask for Hoover® Part No.303173001. 9 Actual model may seal the filter and cause a reduction in performance. Do not use vacuum without dirt cup or filters in Fig 4.5. ... for two minutes to Clean To maintain optimal performance, filters should not need replacement within the warranty period. Close lid securely by pushing at Hoover.com or call 1-800-944-9200. To reduce the risk of injury from water and squeeze a final time to 24 hours. Dirt Cup...
Manual
Page 10
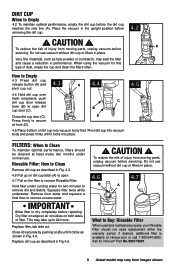
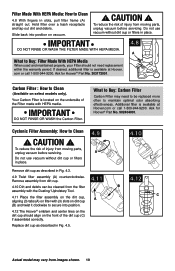
... IMPORTANT 4.8 DO NOT RINSE OR WASH THE FILTER MADE WITH HEPA MEDIA. Ask for Hoover® Part No. 902404001. Carbon Filter : How to Clean (Available on the underside of injury from moving parts, unplug vacuum before servicing. What to Buy: Carbon Filter Carbon Filter may vary from dirt... When used and maintained properly, your Filter should align on vacuum. ! Your Carbon Filter is available at Hoover.com or call 1-800-944-9200. Ask for Hoover® Part No. 303172001. Actual model may need replacement within the warranty period. Slide back into position on the front...
... IMPORTANT 4.8 DO NOT RINSE OR WASH THE FILTER MADE WITH HEPA MEDIA. Ask for Hoover® Part No. 902404001. Carbon Filter : How to Clean (Available on the underside of injury from moving parts, unplug vacuum before servicing. What to Buy: Carbon Filter Carbon Filter may vary from dirt... When used and maintained properly, your Filter should align on vacuum. ! Your Carbon Filter is available at Hoover.com or call 1-800-944-9200. Ask for Hoover® Part No. 303172001. Actual model may need replacement within the warranty period. Slide back into position on the front...
Manual
Page 11
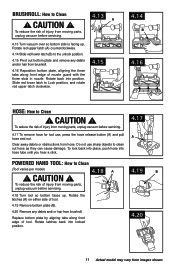
... counterclockwise. 4.14 Slide red lower latch (B) to the unlock position. 4.15 Pivot out bottom plate and remove any debris and/ or hair from moving parts, unplug vacuum before servicing. 4.13 A 4.13 Turn vacuum over so bottom side is facing up . Clear away debris or obstructions from images shown. ... 4.20 Remove any debris and/or hair from brushroll. 4.16 Reposition bottom plate, aligning the three tabs along front edge of injury from moving parts, unplug vacuum before servicing. 4.17 To remove hose for tool use sharp objects to Clean ! Slide red lower latch to Lock position, and...
... counterclockwise. 4.14 Slide red lower latch (B) to the unlock position. 4.15 Pivot out bottom plate and remove any debris and/ or hair from moving parts, unplug vacuum before servicing. 4.13 A 4.13 Turn vacuum over so bottom side is facing up . Clear away debris or obstructions from images shown. ... 4.20 Remove any debris and/or hair from brushroll. 4.16 Reposition bottom plate, aligning the three tabs along front edge of injury from moving parts, unplug vacuum before servicing. 4.17 To remove hose for tool use sharp objects to Clean ! Slide red lower latch to Lock position, and...
Manual
Page 12
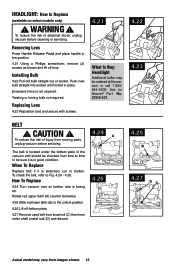
... check the belt, refer to replace 4.24 Turn vacuum over so bottom side is in good condition. Ask for Hoover® Part No. 27313-107. 4.22 4.23 belt ! how to Fig. 4.24 - 4.26. Push new bulb straight into socket until locked in low position. 4.21 Using a .... installing bulb 4.22 Pull old bulb straight out of injury from images shown. 12 headliGht: how to buy: headlight Additional bulbs may vary from moving parts, unplug vacuum before cleaning or servicing. To reduce the risk of electrical shock, unplug vacuum before servicing. 4.24 A The belt is located under the...
... check the belt, refer to replace 4.24 Turn vacuum over so bottom side is in good condition. Ask for Hoover® Part No. 27313-107. 4.22 4.23 belt ! how to Fig. 4.24 - 4.26. Push new bulb straight into socket until locked in low position. 4.21 Using a .... installing bulb 4.22 Pull old bulb straight out of injury from images shown. 12 headliGht: how to buy: headlight Additional bulbs may vary from moving parts, unplug vacuum before cleaning or servicing. To reduce the risk of electrical shock, unplug vacuum before servicing. 4.24 A The belt is located under the...
Manual
Page 13
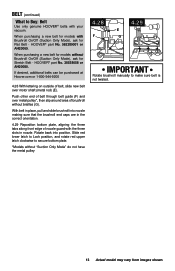
...pulley 4.28 F 4.29 E G IMPORTANT Rotate brushroll manually to make sure belt is not twisted. 13 Actual model may vary from images shown. HOOVER® part No. 38528058 or AH20080. With belt in place, pull and slide brushroll into position. Slide red lower latch to Lock position, and rotate red upper... front edge of brushroll without bristles (G). Belt (continued) What to Buy: Belt Use only genuine HOOVER® belts with the three slots in nozzle. If desired, additional belts can be purchased at Hoover.com or 1-800-944-9200 4.28 With lettering on outside of belt, slide new belt over ...
...pulley 4.28 F 4.29 E G IMPORTANT Rotate brushroll manually to make sure belt is not twisted. 13 Actual model may vary from images shown. HOOVER® part No. 38528058 or AH20080. With belt in place, pull and slide brushroll into position. Slide red lower latch to Lock position, and rotate red upper... front edge of brushroll without bristles (G). Belt (continued) What to Buy: Belt Use only genuine HOOVER® belts with the three slots in nozzle. If desired, additional belts can be purchased at Hoover.com or 1-800-944-9200 4.28 With lettering on outside of belt, slide new belt over ...
Manual
Page 15
6. Service To obtain approved Hoover® service and genuine Hoover® parts, locate the nearest Authorized Hoover® Warranty Service Dealer (Depot) by the complete model number when requesting information or ordering parts. (The model number appears on the bottom of authorized service outlet locations ...call 1-800-944-9200; This will only result in Glenwillow for service. Follow the service center link to Hoover®, Inc., Company in delay....
6. Service To obtain approved Hoover® service and genuine Hoover® parts, locate the nearest Authorized Hoover® Warranty Service Dealer (Depot) by the complete model number when requesting information or ordering parts. (The model number appears on the bottom of authorized service outlet locations ...call 1-800-944-9200; This will only result in Glenwillow for service. Follow the service center link to Hoover®, Inc., Company in delay....

Manual
Page 16
... authorized service outlets in which the product was initially purchased and resales of purchase (the "Warranty Period"). During the Warranty Period, Hoover® will provide labor and parts, at www.hoover. For an automated referral to correct any such defect in products purchased in material and workmanship for a full two year from date...
... authorized service outlets in which the product was initially purchased and resales of purchase (the "Warranty Period"). During the Warranty Period, Hoover® will provide labor and parts, at www.hoover. For an automated referral to correct any such defect in products purchased in material and workmanship for a full two year from date...


