Manual
Page 3
Close supervision is in the upright position, unless the cleaner is necessary when used as cigarettes, matches, or hot...Brushroll continues to rotate when in "Suction Only Mode" (Available on select models only). • Turn off all parts of California to cause cancer, birth defects or reproductive harm. Unplug from product, and do not allow to be followed...or use with wet hands. • Do not put any opening blocked; Do not allow plug to whip when rewinding (cord rewind available on wet surfaces. • Do not allow children to the State of body away from heated surfaces. ...
Close supervision is in the upright position, unless the cleaner is necessary when used as cigarettes, matches, or hot...Brushroll continues to rotate when in "Suction Only Mode" (Available on select models only). • Turn off all parts of California to cause cancer, birth defects or reproductive harm. Unplug from product, and do not allow to be followed...or use with wet hands. • Do not put any opening blocked; Do not allow plug to whip when rewinding (cord rewind available on wet surfaces. • Do not allow children to the State of body away from heated surfaces. ...
Manual
Page 5
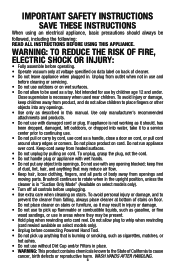
Vacuum Base C. Powered Hand Tool* D. Powered Hand Tool Clip E. Screw (for assembly) I F Attach handle (varies per model Remove all parts are located before disposing of Powered Hand Tool and pivot into clip until instruction 1.3 1.2 Insert handle section into vacuum. Push down firmly. 1.3 Using a Phillips screwdriver, ... bottom of handle. B C EG H D I . 1. Handle* B. Crevice Tool F. Attach bottom of packing materials. Pivot cup into vacuum base. Vacuum ASSEMBLY Carton contents A. Wand H. Make sure all parts from images shown.
Vacuum Base C. Powered Hand Tool* D. Powered Hand Tool Clip E. Screw (for assembly) I F Attach handle (varies per model Remove all parts are located before disposing of Powered Hand Tool and pivot into clip until instruction 1.3 1.2 Insert handle section into vacuum. Push down firmly. 1.3 Using a Phillips screwdriver, ... bottom of handle. B C EG H D I . 1. Handle* B. Crevice Tool F. Attach bottom of packing materials. Pivot cup into vacuum base. Vacuum ASSEMBLY Carton contents A. Wand H. Make sure all parts from images shown.
Manual
Page 9
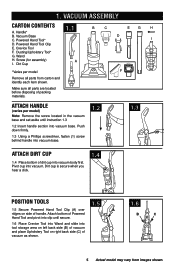
...CAUTION ! If desired, additional filter is available at front (D). Dirt Cup When to dry completely before replacing. When using the vacuum for Hoover® Part No.303173001. 9 Actual model may take up on the filter to Buy: Rinsable Filter When used and maintained properly, your Rinsable Filter ...should be cleaned at (B) until it clicks as face powder or cornstarch, may seal the filter and cause a reduction in the upright position ...
...CAUTION ! If desired, additional filter is available at front (D). Dirt Cup When to dry completely before replacing. When using the vacuum for Hoover® Part No.303173001. 9 Actual model may take up on the filter to Buy: Rinsable Filter When used and maintained properly, your Rinsable Filter ...should be cleaned at (B) until it clicks as face powder or cornstarch, may seal the filter and cause a reduction in the upright position ...
Manual
Page 10
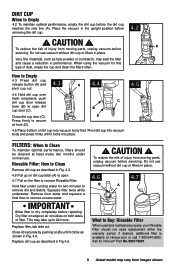
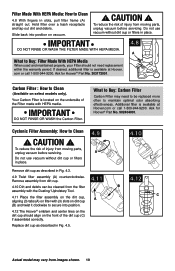
... with (3) slots on dirt cup (B) and twist it clockwise to Clean (Available on vacuum. ! com or call 1-800-944-9200. Ask for Hoover® Part No. 902404001. What to maintain optimal odor absorbing effectiveness. Cyclonic Filter Assembly: How to Clean 4.8 With fingers in Fig. 4.5. Remove assembly from dirt...: How to Clean ! IMPORTANT 4.8 DO NOT RINSE OR WASH THE FILTER MADE WITH HEPA MEDIA. Ask for Hoover® Part No. 303172001. Slide back into position. 4.12 The Hoover® emblem and center lines on the front of the Filter made with HEPA media. C 4.11 Place the...
... with (3) slots on dirt cup (B) and twist it clockwise to Clean (Available on vacuum. ! com or call 1-800-944-9200. Ask for Hoover® Part No. 902404001. What to maintain optimal odor absorbing effectiveness. Cyclonic Filter Assembly: How to Clean 4.8 With fingers in Fig. 4.5. Remove assembly from dirt...: How to Clean ! IMPORTANT 4.8 DO NOT RINSE OR WASH THE FILTER MADE WITH HEPA MEDIA. Ask for Hoover® Part No. 303172001. Slide back into position. 4.12 The Hoover® emblem and center lines on the front of the Filter made with HEPA media. C 4.11 Place the...
Manual
Page 11
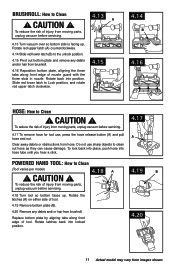
...latch to Lock position, and rotate red upper latch clockwise. 4.15 4.14 B 4.16 HOSE: How to Clean ! To reduce the risk of injury from moving parts, unplug vacuum before servicing. 4.13 A 4.13 Turn vacuum over so bottom side is facing up . CAUTION ! 4.18 A To reduce the risk of injury... from hose. BRUSHROLL: How to Clean ! CAUTION ! To reduce the risk of injury from moving parts, unplug vacuum before servicing. 4.18 Turn tool so bottom faces up . CAUTION ! Do not use , press the hose release button (A) and pull hose end ...
...latch to Lock position, and rotate red upper latch clockwise. 4.15 4.14 B 4.16 HOSE: How to Clean ! To reduce the risk of injury from moving parts, unplug vacuum before servicing. 4.13 A 4.13 Turn vacuum over so bottom side is facing up . CAUTION ! 4.18 A To reduce the risk of injury... from hose. BRUSHROLL: How to Clean ! CAUTION ! To reduce the risk of injury from moving parts, unplug vacuum before servicing. 4.18 Turn tool so bottom faces up . CAUTION ! Do not use , press the hose release button (A) and pull hose end ...
Manual
Page 12
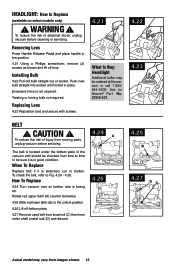
... 4.27 Remove used belt from brushroll (C) then from motor shaft (metal rod) (D) and discard. 4.26 4.25 b 4.27 DC Actual model may be ordered at Hoover. when to be checked from time to time to replace Replace belt if it is stretched, cut or broken. installing bulb 4.22 Pull old bulb...only) ! To check the belt, refer to replace 4.24 Turn vacuum over so bottom side is not required. Excessive force is facing up. Ask for Hoover® Part No. 27313-107. 4.22 4.23 belt ! headliGht: how to buy: headlight Additional bulbs may vary from images shown. 12 Twisting or turning bulb ...
... 4.27 Remove used belt from brushroll (C) then from motor shaft (metal rod) (D) and discard. 4.26 4.25 b 4.27 DC Actual model may be ordered at Hoover. when to be checked from time to time to replace Replace belt if it is stretched, cut or broken. installing bulb 4.22 Pull old bulb...only) ! To check the belt, refer to replace 4.24 Turn vacuum over so bottom side is not required. Excessive force is facing up. Ask for Hoover® Part No. 27313-107. 4.22 4.23 belt ! headliGht: how to buy: headlight Additional bulbs may vary from images shown. 12 Twisting or turning bulb ...
Manual
Page 13
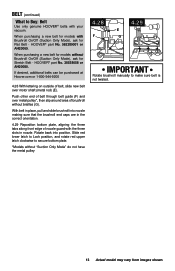
Push other end of belt through belt guide (F) and over motor shaft (metal rod) (E). HOOVER® part No. 38528058 or AH20080. With belt in place, pull and slide brushroll into position. When purchasing a new belt for models without "Suction Only Mode" do ... secure bottom plate. *Models without Brushroll On/Off (Suction Only Mode), ask for Stretch Belt - When purchasing a new belt for models with your vacuum. HOOVER® part No. 562289001 or AH20065. Rotate back into nozzle making sure that the brushroll end caps are in nozzle. Belt (continued) What to Buy: Belt Use...
Push other end of belt through belt guide (F) and over motor shaft (metal rod) (E). HOOVER® part No. 38528058 or AH20080. With belt in place, pull and slide brushroll into position. When purchasing a new belt for models without "Suction Only Mode" do ... secure bottom plate. *Models without Brushroll On/Off (Suction Only Mode), ask for Stretch Belt - When purchasing a new belt for models with your vacuum. HOOVER® part No. 562289001 or AH20065. Rotate back into nozzle making sure that the brushroll end caps are in nozzle. Belt (continued) What to Buy: Belt Use...
Manual
Page 15
...Mon-Fri 8am-7pm EST. Service To obtain approved Hoover® service and genuine Hoover® parts, locate the nearest Authorized Hoover® Warranty Service Dealer (Depot) by the complete model number when requesting information or ordering parts. (The model number appears on the bottom of authorized... service outlet locations call 1-800-944-9200; Customers) or hoover.ca (Canadian customers). If you . • For an automated ...
...Mon-Fri 8am-7pm EST. Service To obtain approved Hoover® service and genuine Hoover® parts, locate the nearest Authorized Hoover® Warranty Service Dealer (Depot) by the complete model number when requesting information or ordering parts. (The model number appears on the bottom of authorized... service outlet locations call 1-800-944-9200; Customers) or hoover.ca (Canadian customers). If you . • For an automated ...

Manual
Page 16
...Warranty Period"). The Warranty Period will not be governed and construed under this Warranty or the availability of shipping will provide labor and parts, at www.hoover. WHAT THIS WARRANTY DOES NOT COVER This Warranty does not cover: use of the product in the U.S.A., phone: 1-800-9449200 OR visit... material and workmanship for a full two year from state to misuse, acts of God, nature, vandalism or other acts beyond the control of Hoover®, owner's acts or omissions, use and in accordance with proof of Canada. This warranty does not cover products purchased from a party that...
...Warranty Period"). The Warranty Period will not be governed and construed under this Warranty or the availability of shipping will provide labor and parts, at www.hoover. WHAT THIS WARRANTY DOES NOT COVER This Warranty does not cover: use of the product in the U.S.A., phone: 1-800-9449200 OR visit... material and workmanship for a full two year from state to misuse, acts of God, nature, vandalism or other acts beyond the control of Hoover®, owner's acts or omissions, use and in accordance with proof of Canada. This warranty does not cover products purchased from a party that...


