
Owners Manual
Page 2
... Brush Ro[[ ...... 12 Replacing Belt 1t Replacing Headlight 10=11 Thermal Protector 12 Warranty 14 ® © 2002 The Hoover Company www, hoover, com _Ir_IERIAL UMBER [mTl Ua When using an electrical appliance, always follow basic precautions, including the following: READ ALL INSTRUCTIONS ...may damage the cJeaner, * Always turn off all controms before unplugging. Keep cord away from electrical outlet before connecting or disconnecting hose, * Do not use without dirt cup or filters in use as it to this appliance before servicing the cleaner. card ...
... Brush Ro[[ ...... 12 Replacing Belt 1t Replacing Headlight 10=11 Thermal Protector 12 Warranty 14 ® © 2002 The Hoover Company www, hoover, com _Ir_IERIAL UMBER [mTl Ua When using an electrical appliance, always follow basic precautions, including the following: READ ALL INSTRUCTIONS ...may damage the cJeaner, * Always turn off all controms before unplugging. Keep cord away from electrical outlet before connecting or disconnecting hose, * Do not use without dirt cup or filters in use as it to this appliance before servicing the cleaner. card ...

Owners Manual
Page 3
... back of packing materials. Push bolts into holes on the "Service" button to the store. Cleaner body C. Switch (A) should be in our Consumer Response Center. Hose, cleaning tools and wands (*some models Attach handle uu urJ ! Find the parts shown before disposing of handle. Please do not return this product to...
... back of packing materials. Push bolts into holes on the "Service" button to the store. Cleaner body C. Switch (A) should be in our Consumer Response Center. Hose, cleaning tools and wands (*some models Attach handle uu urJ ! Find the parts shown before disposing of handle. Please do not return this product to...

Owners Manual
Page 4
...tool (B) and furniture nozzle (C) into clips as shown for storage on back of the short crevice tool. Snap ends of rack. Lift hose tube cover (C). Some models include a long crevice wand (D) instead of cleaner as well. Pivot cup and snap in place while tightening ...The crevice wand is packed inside a wand for Align end of handle. Slide hose into place. Position hose over slots (B) in dirt duct. Attach hose Note: Hose must be connected all operations. Snap wand into hose tube (E). Place bottom of the extension wands. Hold each bolt securely with ...
...tool (B) and furniture nozzle (C) into clips as shown for storage on back of the short crevice tool. Snap ends of rack. Lift hose tube cover (C). Some models include a long crevice wand (D) instead of cleaner as well. Pivot cup and snap in place while tightening ...The crevice wand is packed inside a wand for Align end of handle. Slide hose into place. Position hose over slots (B) in dirt duct. Attach hose Note: Hose must be connected all operations. Snap wand into hose tube (E). Place bottom of the extension wands. Hold each bolt securely with ...

Owners Manual
Page 5
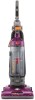
... 20. Dirt cup 21. Pre-filter assembly (inside wand 17. Wands 12. Long crevice wand*: stores inside cup) *Some models only 8. Hose hook 3. Carrying handle 6. Pleated filter (inside cup) 23. Furniture nozzle 16. Dirt cup handle 22. Final filter exhaust Operate cleaner only at... Do not change the plug in the outlet, reverse the plug. The top hook rotates right or left rear corner of cleaner. Hose 18. Nozzle control knob: slide knob to install the proper outlet. Furniture guard: helps prevent cleaner from marking furniture. 11. Polarized...
... 20. Dirt cup 21. Pre-filter assembly (inside wand 17. Wands 12. Long crevice wand*: stores inside cup) *Some models only 8. Hose hook 3. Carrying handle 6. Pleated filter (inside cup) 23. Furniture nozzle 16. Dirt cup handle 22. Final filter exhaust Operate cleaner only at... Do not change the plug in the outlet, reverse the plug. The top hook rotates right or left rear corner of cleaner. Hose 18. Nozzle control knob: slide knob to install the proper outlet. Furniture guard: helps prevent cleaner from marking furniture. 11. Polarized...

Owners Manual
Page 7
...sides of the above the floor and for stair cleaning. Rinse with any of the nozzle to start again, lower nozzle, and use hose, lift hose end as shown. Cleaning tools may be used for upholstered furniture, draperies, mattresses, clothing, automobile interiors, and carpeted stairs. Furniture ... off the rug. To use only forward strokes. F. Use it on furniture, fringed area rugs or carpeted stairs during tool use the hose and furniture nozzle for reaching hard to your cleaner on stairs. Avoid tipping cleaner or setting it with a damp cloth. C I ( E f )I F ...
...sides of the above the floor and for stair cleaning. Rinse with any of the nozzle to start again, lower nozzle, and use hose, lift hose end as shown. Cleaning tools may be used for upholstered furniture, draperies, mattresses, clothing, automobile interiors, and carpeted stairs. Furniture ... off the rug. To use only forward strokes. F. Use it on furniture, fringed area rugs or carpeted stairs during tool use the hose and furniture nozzle for reaching hard to your cleaner on stairs. Avoid tipping cleaner or setting it with a damp cloth. C I ( E f )I F ...

Owners Manual
Page 8
... may seal the filter and cause loss of suction. Remove lid. Do not use if preferred. Remove cup - Replace cup - Remove regular hose from the pleated filter. Attach wands or tools to the wand in dirt duct. This larger debris will ensure continued cleaning effectiveness. Tap side ... cup and snap into cleaner. Follow the steps below for this type of dust, empty the cup and clean the filters often. Slide hose into hose. Twist wand or tool slightly to reach places. The pleated filter will stop larger debris from electrical outlet. Squeeze dirt cup latch. Place...
... may seal the filter and cause loss of suction. Remove lid. Do not use if preferred. Remove cup - Replace cup - Remove regular hose from the pleated filter. Attach wands or tools to the wand in dirt duct. This larger debris will ensure continued cleaning effectiveness. Tap side ... cup and snap into cleaner. Follow the steps below for this type of dust, empty the cup and clean the filters often. Slide hose into hose. Twist wand or tool slightly to reach places. The pleated filter will stop larger debris from electrical outlet. Squeeze dirt cup latch. Place...

Owners Manual
Page 12
...majority of lubricant could cause damage. Other performance factors include Hose Power (ASTM Test F558), Surface Litter Cleaning, Hard Floor Cleaning, Edge Cleaning, Cleaning Width, and Air Filtration. 12 What to The Hoover Company in delay. How to replace Disconnect cleaner from the ...electrical outlet. 2. Therefore, do not touch card. Service To obtain approved HOOVER service and genuine HOOVER parts, locate the nearest Hoover Factory Service Center or Authorized Hoover Warranty Service Dealer (Depot) by the complete model number when requesting information or ordering parts...
...majority of lubricant could cause damage. Other performance factors include Hose Power (ASTM Test F558), Surface Litter Cleaning, Hard Floor Cleaning, Edge Cleaning, Cleaning Width, and Air Filtration. 12 What to The Hoover Company in delay. How to replace Disconnect cleaner from the ...electrical outlet. 2. Therefore, do not touch card. Service To obtain approved HOOVER service and genuine HOOVER parts, locate the nearest Hoover Factory Service Center or Authorized Hoover Warranty Service Dealer (Depot) by the complete model number when requesting information or ordering parts...

Owners Manual
Page 13
...air flow passage • Clear blockage • Pleated filter clogged • Clean pleated filter by reversing procedure for "Attach hose" (Fig. 1-8 and 1-9). 2) Clear out hose. 3) Look into opening (E) for 30 minutes (this will reset the thermal protector) (see "The belt" section). Low... solution • Dirt cup not properly installed • Position dirt cup properly and snap in place (Fig. 3-4) • Blockage in hose • Clear blockage Possible cause Possible solution • Filter assembly not installed properly • Ensure that pre-filter assembly and pleated filter ...
...air flow passage • Clear blockage • Pleated filter clogged • Clean pleated filter by reversing procedure for "Attach hose" (Fig. 1-8 and 1-9). 2) Clear out hose. 3) Look into opening (E) for 30 minutes (this will reset the thermal protector) (see "The belt" section). Low... solution • Dirt cup not properly installed • Position dirt cup properly and snap in place (Fig. 3-4) • Blockage in hose • Clear blockage Possible cause Possible solution • Filter assembly not installed properly • Ensure that pre-filter assembly and pleated filter ...


