
Manual
Page 1
THIS PRODUCT IS INTENDED FOR HOUSEHOLD USE ONLY. CYCLONIC BAGLESS UPRIGHT OWNER'S MANUAL OPERATING AND SERVICING INSTRUCTIONS IMPORTANT: READ CAREFULLY BEFORE ASSEMBLY AND USE. IF USED COMMERCIALLY WARRANTY IS VOID. Questions or concerns? For assistance, please call Customer Service at 1-800-944-9200 Mon-Fri 8am-7pm EST before returning this product to the store.
THIS PRODUCT IS INTENDED FOR HOUSEHOLD USE ONLY. CYCLONIC BAGLESS UPRIGHT OWNER'S MANUAL OPERATING AND SERVICING INSTRUCTIONS IMPORTANT: READ CAREFULLY BEFORE ASSEMBLY AND USE. IF USED COMMERCIALLY WARRANTY IS VOID. Questions or concerns? For assistance, please call Customer Service at 1-800-944-9200 Mon-Fri 8am-7pm EST before returning this product to the store.
Manual
Page 2
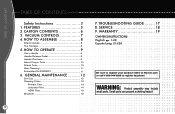
... 8 5. SERVICE 18 9 . GENERAL MAINTENANCE .......... 12 Dirt Cup 12 Cleaning Filters 13 Primary Filter 13 Umbrella Filter 14 HEPA Filter 15 Brushroll 16 7. HOW TO OPERATE 9 Carry Handle 9 Handle Release Pedal 9 Handle Positions 9 Select Proper Tools 10 Attach Tools 10 Stair Cleaning 11 Embedded DirtFINDERTM 11 6. WARNING: Product assembly may include small parts. WA RRA N TY 19 OWNER'S INSTRUCTIONS English pp. 1-20 Español pàg. Small parts can present a choking hazard. 2 VACUU M CONTROLS 7 4. CARTON CONTENTS 6 3. TROUBLESHOOTING GUIDE...
... 8 5. SERVICE 18 9 . GENERAL MAINTENANCE .......... 12 Dirt Cup 12 Cleaning Filters 13 Primary Filter 13 Umbrella Filter 14 HEPA Filter 15 Brushroll 16 7. HOW TO OPERATE 9 Carry Handle 9 Handle Release Pedal 9 Handle Positions 9 Select Proper Tools 10 Attach Tools 10 Stair Cleaning 11 Embedded DirtFINDERTM 11 6. WARNING: Product assembly may include small parts. WA RRA N TY 19 OWNER'S INSTRUCTIONS English pp. 1-20 Español pàg. Small parts can present a choking hazard. 2 VACUU M CONTROLS 7 4. CARTON CONTENTS 6 3. TROUBLESHOOTING GUIDE...
Manual
Page 3
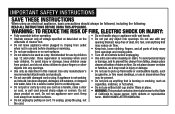
... or use in use and before cleaning or servicing. • Keep hair, loose clothing, fingers, and all parts of body away • Do not use by children • Turn off all controls before operating. • Do not handle plug or appliance with wet hands. • Operate vacuum only at bottom of dust, lint...cleaner at voltage specified on data label on floor. WASH HANDS AFTER HANDLING. • Do not unplug by cord, use cord as described in place. opening blocked; age 12 and under. or furniture, as a toy. Do not run appliance over cord. To avoid injury or damage, keep free...
... or use in use and before cleaning or servicing. • Keep hair, loose clothing, fingers, and all parts of body away • Do not use by children • Turn off all controls before operating. • Do not handle plug or appliance with wet hands. • Operate vacuum only at bottom of dust, lint...cleaner at voltage specified on data label on floor. WASH HANDS AFTER HANDLING. • Do not unplug by cord, use cord as described in place. opening blocked; age 12 and under. or furniture, as a toy. Do not run appliance over cord. To avoid injury or damage, keep free...
Manual
Page 4
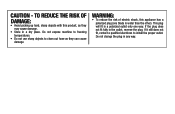
... reduce the risk of electric shock, this product, as they may cause damage. • Store in any way. This plug will fit in the outlet, reverse the plug. Do not expose machine to freezing temperatures. • Do not use sharp objects to install the proper outlet. If the plug does not fit fully in... a polarized outlet only one blade is wider than the other). Do not change the plug in a dry place. TO REDUCE THE RISK OF DAMAGE: • Avoid picking up hard, sharp objects ...
... reduce the risk of electric shock, this product, as they may cause damage. • Store in any way. This plug will fit in the outlet, reverse the plug. Do not expose machine to freezing temperatures. • Do not use sharp objects to install the proper outlet. If the plug does not fit fully in... a polarized outlet only one blade is wider than the other). Do not change the plug in a dry place. TO REDUCE THE RISK OF DAMAGE: • Avoid picking up hard, sharp objects ...
Manual
Page 5
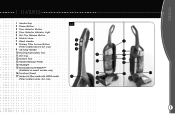
FEATURES 1 Handle Grip 1.1 2 Power Button 3 Floor Selector Button 4 Floor Selector Indicator Light 5 Dirt Cup Release Button 6 Stretch Hose 7 Wand Handle 2 1 6 8 Primary Filter Access Button 3 (Filter located above dirt cup) 9 Carrying Handle 4 7 10 Dusting/Upholstery Tool 11 Dirt Cup 8 9 12 Crevice Tool 13 Handle Release Pedal 14 Headlight 10 11 12 15 Embedded DirtFINDER™ (Available on select models only) 16 Furniture Guard 14 13 17 17 Access to filter made with HEPA media 5 15 (Filter located under dirt cup) 16 5 FEATURES 1.
FEATURES 1 Handle Grip 1.1 2 Power Button 3 Floor Selector Button 4 Floor Selector Indicator Light 5 Dirt Cup Release Button 6 Stretch Hose 7 Wand Handle 2 1 6 8 Primary Filter Access Button 3 (Filter located above dirt cup) 9 Carrying Handle 4 7 10 Dusting/Upholstery Tool 11 Dirt Cup 8 9 12 Crevice Tool 13 Handle Release Pedal 14 Headlight 10 11 12 15 Embedded DirtFINDER™ (Available on select models only) 16 Furniture Guard 14 13 17 17 Access to filter made with HEPA media 5 15 (Filter located under dirt cup) 16 5 FEATURES 1.

Manual
Page 7
..., change floor selector push button to the next highest setting. 3 Floor Selector Indicator Light Indicates the carpet height selected by the Floor Selector Button. 3.1 1 2 3 Indicator Light FLOOR SELECTION Bare Floors. (Brushroll off . 2 Floor Selector Push the floor selector button to raise and lower the nozzle to Mid Pile Carpets. Note: If the cleaner is desired, while maintaining good cleaning performance. VACUUM CONTROLS 1 Power Button Push to turn cleaner on and off ) Low to clean bare floors and...
..., change floor selector push button to the next highest setting. 3 Floor Selector Indicator Light Indicates the carpet height selected by the Floor Selector Button. 3.1 1 2 3 Indicator Light FLOOR SELECTION Bare Floors. (Brushroll off . 2 Floor Selector Push the floor selector button to raise and lower the nozzle to Mid Pile Carpets. Note: If the cleaner is desired, while maintaining good cleaning performance. VACUUM CONTROLS 1 Power Button Push to turn cleaner on and off ) Low to clean bare floors and...

Manual
Page 9
Step on handle release pedal to lower handle to lower handle. Floor Transitions 3. The handle of your cleaner has three positions; 1. HOW TO OPERATE Carry Handle 5.1 Handle Release Handle Positions Pedal 5.2 5.3 1 2 3 The cleaner can be moved by using the carry handle. Storage 2. HOW TO OPERATE 5. Low Reach Step on handle release pedal to each position. 9
Step on handle release pedal to lower handle to lower handle. Floor Transitions 3. The handle of your cleaner has three positions; 1. HOW TO OPERATE Carry Handle 5.1 Handle Release Handle Positions Pedal 5.2 5.3 1 2 3 The cleaner can be moved by using the carry handle. Storage 2. HOW TO OPERATE 5. Low Reach Step on handle release pedal to each position. 9

Manual
Page 10
Crevice Tool may be used on table tops, books, lighting fixtures, and blinds. Attach tool to the hose (F) or to clean upholstered furniture, draperies, mattresses, and carpeted stairs. Disconnect cleaner from electrical outlet. HOW TO OPERATE Select Pro per Tools 5.4 5.5 A t t a c h To o ls 5.6 F G Dusting/Upholstery Tool may be used in tight spaces, corners and along edges. HOW TO OPERATE 5. Remove brush to wand (G) by pushing it firmly into the hose or wand end. 10
Crevice Tool may be used on table tops, books, lighting fixtures, and blinds. Attach tool to the hose (F) or to clean upholstered furniture, draperies, mattresses, and carpeted stairs. Disconnect cleaner from electrical outlet. HOW TO OPERATE Select Pro per Tools 5.4 5.5 A t t a c h To o ls 5.6 F G Dusting/Upholstery Tool may be used in tight spaces, corners and along edges. HOW TO OPERATE 5. Remove brush to wand (G) by pushing it firmly into the hose or wand end. 10
Manual
Page 11
... picked up; HOW TO OPERATE Stair Cleaning Use the wand and the Dusting/Upholstery Tool for stair cleaning. The clean light (green) will come on throughout cleaning except when the detector senses that may need more cleaning attention. then the dirty light (red) will remain on . Clean from falling, always place cleaner at bottom of dirt is being removed. CAUTION: Use extra care when cleaning on select models only) With red and green lights...
... picked up; HOW TO OPERATE Stair Cleaning Use the wand and the Dusting/Upholstery Tool for stair cleaning. The clean light (green) will come on throughout cleaning except when the detector senses that may need more cleaning attention. then the dirty light (red) will remain on . Clean from falling, always place cleaner at bottom of dirt is being removed. CAUTION: Use extra care when cleaning on select models only) With red and green lights...
Manual
Page 12
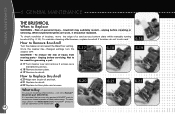
... with HEPA media and umbrella tube for this happens, proceed as proper use cleaner without dirt cup or filters in place. Inspect the hose, nozzle and dirt cup openings, primary filter, filter made with these home maintenance tasks as follows: 1. GENERAL MAINTENANCE 6. cup into cleaner body until dirt cup locks into cleaner body first. An internal thermal protector has been designed into your cleaner will stop running. Place the cleaner in performance. Close door. If this type of...
... with HEPA media and umbrella tube for this happens, proceed as proper use cleaner without dirt cup or filters in place. Inspect the hose, nozzle and dirt cup openings, primary filter, filter made with these home maintenance tasks as follows: 1. GENERAL MAINTENANCE 6. cup into cleaner body until dirt cup locks into cleaner body first. An internal thermal protector has been designed into your cleaner will stop running. Place the cleaner in performance. Close door. If this type of...

Manual
Page 13
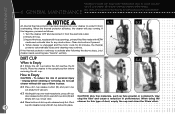
... month in place. Rotate the outer ring counter clockwise to open lid. 6.8 Pull tab located on the back of the dirt cup. To reduce the risk of filter and remove from dirt cup. Squeeze a final time to Clean The clean filter reminder is not accessible, remove filter by hand. 6.9 Hold filter under running water for HOOVER part No. 43615096. 13 Squeeze filter twice while underwater. GENERAL MAINTENANCE CLEANING FILTERS Primary Filter When to remove excess water.
... month in place. Rotate the outer ring counter clockwise to open lid. 6.8 Pull tab located on the back of the dirt cup. To reduce the risk of filter and remove from dirt cup. Squeeze a final time to Clean The clean filter reminder is not accessible, remove filter by hand. 6.9 Hold filter under running water for HOOVER part No. 43615096. 13 Squeeze filter twice while underwater. GENERAL MAINTENANCE CLEANING FILTERS Primary Filter When to remove excess water.

Manual
Page 14
How to open dirt cup door. 6.11 Twist Umbrella tube left and remove from bottom of the dirt cup. 6.12 Hold filter over trash receptacle and remove dirt and debris. Do not use cleaner without dirt cup or filters in Fig. 6.2. 6.10 Press red dirt cup door release button (C) to Clean CAUTION - Replace Umbrella tube in bottom of personal injury - GENERAL MAINTENANCE 6. Remove dirt cup as described in place. Unplug before cleaning or servicing. To reduce the risk of dirt cup and...
How to open dirt cup door. 6.11 Twist Umbrella tube left and remove from bottom of the dirt cup. 6.12 Hold filter over trash receptacle and remove dirt and debris. Do not use cleaner without dirt cup or filters in Fig. 6.2. 6.10 Press red dirt cup door release button (C) to Clean CAUTION - Replace Umbrella tube in bottom of personal injury - GENERAL MAINTENANCE 6. Remove dirt cup as described in place. Unplug before cleaning or servicing. To reduce the risk of dirt cup and...

Manual
Page 15
... Remove the filter made with HEPA media is intended to Buy When purchasing a new filter made with HEPA media. Unplug before cleaning or servicing. Do not use cleaner without dirt cup or filters in Fig.5.2. 6.13 Turn knob on top of lid to turn gray. Remove dirt cup as described in Fig 5.4. 6.13 6.14 What to be a lifetime filter. GENERAL MAINTENANCE 6. Replace filter and lid. Replace dirt cup as described in place. DO NOT RINSE OR WASH...
... Remove the filter made with HEPA media is intended to Buy When purchasing a new filter made with HEPA media. Unplug before cleaning or servicing. Do not use cleaner without dirt cup or filters in Fig.5.2. 6.13 Turn knob on top of lid to turn gray. Remove dirt cup as described in Fig 5.4. 6.13 6.14 What to be a lifetime filter. GENERAL MAINTENANCE 6. Replace filter and lid. Replace dirt cup as described in place. DO NOT RINSE OR WASH...
Manual
Page 16
... servicing. To check condition of brushes, move the edge of injury from moving parts - How to Buy To assure cleaning effectiveness, use only genuine HOOVER® parts to Replace WARNING - To order bags please visit www.hoover.com. It is indicated by the trademark- 16 HOOVER® products can be replaced. To reduce the risk of a card across bottom plate while manually turning brushroll (Fig. 6.16). How to Replace...
... servicing. To check condition of brushes, move the edge of injury from moving parts - How to Buy To assure cleaning effectiveness, use only genuine HOOVER® parts to Replace WARNING - To order bags please visit www.hoover.com. It is indicated by the trademark- 16 HOOVER® products can be replaced. To reduce the risk of a card across bottom plate while manually turning brushroll (Fig. 6.16). How to Replace...
Manual
Page 17
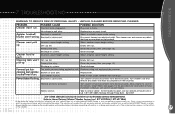
...setting. Cleaning tools won 't turn. Dirt cup full. Powered pet hair cleaning tool agitator brushroll won 't pick up . Power Button Flashing. Brushroll is obstructed. Turn cleaner off and disconnect from electrical outlet. Replace fuse or reset circuit. Disconnect cleaner from electrical outlet. Primary filter dirty. Clear blockage. Allow cleaner to tool. Clean Filters (see pages 13-15) and check for 30 minutes. Take to push. Cord not firmly plugged in hose. Incorrect carpet height setting. Empty dirt cup. Broken or worn belt. Replace belt. The service parts...
...setting. Cleaning tools won 't turn. Dirt cup full. Powered pet hair cleaning tool agitator brushroll won 't pick up . Power Button Flashing. Brushroll is obstructed. Turn cleaner off and disconnect from electrical outlet. Replace fuse or reset circuit. Disconnect cleaner from electrical outlet. Primary filter dirty. Clear blockage. Allow cleaner to tool. Clean Filters (see pages 13-15) and check for 30 minutes. Take to push. Cord not firmly plugged in hose. Incorrect carpet height setting. Empty dirt cup. Broken or worn belt. Replace belt. The service parts...
Manual
Page 18
... Hoover® parts, locate the nearest Hoover® Sales and Service Center or Authorized Hoover® Warranty Service Dealer (Depot) by the complete model number when requesting information or ordering parts. (The model number appears on the Data Plate on -line at www.hoover.com OR • call 1-800-944-9200 for service, this will only result in delay. If further assistance is needed, contact the Exclusive Hoover Platinum Collection...
... Hoover® parts, locate the nearest Hoover® Sales and Service Center or Authorized Hoover® Warranty Service Dealer (Depot) by the complete model number when requesting information or ordering parts. (The model number appears on the Data Plate on -line at www.hoover.com OR • call 1-800-944-9200 for service, this will only result in delay. If further assistance is needed, contact the Exclusive Hoover Platinum Collection...
Manual
Page 19
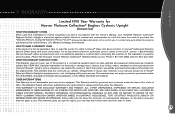
... outside the country in which the product was initially purchased and resales of Hoover®, owner's acts or omissions, use and in material and workmanship for warranty service, cost of purchase (the "Warranty Period"). you mail your HOOVER Platinum Collection® Bagless Cyclonic Upright is not as maid, janitorial and equipment rental services), brushroll, primary filter, HEPA filter, improper maintenance of the product, damage due to misuse, acts of...
... outside the country in which the product was initially purchased and resales of Hoover®, owner's acts or omissions, use and in material and workmanship for warranty service, cost of purchase (the "Warranty Period"). you mail your HOOVER Platinum Collection® Bagless Cyclonic Upright is not as maid, janitorial and equipment rental services), brushroll, primary filter, HEPA filter, improper maintenance of the product, damage due to misuse, acts of...

Brochure
Page 2
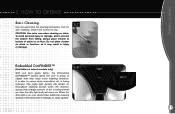
... through the filter is dropped out of suction"1 cleaning. Keeping the airstream cleaner keeps the filters clearer, for Evaluation of Carpet Embedded Dirt Removal Effectiveness NO LOSS OF SUCTION1 To maintain optimum suction, filters should not clog. REMOVES MORE DIRT2 1 Per IEC 60312 4th Ed. 2 From Carpet, than the air that was pulled into the vacuum. WindTunnel Technology™ also prevents dirt from carpets2, while other cyclonic and bagless vacuums per ASTM...
... through the filter is dropped out of suction"1 cleaning. Keeping the airstream cleaner keeps the filters clearer, for Evaluation of Carpet Embedded Dirt Removal Effectiveness NO LOSS OF SUCTION1 To maintain optimum suction, filters should not clog. REMOVES MORE DIRT2 1 Per IEC 60312 4th Ed. 2 From Carpet, than the air that was pulled into the vacuum. WindTunnel Technology™ also prevents dirt from carpets2, while other cyclonic and bagless vacuums per ASTM...
Brochure
Page 3
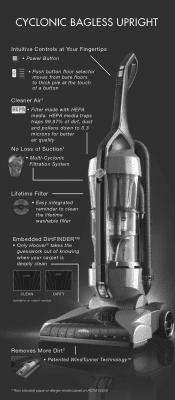
... deeply clean CLEAN DIRTY available on select models Removes More Dirt2 • Patented WindTunnel Technology™ 3 Than standard paper or allergen media based on ASTM F2608 CYCLONIC BAGLESS UPRIGHT Intuitive Controls at Your Fingertips • Power Button • Push button floor selector moves from bare floors to clean the lifetime washable filter Embedded DirtFINDER™ • Only Hoover® takes the guesswork out of a button Cleaner Air3 • Filter...
... deeply clean CLEAN DIRTY available on select models Removes More Dirt2 • Patented WindTunnel Technology™ 3 Than standard paper or allergen media based on ASTM F2608 CYCLONIC BAGLESS UPRIGHT Intuitive Controls at Your Fingertips • Power Button • Push button floor selector moves from bare floors to clean the lifetime washable filter Embedded DirtFINDER™ • Only Hoover® takes the guesswork out of a button Cleaner Air3 • Filter...

Brochure
Page 4
... time and effort while giving you desire. Hoover®'s Best In Class, Limited Six Year Warranty EXCLUSIVE HOOVER PLATINUM COLLECTION™ MEMBER SERVICES LINE: 1.877.MYPLTNM (1.877.697.5866) To learn more about the Hoover Platinum Collection™ visit www.Hoover.com With these six superior cleaners from Hoover®, it is truly clean. With the Hoover Platinum Collection™ you get fast and effective deep...
... time and effort while giving you desire. Hoover®'s Best In Class, Limited Six Year Warranty EXCLUSIVE HOOVER PLATINUM COLLECTION™ MEMBER SERVICES LINE: 1.877.MYPLTNM (1.877.697.5866) To learn more about the Hoover Platinum Collection™ visit www.Hoover.com With these six superior cleaners from Hoover®, it is truly clean. With the Hoover Platinum Collection™ you get fast and effective deep...


